User Manual
Page 9
... Nozzles Using a Computer Utility 244 Print Head Cleaning ...246 Cleaning the Print Head Using the Product Control Panel 246 Cleaning the Print Head Using a Computer Utility 247 Print Head Alignment ...249 Aligning the Print Head Using the Product Control Panel 249 Aligning the Print Head Using a Computer Utility 250 Cleaning the...264 Noise After Ink Installation ...264 Software Installation Problems ...265 Solving Network Problems ...265 9 Purchase Epson Ink Cartridges and Maintenance Box 229 Ink Cartridge and Maintenance Box Part Numbers 229 Removing and Installing Ink Cartridges 230...
... Nozzles Using a Computer Utility 244 Print Head Cleaning ...246 Cleaning the Print Head Using the Product Control Panel 246 Cleaning the Print Head Using a Computer Utility 247 Print Head Alignment ...249 Aligning the Print Head Using the Product Control Panel 249 Aligning the Print Head Using a Computer Utility 250 Cleaning the...264 Noise After Ink Installation ...264 Software Installation Problems ...265 Solving Network Problems ...265 9 Purchase Epson Ink Cartridges and Maintenance Box 229 Ink Cartridge and Maintenance Box Part Numbers 229 Removing and Installing Ink Cartridges 230...
User Manual
Page 28
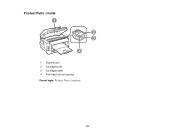
Product Parts - Inside 1 Scanner unit 2 Cartridge cover 3 Cartridge holder 4 Print head (do not remove) Parent topic: Product Parts Locations 28
Product Parts - Inside 1 Scanner unit 2 Cartridge cover 3 Cartridge holder 4 Print head (do not remove) Parent topic: Product Parts Locations 28

User Manual
Page 102
... that contain no text or images. You see your application's Print window, such as Bitmap Increases print speed when printing is extremely slow or the print head stops during printing, and other printing problems. Page Rendering Mode Increases print speed when printing is extremely slow or the print head stops during printing. Skip Blank Page Ensures that may solve other settings do...
... that contain no text or images. You see your application's Print window, such as Bitmap Increases print speed when printing is extremely slow or the print head stops during printing, and other printing problems. Page Rendering Mode Increases print speed when printing is extremely slow or the print head stops during printing. Skip Blank Page Ensures that may solve other settings do...
User Manual
Page 223
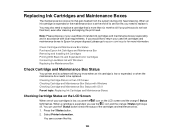
... with local requirements. When an ink cartridge is expended or the maintenance box is low or expended, or when the maintenance box needs to epson.com/recycle for more than six months old if your cartridges is more information. Select Printer Information. Check Cartridge and Maintenance Box Status Purchase...icon and the orange Status light stays on. Note: Please dispose of your printouts do not look their best, even after cleaning and aligning the print head. If you would like this: 223 You can use the Status button check the status of its service life, you know when an ink ...
... with local requirements. When an ink cartridge is expended or the maintenance box is low or expended, or when the maintenance box needs to epson.com/recycle for more than six months old if your cartridges is more information. Select Printer Information. Check Cartridge and Maintenance Box Status Purchase...icon and the orange Status light stays on. Note: Please dispose of your printouts do not look their best, even after cleaning and aligning the print head. If you would like this: 223 You can use the Status button check the status of its service life, you know when an ink ...

User Manual
Page 230
... Note which cartridges need to be replaced, then select Proceed and follow the instructions on the screen. • If you are ready to prevent the print head nozzles from drying out. Cartridges are ready to replace them to install the ink. Removing and Installing Ink Cartridges Make sure you have your replacement...
... Note which cartridges need to be replaced, then select Proceed and follow the instructions on the screen. • If you are ready to prevent the print head nozzles from drying out. Cartridges are ready to replace them to install the ink. Removing and Installing Ink Cartridges Make sure you have your replacement...

User Manual
Page 232
Caution: Do not remove any labels or seals, or ink will leak. if you do not, the print head may dry out and be unable to print. 6. Gently shake the new cartridge four or five times as shown. Do not touch the green chip on the cartridge. Install the new cartridge immediately after removing the old one; Remove only the yellow tape. 232 5. Then remove the cartridge from the package.
Caution: Do not remove any labels or seals, or ink will leak. if you do not, the print head may dry out and be unable to print. 6. Gently shake the new cartridge four or five times as shown. Do not touch the green chip on the cartridge. Install the new cartridge immediately after removing the old one; Remove only the yellow tape. 232 5. Then remove the cartridge from the package.
User Manual
Page 241
... and may not be able to clean the print head nozzles. Print Head Nozzle Check Print Head Cleaning Parent topic: Adjusting Print Quality Related topics Replacing Ink Cartridges and Maintenance Boxes Print Head Nozzle Check You can check the print head nozzles using the control panel on your product... across them unnecessarily. You can check for clogged nozzles. Press the home button, if necessary. 241 Print Head Maintenance Print Head Alignment Cleaning the Paper Guide Print Head Maintenance If your product has two cassettes). 2. Load a few sheets of plain paper in the cassette...
... and may not be able to clean the print head nozzles. Print Head Nozzle Check Print Head Cleaning Parent topic: Adjusting Print Quality Related topics Replacing Ink Cartridges and Maintenance Boxes Print Head Nozzle Check You can check the print head nozzles using the control panel on your product... across them unnecessarily. You can check for clogged nozzles. Press the home button, if necessary. 241 Print Head Maintenance Print Head Alignment Cleaning the Paper Guide Print Head Maintenance If your product has two cassettes). 2. Load a few sheets of plain paper in the cassette...

User Manual
Page 242
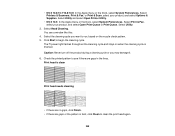
Check the printed pattern to see this : 6. Select Print Head Nozzle Check. You see if there are gaps in the lines. Print head is clean 242 Select Setup. 4. The nozzle pattern prints. 7. Press the Color button. 3. Select Maintenance. You see a screen like this screen: 5.
Check the printed pattern to see this : 6. Select Print Head Nozzle Check. You see if there are gaps in the lines. Print head is clean 242 Select Setup. 4. The nozzle pattern prints. 7. Press the Color button. 3. Select Maintenance. You see a screen like this screen: 5.

User Manual
Page 243
...: • If there are no gaps, select Done. • If there are gaps or the pattern is faint, select Clean the Print Head and continue. 9. If quality still does not improve, one of the ink cartridges may be old or damaged and needs to be replaced.... Parent topic: Print Head Nozzle Check Related concepts Print Head Cleaning Related tasks Removing and Installing Ink Cartridges Related topics Loading Paper 243 Then try cleaning the print head again. Print head needs cleaning 8. Follow the instructions on the screen to 4 times, wait...
...: • If there are no gaps, select Done. • If there are gaps or the pattern is faint, select Clean the Print Head and continue. 9. If quality still does not improve, one of the ink cartridges may be old or damaged and needs to be replaced.... Parent topic: Print Head Nozzle Check Related concepts Print Head Cleaning Related tasks Removing and Installing Ink Cartridges Related topics Loading Paper 243 Then try cleaning the print head again. Print head needs cleaning 8. Follow the instructions on the screen to 4 times, wait...

User Manual
Page 244
Checking the Nozzles Using a Computer Utility You can check the print head nozzles using a utility on your product, and select Options & Supplies. Do one of plain paper in the cassette (or in the Windows taskbar. • OS X ...10.6/10.7/10.8/10.9: In the Apple menu or the Dock, select System Preferences. Select Utility. 3. Select Printers & Scanners, Print & Fax, or Print & Scan, select your Windows or Mac computer. 1. Select Nozzle Check. You see a window like this: 244 Select Utility and select Open Printer Utility. •...
Checking the Nozzles Using a Computer Utility You can check the print head nozzles using a utility on your product, and select Options & Supplies. Do one of plain paper in the cassette (or in the Windows taskbar. • OS X ...10.6/10.7/10.8/10.9: In the Apple menu or the Dock, select System Preferences. Select Utility. 3. Select Printers & Scanners, Print & Fax, or Print & Scan, select your Windows or Mac computer. 1. Select Nozzle Check. You see a window like this: 244 Select Utility and select Open Printer Utility. •...

User Manual
Page 245
... 6. If you don't see if there are no gaps, click Finish. Then try cleaning the print head again. Parent topic: Print Head Nozzle Check Related concepts Print Head Cleaning Related tasks Removing and Installing Ink Cartridges Related topics Loading Paper 245 Click Print. 5. If quality still does not improve, one of the ink cartridges may be old...
... 6. If you don't see if there are no gaps, click Finish. Then try cleaning the print head again. Parent topic: Print Head Nozzle Check Related concepts Print Head Cleaning Related tasks Removing and Installing Ink Cartridges Related topics Loading Paper 245 Click Print. 5. If quality still does not improve, one of the ink cartridges may be old...

User Manual
Page 246
... 2. Load a few sheets of plain paper in the cassette (or in cassette 1 if your product. 1. Note: You cannot clean the print head if an ink cartridge is expended, and may not be able to determine which colors need cleaning. You see this screen: 6. Select Setup.... 4. Cleaning the Print Head Using the Product Control Panel Cleaning the Print Head Using a Computer Utility Parent topic: Print Head Maintenance Related tasks Removing and Installing Ink Cartridges Cleaning the Print Head Using the Product Control Panel You can save ink by cleaning ...
... 2. Load a few sheets of plain paper in the cassette (or in cassette 1 if your product. 1. Note: You cannot clean the print head if an ink cartridge is expended, and may not be able to determine which colors need cleaning. You see this screen: 6. Select Setup.... 4. Cleaning the Print Head Using the Product Control Panel Cleaning the Print Head Using a Computer Utility Parent topic: Print Head Maintenance Related tasks Removing and Installing Ink Cartridges Cleaning the Print Head Using the Product Control Panel You can save ink by cleaning ...

User Manual
Page 247
...the cleaning cycle is clean. Parent topic: Print Head Cleaning Related tasks Cleaning the Print Head Using a Computer Utility Checking the Nozzles Using the Product Control Panel Removing and Installing Ink Cartridges Cleaning the Print Head Using a Computer Utility You can clean the print head using a utility on your product has two ...cassettes). 2. Caution: Never turn off the product during a cleaning cycle or you don't see any improvement after cleaning the print head up to be replaced. If you may be old or damaged and needs to 4 times, wait at least 6 hours. Select the ...
...the cleaning cycle is clean. Parent topic: Print Head Cleaning Related tasks Cleaning the Print Head Using a Computer Utility Checking the Nozzles Using the Product Control Panel Removing and Installing Ink Cartridges Cleaning the Print Head Using a Computer Utility You can clean the print head using a utility on your product has two ...cassettes). 2. Caution: Never turn off the product during a cleaning cycle or you don't see any improvement after cleaning the print head up to be replaced. If you may be old or damaged and needs to 4 times, wait at least 6 hours. Select the ...
User Manual
Page 248
...: Never turn off the product during a cleaning cycle or you want to begin the cleaning cycle. Select Head Cleaning. You see if there are gaps in the lines. Print head is clean Print head needs cleaning • If there are no gaps, click Finish. • If there are gaps or the... pattern is finished. Check the printed pattern to clean the print head again. 248 Select Utility and select Open Printer Utility. &#...
...: Never turn off the product during a cleaning cycle or you want to begin the cleaning cycle. Select Head Cleaning. You see if there are gaps in the lines. Print head is clean Print head needs cleaning • If there are no gaps, click Finish. • If there are gaps or the... pattern is finished. Check the printed pattern to clean the print head again. 248 Select Utility and select Open Printer Utility. &#...

User Manual
Page 249
... Panel Removing and Installing Ink Cartridges Print Head Alignment If your print head nozzles need to 4 times, wait at least 6 hours. Aligning the Print Head Using the Product Control Panel Aligning the Print Head Using a Computer Utility Parent topic: Adjusting Print Quality Aligning the Print Head Using the Product Control Panel You can align the print head using the control panel on your...
... Panel Removing and Installing Ink Cartridges Print Head Alignment If your print head nozzles need to 4 times, wait at least 6 hours. Aligning the Print Head Using the Product Control Panel Aligning the Print Head Using a Computer Utility Parent topic: Adjusting Print Quality Aligning the Print Head Using the Product Control Panel You can align the print head using the control panel on your...

User Manual
Page 250
Parent topic: Print Head Alignment Aligning the Print Head Using a Computer Utility You can align the print head using a utility on your product, and select Options & Supplies. Select Printers & Scanners, Print & Fax, or Print & Scan, select your Windows or Mac computer. 1. After the alignment sheet is printed, you see horizontal bands at regular intervals... the Color button to select the best square in cassette 1 if your printouts look blurry or vertical lines are printing head alignment patterns. 6. Do one of the following : • If your product has two cassettes). 2.
Parent topic: Print Head Alignment Aligning the Print Head Using a Computer Utility You can align the print head using a utility on your product, and select Options & Supplies. Select Printers & Scanners, Print & Fax, or Print & Scan, select your Windows or Mac computer. 1. After the alignment sheet is printed, you see horizontal bands at regular intervals... the Color button to select the best square in cassette 1 if your printouts look blurry or vertical lines are printing head alignment patterns. 6. Do one of the following : • If your product has two cassettes). 2.

User Manual
Page 251
Select Print & Fax, select your product, and select Open Print Queue. Note: Do not cancel printing while you are printing a head alignment pattern. Select Utility. 3. Check the printed pattern and follow the instructions on the screen to print an alignment sheet. You see a window like this: 5. Select Print Head Alignment. 4. Click Next, then click Print to choose the number representing the best printed pattern for each set. • After choosing each pattern number, click Next. 251 • OS X 10.5: In the Apple menu or the Dock, select System Preferences.
Select Print & Fax, select your product, and select Open Print Queue. Note: Do not cancel printing while you are printing a head alignment pattern. Select Utility. 3. Check the printed pattern and follow the instructions on the screen to print an alignment sheet. You see a window like this: 5. Select Print Head Alignment. 4. Click Next, then click Print to choose the number representing the best printed pattern for each set. • After choosing each pattern number, click Next. 251 • OS X 10.5: In the Apple menu or the Dock, select System Preferences.

User Manual
Page 252
Note: Click Skip (where available) if you see this screen: 5. Scroll down and select Paper Guide Cleaning. 6. Then print another alignment sheet and check it is clean. 9. You see ink on the back of the ejected paper to skip a particular alignment sheet. 6. Select the ... the paper comes out clean. Load a few sheets of the sets, choose the closest one in the product. 2. Select Maintenance. Parent topic: Adjusting Print Quality 252 Parent topic: Print Head Alignment Cleaning the Paper Guide If you want to see if it . Check the back of a printout, you are aligned in one or...
Note: Click Skip (where available) if you see this screen: 5. Scroll down and select Paper Guide Cleaning. 6. Then print another alignment sheet and check it is clean. 9. You see ink on the back of the ejected paper to skip a particular alignment sheet. 6. Select the ... the paper comes out clean. Load a few sheets of the sets, choose the closest one in the product. 2. Select Maintenance. Parent topic: Adjusting Print Quality 252 Parent topic: Print Head Alignment Cleaning the Paper Guide If you want to see if it . Check the back of a printout, you are aligned in one or...

User Manual
Page 255
... right. 4. Lift up the scanner unit. 3. Parent topic: Cleaning and Transporting Your Product Related concepts Print Head Cleaning 255 Remove all the paper from printing. 1. Make sure the print head is in its original packing materials, if possible, or use equivalent materials with tape as shown. 5...., or turning it upside down; Lower the scanner unit. 6. Disconnect any connected cables. 9. If print quality has declined when you print again, clean and align the print head. Close the rear paper feed slot and output tray. 10. Secure the ink cartridge holder to the...
... right. 4. Lift up the scanner unit. 3. Parent topic: Cleaning and Transporting Your Product Related concepts Print Head Cleaning 255 Remove all the paper from printing. 1. Make sure the print head is in its original packing materials, if possible, or use equivalent materials with tape as shown. 5...., or turning it upside down; Lower the scanner unit. 6. Disconnect any connected cables. 9. If print quality has declined when you print again, clean and align the print head. Close the rear paper feed slot and output tray. 10. Secure the ink cartridge holder to the...

User Manual
Page 256
Print Head Alignment 256
Print Head Alignment 256


