Operation Manual
Page 19
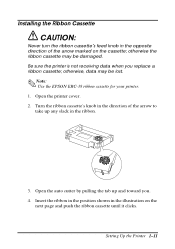
...: Use the EPSON ERC-38 ribbon cassette for your printer. 1. Insert the ribbon in the position shown in the illustration on the cassette; Be sure the printer is not receiving data when you . 4. Setting Up the Printer 1-11 otherwise the ribbon cassette may be damaged. Open the printer cover. 2. Open the auto cutter by pulling the...
...: Use the EPSON ERC-38 ribbon cassette for your printer. 1. Insert the ribbon in the position shown in the illustration on the cassette; Be sure the printer is not receiving data when you . 4. Setting Up the Printer 1-11 otherwise the ribbon cassette may be damaged. Open the printer cover. 2. Open the auto cutter by pulling the...
Operation Manual
Page 20
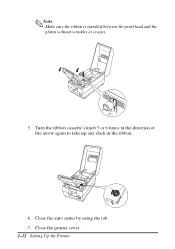
Note: Make sure the ribbon is installed between the print head and the platen without wrinkles or creases. 5. Turn the ribbon cassette's knob 5 or 6 times in the direction of the arrow again to take up any slack in the ribbon. 6. Close the printer cover. 1-12 Setting Up the Printer Close the auto cutter by using the tab. 7.
Note: Make sure the ribbon is installed between the print head and the platen without wrinkles or creases. 5. Turn the ribbon cassette's knob 5 or 6 times in the direction of the arrow again to take up any slack in the ribbon. 6. Close the printer cover. 1-12 Setting Up the Printer Close the auto cutter by using the tab. 7.
Operation Manual
Page 22
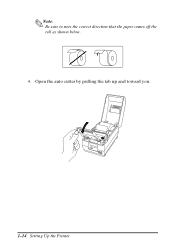
Open the auto cutter by pulling the tab up and toward you. 1-14 Setting Up the Printer Note: Be sure to note the correct direction that the paper comes off the roll as shown below. 4.
Open the auto cutter by pulling the tab up and toward you. 1-14 Setting Up the Printer Note: Be sure to note the correct direction that the paper comes off the roll as shown below. 4.
Operation Manual
Page 23
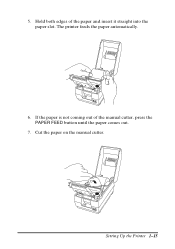
If the paper is not coming out of the paper and insert it straight into the paper slot. Hold both edges of the manual cutter, press the PAPER FEED button until the paper comes out. 7. Setting Up the Printer 1-15 Cut the paper on the manual cutter. The printer feeds the paper automatically. 6. 5.
If the paper is not coming out of the paper and insert it straight into the paper slot. Hold both edges of the manual cutter, press the PAPER FEED button until the paper comes out. 7. Setting Up the Printer 1-15 Cut the paper on the manual cutter. The printer feeds the paper automatically. 6. 5.
Operation Manual
Page 24
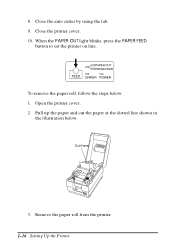
Remove the paper roll from the printer. 1-16 Setting Up the Printer To remove the paper roll, follow the steps below . Close the auto cutter by using the tab. 9. Close the printer cover. 10. When the PAPER OUT light blinks, press the PAPER FEED button to set the printer on line. Pull up the paper and cut the paper at the dotted line shown in the illustration below . 1. Cut here 3. 8. Open the printer cover. 2.
Remove the paper roll from the printer. 1-16 Setting Up the Printer To remove the paper roll, follow the steps below . Close the auto cutter by using the tab. 9. Close the printer cover. 10. When the PAPER OUT light blinks, press the PAPER FEED button to set the printer on line. Pull up the paper and cut the paper at the dotted line shown in the illustration below . 1. Cut here 3. 8. Open the printer cover. 2.
Operation Manual
Page 36
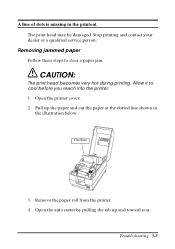
Removing jammed paper Follow these steps to cool before you . Open the printer cover. 2. Allow it to clear a paper jam: CAUTION: The print head becomes very hot during printing. Stop printing and contact your dealer or a qualified service person. Pull up and toward you reach into the printer. 1. The print head may be damaged. Open the auto cutter by pulling the tab up the paper and cut the paper at the dotted line shown in the printout. Remove the paper roll from the printer. 4. A line of dots is missing in the illustration below. Cut here 3. Troubleshooting 3-3
Removing jammed paper Follow these steps to cool before you . Open the printer cover. 2. Allow it to clear a paper jam: CAUTION: The print head becomes very hot during printing. Stop printing and contact your dealer or a qualified service person. Pull up and toward you reach into the printer. 1. The print head may be damaged. Open the auto cutter by pulling the tab up the paper and cut the paper at the dotted line shown in the printout. Remove the paper roll from the printer. 4. A line of dots is missing in the illustration below. Cut here 3. Troubleshooting 3-3

Operation Manual
Page 40
... see exactly what data is not in the normal position), insert a screwdriver into the right side of the auto cutter, and turn on the hex dump function, the printer prints all commands and other data in finding software problems. When you find specific commands. Hexadecimal Dump This feature allows... experienced users to see the blade in the auto cutter slit, the blade is coming to the normal position. Replace ...
... see exactly what data is not in the normal position), insert a screwdriver into the right side of the auto cutter, and turn on the hex dump function, the printer prints all commands and other data in finding software problems. When you find specific commands. Hexadecimal Dump This feature allows... experienced users to see the blade in the auto cutter slit, the blade is coming to the normal position. Replace ...


