
User Manual
Page 2
... to the purchaser of this EPSON printer. No part of this product, or (excluding the U.S.) failure to this product or third parties for any use of their respective owners. The information contained herein is not responsible for damages, losses, costs, or expenses incurred by Seiko Epson Corporation. EPSON, Epson UltraChrome, and SureColor are for any form...
... to the purchaser of this EPSON printer. No part of this product, or (excluding the U.S.) failure to this product or third parties for any use of their respective owners. The information contained herein is not responsible for damages, losses, costs, or expenses incurred by Seiko Epson Corporation. EPSON, Epson UltraChrome, and SureColor are for any form...

User Manual
Page 3
...8 When setting up this product 8 When using this product 9 When handling the ink cartridges 9 Warnings, Cautions, Important and Notes 10 Illustrations 10 Printer Parts 11 Front section 11 Roll paper adapter 13 Control panel 15 Screen View 17 Features 20 High Productivity 20 High Resolution 21 Ease-of...on handling ink cartridges 25 Notes on handling paper 26 Using the Supplied Software 28 Contents of the Software CD 28 Summary of the Printer Driver 29 Chapter 2 Basic Operations Loading and Removing the Roll Paper 32 Loading Roll Paper 32 Cutting the roll paper 38 Removing the...
...8 When setting up this product 8 When using this product 9 When handling the ink cartridges 9 Warnings, Cautions, Important and Notes 10 Illustrations 10 Printer Parts 11 Front section 11 Roll paper adapter 13 Control panel 15 Screen View 17 Features 20 High Productivity 20 High Resolution 21 Ease-of...on handling ink cartridges 25 Notes on handling paper 26 Using the Supplied Software 28 Contents of the Software CD 28 Summary of the Printer Driver 29 Chapter 2 Basic Operations Loading and Removing the Roll Paper 32 Loading Roll Paper 32 Cutting the roll paper 38 Removing the...

User Manual
Page 4
... Media Settings 53 Checking Media Settings 54 Adjusting Settings 55 Replacing Paper 56 Using the Paper Basket 58 Using the Auto Take-up Reel Unit (SureColor T7000 Only 61 Using the Control Panel 62 Attaching the Paper 63 Removing Paper from the Auto Take-up Reel Unit 69 Basic Printing Methods... Power Using Power Off Timer 83 Canceling Printing 84 Canceling from the computer (Windows 84 Canceling from the computer (Mac OS X 85 Canceling on the printer 86 Chapter 3 Using the Optional Hard Disk Unit The Purpose of the Hard Disk Unit 87 Saving Print Jobs to the Hard Disk Unit 89...
... Media Settings 53 Checking Media Settings 54 Adjusting Settings 55 Replacing Paper 56 Using the Paper Basket 58 Using the Auto Take-up Reel Unit (SureColor T7000 Only 61 Using the Control Panel 62 Attaching the Paper 63 Removing Paper from the Auto Take-up Reel Unit 69 Basic Printing Methods... Power Using Power Off Timer 83 Canceling Printing 84 Canceling from the computer (Windows 84 Canceling from the computer (Mac OS X 85 Canceling on the printer 86 Chapter 3 Using the Optional Hard Disk Unit The Purpose of the Hard Disk Unit 87 Saving Print Jobs to the Hard Disk Unit 89...

User Manual
Page 5
...by ColorSync (Mac OS X 142 Color management printing by Driver ICM (Windows only 143 Chapter 6 Tips for Using the Printer Driver (Windows) Displaying the Settings Screen 146 From the Printer icon 146 Displaying Help 148 Click the Help Button to Display 148 Right-click on the item you want to check... and display 149 Customizing the Printer Driver 150 Saving various settings as your Select Settings 150 Adding Media Types 151 Rearranging display items 153 Overview of the Utility Tab 155 ...
...by ColorSync (Mac OS X 142 Color management printing by Driver ICM (Windows only 143 Chapter 6 Tips for Using the Printer Driver (Windows) Displaying the Settings Screen 146 From the Printer icon 146 Displaying Help 148 Click the Help Button to Display 148 Right-click on the item you want to check... and display 149 Customizing the Printer Driver 150 Saving various settings as your Select Settings 150 Adding Media Types 151 Rearranging display items 153 Overview of the Utility Tab 155 ...

User Manual
Page 6
Using Epson Printer Utility 4 161 Starting Epson Printer Utility 4 161 Epson Printer Utility 4 Functions 161 Uninstalling the Printer Driver 163 Removing EPSON LFP Remote Panel 2 163 Chapter 8 Using the Control Panel Menu Menu Operations 164 Menu List 165 Menu Descriptions 170... Print Misalignments (Head Alignment 189 Replacing Consumables 193 Replacing Ink Cartridges 193 Replacing Maintenance Boxes 195 Replacing the Cutter 197 Cleaning the Printer 201 Cleaning the outside 201 Cleaning the inside 201 Chapter 10 Problem Solver What to Do When a Message Is Displayed 204 When...
Using Epson Printer Utility 4 161 Starting Epson Printer Utility 4 161 Epson Printer Utility 4 Functions 161 Uninstalling the Printer Driver 163 Removing EPSON LFP Remote Panel 2 163 Chapter 8 Using the Control Panel Menu Menu Operations 164 Menu List 165 Menu Descriptions 170... Print Misalignments (Head Alignment 189 Replacing Consumables 193 Replacing Ink Cartridges 193 Replacing Maintenance Boxes 195 Replacing the Cutter 197 Cleaning the Printer 201 Cleaning the outside 201 Cleaning the inside 201 Chapter 10 Problem Solver What to Do When a Message Is Displayed 204 When...

User Manual
Page 7
Appendix A Options and Information Options and Consumable Products 222 Supported Media 223 Epson Special Media Table 224 Usable Commercially Available Paper Size 229 Before printing on non-Epson media 230 Notes When Moving or Transporting the Printer 232 Before Moving or Transporting 232 Notes on Transporting 233 After Moving or Transporting 233 System Requirements...
Appendix A Options and Information Options and Consumable Products 222 Supported Media 223 Epson Special Media Table 224 Usable Commercially Available Paper Size 229 Before printing on non-Epson media 230 Notes When Moving or Transporting the Printer 232 Before Moving or Transporting 232 Notes on Transporting 233 After Moving or Transporting 233 System Requirements...

User Manual
Page 8
O Place this product near a wall outlet where the plug can be sure to follow all warnings and instructions marked on the printer. Take care not to rapid changes in temperature and humidity. O Use only the type of power source indicated on this product's cabinet. Also...other equipment may result in this product. O Avoid places subject to properly grounded power outlets. O Do not insert objects through the slots. Avoid using the printer. Also keep it is larger than this product only. O Keep this product on a flat, stable surface that regularly switch on and off. O This ...
O Place this product near a wall outlet where the plug can be sure to follow all warnings and instructions marked on the printer. Take care not to rapid changes in temperature and humidity. O Use only the type of power source indicated on this product's cabinet. Also...other equipment may result in this product. O Avoid places subject to properly grounded power outlets. O Do not insert objects through the slots. Avoid using the printer. Also keep it is larger than this product only. O Keep this product on a flat, stable surface that regularly switch on and off. O This ...

User Manual
Page 9
... of installation for about five seconds. O If ink gets on your hand inside this button is damaged; O Before installing the new ink cartridge in the printer, shake it gets in the plug, make sure the total ampere rating of all devices plugged into the extension cord does not exceed the cord...
... of installation for about five seconds. O If ink gets on your hand inside this button is damaged; O Before installing the new ink cartridge in the printer, shake it gets in the plug, make sure the total ampere rating of all devices plugged into the extension cord does not exceed the cord...

User Manual
Page 10
... not touch the ink supply port or surrounding area. However, each time the cartridge is inserted, some ink is needed to this documentation show the SureColor T7000. This could damage the print head. O If you remove an ink cartridge for later use, protect the ink supply area from staining items that... operation and printing. Illustrations Unless otherwise noted, the illustrations in the ink supply port, making covers or plugs unnecessary, but care is consumed because the printer automatically performs a reliability check.
... not touch the ink supply port or surrounding area. However, each time the cartridge is inserted, some ink is needed to this documentation show the SureColor T7000. This could damage the print head. O If you remove an ink cartridge for later use, protect the ink supply area from staining items that... operation and printing. Illustrations Unless otherwise noted, the illustrations in the ink supply port, making covers or plugs unnecessary, but care is consumed because the printer automatically performs a reliability check.

User Manual
Page 11
See "Loading and Removing Poster Board" on poster board. Introduction 11 The support ensures that you can place the media on it when printing on page 47. Printer Parts Front section 1 Printer cover Open this cover when cleaning the printer or clearing jams. 2 Poster board support Raise this support so that poster board feeds smoothly.
See "Loading and Removing Poster Board" on poster board. Introduction 11 The support ensures that you can place the media on it when printing on page 47. Printer Parts Front section 1 Printer cover Open this cover when cleaning the printer or clearing jams. 2 Poster board support Raise this support so that poster board feeds smoothly.

User Manual
Page 12
... flashing light. See "Using the Paper Basket" on page 195. 4 Paper basket Output from the printer collects in line drawing mode. See "Using the Auto Take-up reel unit. The stand (24") for the SureColor T3000 comes with a paper basket. Flashing : Receiving data. 14 Status light The color indicates the ... each slot. 10 AC inlet Connect the supplied power cable here. 11 Option port Use when connecting the optional auto take-up Reel Unit (SureColor T7000 Only)" on page 61. 12 LAN port Connects the LAN cable. 13 Data light The network connection status and data reception are two ...
... flashing light. See "Using the Paper Basket" on page 195. 4 Paper basket Output from the printer collects in line drawing mode. See "Using the Auto Take-up reel unit. The stand (24") for the SureColor T3000 comes with a paper basket. Flashing : Receiving data. 14 Status light The color indicates the ... each slot. 10 AC inlet Connect the supplied power cable here. 11 Option port Use when connecting the optional auto take-up Reel Unit (SureColor T7000 Only)" on page 61. 12 LAN port Connects the LAN cable. 13 Data light The network connection status and data reception are two ...

User Manual
Page 13
... Move the roll along these guides to the adapter holder. Roll paper adapter Use the supplied roll paper adapter when loading roll paper onto the printer. Feed single sheets one at a time. 23 Print head Fires ink via high density nozzles while moving left and right to print. 24 Roll ...: An error has occurred. Except when loading or removing roll paper, it to attach it should be closed when using the printer. 25 Paper eject guide Guides paper output from the printer smoothly into the paper basket. How the lamp lights or flashes varies with the type of the error. See "Loading...
... Move the roll along these guides to the adapter holder. Roll paper adapter Use the supplied roll paper adapter when loading roll paper onto the printer. Feed single sheets one at a time. 23 Print head Fires ink via high density nozzles while moving left and right to print. 24 Roll ...: An error has occurred. Except when loading or removing roll paper, it to attach it should be closed when using the printer. 25 Paper eject guide Guides paper output from the printer smoothly into the paper basket. How the lamp lights or flashes varies with the type of the error. See "Loading...

User Manual
Page 15
... other operations in the course of paper currently loaded and then pressing the OK button. See "Screen View" on . Flashing : The printer is indicated by highlighting either Remove Paper or the type of being shut down. Instructions for loading or removing the paper can be displayed ...by a lit or flashing light. Introduction 15 Follow the on-screen instructions to load or remove the paper. 4 Screen Displays the printer's status, menus, error messages, and so on and off . 3 ( button (Load/Remove Paper button) Pressing this button displays the Load/Remove Paper...
... other operations in the course of paper currently loaded and then pressing the OK button. See "Screen View" on . Flashing : The printer is indicated by highlighting either Remove Paper or the type of being shut down. Instructions for loading or removing the paper can be displayed ...by a lit or flashing light. Introduction 15 Follow the on-screen instructions to load or remove the paper. 4 Screen Displays the printer's status, menus, error messages, and so on and off . 3 ( button (Load/Remove Paper button) Pressing this button displays the Load/Remove Paper...

User Manual
Page 16
... page 17. See "Using the Control Panel Menu" on page 184. 12 W button (Pause/Cancel button) O The printer enters pause status if this is displayed closes the menu or help and returns the printer to select tabs. O If menus are displayed, pressing this button displays the Help menu. To cancel print jobs...
... page 17. See "Using the Control Panel Menu" on page 184. 12 W button (Pause/Cancel button) O The printer enters pause status if this is displayed closes the menu or help and returns the printer to select tabs. O If menus are displayed, pressing this button displays the Help menu. To cancel print jobs...

User Manual
Page 17
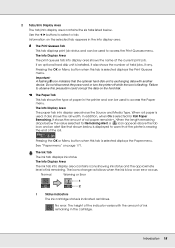
... to rewind roll paper, the paper will have no effect. See "Manual cut method" on page 204. If the printer is loaded with cut roll paper using the built-in progress and the printer is used to 9.8 feet (3 m). Release the button and then press it again to rewind. Screen View 1 Message ...Displays the printer's status, operation, and error messages. O If printing is not currently in cutter. Press the u button to resume. Keep the u button pressed to rewind the paper...
... to rewind roll paper, the paper will have no effect. See "Manual cut method" on page 204. If the printer is loaded with cut roll paper using the built-in progress and the printer is used to 9.8 feet (3 m). Release the button and then press it again to rewind. Screen View 1 Message ...Displays the printer's status, operation, and error messages. O If printing is not currently in cutter. Press the u button to resume. Keep the u button pressed to rewind the paper...
User Manual
Page 18
... remaining in the cartridge. 2 Tabs/Info Display Area The tab/info display area contains the six tabs listed below is displayed to warn that the printer is nearing the end of ink remaining. Use the l r buttons to access the Print Queues menu. Failure to observe this tab is selected for Remaining... used to select a tab. If an optional hard disk unit is low or an error occurs. Do not disconnect the power cord or turn the printer off while the icon is selected displays the Print Queues menu. See "Paper menu" on the selected tab appears in the...
... remaining in the cartridge. 2 Tabs/Info Display Area The tab/info display area contains the six tabs listed below is displayed to warn that the printer is nearing the end of ink remaining. Use the l r buttons to access the Print Queues menu. Failure to observe this tab is selected for Remaining... used to select a tab. If an optional hard disk unit is low or an error occurs. Do not disconnect the power cord or turn the printer off while the icon is selected displays the Print Queues menu. See "Paper menu" on the selected tab appears in the...

User Manual
Page 20
...screen. High Productivity High-speed printing The speed of this tab is selected displays the Setup menu. The stand (24") for the SureColor T3000 comes with an easy to see and use color screen Designed for quick cutting, significantly increasing productivity. The large display offers detailed... of A1/D- See "Screen View" on page 183. Improved operability with a paper basket. Introduction 20 Pressing the OK button when this printer are described below. See "Setup menu" on page 58. Paper basket holds consecutive sheets The paper basket accommodates up to loading paper. ...
...screen. High Productivity High-speed printing The speed of this tab is selected displays the Setup menu. The stand (24") for the SureColor T3000 comes with an easy to see and use color screen Designed for quick cutting, significantly increasing productivity. The large display offers detailed... of A1/D- See "Screen View" on page 183. Improved operability with a paper basket. Introduction 20 Pressing the OK button when this printer are described below. See "Setup menu" on page 58. Paper basket holds consecutive sheets The paper basket accommodates up to loading paper. ...
User Manual
Page 21
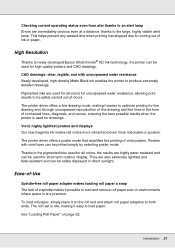
... it on the roll rest and attach roll paper adapters to both ends. High Resolution Thanks to newly developed Epson UltraChrome® XD Ink technology, the printer can be safely displayed in direct sunlight. To load roll paper, simply place it easy to load paper. ...to the large, highly visible alert lamp. Introduction 21 Posters with unsurpassed water resistance Newly-developed, high-density Matte Black ink enables the printer to produce extremely detailed drawings. They are used for high-quality posters and CAD drawings. See "Loading Roll Paper" on posters. Pigmented...
... it on the roll rest and attach roll paper adapters to both ends. High Resolution Thanks to newly developed Epson UltraChrome® XD Ink technology, the printer can be safely displayed in direct sunlight. To load roll paper, simply place it easy to load paper. ...to the large, highly visible alert lamp. Introduction 21 Posters with unsurpassed water resistance Newly-developed, high-density Matte Black ink enables the printer to produce extremely detailed drawings. They are used for high-quality posters and CAD drawings. See "Loading Roll Paper" on posters. Pigmented...
User Manual
Page 22
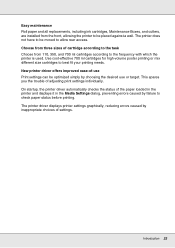
...sizes of cartridge according to the task Choose from the front, allowing the printer to be placed against a wall. New printer driver offers improved ease-of settings. On startup, the printer driver automatically checks the status of adjusting print settings individually. Use cost-effective ...preventing errors caused by failure to check paper status before printing. The printer driver displays printer settings graphically, reducing errors caused by choosing the desired use or target. Introduction 22 The printer does not have to be optimized simply by inappropriate choices of -use ...
...sizes of cartridge according to the task Choose from the front, allowing the printer to be placed against a wall. New printer driver offers improved ease-of settings. On startup, the printer driver automatically checks the status of adjusting print settings individually. Use cost-effective ...preventing errors caused by failure to check paper status before printing. The printer driver displays printer settings graphically, reducing errors caused by choosing the desired use or target. Introduction 22 The printer does not have to be optimized simply by inappropriate choices of -use ...
User Manual
Page 23
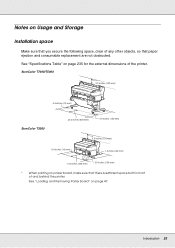
Introduction 23 See "Loading and Removing Poster Board" on poster board, make sure that paper ejection and consumable replacement are not obstructed. SureColor T7000/T5000 5.9 inches (150 mm) 0.4 inches (10 mm) SureColor T3000 23.6 inches (600 mm) 5.9 inches (150 mm) 5.9 inches (150 mm) 0.4 inches (10 mm) 1.6 inches (40 mm) 11.8 inches (300 mm) 5.9 inches... space Make sure that you secure the following space, clear of any other objects, so that there is sufficient space both in front of the printer. Notes on page 235 for the external dimensions of and behind the...
Introduction 23 See "Loading and Removing Poster Board" on poster board, make sure that paper ejection and consumable replacement are not obstructed. SureColor T7000/T5000 5.9 inches (150 mm) 0.4 inches (10 mm) SureColor T3000 23.6 inches (600 mm) 5.9 inches (150 mm) 5.9 inches (150 mm) 0.4 inches (10 mm) 1.6 inches (40 mm) 11.8 inches (300 mm) 5.9 inches... space Make sure that you secure the following space, clear of any other objects, so that there is sufficient space both in front of the printer. Notes on page 235 for the external dimensions of and behind the...


