
Quick Reference Guide
Page 4
2 | Printer Parts Printer Parts Front - S30670 Print head in maintenance position Flushing pad Wiper Media holding plate Cutter Pressure groove rollers Platen heater Wiper cleaner Nozzle caps S30670 Left maintenance cover Front cover Control panel Media loading lever Right maintenance cover USB port After heater Tensioner LAN port AC inlets Cartridge check lights Lock levers Ink cartridges Roll locking screw Roll support Auto switch Vent Waste ink tube Waste ink tank Adjuster Manual switch Caster Inside -
2 | Printer Parts Printer Parts Front - S30670 Print head in maintenance position Flushing pad Wiper Media holding plate Cutter Pressure groove rollers Platen heater Wiper cleaner Nozzle caps S30670 Left maintenance cover Front cover Control panel Media loading lever Right maintenance cover USB port After heater Tensioner LAN port AC inlets Cartridge check lights Lock levers Ink cartridges Roll locking screw Roll support Auto switch Vent Waste ink tube Waste ink tank Adjuster Manual switch Caster Inside -

Quick Reference Guide
Page 5
... check lights Lock levers Ink cartridges Media holding plate Platen heater Cutter groove Low pressure rollers (white) High pressure rollers (green) Nozzle caps Wiper cleaners S50670 and S70670 Front cover Left maintenance cover High speed dryer After heater Control panel Media loading lever Right maintenance cover USB port LAN port AC...
... check lights Lock levers Ink cartridges Media holding plate Platen heater Cutter groove Low pressure rollers (white) High pressure rollers (green) Nozzle caps Wiper cleaners S50670 and S70670 Front cover Left maintenance cover High speed dryer After heater Control panel Media loading lever Right maintenance cover USB port LAN port AC...

Quick Reference Guide
Page 6
... and media holding plates. be hot; Caution: Load media immediately before printing to all three models. Follow these steps to use the built-in this manual apply to avoid creases and curling. 1. 4 | Back Back Drive switch Pre-heater Roll holder Handle Roll locking screw Lift lever Roll support Loading Media Before...
... and media holding plates. be hot; Caution: Load media immediately before printing to all three models. Follow these steps to use the built-in this manual apply to avoid creases and curling. 1. 4 | Back Back Drive switch Pre-heater Roll holder Handle Roll locking screw Lift lever Roll support Loading Media Before...
Quick Reference Guide
Page 9
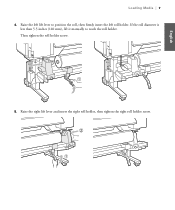
Then tighten the roll holder screw. 5. If the roll diameter is less than 5.5 inches (140 mm), lift it manually to position the roll, then firmly insert the left lift lever to reach the roll holder. Raise the right lift lever and insert the right roll holder, then tighten the right roll holder screw. Raise the left roll holder. English Loading Media | 7 4.
Then tighten the roll holder screw. 5. If the roll diameter is less than 5.5 inches (140 mm), lift it manually to position the roll, then firmly insert the left lift lever to reach the roll holder. Raise the right lift lever and insert the right roll holder, then tighten the right roll holder screw. Raise the left roll holder. English Loading Media | 7 4.
Quick Reference Guide
Page 11
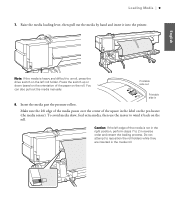
... orientation of the paper on the pre-heater (the media sensor). Insert the media past the pressure rollers. You can also pull out the media manually. Make sure the left edge of the media passes over the center of the media is heavy and difficult to wind it into the printer...
... orientation of the paper on the pre-heater (the media sensor). Insert the media past the pressure rollers. You can also pull out the media manually. Make sure the left edge of the media passes over the center of the media is heavy and difficult to wind it into the printer...
Quick Reference Guide
Page 18
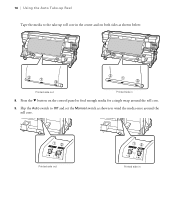
Printed side out Printed side in Flip the Auto switch to Off and set the Manual switch as shown below: Printed side out Printed side in 8. 16 | Using the Auto Take-up Reel Tape the media to the take-up roll core in the center and on the control panel to feed enough media for a single wrap around the roll core. Press the d button on both sides as shown to wind the media once around the roll core. 9.
Printed side out Printed side in Flip the Auto switch to Off and set the Manual switch as shown below: Printed side out Printed side in 8. 16 | Using the Auto Take-up Reel Tape the media to the take-up roll core in the center and on the control panel to feed enough media for a single wrap around the roll core. Press the d button on both sides as shown to wind the media once around the roll core. 9.
Quick Reference Guide
Page 20
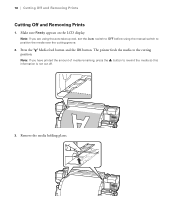
Press the Media feed button and the OK button. Note: If you have printed the amount of media remaining, press the u button to rewind the media so this information is not cut off. 3. Remove the media holding plates. Note: If you are using the auto take-up reel, set the Auto switch to OFF before using the manual switch to the cutting position. The printer feeds the media to position the media over the cutting groove. 2. 18 | Cutting Off and Removing Prints Cutting Off and Removing Prints 1. Make sure Ready appears on the LCD display.
Press the Media feed button and the OK button. Note: If you have printed the amount of media remaining, press the u button to rewind the media so this information is not cut off. 3. Remove the media holding plates. Note: If you are using the auto take-up reel, set the Auto switch to OFF before using the manual switch to the cutting position. The printer feeds the media to position the media over the cutting groove. 2. 18 | Cutting Off and Removing Prints Cutting Off and Removing Prints 1. Make sure Ready appears on the LCD display.
Quick Reference Guide
Page 23
...and press OK. 6. Note: If the automatic adjustments do not work with automatic adjustments. Some media types will not work , use manual adjustments. Press the Menu button. 2. Select the media bank setting number and name for the loaded media and press OK. 5. Select... Setup and press OK. 3. English Performing Auto Feed Adjustment | 21 Performing Auto Feed Adjustment Feed Adjustment corrects banding problems, and can be performed manually (as described in the on -screen User's Guide) or automatically (as described below ). 1. Select Customize Settings and press OK. 4. Select Customize...
...and press OK. 6. Note: If the automatic adjustments do not work with automatic adjustments. Some media types will not work , use manual adjustments. Press the Menu button. 2. Select the media bank setting number and name for the loaded media and press OK. 5. Select... Setup and press OK. 3. English Performing Auto Feed Adjustment | 21 Performing Auto Feed Adjustment Feed Adjustment corrects banding problems, and can be performed manually (as described in the on -screen User's Guide) or automatically (as described below ). 1. Select Customize Settings and press OK. 4. Select Customize...

Setup Guide
Page 4
...flat, stable location that can support the following illustration shows the minimum space required for each printer: • S30670 - 483 lb (219 kg) • S50670 - 524 lb (238 kg) • S70670 - 504 lb (229 kg) WARNING: Six people are required to set up and use the printer. You... and ventilation. 2 | Unpacking and Assembling the Printer Unpacking and Assembling the Printer Note: Unless otherwise indicated, the illustrations in this manual show the S30670, but the instructions apply to direct sunlight, excessive heat, humidity, or dust. Avoid locations subject to all three models.
...flat, stable location that can support the following illustration shows the minimum space required for each printer: • S30670 - 483 lb (219 kg) • S50670 - 524 lb (238 kg) • S70670 - 504 lb (229 kg) WARNING: Six people are required to set up and use the printer. You... and ventilation. 2 | Unpacking and Assembling the Printer Unpacking and Assembling the Printer Note: Unless otherwise indicated, the illustrations in this manual show the S30670, but the instructions apply to direct sunlight, excessive heat, humidity, or dust. Avoid locations subject to all three models.
User Manual
Page 4
... in Media Setting Banks 92 Saving Settings 93 Changing Heater and Fan Settings 99 Correcting Print Misalignment (Head Alignment 101 Feed Adjustment (Manual Feed Adjustment 103 Using a Test Pattern 104 Performing Feed Adjustment During Printing 106 Printable area - S30670 58 Viewing and Changing Media ... 131 Disposing of Different Widths 107 Using the High Pressure Rollers 108 Using the Low Pressure Rollers 109 Printable Area - S70670/S50670 107 Positioning Media of Waste Ink 133 Replacing the Wiper and Wiper Cleaner 135 Replacing the Flushing Pad 138 Cleaning Check Sheet ...
... in Media Setting Banks 92 Saving Settings 93 Changing Heater and Fan Settings 99 Correcting Print Misalignment (Head Alignment 101 Feed Adjustment (Manual Feed Adjustment 103 Using a Test Pattern 104 Performing Feed Adjustment During Printing 106 Printable area - S30670 58 Viewing and Changing Media ... 131 Disposing of Different Widths 107 Using the High Pressure Rollers 108 Using the Low Pressure Rollers 109 Printable Area - S70670/S50670 107 Positioning Media of Waste Ink 133 Replacing the Wiper and Wiper Cleaner 135 Replacing the Flushing Pad 138 Cleaning Check Sheet ...
User Manual
Page 9
Introduction 9 Note that there is a valve in the ink supply port, making covers or plugs unnecessary, but the instructions in the same environment as this manual apply to this product. c Caution: Cautions must be followed to avoid damage to all three models. Important: Important must be followed to avoid bodily injury. &#...
Introduction 9 Note that there is a valve in the ink supply port, making covers or plugs unnecessary, but the instructions in the same environment as this manual apply to this product. c Caution: Cautions must be followed to avoid damage to all three models. Important: Important must be followed to avoid bodily injury. &#...

User Manual
Page 11
.... 8 Auto switch Use this switch to fill all slots. After installing the printer, keep the printer in use "replacement cartridges" to select the manual take -up direction.AutoThe selected option takes effect when the Auto switch is discharged from inside the printer. These are included with a new waste ink... type of this tube is in the waste ink bottle while the printer is in place. Do not obstruct these holders. S70670: 8 colors/10 colors S50670: 4 colors/5 colors In 8 or 4 color mode, you need to the roll core. Lower the levers to lock the cartridges in place once they...
.... 8 Auto switch Use this switch to fill all slots. After installing the printer, keep the printer in use "replacement cartridges" to select the manual take -up direction.AutoThe selected option takes effect when the Auto switch is discharged from inside the printer. These are included with a new waste ink... type of this tube is in the waste ink bottle while the printer is in place. Do not obstruct these holders. S70670: 8 colors/10 colors S50670: 4 colors/5 colors In 8 or 4 color mode, you need to the roll core. Lower the levers to lock the cartridges in place once they...

User Manual
Page 14
... port Connects the LAN cable. 20 USB port Connects the USB cable. 21 Maintenance cover (right) Open this switch to select the manual take-up direction. Introduction 14 8 Manual switch Use this cover when performing regular maintenance. The selected option takes effect when the Auto switch is in use . 13 Waste ink...
... port Connects the LAN cable. 20 USB port Connects the USB cable. 21 Maintenance cover (right) Open this switch to select the manual take-up direction. Introduction 14 8 Manual switch Use this cover when performing regular maintenance. The selected option takes effect when the Auto switch is in use . 13 Waste ink...

User Manual
Page 22
... printing is in progress, you can use this button to right, this display shows the temperature settings for the S50670. 1 Messages Displays the printer's status, operation, and error messages. See "Feed Adjustment (Manual Feed Adjustment)" on page 164. 2 Heater temperature From left to adjust media feed. Introduction 22 See "When a Message is...
... printing is in progress, you can use this button to right, this display shows the temperature settings for the S50670. 1 Messages Displays the printer's status, operation, and error messages. See "Feed Adjustment (Manual Feed Adjustment)" on page 164. 2 Heater temperature From left to adjust media feed. Introduction 22 See "When a Message is...
User Manual
Page 82
... Up The auto take-up reel unit automatically takes up reel unit to Off before using the Manual switch to prevent deformation of the pressure rollers. Note: If you are using the S70670 or S50670 and do not intend to make additional prints, raise the media loading lever to position the media...
... Up The auto take-up reel unit automatically takes up reel unit to Off before using the Manual switch to prevent deformation of the pressure rollers. Note: If you are using the S70670 or S50670 and do not intend to make additional prints, raise the media loading lever to position the media...

User Manual
Page 83
Failure to feed the media as far as expected when ink layering is performed with the S70670 or S50670, causing a decline in injury. c Caution: Be sure that your hands or hair do not get caught in the auto take-up reel unit while it ... the two is loaded correctly, press the d button to observe this precaution could result in print quality. Basic Operations 83 Follow the instructions in the manual when loading media or roll cores or removing media from the take -up roll.
Failure to feed the media as far as expected when ink layering is performed with the S70670 or S50670, causing a decline in injury. c Caution: Be sure that your hands or hair do not get caught in the auto take-up reel unit while it ... the two is loaded correctly, press the d button to observe this precaution could result in print quality. Basic Operations 83 Follow the instructions in the manual when loading media or roll cores or removing media from the take -up roll.
User Manual
Page 86
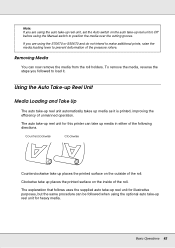
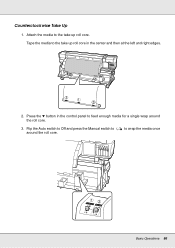
Attach the media to wrap the media once Basic Operations 86 to the take up roll core. Tape the media to around the roll core. 3. Flip the Auto switch to Off and press the Manual switch to the take up roll core in the control panel to feed enough media for a single wrap around the roll core. Counterclockwise Take Up 1. Press the d button in the center and then at the left and right edges. 2.
Attach the media to wrap the media once Basic Operations 86 to the take up roll core. Tape the media to around the roll core. 3. Flip the Auto switch to Off and press the Manual switch to the take up roll core in the control panel to feed enough media for a single wrap around the roll core. Counterclockwise Take Up 1. Press the d button in the center and then at the left and right edges. 2.
User Manual
Page 88
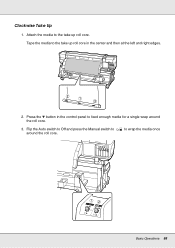
Clockwise Take Up 1. Flip the Auto switch to Off and press the Manual switch to the take up roll core in the control panel to wrap the media once Basic Operations 88 Tape the media to around the roll core. 3. to feed enough media for a single wrap around the roll core. Press the d button in the center and then at the left and right edges. 2. Attach the media to the take up roll core.
Clockwise Take Up 1. Flip the Auto switch to Off and press the Manual switch to the take up roll core in the control panel to wrap the media once Basic Operations 88 Tape the media to around the roll core. 3. to feed enough media for a single wrap around the roll core. Press the d button in the center and then at the left and right edges. 2. Attach the media to the take up roll core.
User Manual
Page 90
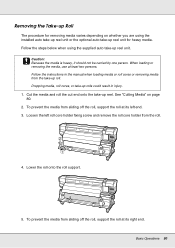
... holder from the take-up reel unit. See "Cutting Media" on whether you are using the supplied auto take -up rolls could result in the manual when loading media or roll cores or removing media from the roll. 4. To prevent the media from sliding off the roll, support the roll at...
... holder from the take-up reel unit. See "Cutting Media" on whether you are using the supplied auto take -up rolls could result in the manual when loading media or roll cores or removing media from the roll. 4. To prevent the media from sliding off the roll, support the roll at...

User Manual
Page 94
... the steps involved in auto feed adjustment. Setting Name Name the media setting bank. The Feed Adjustment menu contains two options: Auto and Manual. Using distinctive names makes it easier to correct banding (horizontal banding, lines, or strips of uneven color). After entering the name, press... the Z button. Basic Operations 94 Select Setting Name and press the Z button. 2. Adjust the feed manually if you feel that any settings already saved to delete the previous character and move the cursor back one spot. 3. Feed Adjustment Feed Adjustment...
... the steps involved in auto feed adjustment. Setting Name Name the media setting bank. The Feed Adjustment menu contains two options: Auto and Manual. Using distinctive names makes it easier to correct banding (horizontal banding, lines, or strips of uneven color). After entering the name, press... the Z button. Basic Operations 94 Select Setting Name and press the Z button. 2. Adjust the feed manually if you feel that any settings already saved to delete the previous character and move the cursor back one spot. 3. Feed Adjustment Feed Adjustment...


