
Quick Reference Guide
Page 3
English Contents Printer Parts 2 Front - S30670 2 Inside - S50670 and S70670 3 Inside - S50670 and S70670 3 Back 4 Loading Media 4 Using the Auto Take-up Reel 13 Cutting Off and Removing Prints 18 Configuring Media 19 Pre-Printing Checklist 19 Creating Media ...
English Contents Printer Parts 2 Front - S30670 2 Inside - S50670 and S70670 3 Inside - S50670 and S70670 3 Back 4 Loading Media 4 Using the Auto Take-up Reel 13 Cutting Off and Removing Prints 18 Configuring Media 19 Pre-Printing Checklist 19 Creating Media ...

Quick Reference Guide
Page 5
... panel Media loading lever Right maintenance cover USB port LAN port AC inlets Tensioner Roll locking screw Roll support Auto switch Manual switch Inside - S50670 and S70670 Print head in maintenance position Vent Waste ink tube Waste ink tank Adjuster Caster Flushing pad Wipers Cartridge check lights Lock levers Ink cartridges Media...
... panel Media loading lever Right maintenance cover USB port LAN port AC inlets Tensioner Roll locking screw Roll support Auto switch Manual switch Inside - S50670 and S70670 Print head in maintenance position Vent Waste ink tube Waste ink tank Adjuster Caster Flushing pad Wipers Cartridge check lights Lock levers Ink cartridges Media...

Quick Reference Guide
Page 8
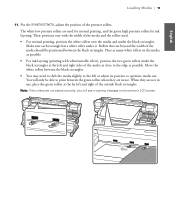
Orient the roll based on the printable side Printable side out Printable side in For the S50670/S70670, place the left edge is not in place, attach it as shown. Orient the roll based on the back of the holes on the printable side Printable side out Printable side in back of the printer and the right edge on any of the printer. For the S30670, place the media on the roll supports and make sure the left edge of the media in any of the black squares on the bar in 6 | Loading Media 3. If the label with black squares is aligned as described in the Setup Guide.
Orient the roll based on the printable side Printable side out Printable side in For the S50670/S70670, place the left edge is not in place, attach it as shown. Orient the roll based on the back of the holes on the printable side Printable side out Printable side in back of the printer and the right edge on any of the printer. For the S30670, place the media on the roll supports and make sure the left edge of the media in any of the black squares on the bar in 6 | Loading Media 3. If the label with black squares is aligned as described in the Setup Guide.
Quick Reference Guide
Page 13
For the S50670/S70670, adjust the position of the media and the rollers used for normal printing, and the green high pressure rollers for ink layering. The white low ...
For the S50670/S70670, adjust the position of the media and the rollers used for normal printing, and the green high pressure rollers for ink layering. The white low ...
Quick Reference Guide
Page 15
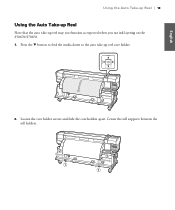
English Using the Auto Take-up Reel | 13 Using the Auto Take-up Reel Note that the auto take -up reel may not function as expected when you use ink layering on the S50670/S70670. 1. Center the roll supports between the roll holders. Press the d button to feed the media down to the auto take -up reel core holder. 2. Loosen the core holder screws and slide the core holders apart.
English Using the Auto Take-up Reel | 13 Using the Auto Take-up Reel Note that the auto take -up reel may not function as expected when you use ink layering on the S50670/S70670. 1. Center the roll supports between the roll holders. Press the d button to feed the media down to the auto take -up reel core holder. 2. Loosen the core holder screws and slide the core holders apart.
Quick Reference Guide
Page 24
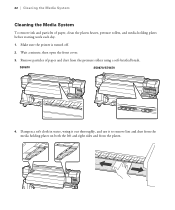
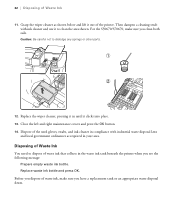
S30670 S50670/S70670 4. Remove particles of paper, clean the platen heater, pressure rollers, and media holding plates on both the left and right sides and from the pressure rollers using a soft-bristled brush. Make sure the printer is turned off. 2. Wait a minute, then open the front cover. 3. Dampen a soft cloth in water, wring it out thoroughly, and use it to remove lint and dust from the media holding plates before starting work each day. 1. 22 | Cleaning the Media System Cleaning the Media System To remove ink and particles of paper and dust from the platen.
S30670 S50670/S70670 4. Remove particles of paper, clean the platen heater, pressure rollers, and media holding plates on both the left and right sides and from the pressure rollers using a soft-bristled brush. Make sure the printer is turned off. 2. Wait a minute, then open the front cover. 3. Dampen a soft cloth in water, wring it out thoroughly, and use it to remove lint and dust from the media holding plates before starting work each day. 1. 22 | Cleaning the Media System Cleaning the Media System To remove ink and particles of paper and dust from the platen.
Quick Reference Guide
Page 25
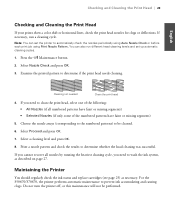
... pattern to prevent ink accumulating and causing clogs. Select Proceed and press OK. 7. If you need to wash the ink system, as necessary. For the S50670/S70670, the printer performs automatic maintenance to determine if the print head needs cleaning. Note: You can also run a cleaning cycle. Select a cleaning level and press...
... pattern to prevent ink accumulating and causing clogs. Select Proceed and press OK. 7. If you need to wash the ink system, as necessary. For the S50670/S70670, the printer performs automatic maintenance to determine if the print head needs cleaning. Note: You can also run a cleaning cycle. Select a cleaning level and press...

Quick Reference Guide
Page 27
...The height of the indicator shows the approximate level of ink remaining. S70670 T715100 T715400 T715300 T715200 T715B00 T715700 T715800 T715500 T715600 Replacing Ink Cartridges Use the following EPSON UltraChrome® GSX or GS2 ink cartridges (see page 37 for ...ordering information): Slot Cartridge BK Black Y Yellow M Magenta C Cyan WH White MS Metallic silver LK Light black OR Orange LC Light cyan LM Light magenta All Cleaning cartridge S30670 T689100 T689400 T689300 T689200 T699000 S50670...
...The height of the indicator shows the approximate level of ink remaining. S70670 T715100 T715400 T715300 T715200 T715B00 T715700 T715800 T715500 T715600 Replacing Ink Cartridges Use the following EPSON UltraChrome® GSX or GS2 ink cartridges (see page 37 for ...ordering information): Slot Cartridge BK Black Y Yellow M Magenta C Cyan WH White MS Metallic silver LK Light black OR Orange LC Light cyan LM Light magenta All Cleaning cartridge S30670 T689100 T689400 T689300 T689200 T699000 S50670...

Quick Reference Guide
Page 31
...on the base of the print head (shown below . Do not reuse a cleaning swab; Do not touch the sensors with head cleaning operations. S30670 S50670/S70670 English Sensors Sensors Head 1 Head 2 Caution: Do not touch the nozzle surface or any other internal part with your hands or swab. Do not ...the cleaning swab with a cleaning swab, as shown below ) can be removed using an extremely small amount of the wiper (or wipers for the S50670/S70670) with water or it with ink cleaner to dampen the swab with ink. dirt or ink from your skin interfering with your hands to a ...
...on the base of the print head (shown below . Do not reuse a cleaning swab; Do not touch the sensors with head cleaning operations. S30670 S50670/S70670 English Sensors Sensors Head 1 Head 2 Caution: Do not touch the nozzle surface or any other internal part with your hands or swab. Do not ...the cleaning swab with a cleaning swab, as shown below ) can be removed using an extremely small amount of the wiper (or wipers for the S50670/S70670) with water or it with ink cleaner to dampen the swab with ink. dirt or ink from your skin interfering with your hands to a ...

Quick Reference Guide
Page 33
After cleaning, close maintenance covers and press OK. Press the OK button to move the wiper to the rear. Clean the area around the outside of the caps, or they might become deformed. 10. English Cleaning the Print Head, Wiper, Caps, and Wiper Rail | 31 8. Make sure you see this message on the points and press it down until it clicks into place. 9. Clean the attachment points, then place the wiper on the display: Clean wiper rail. Caution: Do not touch the insides of the four caps (S30670) or 10 caps (S50670/S70670) with a cleaning swab, as shown below.
After cleaning, close maintenance covers and press OK. Press the OK button to move the wiper to the rear. Clean the area around the outside of the caps, or they might become deformed. 10. English Cleaning the Print Head, Wiper, Caps, and Wiper Rail | 31 8. Make sure you see this message on the points and press it down until it clicks into place. 9. Clean the attachment points, then place the wiper on the display: Clean wiper rail. Caution: Do not touch the insides of the four caps (S30670) or 10 caps (S50670/S70670) with a cleaning swab, as shown below.
Quick Reference Guide
Page 34
.... Then dampen a cleaning swab with industrial waste disposal laws and local government ordinances as shown below and lift it clicks into place. 13. For the S50670/S70670, make sure you clean both rails.
.... Then dampen a cleaning swab with industrial waste disposal laws and local government ordinances as shown below and lift it clicks into place. 13. For the S50670/S70670, make sure you clean both rails.
Quick Reference Guide
Page 36
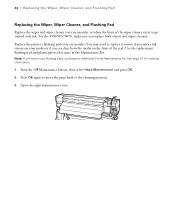
...: If you see dust from the media on your media or if you need more flushing pads, purchase an Additional Printer Maintenance Kit. For the S50670/S70670, make sure you replace both wipers and wiper cleaners. Press the # Maintenance button, then select Head Maintenance and press OK. 2. 34 | Replacing the Wiper, Wiper...
...: If you see dust from the media on your media or if you need more flushing pads, purchase an Additional Printer Maintenance Kit. For the S50670/S70670, make sure you replace both wipers and wiper cleaners. Press the # Maintenance button, then select Head Maintenance and press OK. 2. 34 | Replacing the Wiper, Wiper...

Setup Guide
Page 3
... Media System ...17 Adjusting the Take-in Reel ...17 Adjusting the Take-up Reel ...21 Marking the Media Loading Position 25 Choosing a Color Mode (S50670 and S70670 only 27 Installing Ink Cartridges ...27 Installing Software ...30 Connecting to Your System ...30 Updating Your Printer Firmware ...30 Checking the Current Firmware Version 31...
... Media System ...17 Adjusting the Take-in Reel ...17 Adjusting the Take-up Reel ...21 Marking the Media Loading Position 25 Choosing a Color Mode (S50670 and S70670 only 27 Installing Ink Cartridges ...27 Installing Software ...30 Connecting to Your System ...30 Updating Your Printer Firmware ...30 Checking the Current Firmware Version 31...

Setup Guide
Page 4
....7 in (500 mm) When choosing a place for the printer, leave adequate room for each printer: • S30670 - 483 lb (219 kg) • S50670 - 524 lb (238 kg) • S70670 - 504 lb (229 kg) WARNING: Six people are required to unpack and install the printer. Avoid locations subject to direct sunlight, excessive heat...
....7 in (500 mm) When choosing a place for the printer, leave adequate room for each printer: • S30670 - 483 lb (219 kg) • S50670 - 524 lb (238 kg) • S70670 - 504 lb (229 kg) WARNING: Six people are required to unpack and install the printer. Avoid locations subject to direct sunlight, excessive heat...

Setup Guide
Page 6
4 | Unpacking and Assembling the Printer Printer and Stand Assembly (S50670 and S70670): Replacement cartridges Cable supports Translated warning labels Carry bars Power cable (× 2) Waste ink tank Legs Hex wrench Printer Horizontal struts Media System Assembly: Waste ink tank brackets Software and documentation Media alignment label Take-in reel Take-in/take-up brackets Take-up reel Roll core Adjustment paper
4 | Unpacking and Assembling the Printer Printer and Stand Assembly (S50670 and S70670): Replacement cartridges Cable supports Translated warning labels Carry bars Power cable (× 2) Waste ink tank Legs Hex wrench Printer Horizontal struts Media System Assembly: Waste ink tank brackets Software and documentation Media alignment label Take-in reel Take-in/take-up brackets Take-up reel Roll core Adjustment paper

Setup Guide
Page 16
Installing the Take-up Reel System You need the following parts to the front of the guide label on the bar. Attach the brackets to assemble and attach the take-up Reel System 6. For the S50670/S70670, attach the media alignment label to the front bar, aligning the left end with the left end of the printer as shown. 14 | Installing the Take-up reel system: 1.
Installing the Take-up Reel System You need the following parts to the front of the guide label on the bar. Attach the brackets to assemble and attach the take-up Reel System 6. For the S50670/S70670, attach the media alignment label to the front bar, aligning the left end with the left end of the printer as shown. 14 | Installing the Take-up reel system: 1.

Setup Guide
Page 29
...Cartridges Before loading the ink cartridges, you need to charge and discharge the cleaning liquid. 3. Note: If you selected the 4-color (S50670) or 8-color (S70670) Color Mode, you will not need to use the Replacement Cartridges to fill in the empty cartridge slots.These cartridges do not need ... down to lock it in them and will first need to wash the print head. English Choosing a Color Mode (S50670 and S70670 only) | 27 Choosing a Color Mode (S50670 and S70670 only) Turn the printer on and configure the initial settings such as the ink cartridges for more colors, you must...
...Cartridges Before loading the ink cartridges, you need to charge and discharge the cleaning liquid. 3. Note: If you selected the 4-color (S50670) or 8-color (S70670) Color Mode, you will not need to use the Replacement Cartridges to fill in the empty cartridge slots.These cartridges do not need ... down to lock it in them and will first need to wash the print head. English Choosing a Color Mode (S50670 and S70670 only) | 27 Choosing a Color Mode (S50670 and S70670 only) Turn the printer on and configure the initial settings such as the ink cartridges for more colors, you must...
Setup Guide
Page 31
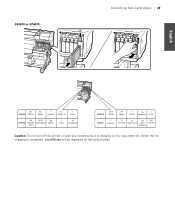
When the ink charging is charging or you may waste ink. S50670 or S70670: Installing Ink Cartridges | 29 English WH S50670 (White) BK (Black) Y M (Yellow) (Magenta) C (Cyan) MS LK/GY BK S70670 (Metallic (Light Black) (Black) Silver) C (Cyan) M (Magenta) S50670 WH (White) BBKK ((BBllaacckk)) Y M C (Yellow) (Magenta) (Cyan) S70670 Y (Yellow) O LC LM WH (Orange) (Light Cyan) (Light (White) Magenta) Caution: Do not turn off the printer or open any covers when it is completed, Load Media will be displayed on the control panel.
When the ink charging is charging or you may waste ink. S50670 or S70670: Installing Ink Cartridges | 29 English WH S50670 (White) BK (Black) Y M (Yellow) (Magenta) C (Cyan) MS LK/GY BK S70670 (Metallic (Light Black) (Black) Silver) C (Cyan) M (Magenta) S50670 WH (White) BBKK ((BBllaacckk)) Y M C (Yellow) (Magenta) (Cyan) S70670 Y (Yellow) O LC LM WH (Orange) (Light Cyan) (Light (White) Magenta) Caution: Do not turn off the printer or open any covers when it is completed, Load Media will be displayed on the control panel.
User Manual
Page 3
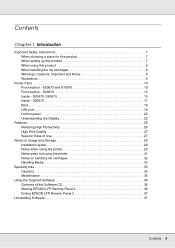
S30670 13 Inside - S70670, S50670 15 Inside - S30670 17 Back 18 LAN port 19 Control panel 20 Understanding the Display 22 Features 26 Realizing High Productivity 26 High Print Quality ... 32 Handling Media 33 Specialty Inks 35 Cautions 35 Maintenance 35 Using the Supplied Software 36 Contents of the Software CD 36 Starting EPSON LFP Remote Panel 2 36 Exiting EPSON LFP Remote Panel 2 37 Uninstalling Software 37 Contents 3 Contents Chapter 1 Introduction Important Safety Instructions 7 When choosing a place for this product 7 When setting...
S30670 13 Inside - S70670, S50670 15 Inside - S30670 17 Back 18 LAN port 19 Control panel 20 Understanding the Display 22 Features 26 Realizing High Productivity 26 High Print Quality ... 32 Handling Media 33 Specialty Inks 35 Cautions 35 Maintenance 35 Using the Supplied Software 36 Contents of the Software CD 36 Starting EPSON LFP Remote Panel 2 36 Exiting EPSON LFP Remote Panel 2 37 Uninstalling Software 37 Contents 3 Contents Chapter 1 Introduction Important Safety Instructions 7 When choosing a place for this product 7 When setting...
User Manual
Page 4
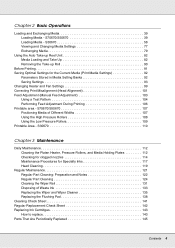
... Alignment 101 Feed Adjustment (Manual Feed Adjustment 103 Using a Test Pattern 104 Performing Feed Adjustment During Printing 106 Printable area - S70670/S50670 107 Positioning Media of Waste Ink 133 Replacing the Wiper and Wiper Cleaner 135 Replacing the Flushing Pad 138 Cleaning Check Sheet 141... to replace 143 Parts That Are Periodically Replaced 145 Contents 4 Chapter 2 Basic Operations Loading and Exchanging Media 39 Loading Media - S70670/S50670 39 Loading Media - S30670 58 Viewing and Changing Media Settings 77 Exchanging Media 79 Using the Auto Take-up Reel Unit 82 ...
... Alignment 101 Feed Adjustment (Manual Feed Adjustment 103 Using a Test Pattern 104 Performing Feed Adjustment During Printing 106 Printable area - S70670/S50670 107 Positioning Media of Waste Ink 133 Replacing the Wiper and Wiper Cleaner 135 Replacing the Flushing Pad 138 Cleaning Check Sheet 141... to replace 143 Parts That Are Periodically Replaced 145 Contents 4 Chapter 2 Basic Operations Loading and Exchanging Media 39 Loading Media - S70670/S50670 39 Loading Media - S30670 58 Viewing and Changing Media Settings 77 Exchanging Media 79 Using the Auto Take-up Reel Unit 82 ...