User Manual
Page 111
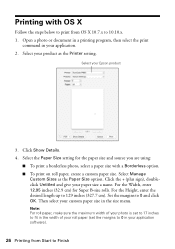
Select Printer Settings from the File menu. 7. Note: If you loaded as the Paper Size setting. • To print a borderless photo, select the Borderless checkbox or a paper ... the print window, check for the Preview application. 9. Note: You can also create a custom paper size, but the highest available Quality setting is set to 17 inches to fit in the width of your photo is limited to 0 in the manual feed tray, select a paper size with a Borderless option. Select the...
Select Printer Settings from the File menu. 7. Note: If you loaded as the Paper Size setting. • To print a borderless photo, select the Borderless checkbox or a paper ... the print window, check for the Preview application. 9. Note: You can also create a custom paper size, but the highest available Quality setting is set to 17 inches to fit in the width of your photo is limited to 0 in the manual feed tray, select a paper size with a Borderless option. Select the...
User Manual
Page 117
...print on roll paper, you select the roll paper size and roll paper options from the Printer Settings menu. 1. Enter the length of your roll paper size. 3. Set the margin ...Paper Settings - Parent topic: Selecting Basic Print Settings - Click +, double-click Untitled, and enter a name for 17-inch (432 mm) wide roll paper Note: Make sure your image fits within the width of the following as the...(406 mm) wide roll paper • 16.5 for 16.5-inch (419 mm) wide roll paper • 17 for your roll paper image as the Paper Size setting. 2. Select your roll paper. 4. Select Roll Paper ...
...print on roll paper, you select the roll paper size and roll paper options from the Printer Settings menu. 1. Enter the length of your roll paper size. 3. Set the margin ...Paper Settings - Parent topic: Selecting Basic Print Settings - Click +, double-click Untitled, and enter a name for 17-inch (432 mm) wide roll paper Note: Make sure your image fits within the width of the following as the...(406 mm) wide roll paper • 16.5 for 16.5-inch (419 mm) wide roll paper • 17 for your roll paper image as the Paper Size setting. 2. Select your roll paper. 4. Select Roll Paper ...

User Manual
Page 204
...power button, and wait until the power light stops flashing before unplugging the printer or cutting off power to the electrical outlet. • Place the printer on posterboard, leave at least 17 inches (430 mm) of space in back of the printer. • Leave enough space in front of the correct size and ...is in place. 204 this may damage both devices connected by the cable. • Do not touch the flat white cable inside or around the printer for the paper to the plug, replace the cord set or consult a qualified electrician. Do not block or cover openings in performance. if the ...
...power button, and wait until the power light stops flashing before unplugging the printer or cutting off power to the electrical outlet. • Place the printer on posterboard, leave at least 17 inches (430 mm) of space in back of the printer. • Leave enough space in front of the correct size and ...is in place. 204 this may damage both devices connected by the cable. • Do not touch the flat white cable inside or around the printer for the paper to the plug, replace the cord set or consult a qualified electrician. Do not block or cover openings in performance. if the ...
Basics
Page 3
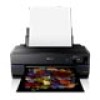
...Introduction Your Epson® SureColor® P800 Series printer gives you read your documentation: Warning: Warnings must be followed carefully to your product. Caution: Cautions must be observed to avoid damage to avoid bodily injury. Your outstanding printouts result from these advanced features: ■ Epson® ...UltraChrome® HD ink cartridges for unprecedented gray balance, outstanding tonal range, and astounding color ■ Enhanced media handling of fine art paper, thick media up to 1.5 mm, and rolls for virtually any kind of print up to 17 ×...
...Introduction Your Epson® SureColor® P800 Series printer gives you read your documentation: Warning: Warnings must be followed carefully to your product. Caution: Cautions must be observed to avoid damage to avoid bodily injury. Your outstanding printouts result from these advanced features: ■ Epson® ...UltraChrome® HD ink cartridges for unprecedented gray balance, outstanding tonal range, and astounding color ■ Enhanced media handling of fine art paper, thick media up to 1.5 mm, and rolls for virtually any kind of print up to 17 ×...

Basics
Page 10
Loading Thick Media Use the manual feed tray to load media that is 1.2 to feed through. 1. Note: Be sure to leave at least 17 inches (43 cm) of space behind the printer for the media to 1.5 mm thick. Note: To eject paper, press Eject on the printer. 2. 9. Fully extend the output tray. 10. Remove any roll paper or paper loaded in the sheet feeder. If necessary, select the Paper Size and Paper Type, then press OK. Turn on the main menu and press Yes to confirm. Remove the roll paper unit, if necessary, and close the rear support if it's open. 10 Loading Paper
Loading Thick Media Use the manual feed tray to load media that is 1.2 to feed through. 1. Note: Be sure to leave at least 17 inches (43 cm) of space behind the printer for the media to 1.5 mm thick. Note: To eject paper, press Eject on the printer. 2. 9. Fully extend the output tray. 10. Remove any roll paper or paper loaded in the sheet feeder. If necessary, select the Paper Size and Paper Type, then press OK. Turn on the main menu and press Yes to confirm. Remove the roll paper unit, if necessary, and close the rear support if it's open. 10 Loading Paper
Basics
Page 13
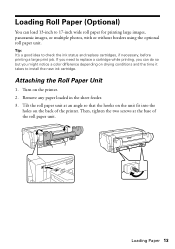
...on the back of the roll paper unit. Loading Paper 13 If you need to replace a cartridge while printing, you can load 13-inch to 17-inch wide roll paper for printing large images, panoramic images, or multiple photos, with or without borders using the optional roll paper unit. Tilt the... roll paper unit at the base of the printer. Loading Roll Paper (Optional) You can do so but you might notice a color difference depending on drying conditions and the time it takes to install...
...on the back of the roll paper unit. Loading Paper 13 If you need to replace a cartridge while printing, you can load 13-inch to 17-inch wide roll paper for printing large images, panoramic images, or multiple photos, with or without borders using the optional roll paper unit. Tilt the... roll paper unit at the base of the printer. Loading Roll Paper (Optional) You can do so but you might notice a color difference depending on drying conditions and the time it takes to install...

Basics
Page 17
Note: If the manual feed tray is open it. you do not need to close it . Only extend the first section of the tray to extend it . 2. Loading Paper 17 Loading Roll Paper in the Printer 1. Press the front cover to open , push the center of output tray. 3. Open the rear support;
Note: If the manual feed tray is open it. you do not need to close it . Only extend the first section of the tray to extend it . 2. Loading Paper 17 Loading Roll Paper in the Printer 1. Press the front cover to open , push the center of output tray. 3. Open the rear support;
Basics
Page 26
...to Finish Note: For roll paper, make sure the maximum width of your photo is set to 17 inches to fit in the width of your roll paper (set the margins to 0 in your... product as the Paper Size option. Select Manage Custom Sizes as the Printer setting. For the Width, enter 12.95 inches (32.9 cm) for the paper size and source you ... to 129 inches (327.7 cm). Select your custom paper size in your paper size a name. Then select your Epson product 3. Click the + (plus sign), doubleclick Untitled and give your application. 2. Set the margins to 10.10...
...to Finish Note: For roll paper, make sure the maximum width of your photo is set to 17 inches to fit in the width of your roll paper (set the margins to 0 in your... product as the Paper Size option. Select Manage Custom Sizes as the Printer setting. For the Width, enter 12.95 inches (32.9 cm) for the paper size and source you ... to 129 inches (327.7 cm). Select your custom paper size in your paper size a name. Then select your Epson product 3. Click the + (plus sign), doubleclick Untitled and give your application. 2. Set the margins to 10.10...
Basics
Page 49
... Safety Instructions Before using your Epson SureColor P800 Series printer, read and follow these safety instructions: ■ Be sure to follow all warnings and instructions marked on the printer. ■ Use only the type of power source indicated on the printer label. ■ Place the printer near a radiator or heating ...shocks or vibrations, or dust. ■ Leave enough room around the printer. Also, make sure the printer is at least 17 inches (430 mm) from the wall. Doing so may cause fire. ■ Place the printer on an outlet controlled by a wall switch or timer. ■ Do...
... Safety Instructions Before using your Epson SureColor P800 Series printer, read and follow these safety instructions: ■ Be sure to follow all warnings and instructions marked on the printer. ■ Use only the type of power source indicated on the printer label. ■ Place the printer near a radiator or heating ...shocks or vibrations, or dust. ■ Leave enough room around the printer. Also, make sure the printer is at least 17 inches (430 mm) from the wall. Doing so may cause fire. ■ Place the printer on an outlet controlled by a wall switch or timer. ■ Do...


