User Manual
Page 4
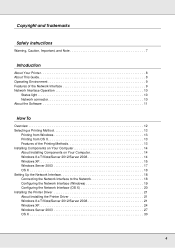
... 10 Status light 10 Network connector 10 About the Software 11 How To Overview 12 Selecting a Printing Method 13 Printing from Windows 13 Printing from OS X 13 Features of the Printing Methods 13 Installing Components on Your Computer 14 About Installing Components on Your Computer 14 Windows 8.x/7/Vista/Server 2012/Server 2008 14 Windows XP 15 Windows Server 2003 17 OS X 18 Setting Up the Network Interface 18 Connecting the Network...
... 10 Status light 10 Network connector 10 About the Software 11 How To Overview 12 Selecting a Printing Method 13 Printing from Windows 13 Printing from OS X 13 Features of the Printing Methods 13 Installing Components on Your Computer 14 About Installing Components on Your Computer 14 Windows 8.x/7/Vista/Server 2012/Server 2008 14 Windows XP 15 Windows Server 2003 17 OS X 18 Setting Up the Network Interface 18 Connecting the Network...
User Manual
Page 8
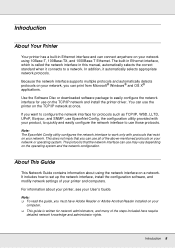
... network and install the printer driver. If you can print from Microsoft® Windows® and OS X® applications. The built-in Ethernet interface, which is written for use EpsonNet Config, the configuration utility provided with protocols that exist on your User's Guide. You can use those protocols. Note: The EpsonNet Config utility configures the network interface to work only with your product, to quickly and easily configure...
... network and install the printer driver. If you can print from Microsoft® Windows® and OS X® applications. The built-in Ethernet interface, which is written for use EpsonNet Config, the configuration utility provided with protocols that exist on your User's Guide. You can use those protocols. Note: The EpsonNet Config utility configures the network interface to work only with your product, to quickly and easily configure...
User Manual
Page 12
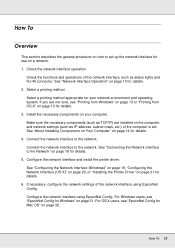
... status lights and RJ-45 connector. If necessary, configure the network settings of the computer is set up the network interface for use on page 14 for details. 3. How To 12 Connect the network interface to the network. Configure the network interface and install the printer driver. See "Configuring the Network Interface (Windows)" on page 19, "Configuring the Network Interface (OS X)" on page 20, or "Installing the Printer Driver" on page 32. For OS X users, see "EpsonNet Config for Windows...
... status lights and RJ-45 connector. If necessary, configure the network settings of the computer is set up the network interface for use on page 14 for details. 3. How To 12 Connect the network interface to the network. Configure the network interface and install the printer driver. See "Configuring the Network Interface (Windows)" on page 19, "Configuring the Network Interface (OS X)" on page 20, or "Installing the Printer Driver" on page 32. For OS X users, see "EpsonNet Config for Windows...
User Manual
Page 19
... disable the Bonjour setting, use the higher speed. 3. If you 're running the Software Disc and the software installer screen does not appear, double-click setup.exe on your printer. Note: You can configure the network interface to use on the TCP/IP network and also install the printer driver using the Software Disc shipped with your printer. Turn on the Software Disc. 4. After the status lights go off , print a network status sheet. otherwise the network interface may not work correctly...
... disable the Bonjour setting, use the higher speed. 3. If you 're running the Software Disc and the software installer screen does not appear, double-click setup.exe on your printer. Note: You can configure the network interface to use on the TCP/IP network and also install the printer driver using the Software Disc shipped with your printer. Turn on the Software Disc. 4. After the status lights go off , print a network status sheet. otherwise the network interface may not work correctly...
User Manual
Page 21
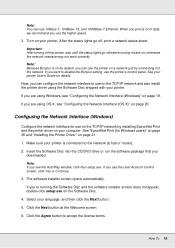
... configure the settings. Click the + button to start the Add Printer wizard. Select the desired printer model that is connected with the desired connection, click More Printers, select the desired connection from the drop-down list, and then select the printer model. 5. See "EpsonNet Print (for Windows users)" on page 36 for your printer is different. Open the Control Panel, and then click View devices and printers (Windows 8.x/7/Server 2012) or Printers (Windows Vista/Server 2008). 2. Open Print & Fax. 3. Installing...
... configure the settings. Click the + button to start the Add Printer wizard. Select the desired printer model that is connected with the desired connection, click More Printers, select the desired connection from the drop-down list, and then select the printer model. 5. See "EpsonNet Print (for Windows users)" on page 36 for your printer is different. Open the Control Panel, and then click View devices and printers (Windows 8.x/7/Server 2012) or Printers (Windows Vista/Server 2008). 2. Open Print & Fax. 3. Installing...
User Manual
Page 23
... radio button and then select EPSON Network Printer. Click Browse. 5. 6. Close the software installer screen. 3. Insert the Software Disc shipped with the printer or run the software package that you to select either Keep existing driver or Replace existing driver, be sure to the location of the printer, and then click Next. Double-click the WINX64 folder or the WINX86 folder depending on page 21 to \Common\Printer. O Software...
... radio button and then select EPSON Network Printer. Click Browse. 5. 6. Close the software installer screen. 3. Insert the Software Disc shipped with the printer or run the software package that you to select either Keep existing driver or Replace existing driver, be sure to the location of the printer, and then click Next. Double-click the WINX64 folder or the WINX86 folder depending on page 21 to \Common\Printer. O Software...

User Manual
Page 26
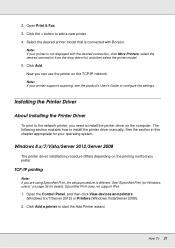
... Printer screen, click the Have Disk button. Click Finish. 8. See "Installing the printer driver" on your operating system. Insert the Software Disc shipped with the printer or run the software package that you to select either Keep existing driver or Replace existing driver, be sure to install the printer driver. The Install From Disk dialog box appears. 4. Double-click the WINX64 folder or the WINX86 folder depending on page...
... Printer screen, click the Have Disk button. Click Finish. 8. See "Installing the printer driver" on your operating system. Insert the Software Disc shipped with the printer or run the software package that you to select either Keep existing driver or Replace existing driver, be sure to install the printer driver. The Install From Disk dialog box appears. 4. Double-click the WINX64 folder or the WINX86 folder depending on page...
User Manual
Page 29
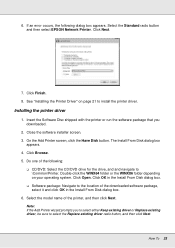
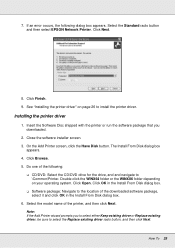
... appears. Click Next. 8. Click Open. On the Add Printer screen, click the Have Disk button. Click Browse. 5. Close the software installer screen. 3. Do one of the printer, and then click Next. See "Installing the printer driver" on your operating system. Installing the printer driver 1. 7. Select the Standard radio button and then select EPSON Network Printer. Double-click the WINX64 folder or the WINX86 folder depending on page 26 to \Common...
... appears. Click Next. 8. Click Open. On the Add Printer screen, click the Have Disk button. Click Browse. 5. Close the software installer screen. 3. Do one of the printer, and then click Next. See "Installing the printer driver" on your operating system. Installing the printer driver 1. 7. Select the Standard radio button and then select EPSON Network Printer. Double-click the WINX64 folder or the WINX86 folder depending on page 26 to \Common...
User Manual
Page 30
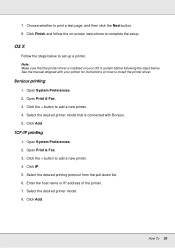
... 30 Bonjour printing 1. Open System Preferences. 2. Click the + button to set up a printer. Select the desired printer model. 8. Click Add. See the manual shipped with Bonjour. 5. Click Add. Open System Preferences. 2. Open Print & Fax. 3. Note: Make sure that is installed on your printer for instructions on -screen instructions to add a new printer. 4. Click the + button to complete the setup. Click IP. 5. Open Print & Fax. 3. 7. Click Finish and follow the on how to print a test page, and...
... 30 Bonjour printing 1. Open System Preferences. 2. Click the + button to set up a printer. Select the desired printer model. 8. Click Add. See the manual shipped with Bonjour. 5. Click Add. Open System Preferences. 2. Open Print & Fax. 3. Note: Make sure that is installed on your printer for instructions on -screen instructions to add a new printer. 4. Click the + button to complete the setup. Click IP. 5. Open Print & Fax. 3. 7. Click Finish and follow the on how to print a test page, and...
User Manual
Page 40
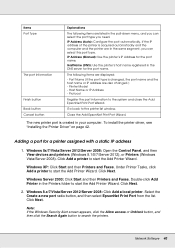
... then Printers and Faxes. Windows 8.x/7/Vista/Server 2012/Server 2008: Click Add a local printer. Select the Create a new port radio button, and then select EpsonNet Print Port from the list. Items Port Type The port Information Finish button Back button Cancel button Explanations The following items are listed in the pull-down menu, and you need. IP Address (Auto): Configure the port automatically. Printer Model - Under Printer Tasks, click Add a printer to start the Add Printer Wizard. Double-click Add Printer...
... then Printers and Faxes. Windows 8.x/7/Vista/Server 2012/Server 2008: Click Add a local printer. Select the Create a new port radio button, and then select EpsonNet Print Port from the list. Items Port Type The port Information Finish button Back button Cancel button Explanations The following items are listed in the pull-down menu, and you need. IP Address (Auto): Configure the port automatically. Printer Model - Under Printer Tasks, click Add a printer to start the Add Printer Wizard. Double-click Add Printer...

User Manual
Page 46
... time before a timeout. To print a network status sheet, see the printer's User Guide. Troubleshooting 46 Refresh the status by selecting Refresh from the Tool menu, and then select Timeout. The message "EpsonNet Config cannot be sure to print a network status sheet that doing so can check the IP address on a status sheet. Cause TCP/IP is not installed on the computer, but its IP address is installed." Set a correct IP address for Windows or Mac OS, or the printer's control panel...
... time before a timeout. To print a network status sheet, see the printer's User Guide. Troubleshooting 46 Refresh the status by selecting Refresh from the Tool menu, and then select Timeout. The message "EpsonNet Config cannot be sure to print a network status sheet that doing so can check the IP address on a status sheet. Cause TCP/IP is not installed on the computer, but its IP address is installed." Set a correct IP address for Windows or Mac OS, or the printer's control panel...

Users Guide
Page 3
... ...23 Loading Media...24 Viewing and Changing Media Settings 39 Saving Sets of Media Settings...41 Printable Area and Media Size Checking 42 Printing the Amount of Media Remaining 44 Aligning the Print Head...45 Media Feed Adjustment ...46 Adjusting the Media Feed Automatically 47 Adjusting the Media Feed Manually 48 Adjusting the Media Feed During Printing 50 Adjusting Heating and Drying During Printing 50 Cutting Media ...51 Using the Auto Take-up Reel ...54 About the Auto Take-up Reel ...55 3 Contents Epson SureColor F9470/F9470H User's Guide 7 Introduction to Your Printer...
... ...23 Loading Media...24 Viewing and Changing Media Settings 39 Saving Sets of Media Settings...41 Printable Area and Media Size Checking 42 Printing the Amount of Media Remaining 44 Aligning the Print Head...45 Media Feed Adjustment ...46 Adjusting the Media Feed Automatically 47 Adjusting the Media Feed Manually 48 Adjusting the Media Feed During Printing 50 Adjusting Heating and Drying During Printing 50 Cutting Media ...51 Using the Auto Take-up Reel ...54 About the Auto Take-up Reel ...55 3 Contents Epson SureColor F9470/F9470H User's Guide 7 Introduction to Your Printer...

Users Guide
Page 46
... references Media Setup Menu Settings Media Feed Adjustment If your printouts contain horizontal banding, uneven tint, or stripes, you plan to print on and selected all the color patterns. You do this step for all the options you should use for printing. Before adjusting the feed, make sure you have correctly loaded the media you need . Repeat this by printing and examining a test pattern, and then selecting the feed adjustments you use for printing. 46 8. Adjust the feed using the auto...
... references Media Setup Menu Settings Media Feed Adjustment If your printouts contain horizontal banding, uneven tint, or stripes, you plan to print on and selected all the color patterns. You do this step for all the options you should use for printing. Before adjusting the feed, make sure you have correctly loaded the media you need . Repeat this by printing and examining a test pattern, and then selecting the feed adjustments you use for printing. 46 8. Adjust the feed using the auto...

Users Guide
Page 119
... gaps or the pattern is clean and you resume printing. Note: You can continue printing. Note: If colors are faint or have gaps, you cannot clear the clogged nozzles after cleaning the print head, manually clean around the print head inside the product. 119 If there are incorrect. Parent topic: Print Head Maintenance Related references Printer Setup Menu Settings Maintenance Menu Settings Related tasks Loading Media Cleaning the Print Head Cleaning the Print Head If printouts are faint or missing even after cleaning with the light level. Nozzles need cleaning 5.
... gaps or the pattern is clean and you resume printing. Note: You can continue printing. Note: If colors are faint or have gaps, you cannot clear the clogged nozzles after cleaning the print head, manually clean around the print head inside the product. 119 If there are incorrect. Parent topic: Print Head Maintenance Related references Printer Setup Menu Settings Maintenance Menu Settings Related tasks Loading Media Cleaning the Print Head Cleaning the Print Head If printouts are faint or missing even after cleaning with the light level. Nozzles need cleaning 5.

Users Guide
Page 157
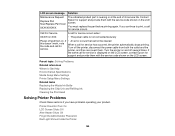
... the ink tank. F/W Install Error Firmware update failed. LCD screen message Solution Chip unit error Chip unit not recognized. Then reinstall the firmware again. Clogged nozzles detected. Press the pause/cancel button and select Job Cancel to cancel printing. Contact Epson for the after heater is not replaced. Replace chip unit. If the error recurs, replace the chip unit with chip unit that supports this printer. Make sure the ink is nearing end of service...
... the ink tank. F/W Install Error Firmware update failed. LCD screen message Solution Chip unit error Chip unit not recognized. Then reinstall the firmware again. Clogged nozzles detected. Press the pause/cancel button and select Job Cancel to cancel printing. Contact Epson for the after heater is not replaced. Replace chip unit. If the error recurs, replace the chip unit with chip unit that supports this printer. Make sure the ink is nearing end of service...
Users Guide
Page 159
... part before printing again. Printer Does Not Turn On LCD Screen Shuts Off After Heater Shuts Off Forgot the Administrator Password Red Light Shines Inside the Printer 159 LCD screen message Solution Maintenance Request Replace Part Now/Replace Part Soon XXXXXXXXXX The indicated product part is not connected securely Power off and then on. If you have problems operating your product. Parent topic: Solving Problems Related references Where to Get Help Environmental Specifications Media Setup Menu Settings Printer Setup Menu Settings...
... part before printing again. Printer Does Not Turn On LCD Screen Shuts Off After Heater Shuts Off Forgot the Administrator Password Red Light Shines Inside the Printer 159 LCD screen message Solution Maintenance Request Replace Part Now/Replace Part Soon XXXXXXXXXX The indicated product part is not connected securely Power off and then on. If you have problems operating your product. Parent topic: Solving Problems Related references Where to Get Help Environmental Specifications Media Setup Menu Settings Printer Setup Menu Settings...

Users Guide
Page 192
... select OK, and click Yes to the Apps screen and select Control Panel > Programs > Programs and Features. Disconnect any on-screen instructions. 4. Note: If you see a User Account Control window, click Yes or Continue. Select your Epson product, then select Uninstall/Change. In the next window, select your software. Then follow any interface cables. 3. Uninstalling Product Software - Select your product again, if necessary, then...
... select OK, and click Yes to the Apps screen and select Control Panel > Programs > Programs and Features. Disconnect any on-screen instructions. 4. Note: If you see a User Account Control window, click Yes or Continue. Select your Epson product, then select Uninstall/Change. In the next window, select your software. Then follow any interface cables. 3. Uninstalling Product Software - Select your product again, if necessary, then...

Users Guide
Page 200
... fuses in the wrong orientation may damage both devices connected by the cable. • Do not move the print head by hand; Inserting a connector in the plug, make sure the total ampere rating of the correct size and rating. • Always turn off power to the electrical outlet. • If you use an extension cord with the product, make sure you replace them with...
... fuses in the wrong orientation may damage both devices connected by the cable. • Do not move the print head by hand; Inserting a connector in the plug, make sure the total ampere rating of the correct size and rating. • Always turn off power to the electrical outlet. • If you use an extension cord with the product, make sure you replace them with...
Notices and Warranty for Latin America
Page 7
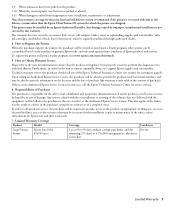
... Obtain Warranty Service Please refer to the user documentation to ensure that warranty coverage for the print head and ink delivery system is terminated if the printer is not covered by improper, unauthorized installation is ever used with the re-installation or resetting of the software that may be billed to the purchaser at the rates in order for the installation, repair or maintenance of the...
... Obtain Warranty Service Please refer to the user documentation to ensure that warranty coverage for the print head and ink delivery system is terminated if the printer is not covered by improper, unauthorized installation is ever used with the re-installation or resetting of the software that may be billed to the purchaser at the rates in order for the installation, repair or maintenance of the...

Warranty Statement for U.S. and Canada
Page 3
... to receive, unpack, and install the replacement Printer, and prepare the defective Printer for Commercial Products 1. If service is required, the on -site. 3 Terms and Conditions Limited Warranty for return shipment by this service is being set up. On-Site Response: If the Printer needs hardware repair and you call the toll-free Epson Preferred support line identified in the user manual or documentation provided by the serial number.
... to receive, unpack, and install the replacement Printer, and prepare the defective Printer for Commercial Products 1. If service is required, the on -site. 3 Terms and Conditions Limited Warranty for return shipment by this service is being set up. On-Site Response: If the Printer needs hardware repair and you call the toll-free Epson Preferred support line identified in the user manual or documentation provided by the serial number.


