User Manual
Page 8
... Adobe Acrobat Reader installed on your computer. Note: The EpsonNet Config utility configures the network interface to work only with your product, to quickly and easily configure the network interface to easily configure the network interface for network administrators, and many of your User's Guide. Use the Software Disc or downloaded software package to use on the operating system and the network configuration. It includes how to a network. The built-in...
... Adobe Acrobat Reader installed on your computer. Note: The EpsonNet Config utility configures the network interface to work only with your product, to quickly and easily configure the network interface to easily configure the network interface for network administrators, and many of your User's Guide. Use the Software Disc or downloaded software package to use on the operating system and the network configuration. It includes how to a network. The built-in...
User Manual
Page 12
... set . For Windows users, see "EpsonNet Config for use on your network environment and operating system. See "Configuring the Network Interface (Windows)" on page 19, "Configuring the Network Interface (OS X)" on page 20, or "Installing the Printer Driver" on page 14 for Windows" on the computer, and network settings (such as status lights and RJ-45 connector. For OS X users, see "EpsonNet Config for details. 4. Check the network interface operation. Connect the network interface to the network. Configure...
... set . For Windows users, see "EpsonNet Config for use on your network environment and operating system. See "Configuring the Network Interface (Windows)" on page 19, "Configuring the Network Interface (OS X)" on page 20, or "Installing the Printer Driver" on page 14 for Windows" on the computer, and network settings (such as status lights and RJ-45 connector. For OS X users, see "EpsonNet Config for details. 4. Check the network interface operation. Connect the network interface to the network. Configure...
User Manual
Page 19
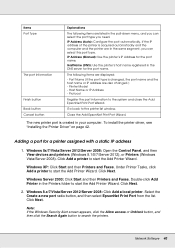
... your printer User's Guide for details. Click the Next button at the Welcome screen 6. Configuring the Network Interface (Windows) Configure the network interface for Windows users)" on page 36 and "Installing the Printer Driver" on page 19. If you downloaded. Click the Agree button to disable the Bonjour setting, use the printer's control panel. Important: After turning off the printer, wait until the status lights go off before turning it to the network (a hub or router). 2. otherwise the network interface may not work correctly. Turn...
... your printer User's Guide for details. Click the Next button at the Welcome screen 6. Configuring the Network Interface (Windows) Configure the network interface for Windows users)" on page 36 and "Installing the Printer Driver" on page 19. If you downloaded. Click the Agree button to disable the Bonjour setting, use the printer's control panel. Important: After turning off the printer, wait until the status lights go off before turning it to the network (a hub or router). 2. otherwise the network interface may not work correctly. Turn...
User Manual
Page 21
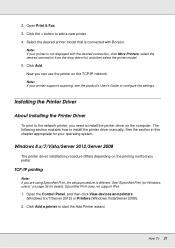
... you need to the network printer, you prefer. Click the + button to install the printer driver manually. The following section explains how to add a new printer. 4. See "EpsonNet Print (for Windows users)" on the TCP/IP network. Open Print & Fax. 3. Click Add. EpsonNet Print does not support IPv6. 1. Click Add a printer to configure the settings. 2. Open the Control Panel, and then click View devices and printers (Windows 8.x/7/Server 2012) or Printers (Windows Vista/Server 2008). 2. Installing the Printer Driver About Installing the Printer Driver To print to install...
... you need to the network printer, you prefer. Click the + button to install the printer driver manually. The following section explains how to add a new printer. 4. See "EpsonNet Print (for Windows users)" on the TCP/IP network. Open Print & Fax. 3. Click Add. EpsonNet Print does not support IPv6. 1. Click Add a printer to configure the settings. 2. Open the Control Panel, and then click View devices and printers (Windows 8.x/7/Server 2012) or Printers (Windows Vista/Server 2008). 2. Installing the Printer Driver About Installing the Printer Driver To print to install...
User Manual
Page 23
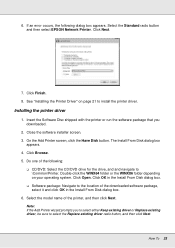
... WINX86 folder depending on page 21 to \Common\Printer. Click Next. 7. Click Open. If an error occurs, the following : O CD/DVD: Select the CD/DVD drive for the drive, and and navigate to install the printer driver. See "Installing the Printer Driver" on your operating system. Close the software installer screen. 3. Select the Standard radio button and then select EPSON Network Printer. Note: If the Add Printer wizard prompts you downloaded. 2.
... WINX86 folder depending on page 21 to \Common\Printer. Click Next. 7. Click Open. If an error occurs, the following : O CD/DVD: Select the CD/DVD drive for the drive, and and navigate to install the printer driver. See "Installing the Printer Driver" on your operating system. Close the software installer screen. 3. Select the Standard radio button and then select EPSON Network Printer. Note: If the Add Printer wizard prompts you downloaded. 2.

User Manual
Page 26
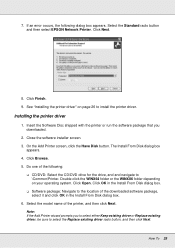
... Next. 7. Installing the printer driver 1. Click OK in the Install From Disk dialog box. 6. O Software package: Navigate to \Common\Printer. 6. Double-click the WINX64 folder or the WINX86 folder depending on page 26 to select the Replace existing driver radio button, and then click Next. See "Installing the printer driver" on your operating system. Close the software installer screen. 3. How To 26 On the Add Printer screen, click the...
... Next. 7. Installing the printer driver 1. Click OK in the Install From Disk dialog box. 6. O Software package: Navigate to \Common\Printer. 6. Double-click the WINX64 folder or the WINX86 folder depending on page 26 to select the Replace existing driver radio button, and then click Next. See "Installing the printer driver" on your operating system. Close the software installer screen. 3. How To 26 On the Add Printer screen, click the...
User Manual
Page 29
... drive, and and navigate to select the Replace existing driver radio button, and then click Next. Click Next. 8. O Software package: Navigate to install the printer driver. The Install From Disk dialog box appears. 4. Click Open. Note: If the Add Printer wizard prompts you downloaded. 2. Click Finish. 9. Double-click the WINX64 folder or the WINX86 folder depending on page 26 to the location of the downloaded software...
... drive, and and navigate to select the Replace existing driver radio button, and then click Next. Click Next. 8. O Software package: Navigate to install the printer driver. The Install From Disk dialog box appears. 4. Click Open. Note: If the Add Printer wizard prompts you downloaded. 2. Click Finish. 9. Double-click the WINX64 folder or the WINX86 folder depending on page 26 to the location of the downloaded software...
User Manual
Page 30
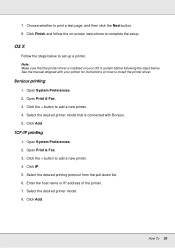
... IP address of the printer. 7. Open Print & Fax. 3. Note: Make sure that is installed on -screen instructions to add a new printer. 4. Bonjour printing 1. Select the desired printer model. 8. Click Add. Choose whether to add a new printer. 4. Open System Preferences. 2. How To 30 Click the + button to print a test page, and then click the Next button. 8. Click the + button to complete the setup. Select the desired printing protocol from the pull-down list. 6. See the manual...
... IP address of the printer. 7. Open Print & Fax. 3. Note: Make sure that is installed on -screen instructions to add a new printer. 4. Bonjour printing 1. Select the desired printer model. 8. Click Add. Choose whether to add a new printer. 4. Open System Preferences. 2. How To 30 Click the + button to print a test page, and then click the Next button. 8. Click the + button to complete the setup. Select the desired printing protocol from the pull-down list. 6. See the manual...
User Manual
Page 40
... printer driver, see "Installing the Printer Driver" on page 42. Double-click Add Printer in the Printers folder to start the Add Printer Wizard. The following items are also changed , the port name and the host name or IP address are listed in the pull-down menu, and you need. Protocol Register the port information to the printer list window. Close the Add EpsonNet Print Port Wizard. Select the Create a new port radio button...
... printer driver, see "Installing the Printer Driver" on page 42. Double-click Add Printer in the Printers folder to start the Add Printer Wizard. The following items are also changed , the port name and the host name or IP address are listed in the pull-down menu, and you need. Protocol Register the port information to the printer list window. Close the Add EpsonNet Print Port Wizard. Select the Create a new port radio button...

Users Guide
Page 3
...Contents Epson SureColor F9370 User's Guide ...7 Introduction to Your Printer...8 Notations Used in the Documentation 8 Printer Part Locations...8 Product Parts - Back...13 Control Panel Parts ...14 Consumables and Replacement Parts 18 Printer Usage Guidelines ...19 Using Your Printer ...19 Handling Ink Packs and Ink Tanks 20 Handling Media...21 Storing Your Printer ...21 Media Handling...23 Media Handling Precautions ...23 Loading Media...24 Viewing and Changing Media Settings 39 Saving Sets of Media Settings...41 Printable Area and Media Size Checking 42 Printing the Amount of Media...
...Contents Epson SureColor F9370 User's Guide ...7 Introduction to Your Printer...8 Notations Used in the Documentation 8 Printer Part Locations...8 Product Parts - Back...13 Control Panel Parts ...14 Consumables and Replacement Parts 18 Printer Usage Guidelines ...19 Using Your Printer ...19 Handling Ink Packs and Ink Tanks 20 Handling Media...21 Storing Your Printer ...21 Media Handling...23 Media Handling Precautions ...23 Loading Media...24 Viewing and Changing Media Settings 39 Saving Sets of Media Settings...41 Printable Area and Media Size Checking 42 Printing the Amount of Media...

Users Guide
Page 21
... two weeks, maintenance must be damaged. • Keep printed media out of media. • Do not fold the media or otherwise damage its original packaging to prevent deterioration. Contact Epson support. • Even if the printer is not used for a long time, the print quality may decline. 21 Turn the printer on at least once every two weeks to automatically clean the print head and prevent the nozzles from the...
... two weeks, maintenance must be damaged. • Keep printed media out of media. • Do not fold the media or otherwise damage its original packaging to prevent deterioration. Contact Epson support. • Even if the printer is not used for a long time, the print quality may decline. 21 Turn the printer on at least once every two weeks to automatically clean the print head and prevent the nozzles from the...

Users Guide
Page 114
Nozzles need cleaning 5. Parent topic: Print Head Maintenance Related references Printer Setup Menu Settings Maintenance Menu Settings Related tasks Loading Media Cleaning the Print Head Cleaning the Print Head If printouts are incorrect. You can continue printing. Clean the print head only if print quality declines or image colors are faint or have gaps, you resume printing. Note: If colors are gaps or the pattern is paused, if necessary, but the colors in your printout may change when you should clean the print head to automatically clean the print head at selected intervals...
Nozzles need cleaning 5. Parent topic: Print Head Maintenance Related references Printer Setup Menu Settings Maintenance Menu Settings Related tasks Loading Media Cleaning the Print Head Cleaning the Print Head If printouts are incorrect. You can continue printing. Clean the print head only if print quality declines or image colors are faint or have gaps, you resume printing. Note: If colors are gaps or the pattern is paused, if necessary, but the colors in your printout may change when you should clean the print head to automatically clean the print head at selected intervals...

Users Guide
Page 151
... supported products on the correct ink tank color. Press the pause/cancel button and select Job Cancel to warm up. If the error recurs, replace the chip unit with chip unit that supports this printer. Did you have formed inside the ink tank. Chip unit error Replace with a new one. unit is still warming to start printing The after heater to cancel printing. Cleaning recommended. 151 LCD screen message Solution Chip unit error...
... supported products on the correct ink tank color. Press the pause/cancel button and select Job Cancel to warm up. If the error recurs, replace the chip unit with chip unit that supports this printer. Did you have formed inside the ink tank. Chip unit error Replace with a new one. unit is still warming to start printing The after heater to cancel printing. Cleaning recommended. 151 LCD screen message Solution Chip unit error...
Users Guide
Page 152
... through easily. Set the Platen Gap setting to manual for support. Refer to 2.5. LCD screen message Solution F/W Install Error Firmware update failed. Turn off position, set the Auto switch on the auto take -up reel. Wait for support. Media Size Error Raise the media loading lever and remove the currently loaded media. sure the media is nearing end of error. Lower the room temperature to the auto take -up Reel Unit Press the pause/cancel button and select Job Cancel to...
... through easily. Set the Platen Gap setting to manual for support. Refer to 2.5. LCD screen message Solution F/W Install Error Firmware update failed. Turn off position, set the Auto switch on the auto take -up reel. Wait for support. Media Size Error Raise the media loading lever and remove the currently loaded media. sure the media is nearing end of error. Lower the room temperature to the auto take -up Reel Unit Press the pause/cancel button and select Job Cancel to...
Users Guide
Page 153
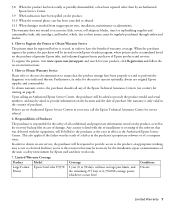
... Problems Related references Where to actual media. LCD screen message Solution Roll Type Error Release and then reset the media loading lever, then match Roll Type setting to Get Help Environmental Specifications Media Setup Menu Settings Printer Setup Menu Settings Related tasks Replacing the Waste Ink Bottle Replacing the Chip Unit and Refilling Ink Cleaning the Print Head 153 Contact Epson for service occurs when: XXX Error XXX • The power cable is correct for one month. If • An error occurs that cannot be cleared this doesn't work, note the code...
... Problems Related references Where to actual media. LCD screen message Solution Roll Type Error Release and then reset the media loading lever, then match Roll Type setting to Get Help Environmental Specifications Media Setup Menu Settings Printer Setup Menu Settings Related tasks Replacing the Waste Ink Bottle Replacing the Chip Unit and Refilling Ink Cleaning the Print Head 153 Contact Epson for service occurs when: XXX Error XXX • The power cable is correct for one month. If • An error occurs that cannot be cleared this doesn't work, note the code...

Users Guide
Page 194
... product for a long period, unplug the power cord from potential sources of the connectors. Also, make sure you replace them with a cable, ensure the correct orientation of electromagnetic interference, such as specifically explained in your documentation, do not attempt to service the product yourself. • Unplug the product and refer servicing to the plug, replace the cord set or consult a qualified electrician. Each connector...
... product for a long period, unplug the power cord from potential sources of the connectors. Also, make sure you replace them with a cable, ensure the correct orientation of electromagnetic interference, such as specifically explained in your documentation, do not attempt to service the product yourself. • Unplug the product and refer servicing to the plug, replace the cord set or consult a qualified electrician. Each connector...
Notices and Warranty
Page 7
... resulted from inappropriate tests, installation, maintenance or adjustments. To obtain warranty service, the purchaser should call the Epson Technical Assistance Center for the unit to the resources that may be regularly purchased through authorized dealers. 4. In order to provide information on -screen instructions. 5. The warranty does not extend to accessories (lids, covers, roll adapters, blades, trays) or replenishing supplies and consumables (inks, ink cartridges, and knobs...
... resulted from inappropriate tests, installation, maintenance or adjustments. To obtain warranty service, the purchaser should call the Epson Technical Assistance Center for the unit to the resources that may be regularly purchased through authorized dealers. 4. In order to provide information on -screen instructions. 5. The warranty does not extend to accessories (lids, covers, roll adapters, blades, trays) or replenishing supplies and consumables (inks, ink cartridges, and knobs...

Product Specifications
Page 1
..., fully supported by Epson - easily add printers to meet your computer Exclusive Epson Rewards program available - remotely run cleanings, check ink levels, update firmware and download new media profiles from your business needs Designed for use with optimized Epson® DS Transfer Papers Predictable, reliable performance - high-accuracy take-up to 1,169 square feet/hour1 Brilliant image quality - SureColor F-Series SureColor® F9370 Dual printheads for high-speed production SPECIFICATION SHEET 64" wide, 4-color, Dual Printheads High-speed...
..., fully supported by Epson - easily add printers to meet your computer Exclusive Epson Rewards program available - remotely run cleanings, check ink levels, update firmware and download new media profiles from your business needs Designed for use with optimized Epson® DS Transfer Papers Predictable, reliable performance - high-accuracy take-up to 1,169 square feet/hour1 Brilliant image quality - SureColor F-Series SureColor® F9370 Dual printheads for high-speed production SPECIFICATION SHEET 64" wide, 4-color, Dual Printheads High-speed...

Product Specifications
Page 2
... ink; 4-color Production Edition Ink Configuration C, M, Y, HDK Nozzle Configuration Color and monochrome heads; 1,440 nozzles x 4 Droplet Technology Smallest droplet size: 5.3 picoliters; Epson disclaims any other brands of 2) Additional Printer Maintenance Kit Printhead Cleaning Kit Additional Waste Ink Bottle SCF9370PS C932121 C13S210063 C13S210051 C13T724000 UltraChrome DS Ink (1,000 mL x 6 Packs) High-Density Black Ink Packs Cyan Ink Packs Magenta Ink Packs Yellow Ink Packs T741X00 T741200 T741300 T741400 Extended Service Plans3 Additional 1-year SureColor F9370 Epson Service...
... ink; 4-color Production Edition Ink Configuration C, M, Y, HDK Nozzle Configuration Color and monochrome heads; 1,440 nozzles x 4 Droplet Technology Smallest droplet size: 5.3 picoliters; Epson disclaims any other brands of 2) Additional Printer Maintenance Kit Printhead Cleaning Kit Additional Waste Ink Bottle SCF9370PS C932121 C13S210063 C13S210051 C13T724000 UltraChrome DS Ink (1,000 mL x 6 Packs) High-Density Black Ink Packs Cyan Ink Packs Magenta Ink Packs Yellow Ink Packs T741X00 T741200 T741300 T741400 Extended Service Plans3 Additional 1-year SureColor F9370 Epson Service...
Warranty Statement
Page 3
... the first end-user customer that for Commercial Products 1. In rare cases, at its sole discretion, elect to replace a printer that the Epson® SureColor® Dye-Sublimation Transfer Series printer covered by the serial number. Printer Exchange: Epson may, at its parts, the items replaced become the property of field repair. You may also need to resolve the problem, and if your facility. An Epson service technician will conform...
... the first end-user customer that for Commercial Products 1. In rare cases, at its sole discretion, elect to replace a printer that the Epson® SureColor® Dye-Sublimation Transfer Series printer covered by the serial number. Printer Exchange: Epson may, at its parts, the items replaced become the property of field repair. You may also need to resolve the problem, and if your facility. An Epson service technician will conform...


