
Network Guide
Page 7
Introduction About Your Printer Your printer has a built-in this manual, automatically selects the correct standard when it automatically selects appropriate network protocols. If you can print from Microsoft® Windows® applications. About This Guide ...
Introduction About Your Printer Your printer has a built-in this manual, automatically selects the correct standard when it automatically selects appropriate network protocols. If you can print from Microsoft® Windows® applications. About This Guide ...
Network Guide
Page 8
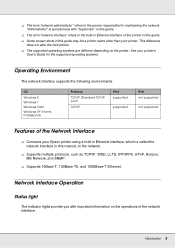
...The term "network interface" refers to the network. O The supported operating systems are different depending on the operations of the printer in this manual, to the built-in Ethernet interface of the network interface. O Supports 10Base-T, 100Base-TX, and 1000Base-T Ethernet. See your printer. OS... (Standard TCP/IP port) TCP/IP IPv4 supported supported IPv6 not supported not supported Features of the Network Interface O Connects your Epson printer using a built-in Ethernet interface, which is synonymous with important information on the printer. O The term "network administrator"...
...The term "network interface" refers to the network. O The supported operating systems are different depending on the operations of the printer in this manual, to the built-in Ethernet interface of the network interface. O Supports 10Base-T, 100Base-TX, and 1000Base-T Ethernet. See your printer. OS... (Standard TCP/IP port) TCP/IP IPv4 supported supported IPv6 not supported not supported Features of the Network Interface O Connects your Epson printer using a built-in Ethernet interface, which is synonymous with important information on the printer. O The term "network administrator"...

Network Guide
Page 17
...is connected to install the printer driver on the Software Disc. 4. To print via a network, make sure to instal the printer driver manually. If the software installer screen does not appear, double-click setup.exe on the computer. The Software Select screen appears. The software ...installer screen opens automatically. Click the Next button at the Welcome screen 6. The following section explains how to select the Epson Driver and Utilities check box and EpsonNet Configuration Utility check box, then click the Install button. Note: If you see the AutoPlay window...
...is connected to install the printer driver on the Software Disc. 4. To print via a network, make sure to instal the printer driver manually. If the software installer screen does not appear, double-click setup.exe on the computer. The Software Select screen appears. The software ...installer screen opens automatically. Click the Next button at the Welcome screen 6. The following section explains how to select the Epson Driver and Utilities check box and EpsonNet Configuration Utility check box, then click the Install button. Note: If you see the AutoPlay window...
Network Guide
Page 18
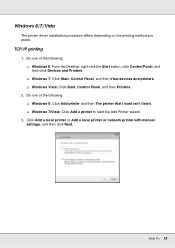
... The printer driver installation procedure differs depending on the printing method you prefer. Click Add a local printer or Add a local printer or network printer with manual settings, and then click Next. O Windows 7/Vista: Click Add a printer to start the Add Printer wizard. 3. Do one of the following : O Windows 8: Click Add printer...
... The printer driver installation procedure differs depending on the printing method you prefer. Click Add a local printer or Add a local printer or network printer with manual settings, and then click Next. O Windows 7/Vista: Click Add a printer to start the Add Printer wizard. 3. Do one of the following : O Windows 8: Click Add printer...
Network Guide
Page 29
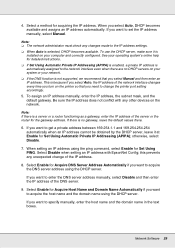
...the default values there. 6. To use the DHCP server, make sure it at Enable for Set Using PING. To assign an IP address manually, enter the IP address, the subnet mask, and the default gateway. Note: If there is not supported, we recommend that you want to... servers on your operating system's online help for Acquire Host Name and Domain Name Automatically if you want to set the IP address manually, select Manual. If there is selected, DHCP becomes available. Select Disable when setting an IP address with any unexpected change the printer port setting ...
...the default values there. 6. To use the DHCP server, make sure it at Enable for Set Using PING. To assign an IP address manually, enter the IP address, the subnet mask, and the default gateway. Note: If there is not supported, we recommend that you want to... servers on your operating system's online help for Acquire Host Name and Domain Name Automatically if you want to set the IP address manually, select Manual. If there is selected, DHCP becomes available. Select Disable when setting an IP address with any unexpected change the printer port setting ...
Network Guide
Page 31
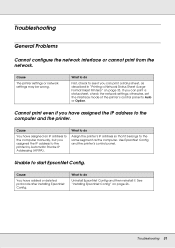
... 33. Troubleshooting 31 Cause The printer settings or network settings may be wrong. Cannot print even if you assigned the IP address to the computer manually, but you have added or deleted protocols after installing EpsonNet Config. Unable to the same segment as described in "Printing a Network Status Sheet (Large Format...
... 33. Troubleshooting 31 Cause The printer settings or network settings may be wrong. Cannot print even if you assigned the IP address to the computer manually, but you have added or deleted protocols after installing EpsonNet Config. Unable to the same segment as described in "Printing a Network Status Sheet (Large Format...

Network Guide
Page 34
... printer. 2. Turn on your printer model. Do one of your operating system for more information about settings on the printer's control panel. O Choose Panel when manually setting the IP address, subnet mask, and default gateway using EpsonNet Config with Web Browser. O See the User's Guide for detailed instructions. See the online...
... printer. 2. Turn on your printer model. Do one of your operating system for more information about settings on the printer's control panel. O Choose Panel when manually setting the IP address, subnet mask, and default gateway using EpsonNet Config with Web Browser. O See the User's Guide for detailed instructions. See the online...

User Manual
Page 10
... bottle. Introduction 10 Check the message on each leg. Normally closed when using the printer. Be sure the end of this switch to select the manual take-up direction. The selected option takes effect when the Auto switch is in the Off position. 9 Casters There are two casters on the control... panel's screen. Choose Off to disable auto take-up direction. 7 Auto switch Use this switch to select the auto take-up . 8 Manual switch Use this tube is in the waste ink bottle while the printer is in use. 14 Ink tank Holds ink used for printing. 15...
... bottle. Introduction 10 Check the message on each leg. Normally closed when using the printer. Be sure the end of this switch to select the manual take-up direction. The selected option takes effect when the Auto switch is in the Off position. 9 Casters There are two casters on the control... panel's screen. Choose Off to disable auto take-up direction. 7 Auto switch Use this switch to select the auto take-up . 8 Manual switch Use this tube is in the waste ink bottle while the printer is in use. 14 Ink tank Holds ink used for printing. 15...
User Manual
Page 26
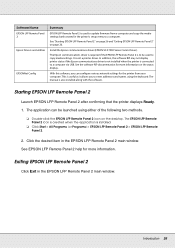
... is not installed when the printer is installed. ❏ Click Start > All Programs (or Programs) > EPSON LFP Remote Panel 2 > EPSON LFP Remote Panel 2. 2. Starting EPSON LFP Remote Panel 2 Launch EPSON LFP Remote Panel 2 after confirming that the printer displays Ready. 1. This is useful as it allows you... if the EPSON LFP Remote Panel 2 is also installed along with the software. Click the desired item in the EPSON LFP Remote Panel 2 main window. The EPSON LFP Remote Panel 2 icon is created when the application is connected to be launched using the keyboard. The manual is to...
... is not installed when the printer is installed. ❏ Click Start > All Programs (or Programs) > EPSON LFP Remote Panel 2 > EPSON LFP Remote Panel 2. 2. Starting EPSON LFP Remote Panel 2 Launch EPSON LFP Remote Panel 2 after confirming that the printer displays Ready. 1. This is useful as it allows you... if the EPSON LFP Remote Panel 2 is also installed along with the software. Click the desired item in the EPSON LFP Remote Panel 2 main window. The EPSON LFP Remote Panel 2 icon is created when the application is connected to be launched using the keyboard. The manual is to...
User Manual
Page 52
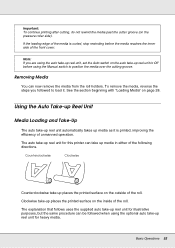
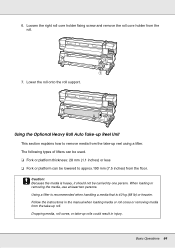
.... The explanation that follows uses the supplied auto take-up reel unit for illustrative purposes, but the same procedure can be followed when using the Manual switch to Off before the media reaches the inner side of the roll.
.... The explanation that follows uses the supplied auto take-up reel unit for illustrative purposes, but the same procedure can be followed when using the Manual switch to Off before the media reaches the inner side of the roll.

User Manual
Page 56
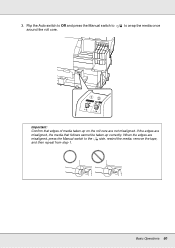
3. Basic Operations 56 When the edges are not misaligned. to the side, rewind the media, remove the tape, and then repeat from step 1. If the edges are misaligned, the media that edges of media taken up on the roll core are misaligned, press the Manual switch to wrap the media once Important: Confirm that follows cannot be taken up correctly. Flip the Auto switch to Off and press the Manual switch to around the roll core.
3. Basic Operations 56 When the edges are not misaligned. to the side, rewind the media, remove the tape, and then repeat from step 1. If the edges are misaligned, the media that edges of media taken up on the roll core are misaligned, press the Manual switch to wrap the media once Important: Confirm that follows cannot be taken up correctly. Flip the Auto switch to Off and press the Manual switch to around the roll core.
User Manual
Page 60
If the edges are misaligned, the media that edges of media taken up correctly. Flip the Auto switch to Off and press the Manual switch to wrap the media once Important: Confirm that follows cannot be taken up on the roll core are misaligned, press the Manual switch to the side, rewind the media, remove the tape, and then repeat from step 1. 3. Basic Operations 60 When the edges are not misaligned. to around the roll core.
If the edges are misaligned, the media that edges of media taken up correctly. Flip the Auto switch to Off and press the Manual switch to wrap the media once Important: Confirm that follows cannot be taken up on the roll core are misaligned, press the Manual switch to the side, rewind the media, remove the tape, and then repeat from step 1. 3. Basic Operations 60 When the edges are not misaligned. to around the roll core.
User Manual
Page 64
... (1.1 inches) or less ❏ Fork or platform can be carried by one person. Dropping media, roll cores, or take -up rolls could result in the manual when loading media or roll cores or removing media from the roll. 7. When loading or removing the media, use at least two persons. 6.
... (1.1 inches) or less ❏ Fork or platform can be carried by one person. Dropping media, roll cores, or take -up rolls could result in the manual when loading media or roll cores or removing media from the roll. 7. When loading or removing the media, use at least two persons. 6.
User Manual
Page 68
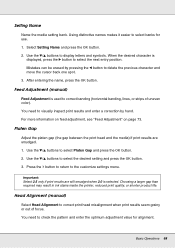
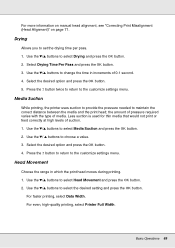
...platen gap (the gap between the print head and the media) if print results are still smudged when 2.0 is selected. Head Alignment (manual) Select Head Alignment to delete the previous character and move the cursor back one spot. 3. You need to visually inspect print results ...d/u buttons to select Platen Gap and press the Z button. 2. When the desired character is used to select the next entry position. Feed Adjustment (manual) Feed Adjustment is displayed, press the r button to correct banding (horizontal banding, lines, or strips of focus. Choosing a larger gap than required ...
...platen gap (the gap between the print head and the media) if print results are still smudged when 2.0 is selected. Head Alignment (manual) Select Head Alignment to delete the previous character and move the cursor back one spot. 3. You need to visually inspect print results ...d/u buttons to select Platen Gap and press the Z button. 2. When the desired character is used to select the next entry position. Feed Adjustment (manual) Feed Adjustment is displayed, press the r button to correct banding (horizontal banding, lines, or strips of focus. Choosing a larger gap than required ...
User Manual
Page 69
... Printer Full Width. Use the d/ u buttons to select the desired setting and press the Z button. Use the d/u buttons to choose a value. 3. For more information on manual head alignment, see "Correcting Print Misalignment (Head Alignment)" on page 71.
... Printer Full Width. Use the d/ u buttons to select the desired setting and press the Z button. Use the d/u buttons to choose a value. 3. For more information on manual head alignment, see "Correcting Print Misalignment (Head Alignment)" on page 71.
User Manual
Page 70
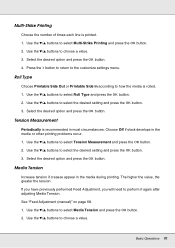
... the desired setting and press the Z button. 3. Media Tension Increase tension if creases appear in the media or other printing problems occur. 1. See "Feed Adjustment (manual)" on page 68. 1. Use the d/u buttons to select Roll Type and press the Z button. 2. Use the d/u buttons to choose a value. 3. Select the desired option and...
... the desired setting and press the Z button. 3. Media Tension Increase tension if creases appear in the media or other printing problems occur. 1. See "Feed Adjustment (manual)" on page 68. 1. Use the d/u buttons to select Roll Type and press the Z button. 2. Use the d/u buttons to choose a value. 3. Select the desired option and...

User Manual
Page 72
... in the printer will be overwritten. 5. Stop rewinding before the media reaches the inner side of the front cover. 8. Use the d/u buttons to select Manual(Uni-D) or Manual(Bi-D) and press the Z button. 7. An alignment pattern will automatically be printed. When printing is complete, the media will be fed to a position where...
... in the printer will be overwritten. 5. Stop rewinding before the media reaches the inner side of the front cover. 8. Use the d/u buttons to select Manual(Uni-D) or Manual(Bi-D) and press the Z button. 7. An alignment pattern will automatically be printed. When printing is complete, the media will be fed to a position where...
User Manual
Page 74
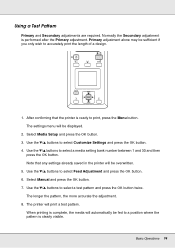
The settings menu will be fed to a position where the pattern is ready to accurately print the length of a design. 1. Select Manual and press the Z button. 7. The printer will automatically be overwritten. 5. Using a Test Pattern Primary and Secondary adjustments are required. After confirming that any settings already ...
The settings menu will be fed to a position where the pattern is ready to accurately print the length of a design. 1. Select Manual and press the Z button. 7. The printer will automatically be overwritten. 5. Using a Test Pattern Primary and Secondary adjustments are required. After confirming that any settings already ...
User Manual
Page 86
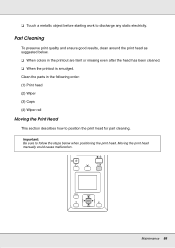
... following order: (1) Print head (2) Wiper (3) Caps (4) Wiper rail Moving the Print Head This section describes how to discharge any static electricity. Moving the print head manually could cause malfunction. Part Cleaning To preserve print quality and ensure good results, clean around the print head as suggested below when positioning the print...
... following order: (1) Print head (2) Wiper (3) Caps (4) Wiper rail Moving the Print Head This section describes how to discharge any static electricity. Moving the print head manually could cause malfunction. Part Cleaning To preserve print quality and ensure good results, clean around the print head as suggested below when positioning the print...

User Manual
Page 100
... ink in a new ink pack to step 2. If the remaining ink level is not covered by Epson's warranties. Information about non-genuine chip unit status may cause erratic printer behavior. See "Options and Consumable ...is 70 mm (2.8 inches) from the base of the ink tank so that is not covered by Epson's warranties, and under certain circumstances, may not be displayed, and use all the ink in the ink...the scale on page 129 1. If the remaining ink level is greater than those specified in this manual, could cause damage that you can use of non-genuine ink may cause damage that is 70 mm...
... ink in a new ink pack to step 2. If the remaining ink level is not covered by Epson's warranties. Information about non-genuine chip unit status may cause erratic printer behavior. See "Options and Consumable ...is 70 mm (2.8 inches) from the base of the ink tank so that is not covered by Epson's warranties, and under certain circumstances, may not be displayed, and use all the ink in the ink...the scale on page 129 1. If the remaining ink level is greater than those specified in this manual, could cause damage that you can use of non-genuine ink may cause damage that is 70 mm...


