Network Guide
Page 11
... the status lights. Configure the network interface using EpsonNet Config. See the section in this chapter appropriate for details. 5. Install the necessary network components on the printing method you need to use. Make sure that the necessary network components (such as TCP/IP) are set up the network interface. 1. Installing Network Components on your computers. For Windows users, see "About EpsonNet Config" on page 27. Setting Up Your System for your operating system...
... the status lights. Configure the network interface using EpsonNet Config. See the section in this chapter appropriate for details. 5. Install the necessary network components on the printing method you need to use. Make sure that the necessary network components (such as TCP/IP) are set up the network interface. 1. Installing Network Components on your computers. For Windows users, see "About EpsonNet Config" on page 27. Setting Up Your System for your operating system...
Network Guide
Page 20
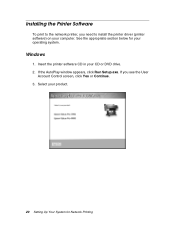
Insert the printer software CD in your computer. See the appropriate section below for Network Printing If the AutoPlay window appears, click Run Setup.exe. Windows 1. Installing the Printer Software To print to the network printer, you see the User Account Control screen, click Yes or Continue. 3. Select your product. 20 Setting Up Your System for your operating system. If you need to install the printer driver (printer software) on your CD or DVD drive. 2.
Insert the printer software CD in your computer. See the appropriate section below for Network Printing If the AutoPlay window appears, click Run Setup.exe. Windows 1. Installing the Printer Software To print to the network printer, you see the User Account Control screen, click Yes or Continue. 3. Select your product. 20 Setting Up Your System for your operating system. If you need to install the printer driver (printer software) on your CD or DVD drive. 2.
Network Guide
Page 32
... the network just by entering the new IP address. ❏ Only changes on the Administrator screen, enter the administrator name for Windows that supports the Universal Plug and Play function. 12. This device name is complete!" If you want to use the printer on -screen instructions to reset the printer. If your screen, the update is complete. If the message "Configuration change is used for the user name. 14. Mac...
... the network just by entering the new IP address. ❏ Only changes on the Administrator screen, enter the administrator name for Windows that supports the Universal Plug and Play function. 12. This device name is complete!" If you want to use the printer on -screen instructions to reset the printer. If your screen, the update is complete. If the message "Configuration change is used for the user name. 14. Mac...

Quick Reference Guide
Page 10
... is number 0 Information about registered paper configurations MAINTENANCE PRINTER STATUS CUTTER ADJUSTMENT CUTTER REPLACEMENT CLEANING CLOCK SETTING VERSION INK LEVEL MAINTENANCE TANK JOB HISTORY TOTAL PRINTS Adjusts cutter position Moves the cutter to access the menus. Press the Menu button to the replacement position NORMAL CLEANING, CLEAN EACH COLOR, POWER CLEANING MM/DD/YY HH:MM Current firmware version Percentage of ink remaining in each saved job; Menu PRINTER SETUP Item PLATEN GAP PAGE LINE ROLL PAPER MARGIN PAPER SIZE CHECK PAPER SKEW CHECK REFRESH MARGIN AUTO NOZZLE CHECK...
... is number 0 Information about registered paper configurations MAINTENANCE PRINTER STATUS CUTTER ADJUSTMENT CUTTER REPLACEMENT CLEANING CLOCK SETTING VERSION INK LEVEL MAINTENANCE TANK JOB HISTORY TOTAL PRINTS Adjusts cutter position Moves the cutter to access the menus. Press the Menu button to the replacement position NORMAL CLEANING, CLEAN EACH COLOR, POWER CLEANING MM/DD/YY HH:MM Current firmware version Percentage of ink remaining in each saved job; Menu PRINTER SETUP Item PLATEN GAP PAGE LINE ROLL PAPER MARGIN PAPER SIZE CHECK PAPER SKEW CHECK REFRESH MARGIN AUTO NOZZLE CHECK...
User's Guide
Page 6
... Paper 81 Creating Paper Configurations 81 Printing Your Paper Configurations 83 Selecting Paper Configurations 83 3 Printing With Epson Drivers for Mac OS X Sizing Images for Borderless Printing on Roll Paper 86 Choosing Page Setup and Basic Print Options 87 Choosing Color Management Options 93 Choosing Advanced Media Control Options 94 Choosing Roll Paper Options 96 Controlling Borderless Image Expansion 98 Choosing Advanced Black and White Photo Settings 99 Creating a Custom Preset and Printing 101 Managing Print Jobs 103 Selecting the Correct Media Type Setting...
... Paper 81 Creating Paper Configurations 81 Printing Your Paper Configurations 83 Selecting Paper Configurations 83 3 Printing With Epson Drivers for Mac OS X Sizing Images for Borderless Printing on Roll Paper 86 Choosing Page Setup and Basic Print Options 87 Choosing Color Management Options 93 Choosing Advanced Media Control Options 94 Choosing Roll Paper Options 96 Controlling Borderless Image Expansion 98 Choosing Advanced Black and White Photo Settings 99 Creating a Custom Preset and Printing 101 Managing Print Jobs 103 Selecting the Correct Media Type Setting...
User's Guide
Page 8
...146 Checking Printer Status From the Printer Driver 147 Checking and Cleaning the Print Head 148 Running the Nozzle Check and Head Cleaning Utilities 148 Checking and Cleaning the Print Head Using the Control Panel . . 150 Automatically Checking and Cleaning the Print Head 150 Running Cleaning Cycles 151 Aligning the Print Head 152 Replacing Ink Cartridges 153 Switching Black Ink Mode 157 Changing the Date and Time 157 Using Maintenance Mode 158 Replacing the Paper Cutter 159 Removing the Old Cutter 159 Installing the New Cutter 161 Replacing the Maintenance Tank 163 Cleaning the...
...146 Checking Printer Status From the Printer Driver 147 Checking and Cleaning the Print Head 148 Running the Nozzle Check and Head Cleaning Utilities 148 Checking and Cleaning the Print Head Using the Control Panel . . 150 Automatically Checking and Cleaning the Print Head 150 Running Cleaning Cycles 151 Aligning the Print Head 152 Replacing Ink Cartridges 153 Switching Black Ink Mode 157 Changing the Date and Time 157 Using Maintenance Mode 158 Replacing the Paper Cutter 159 Removing the Old Cutter 159 Installing the New Cutter 161 Replacing the Maintenance Tank 163 Cleaning the...
User's Guide
Page 15
....5 kg) and the Epson Stylus Pro 9890 weighs about 256 lb (116 kg) without the stand, paper basket, ink, or paper. Use of another cord may need more space behind the printer if you have four people lift the printer. (See page 25.) • When setting up the printer, make sure you use a damaged or frayed power cord. 15 Introduction | 15 Important Safety Instructions Before using your entire computer...
....5 kg) and the Epson Stylus Pro 9890 weighs about 256 lb (116 kg) without the stand, paper basket, ink, or paper. Use of another cord may need more space behind the printer if you have four people lift the printer. (See page 25.) • When setting up the printer, make sure you use a damaged or frayed power cord. 15 Introduction | 15 Important Safety Instructions Before using your entire computer...
User's Guide
Page 72
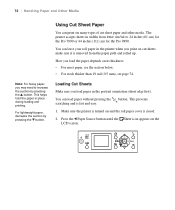
... prevents 1. Make sure the printer is removed from letter size/A4 to increase the suction by pressing the d button. The printer accepts sheets in the printer when you may need to 24 inches (61 cm) for the Pro 7890 or 44 inches (112 cm) for the Pro 9890. Note: For heavy paper, you print on many types of cut sheets; Press the l Paper Source button until the Sheet icon...
... prevents 1. Make sure the printer is removed from letter size/A4 to increase the suction by pressing the d button. The printer accepts sheets in the printer when you may need to 24 inches (61 cm) for the Pro 7890 or 44 inches (112 cm) for the Pro 9890. Note: For heavy paper, you print on many types of cut sheets; Press the l Paper Source button until the Sheet icon...
User's Guide
Page 85
Your Epson Stylus Pro 7890 or Pro 9890 comes with drivers and utilities that may become available. When you install the Epson printer driver, the ready-made profiles are automatically copied to size your printer for color photos. See page 137 for cut sheets and roll paper • Choosing basic print options • Choosing color management options • Choosing paper configuration settings • Choosing roll paper options • Controlling expansion of borderless images • Choosing advanced black and...
Your Epson Stylus Pro 7890 or Pro 9890 comes with drivers and utilities that may become available. When you install the Epson printer driver, the ready-made profiles are automatically copied to size your printer for color photos. See page 137 for cut sheets and roll paper • Choosing basic print options • Choosing color management options • Choosing paper configuration settings • Choosing roll paper options • Controlling expansion of borderless images • Choosing advanced black and...
User's Guide
Page 148
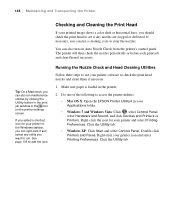
... print head nozzles and clean them if necessary. Make sure paper is loaded in the print job window or the icon on Auto Nozzle Check from the printer's control panel. If necessary, you can run maintenance utilities by clicking the Utility button in the printer. 2. Click the Utility tab. • Windows XP: Click Start and select Control Panel. Right-click your printer software to clear the nozzles. Double-click Printers and Faxes. Running the Nozzle Check and Head Cleaning...
... print head nozzles and clean them if necessary. Make sure paper is loaded in the print job window or the icon on Auto Nozzle Check from the printer's control panel. If necessary, you can run maintenance utilities by clicking the Utility button in the printer. 2. Click the Utility tab. • Windows XP: Click Start and select Control Panel. Right-click your printer software to clear the nozzles. Double-click Printers and Faxes. Running the Nozzle Check and Head Cleaning...
User's Guide
Page 163
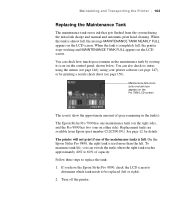
... by viewing its status using the menus (see page 146), using your printer software (see page 147), or by printing a nozzle check sheet (see page 150). Turn off the printer. 163 Replacement tanks are available from the system during the initial ink charge and manual and automatic print head cleaning. Maintaining and Transporting the Printer | 163 Replacing the Maintenance Tank The maintenance tank stores ink that gets flushed from Epson (part number C12C890191). On the Epson Stylus Pro 9890, the right...
... by viewing its status using the menus (see page 146), using your printer software (see page 147), or by printing a nozzle check sheet (see page 150). Turn off the printer. 163 Replacement tanks are available from the system during the initial ink charge and manual and automatic print head cleaning. Maintaining and Transporting the Printer | 163 Replacing the Maintenance Tank The maintenance tank stores ink that gets flushed from Epson (part number C12C890191). On the Epson Stylus Pro 9890, the right...
User's Guide
Page 172
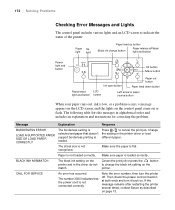
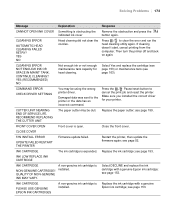
... power cord connection at both ends and turn the printer off. Change the setting in the driver do not match. Note the error number, then turn it back on. BLACK INK MISMATCH The black ink setting on the printer and in the printer driver or load different paper. Make sure paper is not connected correctly. The number 3000 indicates that doesn't support borderless printing is low, or a problem occurs, a message appears on the LCD screen, and the lights on the control panel...
... power cord connection at both ends and turn the printer off. Change the setting in the driver do not match. Note the error number, then turn it back on. BLACK INK MISMATCH The black ink setting on the printer and in the printer driver or load different paper. Make sure paper is not connected correctly. The number 3000 indicates that doesn't support borderless printing is low, or a problem occurs, a message appears on the LCD screen, and the lights on the control panel...
User's Guide
Page 173
... the print job and reset the printer. Make sure you installed the correct driver for head cleaning. RECOMMEND REPLACING THE CUTTER UNIT The paper cutter may be dull. Replace the paper cutter; CLOSE COVER F/W INSTALL ERROR UPDATE FAILED RESTART THE PRINTER Firmware update failed. Restart the printer, then update the firmware again; INK CARTRIDGE The ink cartridge is obstructing the indicated ink cover Remove the obstruction and press the button again. Replace the ink cartridge; INK LOW REPLACE INK CARTRIDGE INK CARTRIDGE NON-GENUINE CARTRIDGE! Epson ink...
... the print job and reset the printer. Make sure you installed the correct driver for head cleaning. RECOMMEND REPLACING THE CUTTER UNIT The paper cutter may be dull. Replace the paper cutter; CLOSE COVER F/W INSTALL ERROR UPDATE FAILED RESTART THE PRINTER Firmware update failed. Restart the printer, then update the firmware again; INK CARTRIDGE The ink cartridge is obstructing the indicated ink cover Remove the obstruction and press the button again. Replace the ink cartridge; INK LOW REPLACE INK CARTRIDGE INK CARTRIDGE NON-GENUINE CARTRIDGE! Epson ink...

User's Guide
Page 181
... printer port setting doesn't match the printer connection port (Windows). Make sure the interface cable is selected. ◗ Download and install the latest driver for your software is installed correctly and the printer is loaded incorrectly. Right-click the icon for Mac OS X or Windows from the Epson website at both ends. ◗ Check the page size or paper size settings in your printer port is incorrect. Your image is ON in the control panel menu. ◗ The ROLL PAPER MARGIN setting on page...
... printer port setting doesn't match the printer connection port (Windows). Make sure the interface cable is selected. ◗ Download and install the latest driver for your software is installed correctly and the printer is loaded incorrectly. Right-click the icon for Mac OS X or Windows from the Epson website at both ends. ◗ Check the page size or paper size settings in your printer port is incorrect. Your image is ON in the control panel menu. ◗ The ROLL PAPER MARGIN setting on page...
User's Guide
Page 182
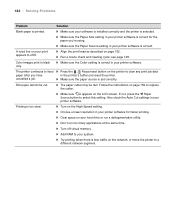
... Pause/reset button on the printer to shift. ◗ Align the print head as described on the LCD screen. Follow the instructions on page 159 to a different network segment. 182 Printing is too slow. ◗ Turn on the network, or move the printer to replace the cutter. ◗ Make sure appears on page 152. ◗ Run a nozzle check and cleaning cycle; cancelled a job. ◗ Make sure the paper source is set correctly...
... Pause/reset button on the printer to shift. ◗ Align the print head as described on the LCD screen. Follow the instructions on page 159 to a different network segment. 182 Printing is too slow. ◗ Turn on the network, or move the printer to replace the cutter. ◗ Make sure appears on page 152. ◗ Run a nozzle check and cleaning cycle; cancelled a job. ◗ Make sure the paper source is set correctly...
User's Guide
Page 187
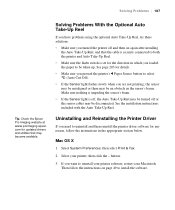
... Problems | 187 Tip: Check the Epson Pro Imaging website at www.proimaging.epson. Mac OS X 1. Select System Preferences, then select Print & Fax. 2. com for details. • Make sure you pressed the printer's l Paper Source button to select (Auto Cut Off). • If the Sensor light flashes slowly when you loaded the paper to install the software. 187 See page 203 for updated drivers and utilities that the cable is securely connected to both the printer and Auto...
... Problems | 187 Tip: Check the Epson Pro Imaging website at www.proimaging.epson. Mac OS X 1. Select System Preferences, then select Print & Fax. 2. com for details. • Make sure you pressed the printer's l Paper Source button to select (Auto Cut Off). • If the Sensor light flashes slowly when you loaded the paper to install the software. 187 See page 203 for updated drivers and utilities that the cable is securely connected to both the printer and Auto...
User's Guide
Page 198
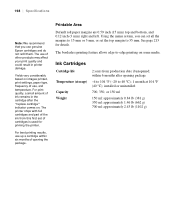
... used for details. Using the menu system, you use up a cartridge within 6 months after the "replace cartridge" indicator comes on. Yields vary considerably based on some media. 198 | Specifications Note: We recommend that you can set all the margins to 15 mm or 3 mm, or set of ink remains in printer damage. The borderless printing feature allows edge-to-edge printing on images printed, print settings, paper type, frequency of use of opening...
... used for details. Using the menu system, you use up a cartridge within 6 months after the "replace cartridge" indicator comes on. Yields vary considerably based on some media. 198 | Specifications Note: We recommend that you can set all the margins to 15 mm or 3 mm, or set of ink remains in printer damage. The borderless printing feature allows edge-to-edge printing on images printed, print settings, paper type, frequency of use of opening...
User's Guide
Page 219
... Maintenance, 152, 159, 214 Network Setup, 216 Printer Setup, 150, 213 Printer Status, 52, 146 to 147, 214 setting summary, 213 to 216 Test Print, 146, 214 Messages, control panel, 172 to 176 Mirror Image setting problems, 181 Windows, 122 Monitoring printer control panel, 172 to 176 Mac OS X, 103 Windows, 132 to 135 Moving printer, 167 to 170 N Network configuring software, 54 connection, 48, 52 Network Setup menu, 216 Nozzle check, 148 O Optional equipment, 12 P Page Line setting control panel, 68 Mac OS X, 97 Windows, 119 Page Rendering Mode setting...
... Maintenance, 152, 159, 214 Network Setup, 216 Printer Setup, 150, 213 Printer Status, 52, 146 to 147, 214 setting summary, 213 to 216 Test Print, 146, 214 Messages, control panel, 172 to 176 Mirror Image setting problems, 181 Windows, 122 Monitoring printer control panel, 172 to 176 Mac OS X, 103 Windows, 132 to 135 Moving printer, 167 to 170 N Network configuring software, 54 connection, 48, 52 Network Setup menu, 216 Nozzle check, 148 O Optional equipment, 12 P Page Line setting control panel, 68 Mac OS X, 97 Windows, 119 Page Rendering Mode setting...

Product Brochure
Page 6
... „ Virtually eliminates any color management process in your media type or driver setting, the printer will automatically switch to accelerate the dry-down and reading process „ Built-in print dryer to the correct black ink type „ Switching can occur automatically or provide a warning before proceeding „ Highly-efficient print head design ensures fast switching with X-Rite „ Simple installation; or 44-inch wide spectrophotometer...
... „ Virtually eliminates any color management process in your media type or driver setting, the printer will automatically switch to accelerate the dry-down and reading process „ Built-in print dryer to the correct black ink type „ Switching can occur automatically or provide a warning before proceeding „ Highly-efficient print head design ensures fast switching with X-Rite „ Simple installation; or 44-inch wide spectrophotometer...
Product Brochure
Page 8
... printing between multiple Epson Stylus Pro printers of the same model, Epson has refined the manufacturing process to media, printed image, display conditions, light intensity, humidity and atmospheric conditions. Part of the ink from printer to printer and print to 3 mm each (0.24" total) Limited by application, OS, and driver/RIP used for both black and color printing. Ink is used for both x32 and x64 supported) Printer Interfaces Includes as standard one Hi-Speed USB 2.0 (1.1 compatible...
... printing between multiple Epson Stylus Pro printers of the same model, Epson has refined the manufacturing process to media, printed image, display conditions, light intensity, humidity and atmospheric conditions. Part of the ink from printer to printer and print to 3 mm each (0.24" total) Limited by application, OS, and driver/RIP used for both black and color printing. Ink is used for both x32 and x64 supported) Printer Interfaces Includes as standard one Hi-Speed USB 2.0 (1.1 compatible...


