Network Guide
Page 4
Contents Chapter 1 Introduction About Your Printer 6 About This Guide 6 Warnings, Cautions, and Notes 7 Operating Environment 7 Features of the Network Interface 8 Network Interface Operation 9 Status lights 9 Network connector 9 About the Software 10 ... Vista 12 Windows XP 13 Mac OS X 15 Setting Up the Network Interface 16 Connecting the Network Printer to the Network 16 Configuring the Network Interface 17 Printing a Network Status Sheet 19 Installing the Printer Software 20 Windows 20 Mac OS X 22 Adding the Network Port 23 Windows 23 Mac OS X 26...
Contents Chapter 1 Introduction About Your Printer 6 About This Guide 6 Warnings, Cautions, and Notes 7 Operating Environment 7 Features of the Network Interface 8 Network Interface Operation 9 Status lights 9 Network connector 9 About the Software 10 ... Vista 12 Windows XP 13 Mac OS X 15 Setting Up the Network Interface 16 Connecting the Network Printer to the Network 16 Configuring the Network Interface 17 Printing a Network Status Sheet 19 Installing the Printer Software 20 Windows 20 Mac OS X 22 Adding the Network Port 23 Windows 23 Mac OS X 26...
Network Guide
Page 6
... network. For information about using 10Base-T or 100Base-TX. About This Guide This Network Guide contains information about your printer, see your printer and computer network settings. It includes how to quickly and easily configure the network interface. The protocols that the network.... This does not imply that exist on the operating system and the network configuration. Chapter 1 Introduction About Your Printer Your printer has a built-in Ethernet interface automatically selects the correct link speed and network protocols when it connects to work only with your...
... network. For information about using 10Base-T or 100Base-TX. About This Guide This Network Guide contains information about your printer, see your printer and computer network settings. It includes how to quickly and easily configure the network interface. The protocols that the network.... This does not imply that exist on the operating system and the network configuration. Chapter 1 Introduction About Your Printer Your printer has a built-in Ethernet interface automatically selects the correct link speed and network protocols when it connects to work only with your...

Network Guide
Page 7
... be observed to avoid damage to avoid bodily injury. Notes contain important information and useful tips on the operation of the printer in this guide may list a printer name other than your printer. Note: ❏ This guide is synonymous with "Supervisor." ❏ The term "network interface" refers to the person responsible for network... rights. ❏ The term "network administrator" in this guide refers to the built-in this guide. ❏ Some screen shots in Ethernet interface of your printer. "Administrator" is written for maintaining the network.
... be observed to avoid damage to avoid bodily injury. Notes contain important information and useful tips on the operation of the printer in this guide may list a printer name other than your printer. Note: ❏ This guide is synonymous with "Supervisor." ❏ The term "network interface" refers to the person responsible for network... rights. ❏ The term "network administrator" in this guide refers to the built-in this guide. ❏ Some screen shots in Ethernet interface of your printer. "Administrator" is written for maintaining the network.
Network Guide
Page 8
Features of the Network Interface ❏ Connects your Epson printer using a built-in Ethernet interface, which is called the network interface in this manual, to the network. ❏ Supports multiple protocols, such as TCP/IP ...
Features of the Network Interface ❏ Connects your Epson printer using a built-in Ethernet interface, which is called the network interface in this manual, to the network. ❏ Supports multiple protocols, such as TCP/IP ...
Network Guide
Page 9
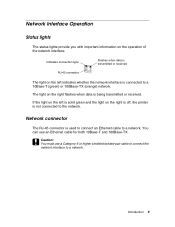
If the light on the right is off, the printer is used to connect an Ethernet cable to the network. Network Interface Operation Status lights The status lights provide you with important information on the ...
If the light on the right is off, the printer is used to connect an Ethernet cable to the network. Network Interface Operation Status lights The status lights provide you with important information on the ...
Network Guide
Page 10
... configure the network interface. Computers and software cannot communicate with Web Browser" on a network. 10 Introduction About the Software The software CD provided with your printer includes the following network software. ❏ EpsonNet Config for Windows is a Windows-based configuration utility that allows you to configure the network interface. See "EpsonNet...
... configure the network interface. Computers and software cannot communicate with Web Browser" on a network. 10 Introduction About the Software The software CD provided with your printer includes the following network software. ❏ EpsonNet Config for Windows is a Windows-based configuration utility that allows you to configure the network interface. See "EpsonNet...
Network Guide
Page 11
...the necessary network components on the printing method you need to the network. 4. See "Configuring the Network Interface" on the printer and install the printer driver. If necessary, configure the network settings of the network interface, such as the IP address, subnet mask, etc.) are...network interface on page 17 for your computer, depending on your operating system. See "Network Interface Operation" on page 28. Connect the printer to install the necessary network components (such as TCP/IP) are set up the network interface. 1. Configure the network interface using ...
...the necessary network components on the printing method you need to the network. 4. See "Configuring the Network Interface" on the printer and install the printer driver. If necessary, configure the network settings of the network interface, such as the IP address, subnet mask, etc.) are...network interface on page 17 for your computer, depending on your operating system. See "Network Interface Operation" on page 28. Connect the printer to install the necessary network components (such as TCP/IP) are set up the network interface. 1. Configure the network interface using ...
Network Guide
Page 12
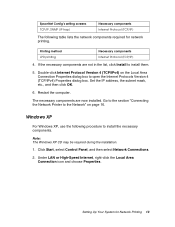
Windows 7 and Windows Vista For Windows 7 and Windows Vista, use the following network components are already installed, go to "Connecting the Network Printer to the Network" on page 16. If they are in the list. The following table lists the network components required for configuring the network interface ...
Windows 7 and Windows Vista For Windows 7 and Windows Vista, use the following network components are already installed, go to "Connecting the Network Printer to the Network" on page 16. If they are in the list. The following table lists the network components required for configuring the network interface ...
Network Guide
Page 13
Go to the section "Connecting the Network Printer to the Network" on the Local Area Connection Properties dialog box to open the Internet Protocols Version 4 (TCP/IPv4) Properties dialog box. Under LAN or ...
Go to the section "Connecting the Network Printer to the Network" on the Local Area Connection Properties dialog box to open the Internet Protocols Version 4 (TCP/IPv4) Properties dialog box. Under LAN or ...

Network Guide
Page 14
Check if the following table lists the network components required for Network Printing If they are in the list. EpsonNet Config's setting screens TCP/IP, SNMP (IP trap) Necessary components Internet Protocol (TCP/IP) 14 Setting Up Your System for configuring the network interface with EpsonNet Config. 3. The following network components are already installed, go to "Connecting the Network Printer to the Network" on page 16.
Check if the following table lists the network components required for Network Printing If they are in the list. EpsonNet Config's setting screens TCP/IP, SNMP (IP trap) Necessary components Internet Protocol (TCP/IP) 14 Setting Up Your System for configuring the network interface with EpsonNet Config. 3. The following network components are already installed, go to "Connecting the Network Printer to the Network" on page 16.
Network Guide
Page 15
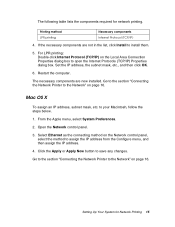
Go to the section "Connecting the Network Printer to the Network" on page 16. Mac OS X To assign an IP address, subnet mask, etc. Setting Up Your System for network printing. The following ... the computer. The necessary components are not in the list, click Install to the Network" on page 16. Go to the section "Connecting the Network Printer to install them. 5. Select Ethernet as the connecting method on the Local Area Connection Properties dialog box to assign the IP address from the Configure...
Go to the section "Connecting the Network Printer to the Network" on page 16. Mac OS X To assign an IP address, subnet mask, etc. Setting Up Your System for network printing. The following ... the computer. The necessary components are not in the list, click Install to the Network" on page 16. Go to the section "Connecting the Network Printer to install them. 5. Select Ethernet as the connecting method on the Local Area Connection Properties dialog box to assign the IP address from the Configure...
Network Guide
Page 16
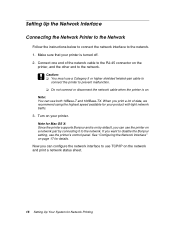
... to prevent malfunction. ❏ Do not connect or disconnect the network cable when the printer is turned off. 2. Note for your product with light network traffic. 3. See "Configuring the Network Interface" on your printer is on the network and print a network status sheet. 16 Setting Up Your System .... When you can use TCP/IP on . c Caution: ❏ You must use a Category 5 or higher shielded twisted-pair cable to connect the printer to use both 10Base-T and 100Base-TX. Turn on page 17 for Network Printing Setting Up the Network Interface Connecting the Network...
... to prevent malfunction. ❏ Do not connect or disconnect the network cable when the printer is turned off. 2. Note for your product with light network traffic. 3. See "Configuring the Network Interface" on your printer is on the network and print a network status sheet. 16 Setting Up Your System .... When you can use TCP/IP on . c Caution: ❏ You must use a Category 5 or higher shielded twisted-pair cable to connect the printer to use both 10Base-T and 100Base-TX. Turn on page 17 for Network Printing Setting Up the Network Interface Connecting the Network...
Network Guide
Page 17
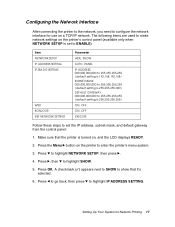
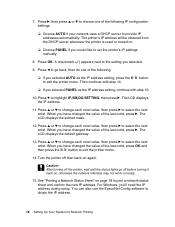
...to highlight NETWORK SETUP, then press r. 4. Setting Up Your System for use on the printer to enter the printer's menu system. 3. Press the Menu r button on a TCP/IP network. Press d to show that the printer is turned on the printer's control panel (available only when NETWORK SETUP is set to ENABLE): Item NETWORK SETUP...EXECUTE Follow these steps to set the IP address, subnet mask, and default gateway from the control panel: 1. Configuring the Network Interface After connecting the printer to the network, you need to configure the network interface for Network Printing 17
...to highlight NETWORK SETUP, then press r. 4. Setting Up Your System for use on the printer to enter the printer's menu system. 3. Press the Menu r button on a TCP/IP network. Press d to show that the printer is turned on the printer's control panel (available only when NETWORK SETUP is set to ENABLE): Item NETWORK SETUP...EXECUTE Follow these steps to set the IP address, subnet mask, and default gateway from the control panel: 1. Configuring the Network Interface After connecting the printer to the network, you need to configure the network interface for Network Printing 17
Network Guide
Page 18
... d to choose one of the last octet, press r. c Caution: After turning off the printer, wait until the status lights go back, then do one of the following : ❏ If... have changed the value of the last octet, press OK and then press the button to exit the printer menu. Turn the printer off before turning it back on again. Press u or d to change each octet value, then press.... When you selected PANEL as the IP address setting, press the to exit the printer menu. 14. See "Printing a Network Status Sheet" on . ❏ Choose PANEL if you 'll need the IP...
... d to choose one of the last octet, press r. c Caution: After turning off the printer, wait until the status lights go back, then do one of the following : ❏ If... have changed the value of the last octet, press OK and then press the button to exit the printer menu. Turn the printer off before turning it back on again. Press u or d to change each octet value, then press.... When you selected PANEL as the IP address setting, press the to exit the printer menu. 14. See "Printing a Network Status Sheet" on . ❏ Choose PANEL if you 'll need the IP...
Network Guide
Page 19
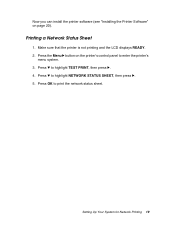
Printing a Network Status Sheet 1. Setting Up Your System for Network Printing 19 Press d to print the network status sheet. Now you can install the printer software (see "Installing the Printer Software" on the printer's control panel to enter the printer's menu system. 3. Press OK to highlight TEST PRINT, then press r. 4. Press the Menu r button on page 20). Press d to highlight NETWORK STATUS SHEET, then press r. 5. Make sure that the printer is not printing and the LCD displays READY. 2.
Printing a Network Status Sheet 1. Setting Up Your System for Network Printing 19 Press d to print the network status sheet. Now you can install the printer software (see "Installing the Printer Software" on the printer's control panel to enter the printer's menu system. 3. Press OK to highlight TEST PRINT, then press r. 4. Press the Menu r button on page 20). Press d to highlight NETWORK STATUS SHEET, then press r. 5. Make sure that the printer is not printing and the LCD displays READY. 2.
Network Guide
Page 20
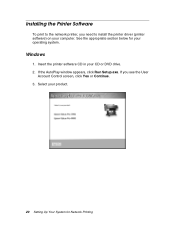
If you need to install the printer driver (printer software) on your operating system. Select your CD or DVD drive. 2. Insert the printer software CD in your product. 20 Setting Up Your System for your computer. Installing the Printer Software To print to the network printer, you see the User Account Control screen, click Yes or Continue. 3. See the appropriate section below for Network Printing If the AutoPlay window appears, click Run Setup.exe. Windows 1.
If you need to install the printer driver (printer software) on your operating system. Select your CD or DVD drive. 2. Insert the printer software CD in your product. 20 Setting Up Your System for your computer. Installing the Printer Software To print to the network printer, you see the User Account Control screen, click Yes or Continue. 3. See the appropriate section below for Network Printing If the AutoPlay window appears, click Run Setup.exe. Windows 1.
Network Guide
Page 21
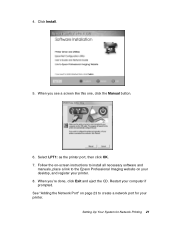
See "Adding the Network Port" on page 23 to the Epson Professional Imaging website on -screen instructions to install all necessary software and manuals, place a link to create a network port for Network Printing 21 When you 're done, click Exit and eject the CD. Setting Up Your System for your printer. Restart your printer. 8. Click Install. 5. Follow the on your desktop, and register your computer if prompted. 4. Select LPT1: as the printer port, then click OK. 7. When you see a screen like this one, click the Manual button. 6.
See "Adding the Network Port" on page 23 to the Epson Professional Imaging website on -screen instructions to install all necessary software and manuals, place a link to create a network port for Network Printing 21 When you 're done, click Exit and eject the CD. Setting Up Your System for your printer. Restart your printer. 8. Click Install. 5. Follow the on your desktop, and register your computer if prompted. 4. Select LPT1: as the printer port, then click OK. 7. When you see a screen like this one, click the Manual button. 6.
Network Guide
Page 22
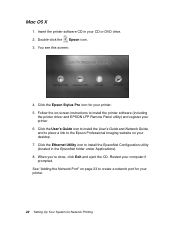
...Click the Epson Stylus Pro icon for your desktop. 7. Click the User's Guide icon to install the User's Guide and Network Guide, and to place a link to create a network port for Network Printing Follow the on page 23 to the Epson Professional Imaging website on your printer. 5.... if prompted. Double-click the Epson icon. 3. Click the Ethernet Utility icon to install the printer software (including the printer driver and EPSON LFP Remote Panel utility) and register your printer. 22 Setting Up Your System for your printer. 6. Insert the printer software CD in the EpsonNet folder...
...Click the Epson Stylus Pro icon for your desktop. 7. Click the User's Guide icon to install the User's Guide and Network Guide, and to place a link to create a network port for Network Printing Follow the on page 23 to the Epson Professional Imaging website on your printer. 5.... if prompted. Double-click the Epson icon. 3. Click the Ethernet Utility icon to install the printer software (including the printer driver and EPSON LFP Remote Panel utility) and register your printer. 22 Setting Up Your System for your printer. 6. Insert the printer software CD in the EpsonNet folder...
Network Guide
Page 23
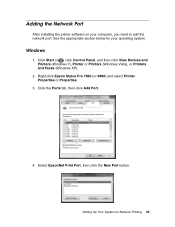
... computer, you need to add the network port. Select EpsonNet Print Port, then click the New Port button. Adding the Network Port After installing the printer software on your operating system. Right-click Epson Stylus Pro 7890 (or 9890) and select Printer Properties or Properties. 3. Click the Ports tab, then click Add Port. 4. Windows 1.
... computer, you need to add the network port. Select EpsonNet Print Port, then click the New Port button. Adding the Network Port After installing the printer software on your operating system. Right-click Epson Stylus Pro 7890 (or 9890) and select Printer Properties or Properties. 3. Click the Ports tab, then click Add Port. 4. Windows 1.
Network Guide
Page 24
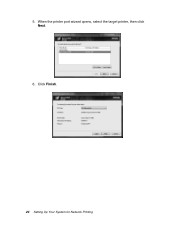
Click Finish. 24 Setting Up Your System for Network Printing When the printer port wizard opens, select the target printer, then click Next. 6. 5.
Click Finish. 24 Setting Up Your System for Network Printing When the printer port wizard opens, select the target printer, then click Next. 6. 5.


