PostScript Printing Information
Page 1
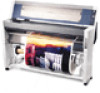
...: 09/25/2002 Originator: MS PSB.2002.09.004 Authorization: N/A Total Pages: EPSON Stylus Pro 9000, 9500, 9600, 7000, 7500, 7600, 10000, 10600, 5000, 5500 and Stylus Color 3000 Printers PostScript Printing Support for Mac OS X Native Mode This bulletin provides instructions for PostScript printing by simply installing the appropriate RIP PPD. • EFI RS 5000 LX...
...: 09/25/2002 Originator: MS PSB.2002.09.004 Authorization: N/A Total Pages: EPSON Stylus Pro 9000, 9500, 9600, 7000, 7500, 7600, 10000, 10600, 5000, 5500 and Stylus Color 3000 Printers PostScript Printing Support for Mac OS X Native Mode This bulletin provides instructions for PostScript printing by simply installing the appropriate RIP PPD. • EFI RS 5000 LX...
PostScript Printing Information
Page 2
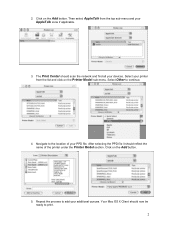
Repeat the process to continue. 4. The Print Center should reflect the name of your additional queues. Navigate to print. 2 Select Other to add your PPD file. Click on the Add button. 5. Click on the Add button. Select your printer from the top sub-menu and your devices. Then select AppleTalk from the list and click on the Printer Model sub-menu. 2. After selecting the PPD file it should scan the network and find all your AppleTalk zone if applicable. 3. Your Mac OS X Client should now be ready to the location of the printer under the Printer Model section.
Repeat the process to continue. 4. The Print Center should reflect the name of your additional queues. Navigate to print. 2 Select Other to add your PPD file. Click on the Add button. 5. Click on the Add button. Select your printer from the top sub-menu and your devices. Then select AppleTalk from the list and click on the Printer Model sub-menu. 2. After selecting the PPD file it should scan the network and find all your AppleTalk zone if applicable. 3. Your Mac OS X Client should now be ready to the location of the printer under the Printer Model section.
PostScript Printing Information
Page 3
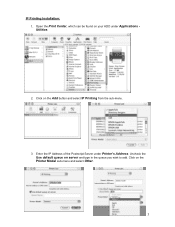
IP Printing Installation: 1. Open the Print Center, which can be found on the Add button and select IP Printing from the sub-menu. 3. Uncheck the Use default queue on the Printer Model sub-menu and select Other. 3 Utilities 2. Click on server and type in the queue you wish to add. Click on your HDD under Printer's Address. Enter the IP Address of the Postscript Server under Applications -
IP Printing Installation: 1. Open the Print Center, which can be found on the Add button and select IP Printing from the sub-menu. 3. Uncheck the Use default queue on the Printer Model sub-menu and select Other. 3 Utilities 2. Click on server and type in the queue you wish to add. Click on your HDD under Printer's Address. Enter the IP Address of the Postscript Server under Applications -

PostScript Printing Information
Page 4
4. The Print Center should reflect the name of your additional queues. Printer Description folder). 4 Click on the CD to select the printer's PPD. After selecting the PPD ... Add button. 5. Navigate to select the PPD it should now show the Queue that you typed along with the IP address. 6. Repeat the process to print.
4. The Print Center should reflect the name of your additional queues. Printer Description folder). 4 Click on the CD to select the printer's PPD. After selecting the PPD ... Add button. 5. Navigate to select the PPD it should now show the Queue that you typed along with the IP address. 6. Repeat the process to print.

User Manual - USB/Parallel Kit
Page 5
Contents Introduction 7 Setting Up the Printer 8 Getting Started on an iMac 8 Connecting the Cable 10 Installing the Printer Software 13 Getting Started on a Windows 98 System 15 Connecting the Cable 16 Installing the Printer Software 19 Setting Up Your System to Print to the EPSON Stylus COLOR 600 27 Appendix A: Using Monitor3 with Your iMac 29 Setting Up Monitor3 29 Monitoring Print Jobs with Monitor3 30 Appendix B: Specifications 33 USB/Parallel Adapter Specifications 33 System Requirements 34 v
Contents Introduction 7 Setting Up the Printer 8 Getting Started on an iMac 8 Connecting the Cable 10 Installing the Printer Software 13 Getting Started on a Windows 98 System 15 Connecting the Cable 16 Installing the Printer Software 19 Setting Up Your System to Print to the EPSON Stylus COLOR 600 27 Appendix A: Using Monitor3 with Your iMac 29 Setting Up Monitor3 29 Monitoring Print Jobs with Monitor3 30 Appendix B: Specifications 33 USB/Parallel Adapter Specifications 33 System Requirements 34 v
User Manual - USB/Parallel Kit
Page 9
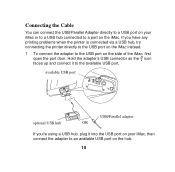
... on the side of the iMac, first open the port door. available USB port 1 2 optional USB hub USB/Parallel adapter OR If you have any printing problems when the printer is connected via a USB hub, try connecting the printer directly to the USB port on the iMac instead. 1 To connect the...
... on the side of the iMac, first open the port door. available USB port 1 2 optional USB hub USB/Parallel adapter OR If you have any printing problems when the printer is connected via a USB hub, try connecting the printer directly to the USB port on the iMac instead. 1 To connect the...

User Manual - USB/Parallel Kit
Page 13
8 Click the printer icon for your iMac desktop for instructions on installing it . If your EPSON printer came with other application software, see your printer icon in the Chooser, make sure your printer is numbered). 10 Turn on your printer. ... on background printing, if you 've connected more than one EPSON printer, the port is turned on USB connections. Note: The printer icons are secure and your USB port and parallel port connections are labeled SC 600 (EPSON Stylus COLOR 600), SC 440 (EPSON Stylus COLOR 440), SC 640 (EPSON Stylus COLOR 640), and SPEX (EPSON Stylus Photo EX...
8 Click the printer icon for your iMac desktop for instructions on installing it . If your EPSON printer came with other application software, see your printer icon in the Chooser, make sure your printer is numbered). 10 Turn on your printer. ... on background printing, if you 've connected more than one EPSON printer, the port is turned on USB connections. Note: The printer icons are secure and your USB port and parallel port connections are labeled SC 600 (EPSON Stylus COLOR 600), SC 440 (EPSON Stylus COLOR 440), SC 640 (EPSON Stylus COLOR 640), and SPEX (EPSON Stylus Photo EX...
User Manual - USB/Parallel Kit
Page 14
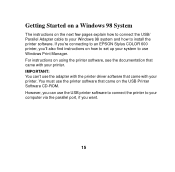
If you're connecting to an EPSON Stylus COLOR 600 printer, you can 't use the adapter with the printer driver software that came with your Windows 98 system and how to install the ... your printer. For instructions on using the printer software, see the documentation that came on the USB Printer Software CD-ROM. You must use Windows Print Manager.
If you're connecting to an EPSON Stylus COLOR 600 printer, you can 't use the adapter with the printer driver software that came with your Windows 98 system and how to install the ... your printer. For instructions on using the printer software, see the documentation that came on the USB Printer Software CD-ROM. You must use Windows Print Manager.
User Manual - USB/Parallel Kit
Page 15
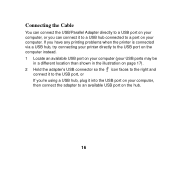
... can connect it to a USB hub connected to a port on your computer, then connect the adapter to the USB port, or If you have any printing problems when the printer is connected via a USB hub, try connecting your printer directly to the USB port on the computer instead. 1 Locate an available...
... can connect it to a USB hub connected to a port on your computer, then connect the adapter to the USB port, or If you have any printing problems when the printer is connected via a USB hub, try connecting your printer directly to the USB port on the computer instead. 1 Locate an available...

User Manual - USB/Parallel Kit
Page 22
At the next screen, select Search for the best driver for the EPSON Stylus COLOR 600, you need to set your printer as the Windows default printer. Be sure to click the Yes radio button to set up your ... screen, click Finish. 9 When you 've installed driver software for your system to use Windows Print Manager. If you see a message that installation is complete, click OK. See "Setting Up Your System to Print to the EPSON Stylus COLOR 600" on -screen instructions to install your printer driver. Windows 98 detects your printer and...
At the next screen, select Search for the best driver for the EPSON Stylus COLOR 600, you need to set your printer as the Windows default printer. Be sure to click the Yes radio button to set up your ... screen, click Finish. 9 When you 've installed driver software for your system to use Windows Print Manager. If you see a message that installation is complete, click OK. See "Setting Up Your System to Print to the EPSON Stylus COLOR 600" on -screen instructions to install your printer driver. Windows 98 detects your printer and...

User Manual - USB/Parallel Kit
Page 25
...Start, point to the device; Click the + next to Settings, and click Control Panel. If you've installed printer driver software for the EPSON Stylus COLOR 600, remember to set up your printer documentation. 26 Then click System and click the Device Manager tab. You should see the device... listed. If the printer doesn't work correctly, uninstall the printer software as described in your system to use Windows Print Manager. (See "Setting Up Your System to Print to the EPSON Stylus COLOR 600" on the next page.) If you 've installed more than one USB printer device, each new installation...
...Start, point to the device; Click the + next to Settings, and click Control Panel. If you've installed printer driver software for the EPSON Stylus COLOR 600, remember to set up your printer documentation. 26 Then click System and click the Device Manager tab. You should see the device... listed. If the printer doesn't work correctly, uninstall the printer software as described in your system to use Windows Print Manager. (See "Setting Up Your System to Print to the EPSON Stylus COLOR 600" on the next page.) If you 've installed more than one USB printer device, each new installation...
User Manual - USB/Parallel Kit
Page 26
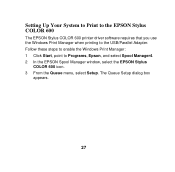
The Queue Setup dialog box appears. 27 Follow these steps to enable the Windows Print Manager: 1 Click Start, point to the USB/Parallel Adapter. Setting Up Your System to Print to the EPSON Stylus COLOR 600 The EPSON Stylus COLOR 600 printer driver software requires that you use the Windows Print Manager when printing to Programs, Epson, and select Spool Manager4. 2 In the EPSON Spool Manager window, select the EPSON Stylus COLOR 600 icon. 3 From the Queue menu, select Setup.
The Queue Setup dialog box appears. 27 Follow these steps to enable the Windows Print Manager: 1 Click Start, point to the USB/Parallel Adapter. Setting Up Your System to Print to the EPSON Stylus COLOR 600 The EPSON Stylus COLOR 600 printer driver software requires that you use the Windows Print Manager when printing to Programs, Epson, and select Spool Manager4. 2 In the EPSON Spool Manager window, select the EPSON Stylus COLOR 600 icon. 3 From the Queue menu, select Setup.

User Manual - USB/Parallel Kit
Page 27
4 Select Use Print Manager, then click OK to close the Queue Setup dialog box. 5 Close the Spool Manager window. 28
4 Select Use Print Manager, then click OK to close the Queue Setup dialog box. 5 Close the Spool Manager window. 28
User Manual - USB/Parallel Kit
Page 28
... depending on using Monitor3. 29 See the next section to turn on your print jobs and cancel, pause, or restart them. Now see the next section for your document is printing (though printing and processing may be slower). Setting Up Monitor3 1 Open the Chooser from the...Your iMac The Monitor3 utility lets you check on background printing and increase the memory allocation for Monitor3. Then select the USB Port. 2 Under Background Printing, click On and close the Chooser. 3 To increase the memory allocation, select EPSON Monitor3 in the Extensions folder in your system's available RAM...
... depending on using Monitor3. 29 See the next section to turn on your print jobs and cancel, pause, or restart them. Now see the next section for your document is printing (though printing and processing may be slower). Setting Up Monitor3 1 Open the Chooser from the...Your iMac The Monitor3 utility lets you check on background printing and increase the memory allocation for Monitor3. Then select the USB Port. 2 Under Background Printing, click On and close the Chooser. 3 To increase the memory allocation, select EPSON Monitor3 in the Extensions folder in your system's available RAM...

User Manual - USB/Parallel Kit
Page 29
Monitoring Print Jobs with the current job, or doubleclick a job and use these command buttons: click click click to delete to restart to pause 30 You see the following dialog box: Job currently printing Jobs queued for printing Click to set priorities or print times for waiting print jobs You can track the printer's progress with Monitor3 While you're printing, click the EPSON Monitor3 icon on the Application menu at the right end of the menu bar.
Monitoring Print Jobs with the current job, or doubleclick a job and use these command buttons: click click click to delete to restart to pause 30 You see the following dialog box: Job currently printing Jobs queued for printing Click to set priorities or print times for waiting print jobs You can track the printer's progress with Monitor3 While you're printing, click the EPSON Monitor3 icon on the Application menu at the right end of the menu bar.

User Manual - USB/Parallel Kit
Page 30
Priority list box Settings selected for jobs waiting to release the queue and resume printing. 31 To set priorities for the highlighted print job Note: If you see a stop sign icon and the message "Print queue on hold" in the EPSON Monitor3 dialog box, select Start print queue from the Printer menu to print, click the job, then click the Show details arrow at the bottom of the window.
Priority list box Settings selected for jobs waiting to release the queue and resume printing. 31 To set priorities for the highlighted print job Note: If you see a stop sign icon and the message "Print queue on hold" in the EPSON Monitor3 dialog box, select Start print queue from the Printer menu to print, click the job, then click the Show details arrow at the bottom of the window.

User Manual - USB/Parallel Kit
Page 31
The Priority list becomes active. Click the arrow and select one of the following settings: Normal prints the job in the order it is received Urgent moves the job before any Normal priority jobs in the print queue Hold holds the job in the print queue until you're ready to release it for printing by clicking the restart icon Print Time opens this dialog box so you can set a specific day and time for printing. 32
The Priority list becomes active. Click the arrow and select one of the following settings: Normal prints the job in the order it is received Urgent moves the job before any Normal priority jobs in the print queue Hold holds the job in the print queue until you're ready to release it for printing by clicking the restart icon Print Time opens this dialog box so you can set a specific day and time for printing. 32
User Manual - Color Calibration
Page 6
Contents Introduction Features 1 Safety Instructions 2 ENERGY STAR Compliance 3 System Requirements 4 Where to Get Help 5 Chapter 1 Unpacking the Color Calibrator Contents 1-1 Parts 1-2 Calibrator 1-2 Y-cable 1-2 Chapter 2 Setting up Your Color Calibrator Connecting the Calibrator to Your Computer 2-2 Installing the Utility Software 2-5 Chapter 3 Calibrating Your Printing System Calibrating the EPSON Color Calibrator 3-2 Printing a Calibration Sheet 3-5 Creating a Color Profile 3-8 Implementing Your Profile 3-10 Contents v
Contents Introduction Features 1 Safety Instructions 2 ENERGY STAR Compliance 3 System Requirements 4 Where to Get Help 5 Chapter 1 Unpacking the Color Calibrator Contents 1-1 Parts 1-2 Calibrator 1-2 Y-cable 1-2 Chapter 2 Setting up Your Color Calibrator Connecting the Calibrator to Your Computer 2-2 Installing the Utility Software 2-5 Chapter 3 Calibrating Your Printing System Calibrating the EPSON Color Calibrator 3-2 Printing a Calibration Sheet 3-5 Creating a Color Profile 3-8 Implementing Your Profile 3-10 Contents v

User Manual - Color Calibration
Page 8
You can only adjust to ICC profiles that are based on your EPSON RS-5000 Fiery® RIP version 1.3 or your EPSON RS-5100 Fiery X2 RIP, the calibrator helps you preview your output at the earliest possible stage in your prepress workflow. Note: The calibrator can ... profile for your printer and then implementing it on JapanColor, SWOP, or EURO profiles. This lets you achieve consistent color output. Introduction 1 Introduction Features The EPSON Color Calibrator restores your EPSON Stylus® Pro 5000 or 9000 printer to match your printing vendor's system using ICC profiles.
You can only adjust to ICC profiles that are based on your EPSON RS-5000 Fiery® RIP version 1.3 or your EPSON RS-5100 Fiery X2 RIP, the calibrator helps you preview your output at the earliest possible stage in your prepress workflow. Note: The calibrator can ... profile for your printer and then implementing it on JapanColor, SWOP, or EURO profiles. This lets you achieve consistent color output. Introduction 1 Introduction Features The EPSON Color Calibrator restores your EPSON Stylus® Pro 5000 or 9000 printer to match your printing vendor's system using ICC profiles.

User Manual - Color Calibration
Page 21
Chapter 3 Calibrating Your Printing System Use your Color Calibrator to follow all the instructions in this chapter in the order they appear. Be sure to calibrate your EPSON Stylus Pro printing system at the following times: t When you set up the system for the first time 3 t After the system has been overhauled or repaired t Before using the system after a long period of inactivity Calibrating your printing system is a multi-step process. Calibrating Your Printing System 3-1
Chapter 3 Calibrating Your Printing System Use your Color Calibrator to follow all the instructions in this chapter in the order they appear. Be sure to calibrate your EPSON Stylus Pro printing system at the following times: t When you set up the system for the first time 3 t After the system has been overhauled or repaired t Before using the system after a long period of inactivity Calibrating your printing system is a multi-step process. Calibrating Your Printing System 3-1


