Product Brochure
Page 1
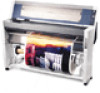
...; DX3™ print head for astounding image quality • 1440 x 720 dpi for all six ink cartridges facilitates accurate production estimates and ease of maintenance • On-the-fly ink cartridge changing even during the middle of a print job with no loss...reason we created the wide-format EPSON Stylus Pro 9000 Series. it can communicate new ideas, demonstrate new concepts, and make an unforgettable impact. Total throughput times depend upon print engine speed only. With its remarkable speed and incredibly durable print engine, the EPSON Stylus Pro 9000 Series provides a set of ...
...; DX3™ print head for astounding image quality • 1440 x 720 dpi for all six ink cartridges facilitates accurate production estimates and ease of maintenance • On-the-fly ink cartridge changing even during the middle of a print job with no loss...reason we created the wide-format EPSON Stylus Pro 9000 Series. it can communicate new ideas, demonstrate new concepts, and make an unforgettable impact. Total throughput times depend upon print engine speed only. With its remarkable speed and incredibly durable print engine, the EPSON Stylus Pro 9000 Series provides a set of ...
Product Brochure
Page 4
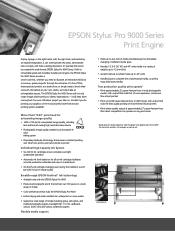
.../Accessories Part Numbers EPSON Stylus Pro 9000 Fiery X2 Printing System EPSON Stylus Pro 9000 Print Engine only C277011S C277011B EPSON Stylus Pro 9500 Fiery X2 Printing System EPSON Stylus Pro 9500 Print Engine only C381011S C381011B EPSON RS-5100 Fiery X2 RIP C850092 Printable Area Maximum paper width: Left and right print margins: Maximum printable width: Maximum printable length: Media Handling Media input: Cut sheet size: Max. EPSON Stylus Pro 9000 Series Print Engine Specifications Printing Method Micro...
.../Accessories Part Numbers EPSON Stylus Pro 9000 Fiery X2 Printing System EPSON Stylus Pro 9000 Print Engine only C277011S C277011B EPSON Stylus Pro 9500 Fiery X2 Printing System EPSON Stylus Pro 9500 Print Engine only C381011S C381011B EPSON RS-5100 Fiery X2 RIP C850092 Printable Area Maximum paper width: Left and right print margins: Maximum printable width: Maximum printable length: Media Handling Media input: Cut sheet size: Max. EPSON Stylus Pro 9000 Series Print Engine Specifications Printing Method Micro...
User Manual
Page 5
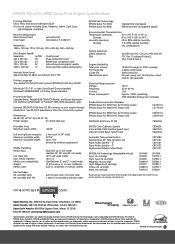
... Features 2-9 Selecting the Printer's Interface 2-9 Configuring the Parallel Interface 2-10 Changing the Printer's Code Page Setting 2-11 Restoring Default Settings 2-11 Setting the Control Panel Language 2-12 3 Maintaining and Transporting the Printer Running a Nozzle Check 3-1 Running a Cleaning Cycle 3-2 Aligning the Print Head 3-3 Printing the Alignment Patterns 3-3 Completing the Alignment Procedure 3-5 Replacing Ink Cartridges 3-7 Replacing...
... Features 2-9 Selecting the Printer's Interface 2-9 Configuring the Parallel Interface 2-10 Changing the Printer's Code Page Setting 2-11 Restoring Default Settings 2-11 Setting the Control Panel Language 2-12 3 Maintaining and Transporting the Printer Running a Nozzle Check 3-1 Running a Cleaning Cycle 3-2 Aligning the Print Head 3-3 Printing the Alignment Patterns 3-3 Completing the Alignment Procedure 3-5 Replacing Ink Cartridges 3-7 Replacing...
User Manual
Page 15
... the Operate light flashes briefly then goes out. Avoid using your printer and RIP Station 5100, read the following safety instructions to rapid changes in temperature and humidity or shock and vibrations. • Do not place the printer near a window or in the printer case (or... and related problems. • Keep the entire system away from potential sources of electromagnetic interference, such as photocopiers or air control systems that the print head is off . Placez l'imprimante près d'une prise de contacte où la fiche peut être débranchée facilement. •...
... the Operate light flashes briefly then goes out. Avoid using your printer and RIP Station 5100, read the following safety instructions to rapid changes in temperature and humidity or shock and vibrations. • Do not place the printer near a window or in the printer case (or... and related problems. • Keep the entire system away from potential sources of electromagnetic interference, such as photocopiers or air control systems that the print head is off . Placez l'imprimante près d'une prise de contacte où la fiche peut être débranchée facilement. •...
User Manual
Page 16
... service the printer (or RIP Station 5100) yourself. Also, make sure the total ampere rating of children and do not move the print head by the operating instructions. Refer all devices plugged into the extension cord does not exceed the cord's ampere rating. If it gets in reduced... entered the printer (or RIP Station 5100); if the printer (or RIP Station 5100) does not operate normally or exhibits a distinct change in damage to the print head. • Install the ink cartridge immediately after you to refill them immediately with soap and water. if the equipment has been dropped ...
... service the printer (or RIP Station 5100) yourself. Also, make sure the total ampere rating of children and do not move the print head by the operating instructions. Refer all devices plugged into the extension cord does not exceed the cord's ampere rating. If it gets in reduced... entered the printer (or RIP Station 5100); if the printer (or RIP Station 5100) does not operate normally or exhibits a distinct change in damage to the print head. • Install the ink cartridge immediately after you to refill them immediately with soap and water. if the equipment has been dropped ...
User Manual
Page 37
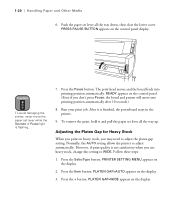
...print on the display. 3. READY appears on the control panel display. Follow these steps: 1. PLATEN GAP=WIDE appears on the display. 2. The print head moves and the board feeds into printing... position automatically after 10 seconds.) 8. Press the SelecType button. PRINTER SETTING MENU appears on the display. 1-20 To remove the print..., never move into printing position automatically. Adjusting...Press the Pause button. Run your print job. Push the paper set ... way up. However, if print quality is not satisfactory when...
...print on the display. 3. READY appears on the control panel display. Follow these steps: 1. PLATEN GAP=WIDE appears on the display. 2. The print head moves and the board feeds into printing... position automatically after 10 seconds.) 8. Press the SelecType button. PRINTER SETTING MENU appears on the display. 1-20 To remove the print..., never move into printing position automatically. Adjusting...Press the Pause button. Run your print job. Push the paper set ... way up. However, if print quality is not satisfactory when...

User Manual
Page 43
... the drying time. Press the Item button. MENU appears on the display. Press the Item button. When you change media, make sure you select the correct setting or change it whenever you can select it back to STD. 1-26 Press the Item button. Start with step 8. ...how long the print head will pause between pages (or before cutting) to use, or select the standard setting, STD. button to step 9. For the EPSON Stylus Pro 9500, continue with one minute. Then press the Enter button. 4. SUCTION=NORM* appears on that paper. 1. For the EPSON Stylus Pro 9000, skip to ...
... the drying time. Press the Item button. MENU appears on the display. Press the Item button. When you change media, make sure you select the correct setting or change it whenever you can select it back to STD. 1-26 Press the Item button. Start with step 8. ...how long the print head will pause between pages (or before cutting) to use, or select the standard setting, STD. button to step 9. For the EPSON Stylus Pro 9500, continue with one minute. Then press the Enter button. 4. SUCTION=NORM* appears on that paper. 1. For the EPSON Stylus Pro 9000, skip to ...

User Manual
Page 51
...on the display. You can use the SelecType menus to testing the printer and checking the status of various components, you change the top and bottom margins to cycle through all margins to find additional information: SelecType menus Menu Description For more information, ... paper thickness and drying time, page 1-25 Configuration and select registered configurations Cutter Replace the paper cutter blade Replacement page 3-11 Head Alignment Align the print head page 3-3 Setting Default Roll Paper Margins The default margins for roll paper are .12 inches or 3 mm (left and right...
...on the display. You can use the SelecType menus to testing the printer and checking the status of various components, you change the top and bottom margins to cycle through all margins to find additional information: SelecType menus Menu Description For more information, ... paper thickness and drying time, page 1-25 Configuration and select registered configurations Cutter Replace the paper cutter blade Replacement page 3-11 Head Alignment Align the print head page 3-3 Setting Default Roll Paper Margins The default margins for roll paper are .12 inches or 3 mm (left and right...
User Manual
Page 58
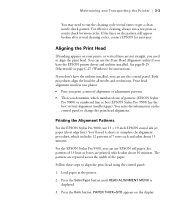
... edge first). Printing the Alignment Patterns For the EPSON Stylus Pro 9000, use the Print Head Alignment utility if you have the utilities installed, you can use the control panel. PAPER THICK=STD appears on the control panel to change the print head alignment. For effective cleaning, always run the cleaning cycle several cleaning cycles, contact EPSON for instructions. Print head alignment involves...
... edge first). Printing the Alignment Patterns For the EPSON Stylus Pro 9000, use the Print Head Alignment utility if you have the utilities installed, you can use the control panel. PAPER THICK=STD appears on the control panel to change the print head alignment. For effective cleaning, always run the cleaning cycle several cleaning cycles, contact EPSON for instructions. Print head alignment involves...
User Manual
Page 79
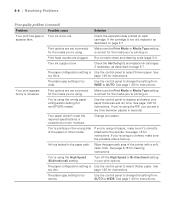
...problems (continued) Problem Possible cause Solution Your print has gaps or Your ink is low. Print head nozzles are set incorrectly for instructions. Your ink... cloth. Wipe the paper path area of the paper or other media. See page 1-20 for non-EPSON media). The platen gap setting is too narrow. See page 1-25 for cleaning instructions. See page 3-...or contains too much moisture. Make sure the Print Mode or Media Type setting is too old, replace it 's correctly attached to register and select your paper. Change your paper thickness and dry time. See page ...
...problems (continued) Problem Possible cause Solution Your print has gaps or Your ink is low. Print head nozzles are set incorrectly for instructions. Your ink... cloth. Wipe the paper path area of the paper or other media. See page 1-20 for non-EPSON media). The platen gap setting is too narrow. See page 1-25 for cleaning instructions. See page 3-...or contains too much moisture. Make sure the Print Mode or Media Type setting is too old, replace it 's correctly attached to register and select your paper. Change your paper thickness and dry time. See page ...
User Manual
Page 83
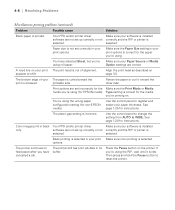
...Blank paper is smeared. The bottom edge of alignment. See page 1-25 for EPSON media). The platen gap setting is out of your print The print head is incorrect. selected. The printer still has print job data in your paper thickness. You have cancelled a job. Use the ... Make sure your print options. You're using roll paper. Use the control panel to change the setting from AUTO to register and select your print Make sure color printing is idle. options. See page 1-20 for non-EPSON media). selected. Color images print in your software ...
...Blank paper is smeared. The bottom edge of alignment. See page 1-25 for EPSON media). The platen gap setting is out of your print The print head is incorrect. selected. The printer still has print job data in your paper thickness. You have cancelled a job. Use the ... Make sure your print options. You're using roll paper. Use the control panel to change the setting from AUTO to register and select your print Make sure color printing is idle. options. See page 1-20 for non-EPSON media). selected. Color images print in your software ...
User Manual
Page 120
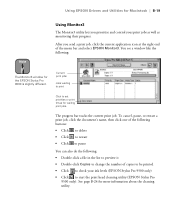
... to restart • Click to start the print head cleaning utility (EPSON Stylus Pro 9500 only). The progress bar tracks the current print job. After you prioritize and control your ink levels (EPSON Stylus Pro 9500 only) • Click to pause You can also do the following : Note The Monitor3 window for the EPSON Stylus Pro 9000 is slightly different. You see a window...
... to restart • Click to start the print head cleaning utility (EPSON Stylus Pro 9500 only). The progress bar tracks the current print job. After you prioritize and control your ink levels (EPSON Stylus Pro 9500 only) • Click to pause You can also do the following : Note The Monitor3 window for the EPSON Stylus Pro 9000 is slightly different. You see a window...
User Manual
Page 124
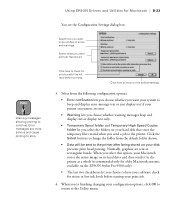
...a whole (recommended only for older Macintosh systems; Click here to return to be sent to the printer after being stored on the EPSON Stylus Pro 9500 only). • The last two checkboxes let you want to the default settings. 3. When you select this option, your ...lets you choose whether you 're finishing changing your configuration options, click OK to return to stop. available on your disk prevents print head pausing. Note Warning messages allowing printing to check for errors and/or the ink level before starting your print job. 4. Normally, graphics are more serious...
...a whole (recommended only for older Macintosh systems; Click here to return to be sent to the printer after being stored on the EPSON Stylus Pro 9500 only). • The last two checkboxes let you want to the default settings. 3. When you select this option, your ...lets you choose whether you 're finishing changing your configuration options, click OK to return to stop. available on your disk prevents print head pausing. Note Warning messages allowing printing to check for errors and/or the ink level before starting your print job. 4. Normally, graphics are more serious...
Service Manual
Page 17
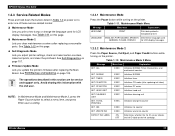
...EPSON Stylus Pro 9000 1.2.3 Service-Related Modes Press and hold down the buttons listed in Table 1-2 at power on to select a menu item, and press Enter save a setting. 1.2.3.1 Maintenance Mode Press the Pause button while turning on the printer. Maintenance Mode Menu Message Menu Item Explanation HEX DUMP PRINT Print data printed... messages. Firmware Update Mode Lets you print a hex dump or change the language used GERMAN, ITALIAN, FRENCH...Item Explanation INIT. INK EXEC. Initializes NVRAM INIT. Initializes head unit INIT CLEANING UNIT EXEC. TIMER EXEC. Initializes CR...
...EPSON Stylus Pro 9000 1.2.3 Service-Related Modes Press and hold down the buttons listed in Table 1-2 at power on to select a menu item, and press Enter save a setting. 1.2.3.1 Maintenance Mode Press the Pause button while turning on the printer. Maintenance Mode Menu Message Menu Item Explanation HEX DUMP PRINT Print data printed... messages. Firmware Update Mode Lets you print a hex dump or change the language used GERMAN, ITALIAN, FRENCH...Item Explanation INIT. INK EXEC. Initializes NVRAM INIT. Initializes head unit INIT CLEANING UNIT EXEC. TIMER EXEC. Initializes CR...
Service Manual
Page 50
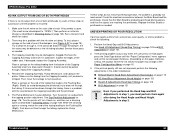
... occurs only when the user prints on thick paper, press the SelecType button until the problem is resolved: 1. If damaged, replace the Capping Assembly. If ink cannot be pulled through the damper, the ink valves may change.) See Paper Configuration Menu on page 116. The Pump ... 1, you must perform them again after doing the Head Angle and Head Height Adjustments in the printer. Try to draw water through the tubing, replace the Pump Mechanism. Then move the carriage to the Flushing Box (Right). EPSON Stylus Pro 9000 NO INK OUTPUT FROM ONE OR BOTH PRINTHEADS If there...
... occurs only when the user prints on thick paper, press the SelecType button until the problem is resolved: 1. If damaged, replace the Capping Assembly. If ink cannot be pulled through the damper, the ink valves may change.) See Paper Configuration Menu on page 116. The Pump ... 1, you must perform them again after doing the Head Angle and Head Height Adjustments in the printer. Try to draw water through the tubing, replace the Pump Mechanism. Then move the carriage to the Flushing Box (Right). EPSON Stylus Pro 9000 NO INK OUTPUT FROM ONE OR BOTH PRINTHEADS If there...

Service Manual
Page 112
EPSON Stylus Pro 9000 SENSORS This function allows you can toggle it . CR Origin Indicates the location of PG Gear. ON or OFF, depending on the LCD display. Ink lever B Indicates the position of the color-side (Lc/Lm/Y) ink holder lever. X = "B" or "C" head and yy = ink color such as 0~7. For example,... to check the Paper Release Lever sensor, select "Sen: Lever" from the Sensor menu and move the lever up or down by hand to check it physically by hand and watch the display for any changes. Lever Indicates whether ...
EPSON Stylus Pro 9000 SENSORS This function allows you can toggle it . CR Origin Indicates the location of PG Gear. ON or OFF, depending on the LCD display. Ink lever B Indicates the position of the color-side (Lc/Lm/Y) ink holder lever. X = "B" or "C" head and yy = ink color such as 0~7. For example,... to check the Paper Release Lever sensor, select "Sen: Lever" from the Sensor menu and move the lever up or down by hand to check it physically by hand and watch the display for any changes. Lever Indicates whether ...

Service Manual
Page 117
...than the length of 0.1 m. Adjustments 117 Note that the result must be read in test prints. A "+" before the number indicates the paper is loaded, "Check Skew 1.0m" appears.... Enter button to change the skew- After setting the distance, press the Enter button to select the ID value. After entering the head ID for service ...heads. If the paper is measured in millimeters (even though the display indicates meters). a smaller distance decreases the magnitude of -range error ("Error Rank Input") occurs, press the Enter button and re-enter the ID. 3. EPSON Stylus Pro 9000...
...than the length of 0.1 m. Adjustments 117 Note that the result must be read in test prints. A "+" before the number indicates the paper is loaded, "Check Skew 1.0m" appears.... Enter button to change the skew- After setting the distance, press the Enter button to select the ID value. After entering the head ID for service ...heads. If the paper is measured in millimeters (even though the display indicates meters). a smaller distance decreases the magnitude of -range error ("Error Rank Input") occurs, press the Enter button and re-enter the ID. 3. EPSON Stylus Pro 9000...
Service Manual
Page 119
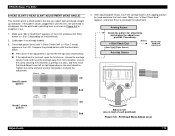
... OK Bad 4. EPSON Stylus Pro 9000 B HEAD SLANT/C HEAD SLANT ADJUSTMENT (HEAD ANGLE) This function prints a check pattern that is printing at a slant, and then move the Head Adjust Lever left or right depending on the printhead). 2. Compare the printed pattern with the illustration below . If the adjustment is misaligned. Printing Pattern Check the pattern for offset lines and change the adjust lever...
... OK Bad 4. EPSON Stylus Pro 9000 B HEAD SLANT/C HEAD SLANT ADJUSTMENT (HEAD ANGLE) This function prints a check pattern that is printing at a slant, and then move the Head Adjust Lever left or right depending on the printhead). 2. Compare the printed pattern with the illustration below . If the adjustment is misaligned. Printing Pattern Check the pattern for offset lines and change the adjust lever...
Service Manual
Page 120
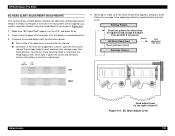
...change the adjust lever position if necessary. BC Slant Check End [Enter] [SelecType]/[Paper Source] Print Adj. Loosen the screw securing Head C, and move the carriage away from home position. Return the carriage to check the adjustment. EPSON Stylus Pro 9000 BC HEAD SLANT ADJUSTMENT (HEAD HEIGHT) This function prints... a check pattern that lets you need to the right of Head C) Figure 5-6. Compare the printed pattern with the illustration below. ...
...change the adjust lever position if necessary. BC Slant Check End [Enter] [SelecType]/[Paper Source] Print Adj. Loosen the screw securing Head C, and move the carriage away from home position. Return the carriage to check the adjustment. EPSON Stylus Pro 9000 BC HEAD SLANT ADJUSTMENT (HEAD HEIGHT) This function prints... a check pattern that lets you need to the right of Head C) Figure 5-6. Compare the printed pattern with the illustration below. ...


