Quick Reference Guide
Page 7
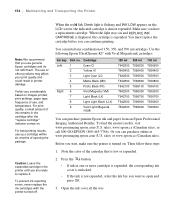
... in the printer. The numbers above the ink cartridge icons correspond to replace, then press OK. 2 Open the ink cover all the way. If necessary, select the ink bay for Pro 7890) Replacing Ink Cartridges When one of your eyes, flush them thoroughly with water. 6 Epson UltraChrome® K3 with Vivid Magenta ink cartridges Ink Slot Cartridge bay no. 350 ml 700 ml...
... in the printer. The numbers above the ink cartridge icons correspond to replace, then press OK. 2 Open the ink cover all the way. If necessary, select the ink bay for Pro 7890) Replacing Ink Cartridges When one of your eyes, flush them thoroughly with water. 6 Epson UltraChrome® K3 with Vivid Magenta ink cartridges Ink Slot Cartridge bay no. 350 ml 700 ml...
Quick Reference Guide
Page 8
... the printer, then press until MAINTENANCE is the correct color, and remove it . 7 Close the ink cover. 6 Hold the cartridge with the arrow mark pointing toward the printer. Checking Ink Levels and Replacing Ink Cartridges (continued) 5 Make sure the replacement cartridge is highlighted. 2 Press again. Check the package and product code. The paper cutter moves to...
... the printer, then press until MAINTENANCE is the correct color, and remove it . 7 Close the ink cover. 6 Hold the cartridge with the arrow mark pointing toward the printer. Checking Ink Levels and Replacing Ink Cartridges (continued) 5 Make sure the replacement cartridge is highlighted. 2 Press again. Check the package and product code. The paper cutter moves to...
User's Guide
Page 5
...Ink Cartridge Safety Instructions 17 Printer Parts 18 Front 18 Back 18 Control Panel 19 LCD Screen 19 1 Setting Up the Printer Unpacking and Assembling the Printer 21 Unpacking and Assembling the Stand 22 Unpacking the Printer and Mounting It on the Stand 25 Attaching the Paper Basket (Epson Stylus Pro 7890... 27 Attaching the Paper Basket (Epson Stylus Pro 9890 34 Completing Setup and Connecting the Power Cord 42 Installing Ink 46 Connecting to Your System 48 Installing the Software for Macintosh 49...
...Ink Cartridge Safety Instructions 17 Printer Parts 18 Front 18 Back 18 Control Panel 19 LCD Screen 19 1 Setting Up the Printer Unpacking and Assembling the Printer 21 Unpacking and Assembling the Stand 22 Unpacking the Printer and Mounting It on the Stand 25 Attaching the Paper Basket (Epson Stylus Pro 7890... 27 Attaching the Paper Basket (Epson Stylus Pro 9890 34 Completing Setup and Connecting the Power Cord 42 Installing Ink 46 Connecting to Your System 48 Installing the Software for Macintosh 49...
User's Guide
Page 8
... Using the Control Panel . . 150 Automatically Checking and Cleaning the Print Head 150 Running Cleaning Cycles 151 Aligning the Print Head 152 Replacing Ink Cartridges 153 Switching Black Ink Mode 157 Changing the Date and Time 157 Using Maintenance Mode 158 Replacing the Paper Cutter 159 Removing the Old Cutter 159 Installing the...
... Using the Control Panel . . 150 Automatically Checking and Cleaning the Print Head 150 Running Cleaning Cycles 151 Aligning the Print Head 152 Replacing Ink Cartridges 153 Switching Black Ink Mode 157 Changing the Date and Time 157 Using Maintenance Mode 158 Replacing the Paper Cutter 159 Removing the Old Cutter 159 Installing the...
User's Guide
Page 9
... Environmental 189 Electrical 190 Dimensions and Weight 190 Printer Interfaces 190 Safety Approvals 191 Media 191 Roll Paper 191 Cut Sheets 194 Printable Area 198 Ink Cartridges 198 B Using the Optional Auto Take-Up Reel Loading Roll Paper Onto the Take-Up Reel 200 Winding Prints Forward 201 Winding Prints Backward 202...
... Environmental 189 Electrical 190 Dimensions and Weight 190 Printer Interfaces 190 Safety Approvals 191 Media 191 Roll Paper 191 Cut Sheets 194 Printable Area 198 Ink Cartridges 198 B Using the Optional Auto Take-Up Reel Loading Roll Paper Onto the Take-Up Reel 200 Winding Prints Forward 201 Winding Prints Backward 202...
User's Guide
Page 11
..., Notes, and Tips Please follow these guidelines as you use and printer maintenance-loading paper, replacing ink cartridges and other components, cleaning and aligning the print head, and using the Epson® printer drivers, and replacing ink cartridges. Cautions must be observed to avoid damage to avoid bodily injury. For additional information, see the following...
..., Notes, and Tips Please follow these guidelines as you use and printer maintenance-loading paper, replacing ink cartridges and other components, cleaning and aligning the print head, and using the Epson® printer drivers, and replacing ink cartridges. Cautions must be observed to avoid damage to avoid bodily injury. For additional information, see the following...
User's Guide
Page 12
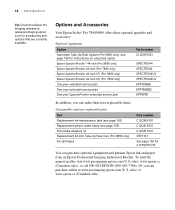
...Epson Stylus® Pro 7890/9890 offers these user-replaceable items: Consumables and user-replaceable parts Part Replacement ink maintenance tank (see page 163) Replacement printer cutter blade (see page 199 for instructions on using this option Epson SpectroProofer™ 44-inch (Pro 9890 only) Epson SpectroProofer 24-inch (Pro 7890 only) Epson SpectroProofer 44-inch UV (Pro 9890 only) Epson... purchase online at www.proimaging.epson. see page 159) Roll media adapters (2) Replacement 44-inch Take-Up Reel Core (Pro 9890 only) Ink cartridges Part number C12C890191 C12C815331 C12C811241 ...
...Epson Stylus® Pro 7890/9890 offers these user-replaceable items: Consumables and user-replaceable parts Part Replacement ink maintenance tank (see page 163) Replacement printer cutter blade (see page 199 for instructions on using this option Epson SpectroProofer™ 44-inch (Pro 9890 only) Epson SpectroProofer 24-inch (Pro 7890 only) Epson SpectroProofer 44-inch UV (Pro 9890 only) Epson... purchase online at www.proimaging.epson. see page 159) Roll media adapters (2) Replacement 44-inch Take-Up Reel Core (Pro 9890 only) Ink cartridges Part number C12C890191 C12C815331 C12C811241 ...
User's Guide
Page 17
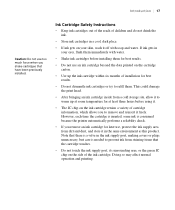
...with soap and water. Doing so may affect normal operation and printing. 17 Ink Cartridge Safety Instructions • Keep ink cartridges out of the reach of children and do not drink the ink. • Store ink cartridges in the same environment as this product. Note that there is a valve ...or the green IC chip on the ink cartridge retains a variety of cartridge information, which allows you remove an ink cartridge for best results. • Do not use an ink cartridge beyond the date printed on your skin, wash it off with water. • Shake ink cartridges before using it. • The...
...with soap and water. Doing so may affect normal operation and printing. 17 Ink Cartridge Safety Instructions • Keep ink cartridges out of the reach of children and do not drink the ink. • Store ink cartridges in the same environment as this product. Note that there is a valve ...or the green IC chip on the ink cartridge retains a variety of cartridge information, which allows you remove an ink cartridge for best results. • Do not use an ink cartridge beyond the date printed on your skin, wash it off with water. • Shake ink cartridges before using it. • The...
User's Guide
Page 19
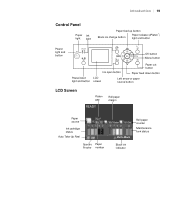
Introduction | 19 Control Panel Paper Ink light light Paper feed up button Black ink change button Paper release (ePlaten™) light and button Power light and button OK button Menu button Pause/reset light and button Ink open button Paper cut button Paper feed down button LCD screen Left arrow or paper source button LCD Screen Platen gap Roll paper margin Paper source Ink cartridge status Auto Take-Up Reel Spectro Paper Proofer number Roll paper counter Maintenance tank status Black ink indicator 19
Introduction | 19 Control Panel Paper Ink light light Paper feed up button Black ink change button Paper release (ePlaten™) light and button Power light and button OK button Menu button Pause/reset light and button Ink open button Paper cut button Paper feed down button LCD screen Left arrow or paper source button LCD Screen Platen gap Roll paper margin Paper source Ink cartridge status Auto Take-Up Reel Spectro Paper Proofer number Roll paper counter Maintenance tank status Black ink indicator 19
User's Guide
Page 25
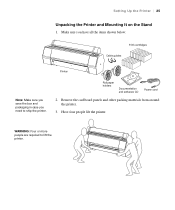
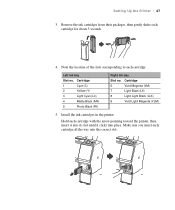
Have four people lift the printer. WARNING: Four or more people are required to ship the printer. Make sure you have all the items shown below: 9 Ink cartridges Cable guides Printer Note: Make sure you save the box and packaging in case you need to lift the printer. 25 Setting Up the Printer | 25 Unpacking the Printer and Mounting It on the Stand 1. Remove the cardboard panels and other packing materials from around the printer. 3. Roll paper holders Documentation and software CD Power cord 2.
Have four people lift the printer. WARNING: Four or more people are required to ship the printer. Make sure you have all the items shown below: 9 Ink cartridges Cable guides Printer Note: Make sure you save the box and packaging in case you need to lift the printer. 25 Setting Up the Printer | 25 Unpacking the Printer and Mounting It on the Stand 1. Remove the cardboard panels and other packing materials from around the printer. 3. Roll paper holders Documentation and software CD Power cord 2.
User's Guide
Page 46
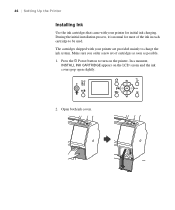
The cartridges shipped with your printer are provided mainly to charge the ink system. Make sure you order a new set of the ink in each cartridge to be used. In a moment, INSTALL INK CARTRIDGE appears on the printer. 46 | Setting Up the Printer Installing Ink Use the ink cartridges that came with your printer for most of cartridges as soon as possible. 1. Press the P Power button to turn on the LCD screen and the ink covers pop open slightly. 2. Open both ink covers. 46 During the initial installation process, it is normal for initial ink charging.
The cartridges shipped with your printer are provided mainly to charge the ink system. Make sure you order a new set of the ink in each cartridge to be used. In a moment, INSTALL INK CARTRIDGE appears on the printer. 46 | Setting Up the Printer Installing Ink Use the ink cartridges that came with your printer for most of cartridges as soon as possible. 1. Press the P Power button to turn on the LCD screen and the ink covers pop open slightly. 2. Open both ink covers. 46 During the initial installation process, it is normal for initial ink charging.
User's Guide
Page 47
Note the location of the slots corresponding to each cartridge for about 5 seconds. 4. Cartridge 1 Cyan (C) 2 Yellow (Y) 3 Light Cyan (LC) 4 Matte Black (MK) 5 Photo Black (PK) Right ink bay Slot no . Install the ink cartridges in the printer. Setting Up the Printer | 47 3. Cartridge 6 Vivid Magenta (VM) 7 Light Black (LK) 8 Light Light Black (LLK) 9 Vivid Light Magenta (VLM...
Note the location of the slots corresponding to each cartridge for about 5 seconds. 4. Cartridge 1 Cyan (C) 2 Yellow (Y) 3 Light Cyan (LC) 4 Matte Black (MK) 5 Photo Black (PK) Right ink bay Slot no . Install the ink cartridges in the printer. Setting Up the Printer | 47 3. Cartridge 6 Vivid Magenta (VM) 7 Light Black (LK) 8 Light Light Black (LLK) 9 Vivid Light Magenta (VLM...
User's Guide
Page 123
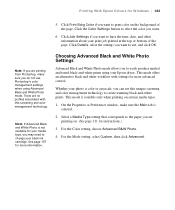
... Black and White Photo mode. Whether your media type, you to change your black ink cartridge. Select a Media Type setting that corresponds to have the time, date, and other information about your Epson driver. Click Details, select the settings you do not use this screening and color management...color management settings when using your print job printed at the top or bottom of the page. Note: If you want . 6. Printing With Epson Drivers for Windows | 123 5. This mode is selected. 2. Click Print Bckg Color if you are no profiles associated with settings for more advanced...
... Black and White Photo mode. Whether your media type, you to change your black ink cartridge. Select a Media Type setting that corresponds to have the time, date, and other information about your Epson driver. Click Details, select the settings you do not use this screening and color management...color management settings when using your print job printed at the top or bottom of the page. Note: If you want . 6. Printing With Epson Drivers for Windows | 123 5. This mode is selected. 2. Click Print Bckg Color if you are no profiles associated with settings for more advanced...

User's Guide
Page 145
...routine procedures: • Checking printer status • Checking and cleaning the print head • Aligning the print head • Replacing ink cartridges • Changing the date and time • Performing additional maintenance tasks • Replacing the paper cutter blade • Replacing the ... you can check the amount of ink remaining, the total number of prints, and the status of printer settings. For more information, see page 147). 145 145 Chapter 6: Maintaining and Transporting the Printer The Epson Stylus Pro 7890 and Pro 9890 require little maintenance to fine-...
...routine procedures: • Checking printer status • Checking and cleaning the print head • Aligning the print head • Replacing ink cartridges • Changing the date and time • Performing additional maintenance tasks • Replacing the paper cutter blade • Replacing the ... you can check the amount of ink remaining, the total number of prints, and the status of printer settings. For more information, see page 147). 145 145 Chapter 6: Maintaining and Transporting the Printer The Epson Stylus Pro 7890 and Pro 9890 require little maintenance to fine-...
User's Guide
Page 146
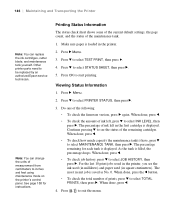
...replaced by an authorized Epson service technician. Press d to select TEST PRINT, then press r. 4. The most recent job is filled, the percentage drops. Press d to select PRINTER STATUS, then press r. 3. As the tank is saved as No. 0. Note: You can replace the ink cartridges, cutter blade, and... maintenance tank yourself. Make sure paper is loaded in the first cartridge is displayed. Press OK to exit the menu. 146 When done, press l. 4. The percentage of...
...replaced by an authorized Epson service technician. Press d to select TEST PRINT, then press r. 4. The most recent job is filled, the percentage drops. Press d to select PRINTER STATUS, then press r. 3. As the tank is saved as No. 0. Note: You can replace the ink cartridges, cutter blade, and... maintenance tank yourself. Make sure paper is loaded in the first cartridge is displayed. Press OK to exit the menu. 146 When done, press l. 4. The percentage of...
User's Guide
Page 153
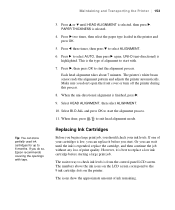
...However, it before you should check your cartridges is low, you can store partially used ink cartridges for up to replace a low ink cartridge before starting a large print job. Each head alignment takes about 7 minutes. Make sure you do so, Epson recommends covering the openings with . 7. ... to start the alignment process. Select HEAD ALIGNMENT, then select ALIGNMENT. 10. Replacing Ink Cartridges Before you begin a large print job, you start with tape. 3. The easiest way to check ink levels is best to 6 months. PAPER THICKNESS is selected, then press r. Maintaining ...
...However, it before you should check your cartridges is low, you can store partially used ink cartridges for up to replace a low ink cartridge before starting a large print job. Each head alignment takes about 7 minutes. Make sure you do so, Epson recommends covering the openings with . 7. ... to start the alignment process. Select HEAD ALIGNMENT, then select ALIGNMENT. 10. Replacing Ink Cartridges Before you begin a large print job, you start with tape. 3. The easiest way to check ink levels is best to 6 months. PAPER THICKNESS is selected, then press r. Maintaining ...
User's Guide
Page 154
... almost expended. For print quality, a small amount of ink remains in the cartridge after the "replace cartridge" indicator comes on and REPLACE INK CARTRIDGE is displayed, the cartridge is expended. You can purchase genuine Epson ink and paper from an Epson Professional Imaging Authorized Reseller. Use the following Epson UltraChrome K3® with the printer turned off. Before you start...
... almost expended. For print quality, a small amount of ink remains in the cartridge after the "replace cartridge" indicator comes on and REPLACE INK CARTRIDGE is displayed, the cartridge is expended. You can purchase genuine Epson ink and paper from an Epson Professional Imaging Authorized Reseller. Use the following Epson UltraChrome K3® with the printer turned off. Before you start...
User's Guide
Page 155
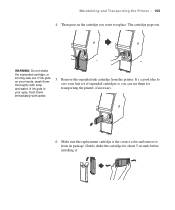
... in your hands, wash them thoroughly with water. 5. If ink gets on your eyes, flush them for about 5 seconds before installing it from the printer. Remove the expended ink cartridge from its package. It's a good idea to save your first set of expended cartridges so you want to replace. Maintaining and Transporting the Printer...
... in your hands, wash them thoroughly with water. 5. If ink gets on your eyes, flush them for about 5 seconds before installing it from the printer. Remove the expended ink cartridge from its package. It's a good idea to save your first set of expended cartridges so you want to replace. Maintaining and Transporting the Printer...
User's Guide
Page 157
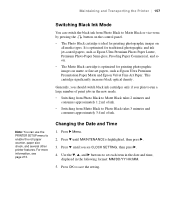
... switch black ink cartridges only if you see page 213. Press r Menu. 2. It is optimized for traditional photographic and ink jet-coated papers, such as Epson Ultra Premium Photo Paper Luster, Premium Photo Paper Semi-gloss, Proofing Paper Commercial, and so on. • The Matte Black cartridge is optimized ...for printing photographic images on matte or fine art papers, such as Epson Ultra Premium Presentation Paper Matte and Epson Velvet Fine Art Paper. Note: You can switch the black ink from Matte Black to Photo Black takes 3 ...
... switch black ink cartridges only if you see page 213. Press r Menu. 2. It is optimized for traditional photographic and ink jet-coated papers, such as Epson Ultra Premium Photo Paper Luster, Premium Photo Paper Semi-gloss, Proofing Paper Commercial, and so on. • The Matte Black cartridge is optimized ...for printing photographic images on matte or fine art papers, such as Epson Ultra Premium Presentation Paper Matte and Epson Velvet Fine Art Paper. Note: You can switch the black ink from Matte Black to Photo Black takes 3 ...
User's Guide
Page 167
... P Power light goes off. Follow the instructions below to prevent water from Epson. Turn off the printer and wait until the carriage moves to the home position (on its stand (see page 169). Leave the ink cartridges installed. 167 Keep the ink cartridge compartments closed to prepare the printer for example, in the same building...
... P Power light goes off. Follow the instructions below to prevent water from Epson. Turn off the printer and wait until the carriage moves to the home position (on its stand (see page 169). Leave the ink cartridges installed. 167 Keep the ink cartridge compartments closed to prepare the printer for example, in the same building...


