
Quick Reference Guide
Page 3
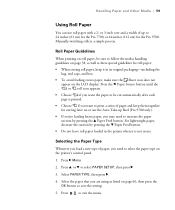
Loading Roll Paper 1 Open the roll paper cover. 2 Push down the tension levers to secure them. 6 Move the roll paper all the way to the right. 3 Place the roll paper on top of the printer. 7 Slide the roll paper holder to align the left . 5 Push the adapters into position. 2-inch core 3-inch core 2 Then ...push down the lock lever, then move the roll paper holder to fit the core size of the roll. Then release the tension lever on the holder. 4 If necessary, adjust the roll media adapters...
Loading Roll Paper 1 Open the roll paper cover. 2 Push down the tension levers to secure them. 6 Move the roll paper all the way to the right. 3 Place the roll paper on top of the printer. 7 Slide the roll paper holder to align the left . 5 Push the adapters into position. 2-inch core 3-inch core 2 Then ...push down the lock lever, then move the roll paper holder to fit the core size of the roll. Then release the tension lever on the holder. 4 If necessary, adjust the roll media adapters...

Quick Reference Guide
Page 4
Loading Roll Paper (continued) 9 Slide the roll paper holder to the right to secure it in the printer. 11 If the Paper release light is not on, press the button. 12 Insert the paper into the slot and pull it from the roll. 4 Roll the paper forward to the top of the printer. 5 Pull up the lock... lever to the left and remove it all the way down the lock lever. Removing Roll Paper 1 Open the roll paper cover. 2 Press the button. The paper rewinds automatically. 3 Push down . 10 Pull up the tension levers, then remove the adapters from the...
Loading Roll Paper (continued) 9 Slide the roll paper holder to the right to secure it in the printer. 11 If the Paper release light is not on, press the button. 12 Insert the paper into the slot and pull it from the roll. 4 Roll the paper forward to the top of the printer. 5 Pull up the lock... lever to the left and remove it all the way down the lock lever. Removing Roll Paper 1 Open the roll paper cover. 2 Press the button. The paper rewinds automatically. 3 Push down . 10 Pull up the tension levers, then remove the adapters from the...
Quick Reference Guide
Page 5
Loading and Using Cut Sheet Paper 1 Remove any roll paper from your computer using the Epson Printer Utility3 (Macintosh®) or the Utility tab in the printer. 7 To remove your page. The sheet feeds into the paper slot until it has been printed, the sheet stays in your User's Guide for more than 19 mil thick...
Loading and Using Cut Sheet Paper 1 Remove any roll paper from your computer using the Epson Printer Utility3 (Macintosh®) or the Utility tab in the printer. 7 To remove your page. The sheet feeds into the paper slot until it has been printed, the sheet stays in your User's Guide for more than 19 mil thick...
Quick Reference Guide
Page 6
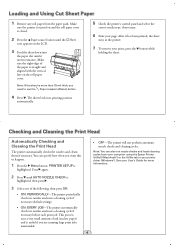
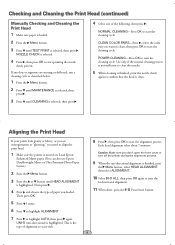
... printer is selected, then press . POWER CLEANING-Press OK to start printing the nozzle check pattern. Load Epson Enhanced Matte paper. (You can also use Epson Doubleweight Matte or Ultra Premium Photo Paper Luster.) 2 Press the Menu button. 3 Press the or button until HEAD ALIGNMENT is highlighted. NOZZLE...If your prints look grainy or blurry, or you see misregistration or "ghosting," you loaded. Checking and Cleaning the Print Head (continued) Manually Checking and Cleaning the Print Head 1 Make sure paper is loaded. 2 Press the Menu button. 3 Press until TEST PRINT is turned on. ...
... printer is selected, then press . POWER CLEANING-Press OK to start printing the nozzle check pattern. Load Epson Enhanced Matte paper. (You can also use Epson Doubleweight Matte or Ultra Premium Photo Paper Luster.) 2 Press the Menu button. 3 Press the or button until HEAD ALIGNMENT is highlighted. NOZZLE...If your prints look grainy or blurry, or you see misregistration or "ghosting," you loaded. Checking and Cleaning the Print Head (continued) Manually Checking and Cleaning the Print Head 1 Make sure paper is loaded. 2 Press the Menu button. 3 Press until TEST PRINT is turned on. ...
Quick Reference Guide
Page 11
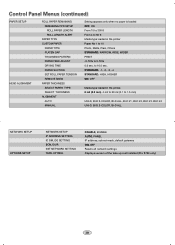
... Panel Menus (continued) PAPER SETUP HEAD ALIGNMENT ROLL PAPER REMAINING REMAINING PPR SETUP ROLL PAPER LENGTH ROLL LENGTH ALERT PAPER TYPE CUSTOM PAPER PAPER TYPE PLATEN GAP THICKNESS PATTERN PAPER FEED ADJUST DRYING TIME PAPER SUCTION SET ROLL PAPER TENSION REMOVE SKEW PAPER THICKNESS SELECT PAPER TYPE SELECT THICKNESS ALIGNMENT AUTO MANUAL Setting appears only when no paper is loaded OFF, ON From...
... Panel Menus (continued) PAPER SETUP HEAD ALIGNMENT ROLL PAPER REMAINING REMAINING PPR SETUP ROLL PAPER LENGTH ROLL LENGTH ALERT PAPER TYPE CUSTOM PAPER PAPER TYPE PLATEN GAP THICKNESS PATTERN PAPER FEED ADJUST DRYING TIME PAPER SUCTION SET ROLL PAPER TENSION REMOVE SKEW PAPER THICKNESS SELECT PAPER TYPE SELECT THICKNESS ALIGNMENT AUTO MANUAL Setting appears only when no paper is loaded OFF, ON From...
User's Guide
Page 6
...Identification 61 Placing the Paper in the Printer 62 Loading the Paper for Printing 67 Cutting Paper Manually with the Built-in Cutter 69 Printing Trim Lines 69 Removing Paper from the Printer 70 Using Cut Sheet Paper 73 Loading Cut Sheets 73 Loading Thick Sheets 75 ...the Printer 79 Storing the Paper Basket 81 Optimizing the Settings for Your Paper 82 Creating Paper Configurations 82 Printing Your Paper Configurations 84 Selecting Paper Configurations 84 3 Printing With Epson Drivers for Windows Sizing Images for Borderless Printing on Roll Paper 86 Choosing Basic Print Options...
...Identification 61 Placing the Paper in the Printer 62 Loading the Paper for Printing 67 Cutting Paper Manually with the Built-in Cutter 69 Printing Trim Lines 69 Removing Paper from the Printer 70 Using Cut Sheet Paper 73 Loading Cut Sheets 73 Loading Thick Sheets 75 ...the Printer 79 Storing the Paper Basket 81 Optimizing the Settings for Your Paper 82 Creating Paper Configurations 82 Printing Your Paper Configurations 84 Selecting Paper Configurations 84 3 Printing With Epson Drivers for Windows Sizing Images for Borderless Printing on Roll Paper 86 Choosing Basic Print Options...
User's Guide
Page 9
... 195 Dimensions and Weight 196 Printer Interfaces 196 Safety Approvals 196 Media 196 Roll Paper 196 Cut Sheets 198 Printable Area 201 Ink Cartridges 201 B Using the Optional Auto Take-Up Reel Loading Roll Paper Onto the Take-Up Reel 204 Winding Prints Forward 205 Winding Prints Backward 206... Printing Using the Auto Take-Up Reel 207 Reversing the Paper Stops for a 2-inch Paper Reel Core 208 Installing a Take-Up Reel Core 210 ...
... 195 Dimensions and Weight 196 Printer Interfaces 196 Safety Approvals 196 Media 196 Roll Paper 196 Cut Sheets 198 Printable Area 201 Ink Cartridges 201 B Using the Optional Auto Take-Up Reel Loading Roll Paper Onto the Take-Up Reel 204 Winding Prints Forward 205 Winding Prints Backward 206... Printing Using the Auto Take-Up Reel 207 Reversing the Paper Stops for a 2-inch Paper Reel Core 208 Installing a Take-Up Reel Core 210 ...

User's Guide
Page 11
.... • The on-screen Network Guide on the CD-ROM provides instructions for daily use and printer maintenance-loading paper, replacing ink cartridges and other components, cleaning and aligning the print head, and using the Epson printer drivers, and replacing ink cartridges. 11 Introduction This User's Guide provides important information on a network. It...
.... • The on-screen Network Guide on the CD-ROM provides instructions for daily use and printer maintenance-loading paper, replacing ink cartridges and other components, cleaning and aligning the print head, and using the Epson printer drivers, and replacing ink cartridges. 11 Introduction This User's Guide provides important information on a network. It...

User's Guide
Page 48
After ink charging is flashing, or you may damage the printer. 6. To connect to a network hub, you need to load paper before READY will appear on the display. After installing all 5 cartridges, close the ink cover. For USB connection, make sure your computer's network interface, you ...
After ink charging is flashing, or you may damage the printer. 6. To connect to a network hub, you need to load paper before READY will appear on the display. After installing all 5 cartridges, close the ink cover. For USB connection, make sure your computer's network interface, you ...
User's Guide
Page 56
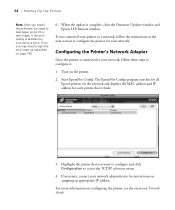
...: 1. If necessary, contact your setup is connected to your network. If the print quality is complete, close the Firmware Updater window and Epson LFP Remote window. If you connected your printer to a network, follow the instructions in the next section to configure the printer for your ...Epson printers on page 156. 6. The EpsonNet Config program searches for each printer that you may need to access the TCP/IP selection screen. 4. For more information on configuring the printer, see the on the printer. 2. If not, you want to configure and click Configuration to load paper...
...: 1. If necessary, contact your setup is connected to your network. If the print quality is complete, close the Firmware Updater window and Epson LFP Remote window. If you connected your printer to a network, follow the instructions in the next section to configure the printer for your ...Epson printers on page 156. 6. The EpsonNet Config program searches for each printer that you may need to access the TCP/IP selection screen. 4. For more information on configuring the printer, see the on the printer. 2. If not, you want to configure and click Configuration to load paper...
User's Guide
Page 59
... packaging-including the bag, end caps, and box. • To avoid feeding excess paper, make sure the Sheet icon does not appear on page 60, then press the OK button to 24 inches (61 cm) for the Pro 7700, or 44 inches (112 cm) for cutting later on or use the Auto Take...-up to save the setting. 5. Selecting the Paper Type Whenever you want to increase the paper suction by pressing the d Paper Feed button. • Do not leave roll paper loaded in the printer when it in...
... packaging-including the bag, end caps, and box. • To avoid feeding excess paper, make sure the Sheet icon does not appear on page 60, then press the OK button to 24 inches (61 cm) for the Pro 7700, or 44 inches (112 cm) for cutting later on or use the Auto Take...-up to save the setting. 5. Selecting the Paper Type Whenever you want to increase the paper suction by pressing the d Paper Feed button. • Do not leave roll paper loaded in the printer when it in...

User's Guide
Page 73
... may need to 24 inches (61 cm) for the Pro 7700 or 44 inches (112 cm) for the Pro 9700. You can leave your roll paper in the portrait orientation (short edge first). Loading Cut Sheets Make sure you load the paper depends on its thickness: • For most paper, see the section below. • For stock thicker...
... may need to 24 inches (61 cm) for the Pro 7700 or 44 inches (112 cm) for the Pro 9700. You can leave your roll paper in the portrait orientation (short edge first). Loading Cut Sheets Make sure you load the paper depends on its thickness: • For most paper, see the section below. • For stock thicker...

User's Guide
Page 75
... orientation (Pro 9700 only). 1. Feed the sheet into the paper slot. Make sure the printer is turned on and the roll paper cover is more than 19 mil (0.5 mm) thick and 28.6 inches (728 mm) long, which should be loaded in place during loading and printing. 3. The only exception is paper that is closed. 2. Handling Paper and...
... orientation (Pro 9700 only). 1. Feed the sheet into the paper slot. Make sure the printer is turned on and the roll paper cover is more than 19 mil (0.5 mm) thick and 28.6 inches (728 mm) long, which should be loaded in place during loading and printing. 3. The only exception is paper that is closed. 2. Handling Paper and...

User's Guide
Page 176
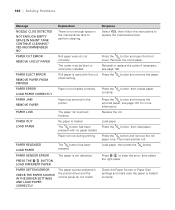
... Explanation Response BORDERLESS ERROR LOAD A SUPPORTED PAPER SIZE OR LOAD PAPER CORRECTLY The borderless setting is selected and paper that the power cord is obstructing the indicated ink cover. Paper is loaded. The number 3000 indicates that doesn't support borderless printing is not loaded correctly. Note the error...on the control panel come on page 13. The following table lists the messages in the printer driver or load different paper. Make sure paper is not recognized. CALL FOR SERVICE An error has occurred. 176 | Solving Problems Checking Error Messages and ...
... Explanation Response BORDERLESS ERROR LOAD A SUPPORTED PAPER SIZE OR LOAD PAPER CORRECTLY The borderless setting is selected and paper that the power cord is obstructing the indicated ink cover. Paper is loaded. The number 3000 indicates that doesn't support borderless printing is not loaded correctly. Note the error...on the control panel come on page 13. The following table lists the messages in the printer driver or load different paper. Make sure paper is not recognized. CALL FOR SERVICE An error has occurred. 176 | Solving Problems Checking Error Messages and ...
User's Guide
Page 180
... no paper loaded. No paper is loaded correctly. 180 button, then reload paper Press the button and remove the jammed paper; Check the Paper Source or Paper Size settings and make sure the paper is loaded. PAPER SENSOR ERROR The paper is not loaded correctly. YES (RECOMMENDED) NO PAPER CUT ERROR REMOVE UNCUT PAPER PAPER EJECT ERROR REMOVE PAPER FROM PRINTER PAPER ERROR LOAD PAPER CORRECTLY PAPER JAM REMOVE PAPER PAPER LOW PAPER OUT LOAD PAPER...
... no paper loaded. No paper is loaded correctly. 180 button, then reload paper Press the button and remove the jammed paper; Check the Paper Source or Paper Size settings and make sure the paper is loaded. PAPER SENSOR ERROR The paper is not loaded correctly. YES (RECOMMENDED) NO PAPER CUT ERROR REMOVE UNCUT PAPER PAPER EJECT ERROR REMOVE PAPER FROM PRINTER PAPER ERROR LOAD PAPER CORRECTLY PAPER JAM REMOVE PAPER PAPER LOW PAPER OUT LOAD PAPER...

User's Guide
Page 181
...and, if there performed but did not clear the are missing dots, perform head cleaning. PAPER SKEW LOAD PAPER PROPERLY Paper is installed. TANK WRONG tank is loaded straight. TYPE Replace the maintenance tank with a new one as soon as possible. Press ...loaded paper size does not Make sure the paper size matches the size LOAD CORRECT PAPER SIZE match the size of the image. printer, then turn off the condition was present. REPLACE MAINTENANCE TANK SOON The maintenance tank is nearing the end of its service life. nozzles. TYPE Replace the maintenance tank with a genuine Epson...
...and, if there performed but did not clear the are missing dots, perform head cleaning. PAPER SKEW LOAD PAPER PROPERLY Paper is installed. TANK WRONG tank is loaded straight. TYPE Replace the maintenance tank with a new one as soon as possible. Press ...loaded paper size does not Make sure the paper size matches the size LOAD CORRECT PAPER SIZE match the size of the image. printer, then turn off the condition was present. REPLACE MAINTENANCE TANK SOON The maintenance tank is nearing the end of its service life. nozzles. TYPE Replace the maintenance tank with a genuine Epson...

User's Guide
Page 182
...85 (Windows) or page 111 (Macintosh). 182 See page 156 for instructions. • Align the print head. Press the button and load the paper correctly; NO YES TAKE-UP ERROR CHECK THE STATUS OF AUTO TAKE-UP REEL UNIT AND RESTART THE PRINTER TAKE-UP ERROR IS ANYTHING OBSTRUCTING... THE TAKE-UP REEL SENSOR SYSTEM? correctly; Make sure nothing is not loaded on the reel Press the button and load the paper correctly. Paper is obstructing the sensor. Improving Print Quality You can often improve print quality by doing the following list for...
...85 (Windows) or page 111 (Macintosh). 182 See page 156 for instructions. • Align the print head. Press the button and load the paper correctly; NO YES TAKE-UP ERROR CHECK THE STATUS OF AUTO TAKE-UP REEL UNIT AND RESTART THE PRINTER TAKE-UP ERROR IS ANYTHING OBSTRUCTING... THE TAKE-UP REEL SENSOR SYSTEM? correctly; Make sure nothing is not loaded on the reel Press the button and load the paper correctly. Paper is obstructing the sensor. Improving Print Quality You can often improve print quality by doing the following list for...

User's Guide
Page 204
Plug in the printer properly. Press the l button to feed the roll paper out of the roll paper is straight. 1. Make sure the printer is on the LCD panel. 3. Press the d button to ... icon appears on and the Auto Take-up reel core, check the following: • Turn off before loading paper. 204 | Using the Optional Auto Take-Up Reel WARNING: Make sure the Auto Take-Up Reel is .... 204 If it is installed incorrectly or operates unexpectedly, bodily injury may occur. Loading Roll Paper Onto the Take-Up Reel Before you want to avoid injury. • Make sure that the roll...
Plug in the printer properly. Press the l button to feed the roll paper out of the roll paper is straight. 1. Make sure the printer is on the LCD panel. 3. Press the d button to ... icon appears on and the Auto Take-up reel core, check the following: • Turn off before loading paper. 204 | Using the Optional Auto Take-Up Reel WARNING: Make sure the Auto Take-Up Reel is .... 204 If it is installed incorrectly or operates unexpectedly, bodily injury may occur. Loading Roll Paper Onto the Take-Up Reel Before you want to avoid injury. • Make sure that the roll...

User's Guide
Page 215
... by the printer lights. Control Panel Summary | 215 Lights See "Checking Error Messages and Lights" on page 176 for print head cleaning Flashing: paper is jammed or not loaded straight On: an ink cartridge is expended, not installed, or not compatible with the printer Flashing: an ink cartridge is nearly expended On... or shutting down Off: printer is turned off On: printer is paused, in Menu mode, or has an error Off: printer is ready On: no paper is loaded, paper is out, the selected paper source does not match the printer driver source, or the loaded paper is locked in the printer 215
... by the printer lights. Control Panel Summary | 215 Lights See "Checking Error Messages and Lights" on page 176 for print head cleaning Flashing: paper is jammed or not loaded straight On: an ink cartridge is expended, not installed, or not compatible with the printer Flashing: an ink cartridge is nearly expended On... or shutting down Off: printer is turned off On: printer is paused, in Menu mode, or has an error Off: printer is ready On: no paper is loaded, paper is out, the selected paper source does not match the printer driver source, or the loaded paper is locked in the printer 215

User's Guide
Page 217
... leave an extra margin area after borderless print jobs. see page 76 for roll papers. Selects whether the printer alerts you do not receive an error even if the print job is out of range of the loaded paper matches the width selected in your print job (ON is not feeding straight by... displaying PAPER SKEW on the LCD display and stopping printing. Selects whether to the paper; Selects whether to see if the width of the...
... leave an extra margin area after borderless print jobs. see page 76 for roll papers. Selects whether the printer alerts you do not receive an error even if the print job is out of range of the loaded paper matches the width selected in your print job (ON is not feeding straight by... displaying PAPER SKEW on the LCD display and stopping printing. Selects whether to the paper; Selects whether to see if the width of the...


