
Network Guide
Page 11
... address, subnet mask, etc.) are installed on page 27. Install the necessary network components on page 17 for details. 5. Make sure that the necessary network components (such as the status lights. Configure the network interface and install the printer driver. For Macintosh users, see "About EpsonNet Config" on page 9 for Network Printing 11 Setting Up Your System for details. 2. See "Network Interface Operation" on page 26. Connect the network interface to the network. Configure the network interface using...
... address, subnet mask, etc.) are installed on page 27. Install the necessary network components on page 17 for details. 5. Make sure that the necessary network components (such as the status lights. Configure the network interface and install the printer driver. For Macintosh users, see "About EpsonNet Config" on page 9 for Network Printing 11 Setting Up Your System for details. 2. See "Network Interface Operation" on page 26. Connect the network interface to the network. Configure the network interface using...
Network Guide
Page 20
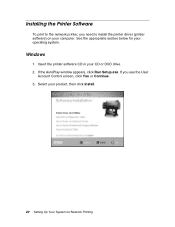
Insert the printer software CD in your product, then click Install. 20 Setting Up Your System for your computer. Select your CD or DVD drive. 2. If you need to install the printer driver (printer software) on your operating system. If the AutoPlay window appears, click Run Setup.exe. See the appropriate section below for Network Printing Windows 1. Installing the Printer Software To print to the network printer, you see the User Account Control screen, click Yes or Continue. 3.
Insert the printer software CD in your product, then click Install. 20 Setting Up Your System for your computer. Select your CD or DVD drive. 2. If you need to install the printer driver (printer software) on your operating system. If the AutoPlay window appears, click Run Setup.exe. See the appropriate section below for Network Printing Windows 1. Installing the Printer Software To print to the network printer, you see the User Account Control screen, click Yes or Continue. 3.
Network Guide
Page 31
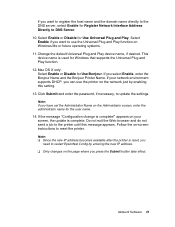
If the message "Configuration change is reset, you need to restart EpsonNet Config by enabling this message appears. Note: ❏ Since the new IP address becomes available after the printer is complete!" Click Submit and enter the password, if necessary, to reset the printer. If you want to use the printer on the network just by entering the new IP address. ❏ Only changes on the page where you press...
If the message "Configuration change is reset, you need to restart EpsonNet Config by enabling this message appears. Note: ❏ Since the new IP address becomes available after the printer is complete!" Click Submit and enter the password, if necessary, to reset the printer. If you want to use the printer on the network just by entering the new IP address. ❏ Only changes on the page where you press...

Quick Reference Guide
Page 8
... the screw using a cross-head screwdriver. 7 Note: If you can't insert the cartridge smoothly, you may have the wrong cartridge. Replacing Printer Parts Replacing the Paper Cutter If you notice that the paper isn't cut cleanly, you may need to replace the cutter (part # C12C815331). 1 Press the Menu button on after installing the cartridge, try removing and then reinserting it . Check the package and product code. Don't force it . 7 Close the ink cover. 6 Hold the cartridge with the...
... the screw using a cross-head screwdriver. 7 Note: If you can't insert the cartridge smoothly, you may have the wrong cartridge. Replacing Printer Parts Replacing the Paper Cutter If you notice that the paper isn't cut cleanly, you may need to replace the cutter (part # C12C815331). 1 Press the Menu button on after installing the cartridge, try removing and then reinserting it . Check the package and product code. Don't force it . 7 Close the ink cover. 6 Hold the cartridge with the...

User's Guide
Page 8
... Aligning the Print Head 156 Replacing Ink Cartridges 157 Changing the Date and Time 161 Using Maintenance Mode 161 Replacing the Paper Cutter 162 Removing the Old Cutter 162 Installing the New Cutter 164 Replacing the Maintenance Tank 166 Cleaning the Printer 168 Transporting or Storing the Printer 170 Preparing the Printer for Shipment 170 Moving the Printer on the Stand 172 Setting Up the Printer After Transportation 173 7 Solving Problems Diagnosing Problems 175 Checking Error Messages and Lights 176 Auto Take-Up Reel Error Messages 182 Improving Print Quality...
... Aligning the Print Head 156 Replacing Ink Cartridges 157 Changing the Date and Time 161 Using Maintenance Mode 161 Replacing the Paper Cutter 162 Removing the Old Cutter 162 Installing the New Cutter 164 Replacing the Maintenance Tank 166 Cleaning the Printer 168 Transporting or Storing the Printer 170 Preparing the Printer for Shipment 170 Moving the Printer on the Stand 172 Setting Up the Printer After Transportation 173 7 Solving Problems Diagnosing Problems 175 Checking Error Messages and Lights 176 Auto Take-Up Reel Error Messages 182 Improving Print Quality...

User's Guide
Page 11
... use and printer maintenance-loading paper, replacing ink cartridges and other components, cleaning and aligning the print head, and using the printer's menu system. Attach it working at its best, and provides troubleshooting tips in case you how to maintain your printer to keep it to your printer, loading paper, using the Epson printer drivers, and replacing ink cartridges. Cautions must be observed to avoid damage to your printer for easy reference. • The on-screen Network Guide on the CD-ROM provides instructions...
... use and printer maintenance-loading paper, replacing ink cartridges and other components, cleaning and aligning the print head, and using the printer's menu system. Attach it working at its best, and provides troubleshooting tips in case you how to maintain your printer to keep it to your printer, loading paper, using the Epson printer drivers, and replacing ink cartridges. Cautions must be observed to avoid damage to your printer for easy reference. • The on-screen Network Guide on the CD-ROM provides instructions...
User's Guide
Page 85
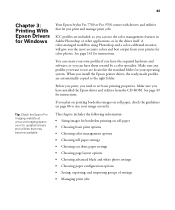
... are automatically copied to use the color management features in Adobe Photoshop or other applications, or in the standard folder for instructions. com for updated drivers and utilities that let you plan on printing borderless images on roll paper, check the guidelines on roll paper • Choosing basic print options • Choosing color management options • Choosing roll paper settings • Choosing cut sheet paper settings • Choosing page layout options • Choosing advanced black and white photo settings...
... are automatically copied to use the color management features in Adobe Photoshop or other applications, or in the standard folder for instructions. com for updated drivers and utilities that let you plan on printing borderless images on roll paper, check the guidelines on roll paper • Choosing basic print options • Choosing color management options • Choosing roll paper settings • Choosing cut sheet paper settings • Choosing page layout options • Choosing advanced black and white photo settings...
User's Guide
Page 111
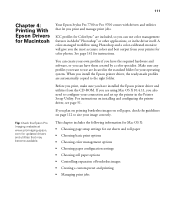
... the Printer Setup Utility. ICC profiles for your image correctly. com for instructions. Before you print, make sure you want to configure your printer for cut sheets and roll paper • Choosing basic print options • Choosing color management options • Choosing paper configuration settings • Choosing roll paper options • Controlling expansion of borderless images • Creating a custom preset and printing • Managing print jobs 111 If you are included, so you can use are automatically copied to size your...
... the Printer Setup Utility. ICC profiles for your image correctly. com for instructions. Before you print, make sure you want to configure your printer for cut sheets and roll paper • Choosing basic print options • Choosing color management options • Choosing paper configuration settings • Choosing roll paper options • Controlling expansion of borderless images • Creating a custom preset and printing • Managing print jobs 111 If you are included, so you can use are automatically copied to size your...

User's Guide
Page 156
... automatic. This ensures that the head is turned on your service provider for deflected nozzles. 4. When cleaning is finished and the P power light stops flashing, print the nozzle check again to run a nozzle check between cycles. Then load Epson Enhanced Matte paper. 156 Although you need to align from the printer's control panel. If you can align the print head using the control panel: 1. Make sure the printer is clean. Press d until CLEANING is still missing segments or has deflections after a power cleaning cycle, turn the printer...
... automatic. This ensures that the head is turned on your service provider for deflected nozzles. 4. When cleaning is finished and the P power light stops flashing, print the nozzle check again to run a nozzle check between cycles. Then load Epson Enhanced Matte paper. 156 Although you need to align from the printer's control panel. If you can align the print head using the control panel: 1. Make sure the printer is clean. Press d until CLEANING is still missing segments or has deflections after a power cleaning cycle, turn the printer...

User's Guide
Page 176
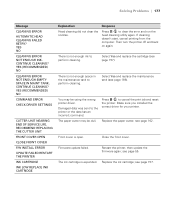
... or flash. CALL FOR SERVICE An error has occurred. CANNOT OPEN INK COVER Something is not connected correctly. Message Explanation Response BORDERLESS ERROR LOAD A SUPPORTED PAPER SIZE OR LOAD PAPER CORRECTLY The borderless setting is selected and paper that the power cord is obstructing the indicated ink cover. The following table lists the messages in the printer driver or load different paper. The sheet size is loaded. Make sure the paper is low, or a problem occurs, a message appears on the LCD display, and the lights on the control panel come on page 13. Change...
... or flash. CALL FOR SERVICE An error has occurred. CANNOT OPEN INK COVER Something is not connected correctly. Message Explanation Response BORDERLESS ERROR LOAD A SUPPORTED PAPER SIZE OR LOAD PAPER CORRECTLY The borderless setting is selected and paper that the power cord is obstructing the indicated ink cover. The following table lists the messages in the printer driver or load different paper. The sheet size is loaded. Make sure the paper is low, or a problem occurs, a message appears on the LCD display, and the lights on the control panel come on page 13. Change...
User's Guide
Page 177
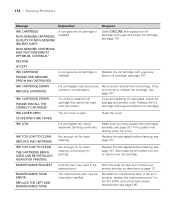
...clear the error and run the head cleaning utility again. Firmware update failed. Replace the ink cartridge; YES NO CLEANING ERROR NOT ENOUGH INK. YES (RECOMMENDED) NO COMMAND ERROR CHECK DRIVER SETTINGS CUTTER UNIT NEARING END OF SERVICE LIFE. You may be using the wrong printer driver. YES (RECOMMENDED) NO CLEANING ERROR NOT ENOUGH EMPTY SPACE IN MAINT TANK. CONTINUE CLEANING? Front cover is not enough space in the maintenance tank to perform cleaning. Solving Problems | 177 Message CLEANING ERROR AUTOMATIC HEAD CLEANING FAILED RETRY? If cleaning doesn't start, cancel printing...
...clear the error and run the head cleaning utility again. Firmware update failed. Replace the ink cartridge; YES NO CLEANING ERROR NOT ENOUGH INK. YES (RECOMMENDED) NO COMMAND ERROR CHECK DRIVER SETTINGS CUTTER UNIT NEARING END OF SERVICE LIFE. You may be using the wrong printer driver. YES (RECOMMENDED) NO CLEANING ERROR NOT ENOUGH EMPTY SPACE IN MAINT TANK. CONTINUE CLEANING? Front cover is not enough space in the maintenance tank to perform cleaning. Solving Problems | 177 Message CLEANING ERROR AUTOMATIC HEAD CLEANING FAILED RETRY? If cleaning doesn't start, cancel printing...
User's Guide
Page 178
...? Epson ink cartridge; Print quality may be used with a genuine installed. Select DECLINE and replace the ink cartridge with a genuine Epson ink cartridge. A non-genuine ink cartridge is low. See page 157. INK TOO LOW TO CLEAN THE CARTRIDGE BEING USED CAN BE INSTALLED AGAIN FOR PRINTING Not enough ink for head cleaning, but enough for head cleaning. Reinstall the maintenance tank. After cleaning is finished, you can re-use the low ink cartridge. For the Pro 9700, note which tank needs replacement; 178 | Solving Problems Message Explanation...
...? Epson ink cartridge; Print quality may be used with a genuine installed. Select DECLINE and replace the ink cartridge with a genuine Epson ink cartridge. A non-genuine ink cartridge is low. See page 157. INK TOO LOW TO CLEAN THE CARTRIDGE BEING USED CAN BE INSTALLED AGAIN FOR PRINTING Not enough ink for head cleaning, but enough for head cleaning. Reinstall the maintenance tank. After cleaning is finished, you can re-use the low ink cartridge. For the Pro 9700, note which tank needs replacement; 178 | Solving Problems Message Explanation...
User's Guide
Page 180
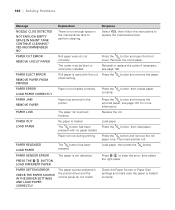
...replace the cutter if necessary; Check the Paper Source or Paper Size settings and make sure the paper is not detected. 180 | Solving Problems Message NOZZLE CLOG DETECTED NOT ENOUGH EMPTY SPACE IN MAINT TANK CONTINUE CLEANING? YES (RECOMMENDED) NO PAPER CUT ERROR REMOVE UNCUT PAPER PAPER EJECT ERROR REMOVE PAPER FROM PRINTER PAPER ERROR LOAD PAPER CORRECTLY PAPER JAM REMOVE PAPER PAPER LOW PAPER OUT LOAD PAPER Explanation There is almost finished. The paper roll is not enough space in the maintenance tank to perform cleaning. Press the button and open the front cover. Remove...
...replace the cutter if necessary; Check the Paper Source or Paper Size settings and make sure the paper is not detected. 180 | Solving Problems Message NOZZLE CLOG DETECTED NOT ENOUGH EMPTY SPACE IN MAINT TANK CONTINUE CLEANING? YES (RECOMMENDED) NO PAPER CUT ERROR REMOVE UNCUT PAPER PAPER EJECT ERROR REMOVE PAPER FROM PRINTER PAPER ERROR LOAD PAPER CORRECTLY PAPER JAM REMOVE PAPER PAPER LOW PAPER OUT LOAD PAPER Explanation There is almost finished. The paper roll is not enough space in the maintenance tank to perform cleaning. Press the button and open the front cover. Remove...
User's Guide
Page 183
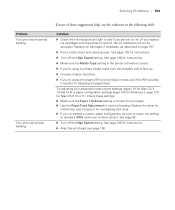
... advanced media control settings (page 119 for Mac OS X 10.6 & 10.5) or paper configuration settings (page 100 for Windows or page 133 for adjusting the paper feed. Check these suggestions help, try the solutions in the printer software is correct. ◗ If you replace ink cartridges with the printer turned off the High Speed setting. see if you 're done using it for instructions. ◗ Turn off the High Speed setting. Your print has vertical banding. Solution ◗ Check the ink indicators and light...
... advanced media control settings (page 119 for Mac OS X 10.6 & 10.5) or paper configuration settings (page 100 for Windows or page 133 for adjusting the paper feed. Check these suggestions help, try the solutions in the printer software is correct. ◗ If you replace ink cartridges with the printer turned off the High Speed setting. see if you 're done using it for instructions. ◗ Turn off the High Speed setting. Your print has vertical banding. Solution ◗ Check the ink indicators and light...
User's Guide
Page 184
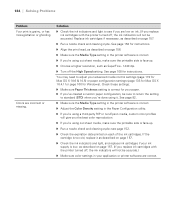
... replace ink cartridges with the printer turned off, the ink indicators will not be accurate.) ◗ Make sure color settings in your ink supply is low, as described on page 157. (If you 're using cut sheet media, make sure the printable side is correct. ◗ Adjust the Color Density setting in the printer software is face-up . ◗ Run a nozzle check and cleaning cycle; Check these settings: ◗ Make sure Paper Thickness setting is grainy, or has misregistration or ghosting. See page 108 for Windows...
... replace ink cartridges with the printer turned off, the ink indicators will not be accurate.) ◗ Make sure color settings in your ink supply is low, as described on page 157. (If you 're using cut sheet media, make sure the printable side is correct. ◗ Adjust the Color Density setting in the printer software is face-up . ◗ Run a nozzle check and cleaning cycle; Check these settings: ◗ Make sure Paper Thickness setting is grainy, or has misregistration or ghosting. See page 108 for Windows...

User's Guide
Page 185
....4.11or page 101 for instructions. ◗ The PLATEN GAP setting is ON in a dry, humidity-free environment. See page 108 for Windows) to uninstall and reinstall the printer driver (see page 152). ◗ Check the ink indicators and light and replace ink cartridges if your paper. See page 76 for Windows) to adjust the paper thickness setting, drying time, or color density. See page 168 for your ink supply is low, as described on non-Epson media, you replace ink cartridges with a custom paper configuration, be...
....4.11or page 101 for instructions. ◗ The PLATEN GAP setting is ON in a dry, humidity-free environment. See page 108 for Windows) to uninstall and reinstall the printer driver (see page 152). ◗ Check the ink indicators and light and replace ink cartridges if your paper. See page 76 for Windows) to adjust the paper thickness setting, drying time, or color density. See page 168 for your ink supply is low, as described on non-Epson media, you replace ink cartridges with a custom paper configuration, be...
User's Guide
Page 187
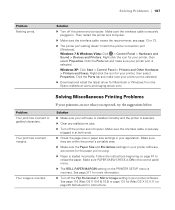
....proimaging.epson.com. Solving Problems | 187 Problem Nothing prints. Make sure the interface cable is selected. ◗ Download and install the latest driver for instructions. 187 see page 13 or 13. ◗ The printer port setting doesn't match the printer connection port (Windows). Windows XP: Click Start > Control Panel > Printers and Other Hardware > Printers and Faxes. Your image is ON in your printer software. Make sure PAPER SKEW CHECK is inverted. See page 118 (Mac OS X 10.6 & 10.5) or page 131 for (Mac OS...
....proimaging.epson.com. Solving Problems | 187 Problem Nothing prints. Make sure the interface cable is selected. ◗ Download and install the latest driver for instructions. 187 see page 13 or 13. ◗ The printer port setting doesn't match the printer connection port (Windows). Windows XP: Click Start > Control Panel > Printers and Other Hardware > Printers and Faxes. Your image is ON in your printer software. Make sure PAPER SKEW CHECK is inverted. See page 118 (Mac OS X 10.6 & 10.5) or page 131 for (Mac OS...
User's Guide
Page 188
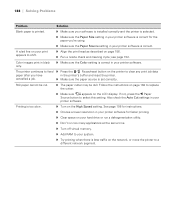
...; Align the print head as described on page 156. ◗ Run a nozzle check and cleaning cycle; cancelled a job. ◗ Make sure the paper source is too slow. ◗ Turn on the High Speed setting. Also check the Auto Cut settings in your printer software. 188 | Solving Problems Problem Solution Blank paper is printed. ◗ Make sure your software is installed correctly and the printer is selected. ◗ Make sure the Paper Size setting in your printer software is correct for faster printing. ◗ Clear space on your hard drive or...
...; Align the print head as described on page 156. ◗ Run a nozzle check and cleaning cycle; cancelled a job. ◗ Make sure the paper source is too slow. ◗ Turn on the High Speed setting. Also check the Auto Cut settings in your printer software. 188 | Solving Problems Problem Solution Blank paper is printed. ◗ Make sure your software is installed correctly and the printer is selected. ◗ Make sure the Paper Size setting in your printer software is correct for faster printing. ◗ Clear space on your hard drive or...
User's Guide
Page 193
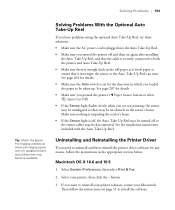
... the AC power cord is set for details. • Make sure you pressed the printer's l Paper Source button to select (Auto Cut Off). • If the Sensor light flashes slowly when you are not printing, the sensor may be misaligned or there may be an obstacle in which you need to uninstall and then reinstall the printer driver software for updated drivers and utilities that it feeds paper to both the printer and Auto Take-Up...
... the AC power cord is set for details. • Make sure you pressed the printer's l Paper Source button to select (Auto Cut Off). • If the Sensor light flashes slowly when you are not printing, the sensor may be misaligned or there may be an obstacle in which you need to uninstall and then reinstall the printer driver software for updated drivers and utilities that it feeds paper to both the printer and Auto Take-Up...
User's Guide
Page 220
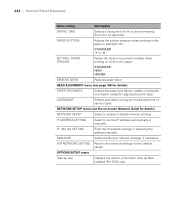
...NETWORK SETUP Select to 10 seconds). IP ADDRESS SETTING Select to their default values. NETWORK SETUP menu (see page 156 for details) PAPER THICKNESS Selects the paper type (Epson media) or thickness (non-Epson media) for ink to avoid smearing (from 0 to enable or disable network printing. PAPER SUCTION Adjusts the suction pressure when printing on cloth or thin paper. INIT NETWORK SETTING Returns the network settings to set the IP address automatically or manually. ALIGNMENT Selects and starts running print head alignment of the Auto Take-up Reel installed (Pro...
...NETWORK SETUP Select to 10 seconds). IP ADDRESS SETTING Select to their default values. NETWORK SETUP menu (see page 156 for details) PAPER THICKNESS Selects the paper type (Epson media) or thickness (non-Epson media) for ink to avoid smearing (from 0 to enable or disable network printing. PAPER SUCTION Adjusts the suction pressure when printing on cloth or thin paper. INIT NETWORK SETTING Returns the network settings to set the IP address automatically or manually. ALIGNMENT Selects and starts running print head alignment of the Auto Take-up Reel installed (Pro...


