Network Guide
Page 23
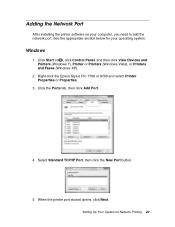
... , click Control Panel, and then click View Devices and Printers (Windows 7), Printer or Printers (Windows Vista), or Printers and Faxes (Windows XP). 2. Right-click the Epson Stylus Pro 7700 or 9700 and select Printer Properties or Properties. 3. When the printer port wizard opens, click Next. Select Standard TCP/IP Port, then click the New...
... , click Control Panel, and then click View Devices and Printers (Windows 7), Printer or Printers (Windows Vista), or Printers and Faxes (Windows XP). 2. Right-click the Epson Stylus Pro 7700 or 9700 and select Printer Properties or Properties. 3. When the printer port wizard opens, click Next. Select Standard TCP/IP Port, then click the New...

User's Guide
Page 5
... Printer 21 Unpacking and Assembling the Stand 22 Unpacking the Printer and Mounting It on the Stand 25 Attaching the Paper Basket (Epson Stylus Pro 7700 27 Attaching the Paper Basket (Epson Stylus Pro 9700 34 Completing Setup and Connecting the Power Cord 42 Installing Ink 46 Connecting to Your System 48 Installing the Software for Windows... 55 Downloading and Updating the Firmware 55 Configuring the Printer's Network Adapter 56 2 Handling Paper and Other Media Selecting Media for Your Printer 57 Available Epson Special Media 58 Guidelines for Using...
... Printer 21 Unpacking and Assembling the Stand 22 Unpacking the Printer and Mounting It on the Stand 25 Attaching the Paper Basket (Epson Stylus Pro 7700 27 Attaching the Paper Basket (Epson Stylus Pro 9700 34 Completing Setup and Connecting the Power Cord 42 Installing Ink 46 Connecting to Your System 48 Installing the Software for Windows... 55 Downloading and Updating the Firmware 55 Configuring the Printer's Network Adapter 56 2 Handling Paper and Other Media Selecting Media for Your Printer 57 Available Epson Special Media 58 Guidelines for Using...

User's Guide
Page 12
... upgrades and accessories: Optional equipment Option Automatic Take-Up Reel System (Pro 9700 only); com for a complete list. sales) or www.epson.ca (Canadian sales). 12 To find the nearest reseller, visit www.proimaging.epson.com (U.S. Options and Accessories Your Epson Stylus® Pro 7700/9700 offers these user-replaceable items: Consumables and user-replaceable parts Part...
... upgrades and accessories: Optional equipment Option Automatic Take-Up Reel System (Pro 9700 only); com for a complete list. sales) or www.epson.ca (Canadian sales). 12 To find the nearest reseller, visit www.proimaging.epson.com (U.S. Options and Accessories Your Epson Stylus® Pro 7700/9700 offers these user-replaceable items: Consumables and user-replaceable parts Part...
User's Guide
Page 15
... a damaged or frayed power cord. 15 You may result in fire or electric shock. • Do not use the equipment safely and effectively. • The Epson Stylus Pro 7700 weighs about 186 lb (84.5 kg) and the Epson Stylus Pro 9700 weighs about 256 lb (116 kg) without the stand, paper basket, ink, or paper.
... a damaged or frayed power cord. 15 You may result in fire or electric shock. • Do not use the equipment safely and effectively. • The Epson Stylus Pro 7700 weighs about 186 lb (84.5 kg) and the Epson Stylus Pro 9700 weighs about 256 lb (116 kg) without the stand, paper basket, ink, or paper.

User's Guide
Page 18
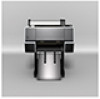
Front Roll paper holder Roll paper cover Front cover Control panel Paper basket Back Interface connector for optional equipment USB interface for the Pro 7700 unless otherwise noted. 18 | Introduction Printer Parts These illustrations show the Epson Stylus Pro 9700, but the parts are the same for computer Ink bay Casters Network interface Maintenance tank (Pro 9700 includes two tanks, one on each side of printer) 18 AC inlet
Front Roll paper holder Roll paper cover Front cover Control panel Paper basket Back Interface connector for optional equipment USB interface for the Pro 7700 unless otherwise noted. 18 | Introduction Printer Parts These illustrations show the Epson Stylus Pro 9700, but the parts are the same for computer Ink bay Casters Network interface Maintenance tank (Pro 9700 includes two tanks, one on each side of printer) 18 AC inlet
User's Guide
Page 21
... When choosing a place for the printer, leave adequate room for the Epson Stylus Pro 9700 21 Before you begin, make sure you have sufficient space to set...conditioners. 21 Chapter 1: Setting Up the Printer This chapter includes the following information: • Unpacking and assembling the Pro 7700 and Pro 9700 • Connecting the power cord • Installing ink • Connecting to your printer and its stand. Follow... • 53.4 × 35.6 inches (1356 × 903 mm) for the Epson Stylus Pro 7700 • 73.4 × 52 inches (1864 × 1318 mm) for easy access and ventilation.
... When choosing a place for the printer, leave adequate room for the Epson Stylus Pro 9700 21 Before you begin, make sure you have sufficient space to set...conditioners. 21 Chapter 1: Setting Up the Printer This chapter includes the following information: • Unpacking and assembling the Pro 7700 and Pro 9700 • Connecting the power cord • Installing ink • Connecting to your printer and its stand. Follow... • 53.4 × 35.6 inches (1356 × 903 mm) for the Epson Stylus Pro 7700 • 73.4 × 52 inches (1864 × 1318 mm) for easy access and ventilation.
User's Guide
Page 22
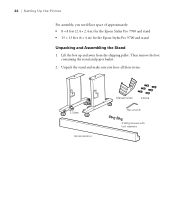
Lift the box up and away from the shipping pallet. Unpack the stand and make sure you need floor space of approximately: • 8 × 8 feet (2.4 × 2.4 m) for the Epson Stylus Pro 7700 and stand • 13 × 13 feet (4 × 4 m) for the Epson Stylus Pro 9700 and stand Unpacking and Assembling the Stand 1. Then remove the box containing the stand and paper basket. 2. 22 | Setting Up the Printer For assembly, you have all these items. 2 Sides Horizontal strut Manual holder 6 Bolts Hex wrench 2 Wing screws with lock washers 22
Lift the box up and away from the shipping pallet. Unpack the stand and make sure you need floor space of approximately: • 8 × 8 feet (2.4 × 2.4 m) for the Epson Stylus Pro 7700 and stand • 13 × 13 feet (4 × 4 m) for the Epson Stylus Pro 9700 and stand Unpacking and Assembling the Stand 1. Then remove the box containing the stand and paper basket. 2. 22 | Setting Up the Printer For assembly, you have all these items. 2 Sides Horizontal strut Manual holder 6 Bolts Hex wrench 2 Wing screws with lock washers 22
User's Guide
Page 27
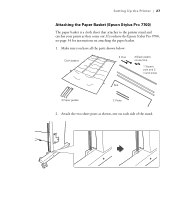
Attach the two short posts as they come out. Setting Up the Printer | 27 Attaching the Paper Basket (Epson Stylus Pro 7700) The paper basket is a cloth sheet that attaches to the printer stand and catches your prints as shown, one on attaching the paper basket. 1. If you have the Epson Stylus Pro 9700, see page 34 for instructions on each side of the stand. 27 Make sure you have all the parts shown below: Cloth basket 2 Pins 2 Black plastic connectors 1 Square pole and 2 round poles Rod 2 Paper guides 2 Posts 2.
Attach the two short posts as they come out. Setting Up the Printer | 27 Attaching the Paper Basket (Epson Stylus Pro 7700) The paper basket is a cloth sheet that attaches to the printer stand and catches your prints as shown, one on attaching the paper basket. 1. If you have the Epson Stylus Pro 9700, see page 34 for instructions on each side of the stand. 27 Make sure you have all the parts shown below: Cloth basket 2 Pins 2 Black plastic connectors 1 Square pole and 2 round poles Rod 2 Paper guides 2 Posts 2.

User's Guide
Page 34
Attach two of the stand as they come out. If you have the Epson Stylus Pro 7700, see page 27 for instructions on each side. 34 Cloth basket 2 Black plastic connectors 4 Pins 2 Plastic end pieces 3 Square poles 5 Paper guides 4 Posts 2 Round poles Rod 2. 34 | Setting Up the Printer Attaching the Paper Basket (Epson Stylus Pro 9700) The paper basket is a cloth sheet that attaches to the front of the posts to the printer stand and catches your prints as shown, one on attaching the paper basket. 1. Make sure you have all the parts shown below.
Attach two of the stand as they come out. If you have the Epson Stylus Pro 7700, see page 27 for instructions on each side. 34 Cloth basket 2 Black plastic connectors 4 Pins 2 Plastic end pieces 3 Square poles 5 Paper guides 4 Posts 2 Round poles Rod 2. 34 | Setting Up the Printer Attaching the Paper Basket (Epson Stylus Pro 9700) The paper basket is a cloth sheet that attaches to the front of the posts to the printer stand and catches your prints as shown, one on attaching the paper basket. 1. Make sure you have all the parts shown below.

User's Guide
Page 44
Close the front cover. 7. Open the front cover and remove the tape and packing material. Save the packing material in the following sections show the Epson Stylus Pro 9700, but the instructions are the same for the Pro 7700. Connect the power cord to ship the printer. 6. Note: The illustrations in case you need to the AC inlet on the back of the printer. 44 44 | Setting Up the Printer 5.
Close the front cover. 7. Open the front cover and remove the tape and packing material. Save the packing material in the following sections show the Epson Stylus Pro 9700, but the instructions are the same for the Pro 7700. Connect the power cord to ship the printer. 6. Note: The illustrations in case you need to the AC inlet on the back of the printer. 44 44 | Setting Up the Printer 5.

User's Guide
Page 57
... the following table shows the paper sizes you can also use : Supported paper sizes Roll paper Pro 9700 Width 10 to 44.0 in. (203 to 1118 mm) Length 2 in . (610...24 in . core: 662.7 ft (202 m) Maximum 2 in . 57 Chapter 2: Handling Paper and Other Media The Epson Stylus Pro 7700 and Pro 9700 print on a variety of coated, glossy, matte, and fine art paper, as well as posterboard up to 59...1580 mm) Letter size up to 610 mm) Length 2 in . (203 to 24 inches (610 mm) for the Pro 7700 or 44 inches (1118 mm) for your printer. core: 147.6 ft (45 m) 3 in . You can use heavy...
... the following table shows the paper sizes you can also use : Supported paper sizes Roll paper Pro 9700 Width 10 to 44.0 in. (203 to 1118 mm) Length 2 in . (610...24 in . core: 662.7 ft (202 m) Maximum 2 in . 57 Chapter 2: Handling Paper and Other Media The Epson Stylus Pro 7700 and Pro 9700 print on a variety of coated, glossy, matte, and fine art paper, as well as posterboard up to 59...1580 mm) Letter size up to 610 mm) Length 2 in . (203 to 24 inches (610 mm) for the Pro 7700 or 44 inches (1118 mm) for your printer. core: 147.6 ft (45 m) 3 in . You can use heavy...
User's Guide
Page 85
... best output from the CD-ROM. Before you print, you install the Epson printer driver, the ready-made profiles are located in the driver itself. Tip: Check the Epson Pro Imaging website at www.proimaging.epson. This chapter includes the following information: • Sizing images for borderless...color specialist. com for updated drivers and utilities that let you print and manage print jobs. 85 Chapter 3: Printing With Epson Drivers for Windows Your Epson Stylus Pro 7700 or Pro 9700 comes with drivers and utilities that may become available. See page 49 for instructions.
... best output from the CD-ROM. Before you print, you install the Epson printer driver, the ready-made profiles are located in the driver itself. Tip: Check the Epson Pro Imaging website at www.proimaging.epson. This chapter includes the following information: • Sizing images for borderless...color specialist. com for updated drivers and utilities that let you print and manage print jobs. 85 Chapter 3: Printing With Epson Drivers for Windows Your Epson Stylus Pro 7700 or Pro 9700 comes with drivers and utilities that may become available. See page 49 for instructions.
User's Guide
Page 111
...and utilities that let you have them created by a color specialist. You can have installed the Epson printer driver and utilities from your image correctly. Tip: Check the Epson Pro Imaging website at www.proimaging.epson. A color-managed workflow using Mac OS X 10.4.11, you want to the right folder....system. This chapter includes the following information for Mac OS X: • Choosing page setup settings for instructions. 111 Chapter 4: Printing With Epson Drivers for Macintosh Your Epson Stylus Pro 7700 or Pro 9700 comes with drivers and utilities that may become available.
...and utilities that let you have them created by a color specialist. You can have installed the Epson printer driver and utilities from your image correctly. Tip: Check the Epson Pro Imaging website at www.proimaging.epson. A color-managed workflow using Mac OS X 10.4.11, you want to the right folder....system. This chapter includes the following information for Mac OS X: • Choosing page setup settings for instructions. 111 Chapter 4: Printing With Epson Drivers for Macintosh Your Epson Stylus Pro 7700 or Pro 9700 comes with drivers and utilities that may become available.
User's Guide
Page 144
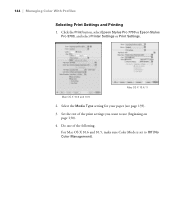
Set the rest of the following: For Mac OS X 10.6 and 10.5, make sure Color Mode is set to use (beginning on page 130). 4. 144 | Managing Color With Profiles Selecting Print Settings and Printing 1. Do one of the print settings you want to Off (No Color Management). 144 Mac OS X 10.4.11 Mac OS X 10.6 and 10.5 2. Select the Media Type setting for your paper (see page 139). 3. Click the Print button, select Epson Stylus Pro 7700 or Epson Stylus Pro 9700, and select Printer Settings or Print Settings.
Set the rest of the following: For Mac OS X 10.6 and 10.5, make sure Color Mode is set to use (beginning on page 130). 4. 144 | Managing Color With Profiles Selecting Print Settings and Printing 1. Do one of the print settings you want to Off (No Color Management). 144 Mac OS X 10.4.11 Mac OS X 10.6 and 10.5 2. Select the Media Type setting for your paper (see page 139). 3. Click the Print button, select Epson Stylus Pro 7700 or Epson Stylus Pro 9700, and select Printer Settings or Print Settings.

User's Guide
Page 149
... menu system on the LCD display (see page 150) or a printer driver screen (see page 217. 149 Chapter 6: Maintaining and Transporting the Printer The Epson Stylus Pro 7700 and Pro 9700 require little maintenance to fine-tune a variety of your maintenance tank(s), and other information. For more information, see page 151). 149 You can check...
... menu system on the LCD display (see page 150) or a printer driver screen (see page 217. 149 Chapter 6: Maintaining and Transporting the Printer The Epson Stylus Pro 7700 and Pro 9700 require little maintenance to fine-tune a variety of your maintenance tank(s), and other information. For more information, see page 151). 149 You can check...
User's Guide
Page 166
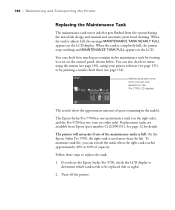
...is completely full, the printer stops working and MAINTENANCE TANK FULL appears on the LCD display. To maximize tank life, you have the Epson Stylus Pro 9700, check the LCD display to determine which tank needs to be replaced (left . When the tank is almost full, the message ...of the maintenance tanks is used more than the left or right). 2. See page 12 for details. On the Epson Stylus Pro 9700, the right tank is full. The Epson Stylus Pro 7700 has one maintenance tank (on the control panel, shown below. Replacement tanks are available from the system during the initial...
...is completely full, the printer stops working and MAINTENANCE TANK FULL appears on the LCD display. To maximize tank life, you have the Epson Stylus Pro 9700, check the LCD display to determine which tank needs to be replaced (left . When the tank is almost full, the message ...of the maintenance tanks is used more than the left or right). 2. See page 12 for details. On the Epson Stylus Pro 9700, the right tank is full. The Epson Stylus Pro 7700 has one maintenance tank (on the control panel, shown below. Replacement tanks are available from the system during the initial...

User's Guide
Page 190
... position. • If you are feeding paper in front of the printer as shown below: 190 There are two paper guides for the Epson Stylus Pro 7700 and five for the Pro 9700. Epson Stylus Pro 7700 Epson Stylus Pro 9700 Do one of the following: • If you are feeding paper backward (under the printer), gently squeeze the paper guides and...
... position. • If you are feeding paper in front of the printer as shown below: 190 There are two paper guides for the Epson Stylus Pro 7700 and five for the Pro 9700. Epson Stylus Pro 7700 Epson Stylus Pro 9700 Do one of the following: • If you are feeding paper backward (under the printer), gently squeeze the paper guides and...
User's Guide
Page 195
... consumption Description 90 V to 264 V 50 to 60 Hz 49.5 to 60.5 Hz 1.0 A at 120 V 0.5 A at 220 V Epson Stylus Pro 7700: Approx. 80 W Approx. 14 W in low-power mode Approx. 1 W or less in power off mode Epson Stylus Pro 9700: Approx. 85 W Approx.14 W in low-power mode Approx.1 W or less in power off mode Check the...
... consumption Description 90 V to 264 V 50 to 60 Hz 49.5 to 60.5 Hz 1.0 A at 120 V 0.5 A at 220 V Epson Stylus Pro 7700: Approx. 80 W Approx. 14 W in low-power mode Approx. 1 W or less in power off mode Epson Stylus Pro 9700: Approx. 85 W Approx.14 W in low-power mode Approx.1 W or less in power off mode Check the...
User's Guide
Page 196
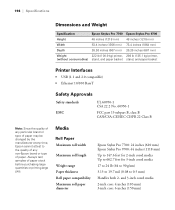
...4 inches (103 mm) 3-inch core: 6 inches (150 mm) 196 Always test samples of paper. 196 | Specifications Dimensions and Weight Specification Epson Stylus Pro 7700 Epson Stylus Pro 9700 Height 48 inches (1218 mm) 48 inches (1218 mm) Width 53.4 inches (1356 mm) 73.4 inches (1864 mm) Depth 26.26 inches... 2- Media Roll Paper Maximum roll width Maximum roll length Weight range Paper thickness Roll paper compatibility Maximum roll paper diameter Epson Stylus Pro 7700: 24 inches (610 mm) Epson Stylus Pro 9700: 44 inches (1118 mm) Up to 147.6 feet for 2-inch cored media Up to 662.7 feet for ...
...4 inches (103 mm) 3-inch core: 6 inches (150 mm) 196 Always test samples of paper. 196 | Specifications Dimensions and Weight Specification Epson Stylus Pro 7700 Epson Stylus Pro 9700 Height 48 inches (1218 mm) 48 inches (1218 mm) Width 53.4 inches (1356 mm) 73.4 inches (1864 mm) Depth 26.26 inches... 2- Media Roll Paper Maximum roll width Maximum roll length Weight range Paper thickness Roll paper compatibility Maximum roll paper diameter Epson Stylus Pro 7700: 24 inches (610 mm) Epson Stylus Pro 9700: 44 inches (1118 mm) Up to 147.6 feet for 2-inch cored media Up to 662.7 feet for ...
User's Guide
Page 227
Stylus Pro 7700, paper basket, 27 to 33 Stylus Pro 9700, paper basket, 34 to 42 Suction, 83, 101, 120, 134 Super strong cleaning cycle, 162 Support, Epson, 13 System requirements, 13 T Take-Up Reel, Auto, see Automatic Take-Up Reel, optional Technical support, 13 Temperature requirements, 195 Test Print menu, 150 Time ...
Stylus Pro 7700, paper basket, 27 to 33 Stylus Pro 9700, paper basket, 34 to 42 Suction, 83, 101, 120, 134 Super strong cleaning cycle, 162 Support, Epson, 13 System requirements, 13 T Take-Up Reel, Auto, see Automatic Take-Up Reel, optional Technical support, 13 Temperature requirements, 195 Test Print menu, 150 Time ...


