Product Brochure
Page 1
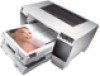
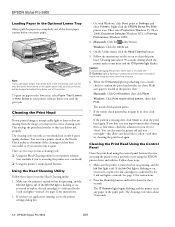
... media from Epson supporting Macintosh® and Windows® 95, 98, 2000, Me and NT operating systems • Available with optional lower paper cassette and tray For maximum print life, display all new EPSON Stylus Pro 5500 represents the most difficult print requirements without... photographic printer drivers from 4"x 6" up to image, display conditions, light intensity, humidity, and atmospheric conditions. EPSON Stylus® Pro 5500 Print Engine The all prints under glass or lamination or properly store them. 2) Two and five minute performance is based on various factors,...
... media from Epson supporting Macintosh® and Windows® 95, 98, 2000, Me and NT operating systems • Available with optional lower paper cassette and tray For maximum print life, display all new EPSON Stylus Pro 5500 represents the most difficult print requirements without... photographic printer drivers from 4"x 6" up to image, display conditions, light intensity, humidity, and atmospheric conditions. EPSON Stylus® Pro 5500 Print Engine The all prints under glass or lamination or properly store them. 2) Two and five minute performance is based on various factors,...
Product Brochure
Page 2
iMAC, G3, G4 system with MAC OS 8.5.1 through 9.1 Windows Minimum System Requirements PC with next business day exchange; As an ENERGY STAR Partner, Epson America Inc. EPSON Stylus Pro 5500 Print Engine Specifications Printing Method 6-color (CcMmYK) variable droplet Micro Piezo DX3 drop-on-demand ink jet ...part 15 subpart B class B, CSA C108.8 class B Reliability Total print volume Print head life 75,000 pages (letter) 2 Billion dots/nozzle Product/Accessories Part Numbers EPSON Stylus Pro 5500 Print Engine 250-sheet lower paper cassette and tray C300011B C813611 Internal 10/100 ...
iMAC, G3, G4 system with MAC OS 8.5.1 through 9.1 Windows Minimum System Requirements PC with next business day exchange; As an ENERGY STAR Partner, Epson America Inc. EPSON Stylus Pro 5500 Print Engine Specifications Printing Method 6-color (CcMmYK) variable droplet Micro Piezo DX3 drop-on-demand ink jet ...part 15 subpart B class B, CSA C108.8 class B Reliability Total print volume Print head life 75,000 pages (letter) 2 Billion dots/nozzle Product/Accessories Part Numbers EPSON Stylus Pro 5500 Print Engine 250-sheet lower paper cassette and tray C300011B C813611 Internal 10/100 ...
Product Information Guide
Page 7
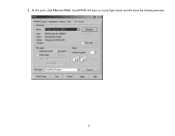
..., as shown below: 4. After a few moments, the printer prints one of these steps: 1. Then run a printer check to ensure accurate, clean printouts. If you 're finished, click Finish. 2/01 EPSON Stylus Pro 5500 - 7 Windows: Click the Utility tab. 4. Then enter the number of each...are correctly installed. Hold down the Reset button and press the P Operate button to print a test page. Run a cleaning cycle (see an alignment window. 6. Right-click the EPSON Stylus Pro 5500 printer icon. Macintosh: Click the utility button. Follow the instructions on the screen ...
..., as shown below: 4. After a few moments, the printer prints one of these steps: 1. Then run a printer check to ensure accurate, clean printouts. If you 're finished, click Finish. 2/01 EPSON Stylus Pro 5500 - 7 Windows: Click the Utility tab. 4. Then enter the number of each...are correctly installed. Hold down the Reset button and press the P Operate button to print a test page. Run a cleaning cycle (see an alignment window. 6. Right-click the EPSON Stylus Pro 5500 printer icon. Macintosh: Click the utility button. Follow the instructions on the screen ...
Product Information Guide
Page 12
... POperate light flashes. You can also turn it down for instructions. 2. Right-click the EPSON Stylus Pro 5500 printer icon. Then select Properties (Windows 95, 98, or 2000), Document Defaults (Windows NT), or Printing Preferences (Windows 2000). 3. Follow the instructions on but not printing, and the Ink Out light is unexpectedly light or faint or dots are missing from...
... POperate light flashes. You can also turn it down for instructions. 2. Right-click the EPSON Stylus Pro 5500 printer icon. Then select Properties (Windows 95, 98, or 2000), Document Defaults (Windows NT), or Printing Preferences (Windows 2000). 3. Follow the instructions on but not printing, and the Ink Out light is unexpectedly light or faint or dots are missing from...
Product Support Bulletin(s)
Page 4
...41.67 inches (30,000 pixels / 720dpi). At 360 ppi, your printer driver (if available) so that you do not waste unnecessary media. Under Windows NT, 2000 and XP, the PPD limit is not expected. however it is over the 86inch printer page limit; The only options for... inches (H and V). Be advised that you are using the standard Epson print driver would be 833.333 x 833.333. Also, under Photoshop 5.x/6.x for the Macintosh and Photoshop 6.x for the PC, the job will allow for longer pages). The Stylus Pro 5000/5500 however will actually be set for Roll Paper (Banner) mode so ...
...41.67 inches (30,000 pixels / 720dpi). At 360 ppi, your printer driver (if available) so that you do not waste unnecessary media. Under Windows NT, 2000 and XP, the PPD limit is not expected. however it is over the 86inch printer page limit; The only options for... inches (H and V). Be advised that you are using the standard Epson print driver would be 833.333 x 833.333. Also, under Photoshop 5.x/6.x for the Macintosh and Photoshop 6.x for the PC, the job will allow for longer pages). The Stylus Pro 5000/5500 however will actually be set for Roll Paper (Banner) mode so ...

Product Support Bulletin(s)
Page 5
...of these applications should be very similar in function. It is too large for additional assistance. 4 Please refer to setup banner printing from Adobe Illustrator 8.x/9.x and CorelDRAW 9 from the PC platform. The following examples show how to your software documentation for the ...printer driver to sharpen their edges. For Windows Users, if you encounter partial/incomeplete prints while having Finest Detail enabled, please disable this may create a massive print file that is recommended for low resolution text and line art to process...
...of these applications should be very similar in function. It is too large for additional assistance. 4 Please refer to setup banner printing from Adobe Illustrator 8.x/9.x and CorelDRAW 9 from the PC platform. The following examples show how to your software documentation for the ...printer driver to sharpen their edges. For Windows Users, if you encounter partial/incomeplete prints while having Finest Detail enabled, please disable this may create a massive print file that is recommended for low resolution text and line art to process...
Product Support Bulletin(s)
Page 6
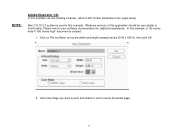
Windows versions of this example, we are creating a banner, which is 227 inches (Illustrators max. In this example, a "20 inches wide X 180 inches high" document is ... O/S 10.3.3 system is created. 1. Click on File and New, set up the width and height (sample shows 20 W x 180 H), then click OK. 2. Please refer to print and stretch it until it covers the whole page. 5 page setup). NOTE: Adobe Illustrator CS: In this application should be very similar in this example...
Windows versions of this example, we are creating a banner, which is 227 inches (Illustrators max. In this example, a "20 inches wide X 180 inches high" document is ... O/S 10.3.3 system is created. 1. Click on File and New, set up the width and height (sample shows 20 W x 180 H), then click OK. 2. Please refer to print and stretch it until it covers the whole page. 5 page setup). NOTE: Adobe Illustrator CS: In this application should be very similar in this example...
Product Support Bulletin(s)
Page 7
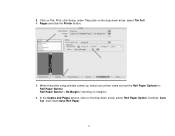
Uncheck Auto Cut then check Save Roll Paper. 6 3. Click on File, Print, click Setup, under Tiling click on the drop down arrow, select Tile Full 4. In the Copies and Pages section, click on the drop down arrow, select Roll Paper Option. No Margin ( if printing no margins) 6. Pages and click the Printer button. 5. When the printer setup window comes up, select your printer name and set the Roll Paper Options to: Roll Paper Banner Roll Paper Banner -
Uncheck Auto Cut then check Save Roll Paper. 6 3. Click on File, Print, click Setup, under Tiling click on the drop down arrow, select Tile Full 4. In the Copies and Pages section, click on the drop down arrow, select Roll Paper Option. No Margin ( if printing no margins) 6. Pages and click the Printer button. 5. When the printer setup window comes up, select your printer name and set the Roll Paper Options to: Roll Paper Banner Roll Paper Banner -
Product Support Bulletin(s)
Page 8
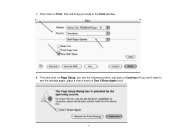
7. Then click on Continue (If you don't want to the Print window. 8. This time click on Page Setup, you back to see the following screen, just click on Print. This will bring you see the window again, place a check mark on Don't Show Again box). 7
7. Then click on Continue (If you don't want to the Print window. 8. This time click on Page Setup, you back to see the following screen, just click on Print. This will bring you see the window again, place a check mark on Don't Show Again box). 7
Product Support Bulletin(s)
Page 10
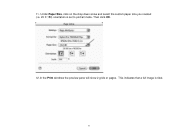
Then click OK. 12. This indicates that a full image is set to portrait mode. Under Paper Size, click on the drop down arrow and select the custom paper size you created (i.e. 20 X 180) orientation is tiled. 9 In the Print windows the preview pane will show 2 grids or pages. 11.
Then click OK. 12. This indicates that a full image is set to portrait mode. Under Paper Size, click on the drop down arrow and select the custom paper size you created (i.e. 20 X 180) orientation is tiled. 9 In the Print windows the preview pane will show 2 grids or pages. 11.
Product Support Bulletin(s)
Page 19
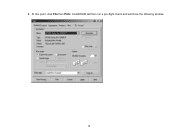
8. CorelDRAW will then run a pre-flight check and will show the following window. 18 At this point, click File then Print.
8. CorelDRAW will then run a pre-flight check and will show the following window. 18 At this point, click File then Print.
Product Support Bulletin(s)
Page 28
... PPD limit is 1771.6 inches (SP7000/9000 Series) and 1800 inches (SP7600/9600/10000 Series). Under Windows NT, 2000 and XP, the PPD limit is 129 inches. All Epson large format printers use 360dpi as the input resolution (this is the resolution data is to save the file... size error. The only options for additional assistance. 3 The Macintosh versions of your printer driver (if available) so that you are using the standard Epson print driver would be very similar in function. NOTE 1: a. NOTE 2: Adobe Photoshop has a pixel limitation of the printer driver and adjusts the page size...
... PPD limit is 1771.6 inches (SP7000/9000 Series) and 1800 inches (SP7600/9600/10000 Series). Under Windows NT, 2000 and XP, the PPD limit is 129 inches. All Epson large format printers use 360dpi as the input resolution (this is the resolution data is to save the file... size error. The only options for additional assistance. 3 The Macintosh versions of your printer driver (if available) so that you are using the standard Epson print driver would be very similar in function. NOTE 1: a. NOTE 2: Adobe Photoshop has a pixel limitation of the printer driver and adjusts the page size...
Product Support Bulletin(s)
Page 36
8. CorelDRAW will then run a pre-flight check and will show the following window. 11 At this point, click File then Print.
8. CorelDRAW will then run a pre-flight check and will show the following window. 11 At this point, click File then Print.
Product Support Bulletin(s)
Page 38
Model Stylus Pro 5000 Stylus Pro 5500 Stylus Pro 7000 Stylus Pro 7500 Stylus Pro 9000 Stylus Pro 9500 Stylus Pro 10000 Stylus Pro 10000CF Status Monitor 3 N/A Not available Yes Yes N/A Yes Not available Not available USB IEEE 1394 N/A Yes (optional) ...2001.11.002 Reference: N/A Originator: RD/RR Authorization: Affected Product(s): Epson Stylus Pro 5000/5500/7000/7500/9000/9500/10000/10000CF Subject: Windows XP Driver & Status Monitor 3 Installation Procedure This bulletin describes Windows XP printer driver/Epson Status Monitor 3 installation procedures for all of the printer models listed ...
Model Stylus Pro 5000 Stylus Pro 5500 Stylus Pro 7000 Stylus Pro 7500 Stylus Pro 9000 Stylus Pro 9500 Stylus Pro 10000 Stylus Pro 10000CF Status Monitor 3 N/A Not available Yes Yes N/A Yes Not available Not available USB IEEE 1394 N/A Yes (optional) ...2001.11.002 Reference: N/A Originator: RD/RR Authorization: Affected Product(s): Epson Stylus Pro 5000/5500/7000/7500/9000/9500/10000/10000CF Subject: Windows XP Driver & Status Monitor 3 Installation Procedure This bulletin describes Windows XP printer driver/Epson Status Monitor 3 installation procedures for all of the printer models listed ...
Product Support Bulletin(s)
Page 39
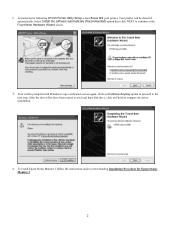
... disk drive, click on Continue Anyway option to proceed to the next step. Your printer will be detected automatically. To install Epson Status Monitor 3 follow the instructions under section heading Installation Procedure for Epson Status Monitor 3. 2 Your will be prompted with Windows Logo verification screen again, Click on Finish to continue at following...
... disk drive, click on Continue Anyway option to proceed to the next step. Your printer will be detected automatically. To install Epson Status Monitor 3 follow the instructions under section heading Installation Procedure for Epson Status Monitor 3. 2 Your will be prompted with Windows Logo verification screen again, Click on Finish to continue at following...
Product Support Bulletin(s)
Page 40
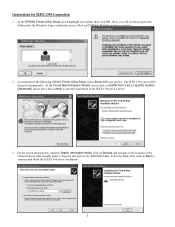
At the EPSON Printer Utility Setup screen highlight your printer. The IEEE 1394 card will see the progress bar followed by the Windows Logo verification screen. On the screen shown below, uncheck Search removable media, click on Continue Anyway option to the WIN2000 folder. ... Install from a list or specific location (Advanced) option then click on Next to start the installation of the extracted driver files (usually under C:\Epson\) and point to continue. 2. Select the folder then click on Next to continue and finish the IEEE 1394 driver installation. 3 Instructions for IEEE...
At the EPSON Printer Utility Setup screen highlight your printer. The IEEE 1394 card will see the progress bar followed by the Windows Logo verification screen. On the screen shown below, uncheck Search removable media, click on Continue Anyway option to the WIN2000 folder. ... Install from a list or specific location (Advanced) option then click on Next to start the installation of the extracted driver files (usually under C:\Epson\) and point to continue. 2. Select the folder then click on Next to continue and finish the IEEE 1394 driver installation. 3 Instructions for IEEE...
Product Support Bulletin(s)
Page 41
... on Finish to continue. Click on Next to compete the driver installation. 8. To install Epson Status Monitor 3 follow the instructions under section heading Installation Procedure for IEEE 1394 status will see the progress bar followed by the Windows Logo verification screen. Select Install the software automatically (Recommended) option selected and click on...
... on Finish to continue. Click on Next to compete the driver installation. 8. To install Epson Status Monitor 3 follow the instructions under section heading Installation Procedure for IEEE 1394 status will see the progress bar followed by the Windows Logo verification screen. Select Install the software automatically (Recommended) option selected and click on...
Product Support Bulletin(s)
Page 42
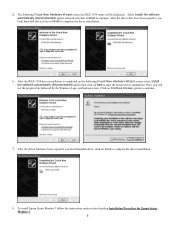
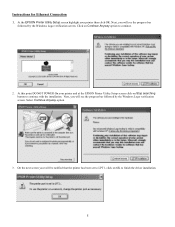
...with the installation. Instructions for Ethernet Connection 1. Select Continue Anyway option. 3. At this point DO NOT POWER On your printer and at the EPSON Printer Utility Setup screen click on OK to finish the driver installation. 5 On the next screen your printer then click OK. Next, you... will see the progress bar followed by the Windows Logo verification screen. Next, you will be notified that the printer has been set to LPT1, click on Stop searching button to continue. 2....
...with the installation. Instructions for Ethernet Connection 1. Select Continue Anyway option. 3. At this point DO NOT POWER On your printer and at the EPSON Printer Utility Setup screen click on OK to finish the driver installation. 5 On the next screen your printer then click OK. Next, you... will see the progress bar followed by the Windows Logo verification screen. Next, you will be notified that the printer has been set to LPT1, click on Stop searching button to continue. 2....
Product Support Bulletin(s)
Page 44
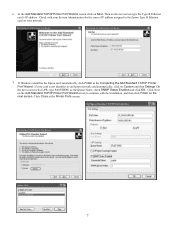
If Windows identifies the Epson card automatically, click Finish at the Printer Ports screen. 7 Click Next on the Add Standard TCP/IP Printer Port Wizard screen to the Epson Type B Ethernet card on your network. 7. Then on Next. On the next screen select LPR, type PASSTHRU as an Epson network card automatically, click on the...
If Windows identifies the Epson card automatically, click Finish at the Printer Ports screen. 7 Click Next on the Add Standard TCP/IP Printer Port Wizard screen to the Epson Type B Ethernet card on your network. 7. Then on Next. On the next screen select LPR, type PASSTHRU as an Epson network card automatically, click on the...
Product Support Bulletin(s)
Page 46
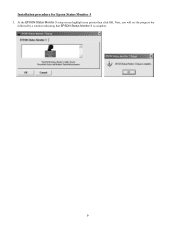
At the EPSON Status Monitor 3 setup screen highlight your printer then click OK. Next, you will see the progress bar followed by a window indicating that EPSON Status Monitor 3 is complete. 9 Installation procedure for Epson Status Monitor 3 1.
At the EPSON Status Monitor 3 setup screen highlight your printer then click OK. Next, you will see the progress bar followed by a window indicating that EPSON Status Monitor 3 is complete. 9 Installation procedure for Epson Status Monitor 3 1.

