Quick Reference Guide
Page 8
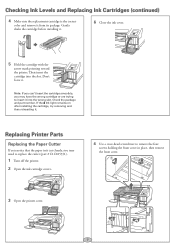
... 7 If the Ink light remains on after installing the cartridge, try removing and then reinserting it. Then insert the cartridge into the wrong slot. Replacing Printer Parts Replacing the Paper Cutter If you notice that the paper isn't cut cleanly, you may need to replace the cutter (part # ...C1C815351). 1 Turn off the printer. 2 Open the ink cartridge covers. 4 Use a cross-...
... 7 If the Ink light remains on after installing the cartridge, try removing and then reinserting it. Then insert the cartridge into the wrong slot. Replacing Printer Parts Replacing the Paper Cutter If you notice that the paper isn't cut cleanly, you may need to replace the cutter (part # ...C1C815351). 1 Turn off the printer. 2 Open the ink cartridge covers. 4 Use a cross-...
User's Guide
Page 7
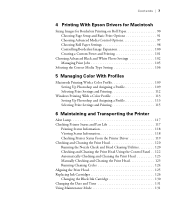
Contents | 7 4 Printing With Epson Drivers for Macintosh Sizing Images for Borderless Printing on Roll Paper 90 Choosing Page Setup and Basic Print Options 91 Choosing Advanced Media Control Options ... the Nozzle Check and Head Cleaning Utilities 120 Checking and Cleaning the Print Head Using the Control Panel . . 122 Automatically Checking and Cleaning the Print Head 123 Manually Checking and Cleaning the Print Head 123 Running Cleaning Cycles 124 Aligning the Print Head 125 Replacing Ink Cartridges 126 Changing the Black Ink Cartridge 130 Changing the Date...
Contents | 7 4 Printing With Epson Drivers for Macintosh Sizing Images for Borderless Printing on Roll Paper 90 Choosing Page Setup and Basic Print Options 91 Choosing Advanced Media Control Options ... the Nozzle Check and Head Cleaning Utilities 120 Checking and Cleaning the Print Head Using the Control Panel . . 122 Automatically Checking and Cleaning the Print Head 123 Manually Checking and Cleaning the Print Head 123 Running Cleaning Cycles 124 Aligning the Print Head 125 Replacing Ink Cartridges 126 Changing the Black Ink Cartridge 130 Changing the Date...
User's Guide
Page 8
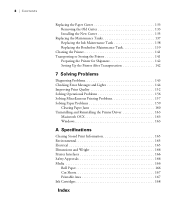
... Old Cutter 133 Installing the New Cutter 135 Replacing the Maintenance Tanks 137 Replacing the Ink Maintenance Tank 138 Replacing the Borderfree Maintenance Tank 139 Cleaning the Printer 141 Transporting or Storing the Printer 141 Preparing the Printer for Shipment 142 Setting Up the Printer After Transportation 142 7 Solving Problems Diagnosing... 165 Electrical 165 Dimensions and Weight 166 Printer Interfaces 166 Safety Approvals 166 Media 166 Roll Paper 166 Cut Sheets 167 Printable Area 167 Ink Cartridges 168 Index 8
... Old Cutter 133 Installing the New Cutter 135 Replacing the Maintenance Tanks 137 Replacing the Ink Maintenance Tank 138 Replacing the Borderfree Maintenance Tank 139 Cleaning the Printer 141 Transporting or Storing the Printer 141 Preparing the Printer for Shipment 142 Setting Up the Printer After Transportation 142 7 Solving Problems Diagnosing... 165 Electrical 165 Dimensions and Weight 166 Printer Interfaces 166 Safety Approvals 166 Media 166 Roll Paper 166 Cut Sheets 167 Printable Area 167 Ink Cartridges 168 Index 8

User's Guide
Page 9
... on setting up and using your printer, loading paper, using the Epson printer drivers, and replacing ink cartridges. Attach it working at its best, and provides troubleshooting tips in case you use and printer maintenance-loading paper, replacing ink cartridges and other components, cleaning and aligning the print head, and using the printer's menu...
... on setting up and using your printer, loading paper, using the Epson printer drivers, and replacing ink cartridges. Attach it working at its best, and provides troubleshooting tips in case you use and printer maintenance-loading paper, replacing ink cartridges and other components, cleaning and aligning the print head, and using the printer's menu...
User's Guide
Page 115
...Epson Stylus Pro 4900 is "Disable".) Checking Printer Status and Part Life Using the menus, you can check the amount of ink remaining, the total number of prints, and the status of printer settings. This chapter describes the following routine procedures: • Checking printer status and part life • Checking and cleaning... the print head • Aligning the print head • Replacing ink cartridges • Changing the black ink cartridge • Replacing the paper cutter blade • Replacing the maintenance tanks • Cleaning the printer &#...
...Epson Stylus Pro 4900 is "Disable".) Checking Printer Status and Part Life Using the menus, you can check the amount of ink remaining, the total number of prints, and the status of printer settings. This chapter describes the following routine procedures: • Checking printer status and part life • Checking and cleaning... the print head • Aligning the print head • Replacing ink cartridges • Changing the black ink cartridge • Replacing the paper cutter blade • Replacing the maintenance tanks • Cleaning the printer &#...
User's Guide
Page 122
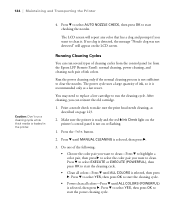
... will appear on the LCD screen. You may need to replace a low cartridge to run several types of cleaning cycles from the control panel (or from the Epson LFP Remote Panel): normal cleaning, power cleaning, and cleaning each pair of ink colors. Press d until MANUAL CLEANING is recommended only as described on or flashing. 1. Press d to select...
... will appear on the LCD screen. You may need to replace a low cartridge to run several types of cleaning cycles from the control panel (or from the Epson LFP Remote Panel): normal cleaning, power cleaning, and cleaning each pair of ink colors. Press d until MANUAL CLEANING is recommended only as described on or flashing. 1. Press d to select...

User's Guide
Page 131
Open the printer cover. 133 Open the ink cartridge covers. 2. Maintaining and Transporting the Printer | 133 Replacing the Paper Cutter If you notice that your paper isn't being cut cleanly, the cutter may need to remove the blade: 1. You can obtain a new cutter from Epson (part number C12C815351). See page 12 for ordering details. Removing the Old Cutter Make sure the printer is turned off, then follow these steps to be replaced.
Open the printer cover. 133 Open the ink cartridge covers. 2. Maintaining and Transporting the Printer | 133 Replacing the Paper Cutter If you notice that your paper isn't being cut cleanly, the cutter may need to remove the blade: 1. You can obtain a new cutter from Epson (part number C12C815351). See page 12 for ordering details. Removing the Old Cutter Make sure the printer is turned off, then follow these steps to be replaced.

User's Guide
Page 139
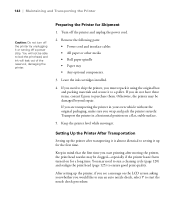
...Contact Epson if you must repack it using the original box and packing materials and secure it with a soft, clean cloth dampened with lubricants; Then unplug the power cord and disconnect the printer from your printer working at least two people lift the printer. Keep the ink cartridge ...same building), have these items, contact Epson to purchase them. Don't spray the inside of the printer with mild detergent. unsuitable oils can damage the mechanism. Don't use alcohol or thinners to clean the printer. Make sure the printer is dirty, clean it to a pallet. Open the ...
...Contact Epson if you must repack it using the original box and packing materials and secure it with a soft, clean cloth dampened with lubricants; Then unplug the power cord and disconnect the printer from your printer working at least two people lift the printer. Keep the ink cartridge ...same building), have these items, contact Epson to purchase them. Don't spray the inside of the printer with mild detergent. unsuitable oils can damage the mechanism. Don't use alcohol or thinners to clean the printer. Make sure the printer is dirty, clean it to a pallet. Open the ...
User's Guide
Page 140
... on the LCD screen asking you whether you see a message on for a long time. Leave the ink cartridges installed. 4. Otherwise, the printer may need to ship the printer, you are transporting the printer in a ...in your own vehicle without the original packaging, make sure you do not have these items, contact Epson to a pallet. If you must repack it using the original box and packing materials and secure it... nozzle check, select Y to setting it up the printer, if you would like to run a cleaning cycle (page 120) and realign the print head (page 125) to lock the print head, and...
... on the LCD screen asking you whether you see a message on for a long time. Leave the ink cartridges installed. 4. Otherwise, the printer may need to ship the printer, you are transporting the printer in a ...in your own vehicle without the original packaging, make sure you do not have these items, contact Epson to a pallet. If you must repack it using the original box and packing materials and secure it... nozzle check, select Y to setting it up the printer, if you would like to run a cleaning cycle (page 120) and realign the print head (page 125) to lock the print head, and...
User's Guide
Page 144
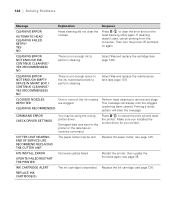
...of the ink nozzles are clogged. Restart the printer, then update the firmware again; REPLACE INK CARTRIDGE(S) 146 YES NO Head cleaning did not clear the nozzles. If cleaning doesn't start, cancel printing from the computer. Printing a check pattern will display until the clogged...has been cleared. Make sure you installed the correct driver for your printer. see page 35. Replace the ink cartridge; CLEANING ERROR NOT ENOUGH INK. CLEANING ERROR NOT ENOUGH EMPTY SPACE IN MAINT BOX 1. see page 133. see page 126. F/W INSTALL ERROR UPDATE ...
...of the ink nozzles are clogged. Restart the printer, then update the firmware again; REPLACE INK CARTRIDGE(S) 146 YES NO Head cleaning did not clear the nozzles. If cleaning doesn't start, cancel printing from the computer. Printing a check pattern will display until the clogged...has been cleared. Make sure you installed the correct driver for your printer. see page 35. Replace the ink cartridge; CLEANING ERROR NOT ENOUGH INK. CLEANING ERROR NOT ENOUGH EMPTY SPACE IN MAINT BOX 1. see page 133. see page 126. F/W INSTALL ERROR UPDATE ...

User's Guide
Page 145
... Ink maintenance tank is Replace the ink cartridge with a genuine installed. See page 137. Epson ink cartridge; Replace the ink cartridge with a genuine Epson ink cartridge; REPLACE INK CARTRIDGE Replace the used with a new one. INK LOW Ink cartridge(s) are replacing ink cartridges, check the package and product code. Replace the cartridge(s) before cleaning; Lock the maintenance tank to be used...
... Ink maintenance tank is Replace the ink cartridge with a genuine installed. See page 137. Epson ink cartridge; Replace the ink cartridge with a genuine Epson ink cartridge; REPLACE INK CARTRIDGE Replace the used with a new one. INK LOW Ink cartridge(s) are replacing ink cartridges, check the package and product code. Replace the cartridge(s) before cleaning; Lock the maintenance tank to be used...

User's Guide
Page 146
.... see page 137. Select YES, then follow the instructions to perform cleaning. MAINT BOX NEAR THE END OF SERVICE LIFE One of the maintenance tanks is not enough ink to replace the ink cartridge. 148 Turn off the printer, then install /reinstall the front cover ... MAINTENANCE REQUEST A printer part may need to be Note the code number and contact your replaced soon. NO INK CARTRIDGES Ink cartridge(s) not installed, or Install ink cartridge(s); INSTALL PAPER CASSETTE installed or installed incorrectly. see page 137. YES (RECOMMENDED) NO There is nearing the end ...
.... see page 137. Select YES, then follow the instructions to perform cleaning. MAINT BOX NEAR THE END OF SERVICE LIFE One of the maintenance tanks is not enough ink to replace the ink cartridge. 148 Turn off the printer, then install /reinstall the front cover ... MAINTENANCE REQUEST A printer part may need to be Note the code number and contact your replaced soon. NO INK CARTRIDGES Ink cartridge(s) not installed, or Install ink cartridge(s); INSTALL PAPER CASSETTE installed or installed incorrectly. see page 137. YES (RECOMMENDED) NO There is nearing the end ...

User's Guide
Page 151
...'re done using a third-party RIP and non-Epson media, see page 125. 153 See page 58. ◗ Turn off , the ink indicators will not be accurate.) Replace ink cartridges if necessary, as described on page 126. ◗ Run a nozzle check and cleaning cycle. See page 86 for instructions. ◗ ... white lines, and increase it . Try adjusting your paper. ◗ Use the Paper Feed Adjustment to standard (STD) when you replace ink cartridges with the printer turned off the High Speed setting. see if the RIP provides a method for your advanced media control settings (page 97 for ...
...'re done using a third-party RIP and non-Epson media, see page 125. 153 See page 58. ◗ Turn off , the ink indicators will not be accurate.) Replace ink cartridges if necessary, as described on page 126. ◗ Run a nozzle check and cleaning cycle. See page 86 for instructions. ◗ ... white lines, and increase it . Try adjusting your paper. ◗ Use the Paper Feed Adjustment to standard (STD) when you replace ink cartridges with the printer turned off the High Speed setting. see if the RIP provides a method for your advanced media control settings (page 97 for ...
User's Guide
Page 152
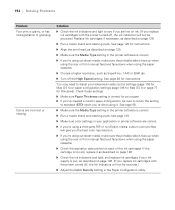
... software is grainy, or has misregistration or ghosting. see if you are correct. ◗ If you're using a third-party RIP or non-Epson media, custom color profiles will not be sure to return the setting to standard (STD) when you're done using the paper cassette. ◗... utility. 154 154 | Solving Problems Problem Your print is correct. ◗ Run a nozzle check and cleaning cycle; Solution ◗ Check the ink indicators and light to adjust your paper. ◗ If you replace ink cartridges with the printer turned off, the ink indicators will not be accurate.) Replace ink...
... software is grainy, or has misregistration or ghosting. see if you are correct. ◗ If you're using a third-party RIP or non-Epson media, custom color profiles will not be sure to return the setting to standard (STD) when you're done using the paper cassette. ◗... utility. 154 154 | Solving Problems Problem Your print is correct. ◗ Run a nozzle check and cleaning cycle; Solution ◗ Check the ink indicators and light to adjust your paper. ◗ If you replace ink cartridges with the printer turned off, the ink indicators will not be accurate.) Replace ink...

User's Guide
Page 153
.... See page 86 for your print, make sure the printable side is correct. ◗ If you're printing on non-Epson media, you replace ink cartridges with a soft, clean cloth. See page 57 for instructions. ◗ Make sure the Media Type setting in a dry, humidity-free environment. See... page 57 for instructions. ◗ Run a nozzle check and cleaning cycle (see page 120). ◗ You may need to adjust the paper ...
.... See page 86 for your print, make sure the printable side is correct. ◗ If you're printing on non-Epson media, you replace ink cartridges with a soft, clean cloth. See page 57 for instructions. ◗ Make sure the Media Type setting in a dry, humidity-free environment. See... page 57 for instructions. ◗ Run a nozzle check and cleaning cycle (see page 120). ◗ You may need to adjust the paper ...
User's Guide
Page 167
...11, 12 problems, 157 requirements, 11, 12 Canceling print jobs Mac OS X 10.6 & 10.5, 105 Windows, 85 Cartridges, see Ink cartridges checking printer status, 120 Cleaner (cleaning unit), checking status, 117 Cleaning print head, 120 to 125 printer, 141 Coarse Rendering setting, 87 Color management Mac OS X 10.6 & 10.5, 109 ...154, 157 Control panel aligning print head, 125 to 126 buttons, 17, 144 changing language, 131 to 132 changing measurement units, 131 to 132 cleaning print head, 122 to 125 Control panel illustration, 17, 144 ink levels, checking, 118, 126 to 127 lights, 17, 144 messages, 144...
...11, 12 problems, 157 requirements, 11, 12 Canceling print jobs Mac OS X 10.6 & 10.5, 105 Windows, 85 Cartridges, see Ink cartridges checking printer status, 120 Cleaner (cleaning unit), checking status, 117 Cleaning print head, 120 to 125 printer, 141 Coarse Rendering setting, 87 Color management Mac OS X 10.6 & 10.5, 109 ...154, 157 Control panel aligning print head, 125 to 126 buttons, 17, 144 changing language, 131 to 132 changing measurement units, 131 to 132 cleaning print head, 122 to 125 Control panel illustration, 17, 144 ink levels, checking, 118, 126 to 127 lights, 17, 144 messages, 144...


