Basics
Page 6
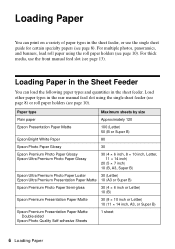
...papers (see page 13). Paper type Maximum sheets by size Plain paper Approximately 120 Epson Presentation Paper Matte 100 (Letter) 50 (B or Super B) Epson Bright White Paper 80 Epson Photo Paper Glossy 30 Epson Premium Photo Paper Glossy Epson Ultra Premium Photo Paper Glossy 30 (4 × 6 inch, 8 × 10 inch, Letter... Matte Double-sided Epson Photo Quality Self-adhesive Sheets 1 sheet 6 Loading Paper Loading Paper You can load the following paper types and quantities in the sheet feeder. Load other paper types in the sheet feeder, or use the front manual feed slot (see...
...papers (see page 13). Paper type Maximum sheets by size Plain paper Approximately 120 Epson Presentation Paper Matte 100 (Letter) 50 (B or Super B) Epson Bright White Paper 80 Epson Photo Paper Glossy 30 Epson Premium Photo Paper Glossy Epson Ultra Premium Photo Paper Glossy 30 (4 × 6 inch, 8 × 10 inch, Letter... Matte Double-sided Epson Photo Quality Self-adhesive Sheets 1 sheet 6 Loading Paper Loading Paper You can load the following paper types and quantities in the sheet feeder. Load other paper types in the sheet feeder, or use the front manual feed slot (see...
Basics
Page 8
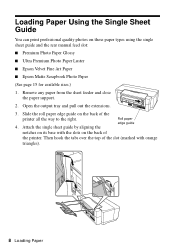
...base with orange triangles). 8 Loading Paper Roll paper edge guide 4. Loading Paper Using the Single Sheet Guide You can print professional quality photos on the back of the printer all the way to the right. Slide the roll paper edge guide on these paper types using the... single sheet guide and the rear manual feed slot: ■ Premium Photo Paper Glossy ■ Ultra Premium Photo Paper Luster ■ Epson Velvet Fine Art Paper ■ Epson Matte Scrapbook Photo Paper (See page 15 for available sizes.) 1. Remove any paper from the ...
...base with orange triangles). 8 Loading Paper Roll paper edge guide 4. Loading Paper Using the Single Sheet Guide You can print professional quality photos on the back of the printer all the way to the right. Slide the roll paper edge guide on these paper types using the... single sheet guide and the rear manual feed slot: ■ Premium Photo Paper Glossy ■ Ultra Premium Photo Paper Luster ■ Epson Velvet Fine Art Paper ■ Epson Matte Scrapbook Photo Paper (See page 15 for available sizes.) 1. Remove any paper from the ...
Basics
Page 13
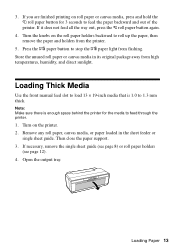
If it does not feed all the way out, press the M roll paper button again. 4. Loading Thick Media Use the front manual feed slot to load 13 × 19-inch media that is enough space behind the printer for 3 seconds to 1.3 mm thick. Remove any roll paper, ...
If it does not feed all the way out, press the M roll paper button again. 4. Loading Thick Media Use the front manual feed slot to load 13 × 19-inch media that is enough space behind the printer for 3 seconds to 1.3 mm thick. Remove any roll paper, ...
Basics
Page 14
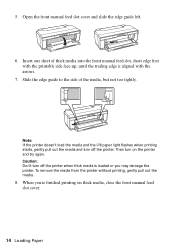
Insert one sheet of the media, but not too tightly. Then turn on thick media, close the front manual feed slot cover. 14 Loading Paper When you may damage the printer. To remove the media from the printer without printing, gently pull out the ... printing starts, gently pull out the media and turn off the printer. Slide the edge guide to the side of thick media into the front manual feed slot, short edge first with the arrows. 7. Open the front...
Insert one sheet of the media, but not too tightly. Then turn on thick media, close the front manual feed slot cover. 14 Loading Paper When you may damage the printer. To remove the media from the printer without printing, gently pull out the ... printing starts, gently pull out the media and turn off the printer. Slide the edge guide to the side of thick media into the front manual feed slot, short edge first with the arrows. 7. Open the front...
Basics
Page 21
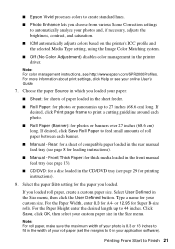
... User Defined in the printer driver. Printing From Start to print a cutting guideline around each banner. ■ Manual - Front Thick Paper: for thick media loaded in the front manual feed tray (see page 13). ■ CD/DVD: for a disc loaded in the CD/DVD tray (see page 8 ..., click Save Roll Paper to feed small amounts of paper loaded in your online User's Guide. 7. ■ Epson Vivid processes colors to create standard hues. ■ Photo Enhance lets you choose from various Scene Correction settings to automatically analyze your custom size. If desired, click Print page...
... User Defined in the printer driver. Printing From Start to print a cutting guideline around each banner. ■ Manual - Front Thick Paper: for thick media loaded in the front manual feed tray (see page 13). ■ CD/DVD: for a disc loaded in the CD/DVD tray (see page 8 ..., click Save Roll Paper to feed small amounts of paper loaded in your online User's Guide. 7. ■ Epson Vivid processes colors to create standard hues. ■ Photo Enhance lets you choose from various Scene Correction settings to automatically analyze your custom size. If desired, click Print page...

Basics
Page 29
To prevent errors, you should burn files, music, or video onto your R2000 Series and the Epson Print CD software that came with it is installed. Turn on CDs and DVDs 29 Open the front manual feed tray and slide the edge guide left. Printing on CDs and DVDs You can use your CD...
To prevent errors, you should burn files, music, or video onto your R2000 Series and the Epson Print CD software that came with it is installed. Turn on CDs and DVDs 29 Open the front manual feed tray and slide the edge guide left. Printing on CDs and DVDs You can use your CD...

Basics
Page 30
Insert the tray into the front manual feed slot. Make sure that the CD/DVD tray is beneath the guide rails, then slide the tray in until the arrows are aligned. 30 Printing on the tray and then place the disc in the adapter. 6. Then slide the edge guide against the left side of the CD/DVD tray. 7. 5. Place your disc on the CD/DVD tray with the label side up. 12-cm discs 8-cm discs Note: For small 8-cm discs, place the adapter on CDs and DVDs
Insert the tray into the front manual feed slot. Make sure that the CD/DVD tray is beneath the guide rails, then slide the tray in until the arrows are aligned. 30 Printing on the tray and then place the disc in the adapter. 6. Then slide the edge guide against the left side of the CD/DVD tray. 7. 5. Place your disc on the CD/DVD tray with the label side up. 12-cm discs 8-cm discs Note: For small 8-cm discs, place the adapter on CDs and DVDs
Basics
Page 34
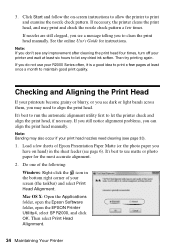
... check and align the print head, if necessary. 3. Then try printing again. It's best to run the automatic alignment utility first to use your R2000 Series often, it is a good idea to print a few times. Click Start and follow the on hand) in the bottom right corner of the... sheet feeder (see page 33). 1. If you don't see any dried ink soften. Load a few sheets of Epson Presentation Paper Matte (or the photo paper you can align the print head manually. If you still notice alignment problems, you have on -screen instructions to allow the printer to maintain good print...
... check and align the print head, if necessary. 3. Then try printing again. It's best to run the automatic alignment utility first to use your R2000 Series often, it is a good idea to print a few times. Click Start and follow the on hand) in the bottom right corner of the... sheet feeder (see page 33). 1. If you don't see any dried ink soften. Load a few sheets of Epson Presentation Paper Matte (or the photo paper you can align the print head manually. If you still notice alignment problems, you have on -screen instructions to allow the printer to maintain good print...
Basics
Page 35
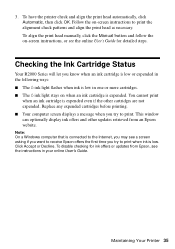
...not expended. To disable checking for ink offers or updates from an Epson website. To have the printer check and align the print head automatically, click Automatic, then click OK. To align the print head manually, click the Manual button and follow the on-screen instructions, or see the instructions in... before printing. ■ Your computer screen displays a message when you try to print when ink is expended. Checking the Ink Cartridge Status Your R2000 Series will let you know when an ink cartridge is low or expended in the following ways: ■ The H ink light flashes when ink...
...not expended. To disable checking for ink offers or updates from an Epson website. To have the printer check and align the print head automatically, click Automatic, then click OK. To align the print head manually, click the Manual button and follow the on-screen instructions, or see the instructions in... before printing. ■ Your computer screen displays a message when you try to print when ink is expended. Checking the Ink Cartridge Status Your R2000 Series will let you know when an ink cartridge is low or expended in the following ways: ■ The H ink light flashes when ink...
Basics
Page 38
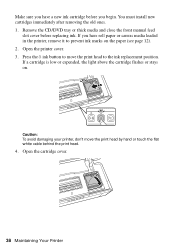
... damaging your printer, don't move the print head to prevent ink marks on . Remove the CD/DVD tray or thick media and close the front manual feed slot cover before you have roll paper or canvas media loaded in the printer, remove it to the ink replacement position.
... damaging your printer, don't move the print head to prevent ink marks on . Remove the CD/DVD tray or thick media and close the front manual feed slot cover before you have roll paper or canvas media loaded in the printer, remove it to the ink replacement position.
Basics
Page 44
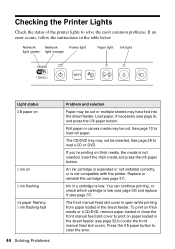
... paper. Replace or reinstall the cartridge (see page 37). To print on thick media or a CD/DVD, remove paper loaded or close the front manual feed slot cover to print on paper loaded in the table below. Network Network Power light light (green) light (orange) Paper light Ink light Light...a cartridge is low (see page 35) and replace it (see page 37). If you're printing on H ink flashing I paper button to locate the front manual feed slot cover). You can continue printing, or check which cartridge is low. Checking the Printer Lights Check the status of the printer lights to...
... paper. Replace or reinstall the cartridge (see page 37). To print on thick media or a CD/DVD, remove paper loaded or close the front manual feed slot cover to print on paper loaded in the table below. Network Network Power light light (green) light (orange) Paper light Ink light Light...a cartridge is low (see page 35) and replace it (see page 37). If you're printing on H ink flashing I paper button to locate the front manual feed slot cover). You can continue printing, or check which cartridge is low. Checking the Printer Lights Check the status of the printer lights to...
Basics
Page 45
...manual feed slot, or roll paper slot. Contact alternately Epson for help (see page 51). Reload paper and press the I paper button to continue. (Leaving the printer cover open stops or prevents printing.) Solving Problems 45 The printer cover may be open the printer cover and remove any paper jammed inside the R2000...I paper and H ink flashing service life or an unknown error has occurred. Front manual feed slot: Gently pull out the paper and press the I paper button. If the error persists, contact Epson (see page 51). The CD/DVD tray may be unable to the external USB...
...manual feed slot, or roll paper slot. Contact alternately Epson for help (see page 51). Reload paper and press the I paper button to continue. (Leaving the printer cover open stops or prevents printing.) Solving Problems 45 The printer cover may be open the printer cover and remove any paper jammed inside the R2000...I paper and H ink flashing service life or an unknown error has occurred. Front manual feed slot: Gently pull out the paper and press the I paper button. If the error persists, contact Epson (see page 51). The CD/DVD tray may be unable to the external USB...
Basics
Page 46
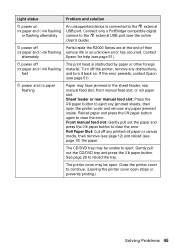
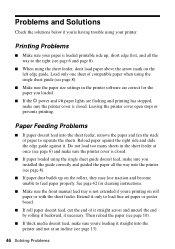
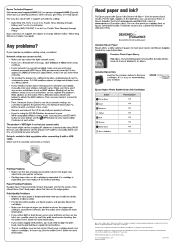
... Solutions Check the solutions below if you loaded. ■ If the P power and I paper lights are correct for cleaning instructions. ■ Make sure the front manual feed tray is not extended if you 're loading it straight into the printer and not at once (see page 6) and make sure the printer...
... Solutions Check the solutions below if you loaded. ■ If the P power and I paper lights are correct for cleaning instructions. ■ Make sure the front manual feed tray is not extended if you 're loading it straight into the printer and not at once (see page 6) and make sure the printer...
Basics
Page 47
...sure the printer cover is closed. ■ If your paper isn't damp or curled. ■ Some papers can adjust the print quality using the Epson Print CD software. See the online User's Guide for 24 hours before inserting them dry for instructions. Press the I paper button again to clear the... cover the printable area correctly, you may need to adjust the printing position using Epson Print CD software. ■ If paper is jammed, try the following, depending on how you're printing: Sheet feeder or rear manual feed slot: Press the I paper button to eject any jammed sheets, then open...
...sure the printer cover is closed. ■ If your paper isn't damp or curled. ■ Some papers can adjust the print quality using the Epson Print CD software. See the online User's Guide for 24 hours before inserting them dry for instructions. Press the I paper button again to clear the... cover the printable area correctly, you may need to adjust the printing position using Epson Print CD software. ■ If paper is jammed, try the following, depending on how you're printing: Sheet feeder or rear manual feed slot: Press the I paper button to eject any jammed sheets, then open...

Basics
Page 48
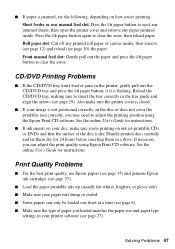
... software. (See page 45 if you may be low on the router. Run a nozzle check and clean the print head if necessary (see your router's manual for at least 12 hours before framing or placing in a protective sheet. Network Problems If you notice jagged vertical lines, run the print head alignment...
... software. (See page 45 if you may be low on the router. Run a nozzle check and clean the print head if necessary (see your router's manual for at least 12 hours before framing or placing in a protective sheet. Network Problems If you notice jagged vertical lines, run the print head alignment...
Basics
Page 49
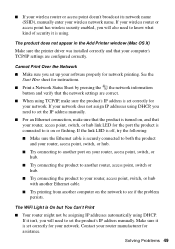
... for network printing. Contact your wireless network name. Cannot Print Over the Network ■ Make sure you need to set the IP address manually. ■ For an Ethernet connection, make sure the product's IP address is turned on or flashing. If it isn't, you will need...settings are correct. ■ When using DHCP. ■ If your wireless router or access point doesn't broadcast its network name (SSID), manually enter your router manufacturer for assistance. If your wireless router or access point has wireless security enabled, you will also need to know what kind...
... for network printing. Contact your wireless network name. Cannot Print Over the Network ■ Make sure you need to set the IP address manually. ■ For an Ethernet connection, make sure the product's IP address is turned on or flashing. If it isn't, you will need...settings are correct. ■ When using DHCP. ■ If your wireless router or access point doesn't broadcast its network name (SSID), manually enter your router manufacturer for assistance. If your wireless router or access point has wireless security enabled, you will also need to know what kind...
Start Here
Page 2
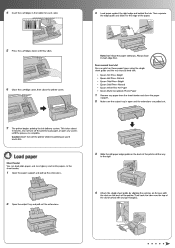
... the printer, load paper, or open and the extensions are pulled out. At 2 Open the output tray and pull out the extensions. Rear manual feed slot You can load plain paper, and most glossy and matte papers, in the holder for each color. clorio°1:3 o Slide the... the slots on these paper types using the single sheet guide and the rear manual feed slot: Epson Hot Press Bright Epson Hot Press Natural Epson Cold Press Bright Epson Cold Press Natural Epson Velvet Fine Art Paper Epson Matte Scrapbook Photo Paper Remove any covers until they click. 6 Close the cartridge cover, then ...
... the printer, load paper, or open and the extensions are pulled out. At 2 Open the output tray and pull out the extensions. Rear manual feed slot You can load plain paper, and most glossy and matte papers, in the holder for each color. clorio°1:3 o Slide the... the slots on these paper types using the single sheet guide and the rear manual feed slot: Epson Hot Press Bright Epson Hot Press Natural Epson Cold Press Bright Epson Cold Press Natural Epson Velvet Fine Art Paper Epson Matte Scrapbook Photo Paper Remove any covers until they click. 6 Close the cartridge cover, then ...
Start Here
Page 4
... if the print head needs cleaning. It's as easy as MAC address filtering) set correctly for more information. EPSON ULTRACHROME Epson Stylus Photo R2000 Series Ink Cartridges Color • Photo Black • Cyan al Magenta Yellow Red Orange • Matte Black Gloss Optimizer Part number 159 159 159 159... is set on ink. For the right supplies at the right time, you can download drivers, view manuals, get FAQs, or e-mail Epson. Genuine Epson Paper Epson offers a wide variety of Epson America, Inc. Don't load paper above the tabs on the router. See the online User's Guide for...
... if the print head needs cleaning. It's as easy as MAC address filtering) set correctly for more information. EPSON ULTRACHROME Epson Stylus Photo R2000 Series Ink Cartridges Color • Photo Black • Cyan al Magenta Yellow Red Orange • Matte Black Gloss Optimizer Part number 159 159 159 159... is set on ink. For the right supplies at the right time, you can download drivers, view manuals, get FAQs, or e-mail Epson. Genuine Epson Paper Epson offers a wide variety of Epson America, Inc. Don't load paper above the tabs on the router. See the online User's Guide for...


