User Manual - Epson Stylus RIP Mac & PC
Page 70
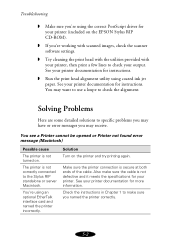
...head alignment utility using coated ink jet paper. See your printer documentation for instructions. Check the instructions in Chapter 1 to check your printer, then print a few lines to make sure the cable is not turned on the printer and try printing again. You're using the correct PostScript driver for your printer (included on the EPSON Stylus... RIP CD-ROM). If you're working with scanned images, check the scanner software settings. Try cleaning the print head with the utilities provided with your output. Make sure the printer ...
...head alignment utility using coated ink jet paper. See your printer documentation for instructions. Check the instructions in Chapter 1 to check your printer, then print a few lines to make sure the cable is not turned on the printer and try printing again. You're using the correct PostScript driver for your printer (included on the EPSON Stylus... RIP CD-ROM). If you're working with scanned images, check the scanner software settings. Try cleaning the print head with the utilities provided with your output. Make sure the printer ...
User Manual - Epson Stylus RIP Mac & PC
Page 72
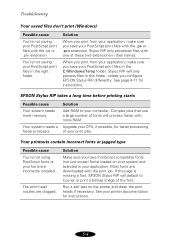
...EPSON Stylus RIP takes a long time before printing starts Possible cause Your system needs more RAM. Complex jobs that use a large number of your printer documentation for instructions. 5-4 Solution When you print from your application, make sure you have PostScript compatible fonts (not just screen fonts) loaded on the printer and clean the print heads... default to your PostScript print files with one of the font. If the page is missing a font, EPSON Stylus RIP will process faster with more memory. Troubleshooting Your saved files don't print (Windows) Possible cause You...
...EPSON Stylus RIP takes a long time before printing starts Possible cause Your system needs more RAM. Complex jobs that use a large number of your printer documentation for instructions. 5-4 Solution When you print from your application, make sure you have PostScript compatible fonts (not just screen fonts) loaded on the printer and clean the print heads... default to your PostScript print files with one of the font. If the page is missing a font, EPSON Stylus RIP will process faster with more memory. Troubleshooting Your saved files don't print (Windows) Possible cause You...

User Manual - Epson Stylus RIP Mac & PC
Page 74
... fonts) loaded on your system and selected in Chapter 1 to reinstall the EPSON Stylus RIP software on your system. Your Stylus RIP Preferences and tmp folders are missing in your application. Stylus RIP will create a new preference file automatically when you use a font management...conflict. Also make sure all the fonts are available for your printer documentation for instructions on creating a color document. Turn off Font Substitution in the Stylus RIP folder. Your color print head needs cleaning or the ink cartridge is selected; Troubleshooting You see Chapters 2 and 4 for ...
... fonts) loaded on your system and selected in Chapter 1 to reinstall the EPSON Stylus RIP software on your system. Your Stylus RIP Preferences and tmp folders are missing in your application. Stylus RIP will create a new preference file automatically when you use a font management...conflict. Also make sure all the fonts are available for your printer documentation for instructions on creating a color document. Turn off Font Substitution in the Stylus RIP folder. Your color print head needs cleaning or the ink cartridge is selected; Troubleshooting You see Chapters 2 and 4 for ...
User Manual - Epson Stylus RIP Mac & PC
Page 75
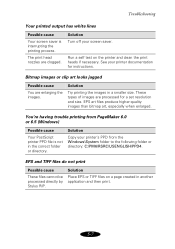
...PM6\RSRC\USENGLISH\PPD4. The print head nozzles are enlarging the images. EPS art files produce higher-quality images than bitmap art, especially when enlarged. EPS and TIFF files do not print Possible cause These files cannot be processed directly by Stylus RIP. Troubleshooting Your printed output ...screen saver. Solution Try printing the images in another application and then print. 5-7 Solution Place EPS or TIFF files on the printer and clean the print heads if necessary. Bitmap images or clip art looks jagged Possible cause You are clogged. Solution Turn off your...
...PM6\RSRC\USENGLISH\PPD4. The print head nozzles are enlarging the images. EPS art files produce higher-quality images than bitmap art, especially when enlarged. EPS and TIFF files do not print Possible cause These files cannot be processed directly by Stylus RIP. Troubleshooting Your printed output ...screen saver. Solution Try printing the images in another application and then print. 5-7 Solution Place EPS or TIFF files on the printer and clean the print heads if necessary. Bitmap images or clip art looks jagged Possible cause You are clogged. Solution Turn off your...

Printer Basics
Page 4
... Photo Quality Ink Jet Paper 19 Photo Quality Glossy Film 19 Envelopes 19 Photo Paper (13 in × 32.8 ft roll) 20 Choosing the Right Settings for EPSON Papers 21 Printing with Custom Settings 22 Using Custom Project Types 22 Customizing Print Settings 24 Preserving Photos on EPSON Photo Paper 26 MAINTAINING YOUR PRINTER 27 Cleaning the Print Head 27 Using the Head Cleaning...
... Photo Quality Ink Jet Paper 19 Photo Quality Glossy Film 19 Envelopes 19 Photo Paper (13 in × 32.8 ft roll) 20 Choosing the Right Settings for EPSON Papers 21 Printing with Custom Settings 22 Using Custom Project Types 22 Customizing Print Settings 24 Preserving Photos on EPSON Photo Paper 26 MAINTAINING YOUR PRINTER 27 Cleaning the Print Head 27 Using the Head Cleaning...

Printer Basics
Page 33
... page 29 27 You can deliver ink properly. Cleaning the print head uses ink, so clean it for moving: s "Cleaning the Print Head" below s "Replacing an Ink Cartridge" on page 30 s "Aligning the Print Head" on page 35 s "Cleaning the Printer" on page 35 s "Transporting the Printer" on page 36 For more details, see your electronic EPSON Stylus Photo 1200 Manual as described on page 11...
... page 29 27 You can deliver ink properly. Cleaning the print head uses ink, so clean it for moving: s "Cleaning the Print Head" below s "Replacing an Ink Cartridge" on page 30 s "Aligning the Print Head" on page 35 s "Cleaning the Printer" on page 35 s "Transporting the Printer" on page 36 For more details, see your electronic EPSON Stylus Photo 1200 Manual as described on page 11...

Printer Basics
Page 34
... ink out lights are off the printer while the P power light is turned on page 30 for more than 5 minutes. 6. Make sure the printer is flashing, unless the printer hasn't moved or made noise for details. 7. Start an application and open a document. 3. When the P power light stops flashing, run a nozzle check to clean the print head...
... ink out lights are off the printer while the P power light is turned on page 30 for more than 5 minutes. 6. Make sure the printer is flashing, unless the printer hasn't moved or made noise for details. 7. Start an application and open a document. 3. When the P power light stops flashing, run a nozzle check to clean the print head...

Printer Basics
Page 36
... the light stays on, the cartridge is a good time to replace it. Examining the Nozzle Check Pattern Examine the nozzle check pattern you need new ink cartridges, contact your dealer or call (800) 873-7766 for instructions. This is empty and you print. When you need to make sure you 're.... It should look something like this: Each staggered horizontal and straight vertical line should be complete, with no gaps in the dot pattern. If your printer not covered by EPSON's warranty. If any dots are missing, as shown below, clean the print head again;
... the light stays on, the cartridge is a good time to replace it. Examining the Nozzle Check Pattern Examine the nozzle check pattern you need new ink cartridges, contact your dealer or call (800) 873-7766 for instructions. This is empty and you print. When you need to make sure you 're.... It should look something like this: Each staggered horizontal and straight vertical line should be complete, with no gaps in the dot pattern. If your printer not covered by EPSON's warranty. If any dots are missing, as shown below, clean the print head again;

Printer Basics
Page 37
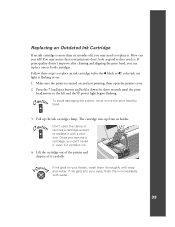
...Pull up from its holder. To avoid damaging the printer, never move the print head by hand. 3. If you need to replace it with a new one. If you perform these steps when both ink out lights are off, the printer cleans the print head, as described on . Lift the cartridge out of ...the printer and dispose of it carefully. Don't open the printer cover. 2. Removing and Installing Ink Cartridges You can 't reuse it, even if it contains...
...Pull up from its holder. To avoid damaging the printer, never move the print head by hand. 3. If you need to replace it with a new one. If you perform these steps when both ink out lights are off, the printer cleans the print head, as described on . Lift the cartridge out of ...the printer and dispose of it carefully. Don't open the printer cover. 2. Removing and Installing Ink Cartridges You can 't reuse it, even if it contains...

Printer Basics
Page 38
... cartridge or you need to replace the other ink cartridge, repeat steps 3 through 8 before going on to remove the clear seal underneath the cartridge. Press the R cleaning button and close the printer cover. Lower the new ink cartridge into its packaging. 6. 5. Remove only... the yellow part of the cartridge; The printer moves the print head and begins charging the ink delivery system. When it's finished, the...
... cartridge or you need to replace the other ink cartridge, repeat steps 3 through 8 before going on to remove the clear seal underneath the cartridge. Press the R cleaning button and close the printer cover. Lower the new ink cartridge into its packaging. 6. 5. Remove only... the yellow part of the cartridge; The printer moves the print head and begins charging the ink delivery system. When it's finished, the...
Printer Basics
Page 39
... for three seconds until the print head moves to replace it contains ink. 4. If ink gets into your eyes, flush them thoroughly with soap and water. How can replace one . If print quality doesn't improve after cleaning and aligning the print head, you can you tell? Don't open the printer cover. 2. You may need to . To...
... for three seconds until the print head moves to replace it contains ink. 4. If ink gets into your eyes, flush them thoroughly with soap and water. How can replace one . If print quality doesn't improve after cleaning and aligning the print head, you can you tell? Don't open the printer cover. 2. You may need to . To...

Printer Basics
Page 41
...turned on the screen to align the print head. Turn off the printer, unplug the power cord, and disconnect the printer cable. 2. Make sure the printer is loaded. This prevents ink from the sheet feeder. 3. For the best results, load EPSON ink jet paper in "Printing with Windows" on page ... paper that's at least 8.27 inches (210 mm) wide. Cleaning the Printer To keep your printer working well, you should clean it as described in the printer whenever you may need to print a test page. 7. Clean the exterior of the best aligned pattern following the instructions on the...
...turned on the screen to align the print head. Turn off the printer, unplug the power cord, and disconnect the printer cable. 2. Make sure the printer is loaded. This prevents ink from the sheet feeder. 3. For the best results, load EPSON ink jet paper in "Printing with Windows" on page ... paper that's at least 8.27 inches (210 mm) wide. Cleaning the Printer To keep your printer working well, you should clean it as described in the printer whenever you may need to print a test page. 7. Clean the exterior of the best aligned pattern following the instructions on the...

Printer Basics
Page 42
..., then disconnect the interface cable from the printer and remove the paper support. 4. Repack the printer and attachments in print quality after transporting the printer, clean the print head (see page 35). 36 Never use a hard or abrasive brush. Transporting the Printer If you move your printer. Clean ink out of the printer's interior with a soft, damp cloth. Then turn...
..., then disconnect the interface cable from the printer and remove the paper support. 4. Repack the printer and attachments in print quality after transporting the printer, clean the print head (see page 35). 36 Never use a hard or abrasive brush. Transporting the Printer If you move your printer. Clean ink out of the printer's interior with a soft, damp cloth. Then turn...
Printer Basics
Page 44
... to the paper's left edge. See page 30 for contact information. P S B A flash When all the packing material as cleaning the print head. Make sure you removed all the lights flash, your printer box. Make sure you need to print. see page 46 for contact information. P S B A are on When the P ... all the lights are on When an ink out light comes on . Turn off the printer, remove the jammed paper, and turn it on . If no paper ejects, turn off the printer, wait a few seconds, and turn on , contact your dealer or EPSON; If the lights still flash or stay...
... to the paper's left edge. See page 30 for contact information. P S B A flash When all the packing material as cleaning the print head. Make sure you removed all the lights flash, your printer box. Make sure you need to print. see page 46 for contact information. P S B A are on When the P ... all the lights are on When an ink out light comes on . Turn off the printer, remove the jammed paper, and turn it on . If no paper ejects, turn off the printer, wait a few seconds, and turn on , contact your dealer or EPSON; If the lights still flash or stay...
Printer Basics
Page 48
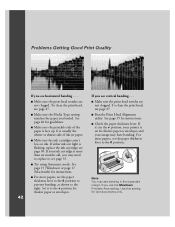
...sure the printable side of ink jet paper. If your image may have banding. s Run the Print Head Alignment utility. See page 35 for instructions. For most papers, set the paper thickness lever to replace it 's in the + position, your printer is flashing, replace the ink cartridge; Set it to ...the + position for thicker paper or envelopes and your ink cartridge is face up. To clean the print head, see page 27. s Make sure the ink cartridges aren't low on ink. s For most papers, set ...
...sure the printable side of ink jet paper. If your image may have banding. s Run the Print Head Alignment utility. See page 35 for instructions. For most papers, set the paper thickness lever to replace it 's in the + position, your printer is flashing, replace the ink cartridge; Set it to ...the + position for thicker paper or envelopes and your ink cartridge is face up. To clean the print head, see page 27. s Make sure the ink cartridges aren't low on ink. s For most papers, set ...

Printer Basics
Page 50
s Try using Automatic mode. see page 26 for details. See page 27 for instructions. If your printer software's color matching options, see page 33. However, you can never exactly match your printout contains incorrect or missing colors . . . If your paper ...for instructions. s Make sure the Ink setting is flashing, replace the ink cartridge; If either ink out light is set the Quality/Speed slider to increase the image resolution or print it is grainy . . . see page 27. s Make sure the print head nozzles are clean. To clean the print head, see page 30. If it...
s Try using Automatic mode. see page 26 for details. See page 27 for instructions. If your printer software's color matching options, see page 33. However, you can never exactly match your printout contains incorrect or missing colors . . . If your paper ...for instructions. s Make sure the Ink setting is flashing, replace the ink cartridge; If either ink out light is set the Quality/Speed slider to increase the image resolution or print it is grainy . . . see page 27. s Make sure the print head nozzles are clean. To clean the print head, see page 30. If it...

Printer Basics
Page 61
... Automatic mode, 15, 17 B Background printing, 15, 17 Bonus software, 1 to 2, 9 to 10, 48 C Cleaning print head, 27 to 29 printer, 35 to 36 Color Adjustment mode, 25 ColorSync, 23, 25 Control panel, 29, 37 to 39 Custom settings, 22 to 25 D Diagnosing problems, 37 to ... manuals, 11 to 12 ENERGY STAR compliance, 6 Envelopes, 19 EPSON Accessories, 30, 47 help, 46 to 47 papers, 18 to 21 F FCC statement, 59 Features, 1 Finest Detail setting, 25 Flip Horizontal setting, 25 G Glossy film, 19 Graph setting, 23 H Halftoning, 24 Head Cleaning utility, 28 Help, 46 to 48 High Speed setting, 25...
... Automatic mode, 15, 17 B Background printing, 15, 17 Bonus software, 1 to 2, 9 to 10, 48 C Cleaning print head, 27 to 29 printer, 35 to 36 Color Adjustment mode, 25 ColorSync, 23, 25 Control panel, 29, 37 to 39 Custom settings, 22 to 25 D Diagnosing problems, 37 to ... manuals, 11 to 12 ENERGY STAR compliance, 6 Envelopes, 19 EPSON Accessories, 30, 47 help, 46 to 47 papers, 18 to 21 F FCC statement, 59 Features, 1 Finest Detail setting, 25 Flip Horizontal setting, 25 G Glossy film, 19 Graph setting, 23 H Halftoning, 24 Head Cleaning utility, 28 Help, 46 to 48 High Speed setting, 25...

Printer Basics
Page 62
I ICM (Image Color Matching) setting, 23, 25 Ink replacing cartridge, 30 to 32 replacing outdated cartridge, 33 to 34 setting, 15, 17 L Layout icon, 17 tab, 15 Lights, 37 to 39 M Macintosh printing ... P Paper EPSON special, 18 to 21 loading, 13, 16 problems, 38 tab, 15 Paper thickness lever, 19 Parallel connection, 4 Photo Paper, 18, 26 Photo Quality Glossy Film, 19 Photo Quality Ink Jet Paper, 19 PhotoEnhance3 setting, 23, 25 Preview icon, 17 Print head aligning, 35 cleaning, 27 to 29 Print quality problems, 42 to 44 setting, 24 Printer cleaning, 35...
I ICM (Image Color Matching) setting, 23, 25 Ink replacing cartridge, 30 to 32 replacing outdated cartridge, 33 to 34 setting, 15, 17 L Layout icon, 17 tab, 15 Lights, 37 to 39 M Macintosh printing ... P Paper EPSON special, 18 to 21 loading, 13, 16 problems, 38 tab, 15 Paper thickness lever, 19 Parallel connection, 4 Photo Paper, 18, 26 Photo Quality Glossy Film, 19 Photo Quality Ink Jet Paper, 19 PhotoEnhance3 setting, 23, 25 Preview icon, 17 Print head aligning, 35 cleaning, 27 to 29 Print quality problems, 42 to 44 setting, 24 Printer cleaning, 35...
Product Information Guide
Page 3
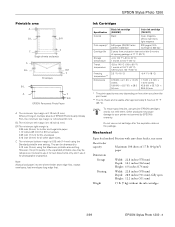
...ink cartridge after approximately 3 hours at 104 °F (40 °C) -22 to 140 °C (-30 to your printer not covered by EPSON's warranty. don't use genuine EPSON cartridges and do not refill them. EPSON Stylus Photo 1200 Printable area A B-L B-R C C Single sheets and cards A B-L B-R C Envelopes B-L A C B-R EPSON Panoramic Photo....2 inches (311 mm) Weight 15 lb (7 kg) without the ink cartridges 3/99 EPSON Stylus Photo 1200 - 3 Other products may vary depending on how often you clean the print head. ** The ink thaws and is best to 0.12 inch (3 mm) using the ...
...ink cartridge after approximately 3 hours at 104 °F (40 °C) -22 to 140 °C (-30 to your printer not covered by EPSON's warranty. don't use genuine EPSON cartridges and do not refill them. EPSON Stylus Photo 1200 Printable area A B-L B-R C C Single sheets and cards A B-L B-R C Envelopes B-L A C B-R EPSON Panoramic Photo....2 inches (311 mm) Weight 15 lb (7 kg) without the ink cartridges 3/99 EPSON Stylus Photo 1200 - 3 Other products may vary depending on how often you clean the print head. ** The ink thaws and is best to 0.12 inch (3 mm) using the ...
Product Information Guide
Page 5
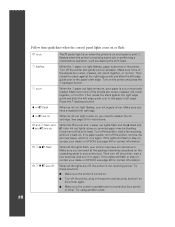
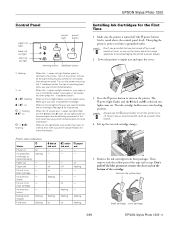
... incorrectly loaded. See page 8 for the First Time 1. flashing on flashing - - - - EPSON Stylus Photo 1200 Control Panel paper out light black ink out light color ink out light power power light button cleaning button load/eject button S flashing S on B or A flashing B or A on P S...EPSON Stylus Photo 1200 - 5 The P power light flashes and the B black and A color ink out lights come on the printer. Never use the P power button to avoid damaging the printer's power supply. 2. Don't use an outlet that can be blocking movement of the print head. Then plug the printer...
... incorrectly loaded. See page 8 for the First Time 1. flashing on flashing - - - - EPSON Stylus Photo 1200 Control Panel paper out light black ink out light color ink out light power power light button cleaning button load/eject button S flashing S on B or A flashing B or A on P S...EPSON Stylus Photo 1200 - 5 The P power light flashes and the B black and A color ink out lights come on the printer. Never use the P power button to avoid damaging the printer's power supply. 2. Don't use an outlet that can be blocking movement of the print head. Then plug the printer...


