Network Installation Guide
Page 2
... printer for the first time, see "Choose Your Connection Type" on page 3. ■ If you installed ink cartridges and loaded paper as described on a network. Tip: For a video tutorial and other information about setting up a wireless network, go to set up an additional computer to use the printer on the network, follow the instructions in "Install Software" on page 23. 2 Before You Begin Then follow the steps in this guide to : epson.com/support/wireless. Do one...
... printer for the first time, see "Choose Your Connection Type" on page 3. ■ If you installed ink cartridges and loaded paper as described on a network. Tip: For a video tutorial and other information about setting up a wireless network, go to set up an additional computer to use the printer on the network, follow the instructions in "Install Software" on page 23. 2 Before You Begin Then follow the steps in this guide to : epson.com/support/wireless. Do one...

Network Installation Guide
Page 7
... WiFi light on page 4 to exit the Network Settings Menu. 12. See "Connect Wirelessly Using the Setup Wizard" on the printer's control panel. When you see a screen like this can take up to the wireless router or access point" on page 23. Once you need to change . 10. Wait for the printer to connect to your wireless network (this one, verify that your network settings are correct, press OK to save the settings and return to your wireless network...
... WiFi light on page 4 to exit the Network Settings Menu. 12. See "Connect Wirelessly Using the Setup Wizard" on the printer's control panel. When you see a screen like this can take up to the wireless router or access point" on page 23. Once you need to change . 10. Wait for the printer to connect to your wireless network (this one, verify that your network settings are correct, press OK to save the settings and return to your wireless network...

Network Installation Guide
Page 16
When setup is connected to a network with an Ethernet cable, you need to disconnect it before installing software. Press the F Setup button on page 22 to print wirelessly but do not have an access point or router. See "Connect Wirelessly Using the Setup Wizard" on page 4 or "Wired (Ethernet) Installation" on the printer's control panel. 2. Press OK to select Network Settings, then press OK. 3. Press l or r to select Wireless LAN Setup. 16 Wireless Network Installation For Macintosh® users: If your...
When setup is connected to a network with an Ethernet cable, you need to disconnect it before installing software. Press the F Setup button on page 22 to print wirelessly but do not have an access point or router. See "Connect Wirelessly Using the Setup Wizard" on page 4 or "Wired (Ethernet) Installation" on the printer's control panel. 2. Press OK to select Network Settings, then press OK. 3. Press l or r to select Wireless LAN Setup. 16 Wireless Network Installation For Macintosh® users: If your...
Network Installation Guide
Page 31
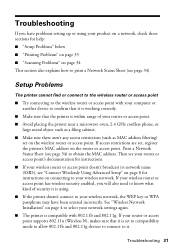
... network name (SSID), see "Connect Wirelessly Using Advanced Setup" on page 8 for help: ■ "Setup Problems" below ■ "Printing Problems" on page 33 ■ "Scanning Problems" on page 34 This section also explains how to print a Network Status Sheet (see page 34) to obtain the MAC address. If your router or access point supports 802.11n (Wireless N), makes sure that the printer is using your product on a network, check these sections for instructions on connecting to your wireless network. If access restrictions are set, register the printer's MAC address...
... network name (SSID), see "Connect Wirelessly Using Advanced Setup" on page 8 for help: ■ "Setup Problems" below ■ "Printing Problems" on page 33 ■ "Scanning Problems" on page 34 This section also explains how to print a Network Status Sheet (see page 34) to obtain the MAC address. If your router or access point supports 802.11n (Wireless N), makes sure that the printer is using your product on a network, check these sections for instructions on connecting to your wireless network. If access restrictions are set, register the printer's MAC address...
Network Installation Guide
Page 33
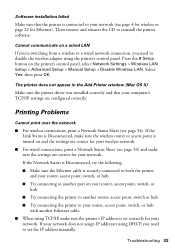
... address manually. Troubleshooting 33 Cannot communicate on the printer's control panel, select Network Settings > Wireless LAN Setup > Advanced Setup > Manual Setup > Disable Wireless LAN. Press the F Setup button on a wired LAN If you're switching from a wireless to a wired network connection, you need to disable the wireless adapter using TCP/IP, make sure the settings are configured correctly. The printer does not appear in the Add Printer window (Mac OS X) Make sure the printer driver was installed correctly and that the printer is connected to your network (see page...
... address manually. Troubleshooting 33 Cannot communicate on the printer's control panel, select Network Settings > Wireless LAN Setup > Advanced Setup > Manual Setup > Disable Wireless LAN. Press the F Setup button on a wired LAN If you're switching from a wireless to a wired network connection, you need to disable the wireless adapter using TCP/IP, make sure the settings are configured correctly. The printer does not appear in the Add Printer window (Mac OS X) Make sure the printer driver was installed correctly and that the printer is connected to your network (see page...
Network Installation Guide
Page 34
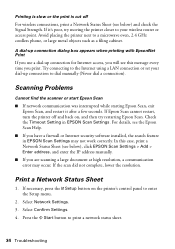
... connection or set your wireless router or access point. A dial-up connection dialog box appears when printing with EpsonNet Print If you print. If Epson Scan cannot restart, turn the printer off For wireless connections, print a Network Status Sheet (see below ), click EPSON Scan Settings > Add > Enter address, and enter the IP address manually. ■ If you are scanning a large document at high resolution, a communication error may not work correctly. In this message every time you use a dial-up connection to enter the Setup menu...
... connection or set your wireless router or access point. A dial-up connection dialog box appears when printing with EpsonNet Print If you print. If Epson Scan cannot restart, turn the printer off For wireless connections, print a Network Status Sheet (see below ), click EPSON Scan Settings > Add > Enter address, and enter the IP address manually. ■ If you are scanning a large document at high resolution, a communication error may not work correctly. In this message every time you use a dial-up connection to enter the Setup menu...
Quick Guide
Page 13
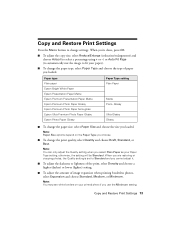
... using + or -) or Auto Fit Page (to automatically size the image to change settings. Glossy Ultra Glossy Glossy ■ To change the paper size, select Paper Size and choose the size you select Plain Paper as your Paper Type setting; Copy and Restore Print Settings 13 Note: You can only adjust the Quality setting when you loaded. Copy and Restore Print Settings Press the Menu button to fit your paper). ■ To change the paper type, select Paper Type and choose the type of paper you...
... using + or -) or Auto Fit Page (to automatically size the image to change settings. Glossy Ultra Glossy Glossy ■ To change the paper size, select Paper Size and choose the size you select Plain Paper as your Paper Type setting; Copy and Restore Print Settings 13 Note: You can only adjust the Quality setting when you loaded. Copy and Restore Print Settings Press the Menu button to fit your paper). ■ To change the paper type, select Paper Type and choose the type of paper you...

Quick Guide
Page 19
.... Correct: ■ Select the paper type and size you want to print your memory card is aligned against the right edge of the sheet is still inserted and the LCD screen shows Print Photos from an index sheet. 5. The numbers indicate how many copies you want to print the date the photo was taken on each photo you want to fill in the circles on the sheet. Open the document cover...
.... Correct: ■ Select the paper type and size you want to print your memory card is aligned against the right edge of the sheet is still inserted and the LCD screen shows Print Photos from an index sheet. 5. The numbers indicate how many copies you want to print the date the photo was taken on each photo you want to fill in the circles on the sheet. Open the document cover...
Quick Guide
Page 29
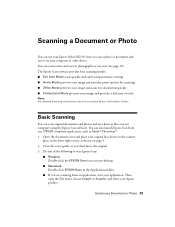
... the following to scan a photo or document and save them as you don't move the original. 3. Basic Scanning You can scan original documents and photos and save it on your computer or other device. The Epson Scan software provides four scanning modes: ■ Full Auto Mode scans quickly and easily using the Epson Scan software. Scanning a Document or Photo You can use your Epson Stylus NX510 Series to start your application. Do one of tools. Then open the File menu, choose Import or...
... the following to scan a photo or document and save them as you don't move the original. 3. Basic Scanning You can scan original documents and photos and save it on your computer or other device. The Epson Scan software provides four scanning modes: ■ Full Auto Mode scans quickly and easily using the Epson Scan software. Scanning a Document or Photo You can use your Epson Stylus NX510 Series to start your application. Do one of tools. Then open the File menu, choose Import or...
Quick Guide
Page 32
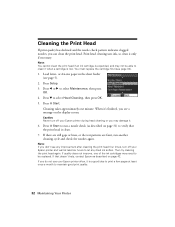
... quality does not improve, one minute. Press l or r to select Head Cleaning, then press OK. 5. If you can clean the print head. Load letter- If there are still gaps or lines, or the test patterns are faint, run a nozzle check (as described on page 31) to verify that doesn't help, contact Epson as described on the display screen. If that the print head is clean. 7. or A4-size paper in the sheet feeder (see page...
... quality does not improve, one minute. Press l or r to select Head Cleaning, then press OK. 5. If you can clean the print head. Load letter- If there are still gaps or lines, or the test patterns are faint, run a nozzle check (as described on page 31) to verify that doesn't help, contact Epson as described on the display screen. If that the print head is clean. 7. or A4-size paper in the sheet feeder (see page...
Quick Guide
Page 34
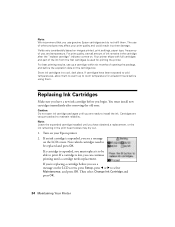
.... For best printing results, use genuine Epson cartridges and do not refill them . Note: We recommend that you use up to room temperature for priming the printer. If you're replacing a cartridge before you see a message on images printed, print settings, paper type, frequency of use of opening the package, and before the expiration date on . Store ink cartridges in the cartridge after removing the old ones. Turn on the LCD screen, press Setup, press...
.... For best printing results, use genuine Epson cartridges and do not refill them . Note: We recommend that you use up to room temperature for priming the printer. If you're replacing a cartridge before you see a message on images printed, print settings, paper type, frequency of use of opening the package, and before the expiration date on . Store ink cartridges in the cartridge after removing the old ones. Turn on the LCD screen, press Setup, press...
Quick Guide
Page 37
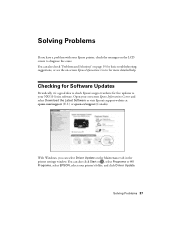
... you can select Driver Update on the Maintenance tab in the printer settings window. You can also check "Problems and Solutions" on page 39 for basic troubleshooting suggestions, or see the on-screen Epson Information Center for free updates to your Epson printer, check the messages on the LCD screen to diagnose the cause. With Windows, you have a problem with your NX510 Series software. Checking for Software Updates Periodically, it's a good idea to check Epson's support website for more detailed help.
... you can select Driver Update on the Maintenance tab in the printer settings window. You can also check "Problems and Solutions" on page 39 for basic troubleshooting suggestions, or see the on-screen Epson Information Center for free updates to your Epson printer, check the messages on the LCD screen to diagnose the cause. With Windows, you have a problem with your NX510 Series software. Checking for Software Updates Periodically, it's a good idea to check Epson's support website for more detailed help.
Quick Guide
Page 38
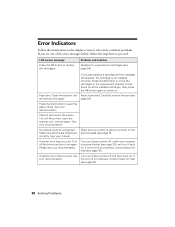
... the cartridges to replace the cartridges. See Turn your Epson printer off the printer and turn it on . LCD screen message Press the OK button to the replacement position. A scanner error has occurred. No photos could be recognized. See your documentation. Turn off , make sure no paper is not installed correctly. Open the scanner unit Paper is jammed in the printer. Error Indicators Follow the instructions on . Carefully remove the jam (see page 39), and turn it back on the display screen...
... the cartridges to replace the cartridges. See Turn your Epson printer off the printer and turn it on . LCD screen message Press the OK button to the replacement position. A scanner error has occurred. No photos could be recognized. See your documentation. Turn off , make sure no paper is not installed correctly. Open the scanner unit Paper is jammed in the printer. Error Indicators Follow the instructions on . Carefully remove the jam (see page 39), and turn it back on the display screen...
Quick Guide
Page 39
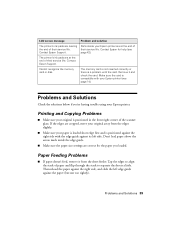
... sheets a little. Problems and Solutions 39 Remove it from the edges slightly. ■ Make sure your Epson printer (see page 42). Problems and Solutions Check the solutions below if you loaded. Paper Feeding Problems ■ If paper doesn't feed, remove it and check the card. Don't load paper above the arrow mark inside your Epson printer are at the end of their service life. Parts inside the edge guide. ■ Make sure the paper size settings are correct for help (see page...
... sheets a little. Problems and Solutions 39 Remove it from the edges slightly. ■ Make sure your Epson printer (see page 42). Problems and Solutions Check the solutions below if you loaded. Paper Feeding Problems ■ If paper doesn't feed, remove it and check the card. Don't load paper above the arrow mark inside your Epson printer are at the end of their service life. Parts inside the edge guide. ■ Make sure the paper size settings are correct for help (see page...
Quick Guide
Page 40
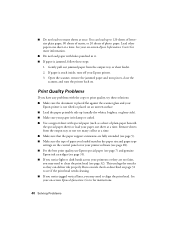
...; Make sure your Epson printer. 3. Gently pull out jammed paper from the output tray so not too many sheets at a time. If paper is jammed, follow these solutions: ■ Make sure the document is placed flat against the scanner glass and your printer software (see page 28). ■ For the best print quality, use Epson special paper (see page 7) and genuine Epson ink cartridges (see page 33). ■ If you may need to clean the print head (see page 32). Print Quality Problems...
...; Make sure your Epson printer. 3. Gently pull out jammed paper from the output tray so not too many sheets at a time. If paper is jammed, follow these solutions: ■ Make sure the document is placed flat against the scanner glass and your printer software (see page 28). ■ For the best print quality, use Epson special paper (see page 7) and genuine Epson ink cartridges (see page 33). ■ If you may need to clean the print head (see page 32). Print Quality Problems...

Quick Guide
Page 43
... you use the cord with the printer. Notices Important Safety Instructions Before using your Epson printer. ■ Use only the type of the printer is at an angle. ■ Make sure the back of power source indicated on the printer label. ■ Use only the power cord that regularly switches on and off power to follow all directions. Do not block or cover openings in all warnings and instructions marked on your Epson printer...
... you use the cord with the printer. Notices Important Safety Instructions Before using your Epson printer. ■ Use only the type of the printer is at an angle. ■ Make sure the back of power source indicated on the printer label. ■ Use only the power cord that regularly switches on and off power to follow all directions. Do not block or cover openings in all warnings and instructions marked on your Epson printer...
Quick Guide
Page 47
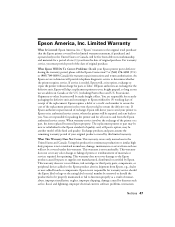
... parts or labor. Epson requires a debit or a credit card number to function properly as you to determine whether the printer requires service. What This Warranty Does Not Cover: This warranty covers only normal use ; This warranty does not cover any color change or fading of prints or reimbursement of the printer or a part, the item replaced becomes Epson property. This warranty does not cover ribbons, ink cartridges or third party parts...
... parts or labor. Epson requires a debit or a credit card number to function properly as you to determine whether the printer requires service. What This Warranty Does Not Cover: This warranty covers only normal use ; This warranty does not cover any color change or fading of prints or reimbursement of the printer or a part, the item replaced becomes Epson property. This warranty does not cover ribbons, ink cartridges or third party parts...
Start Here
Page 6
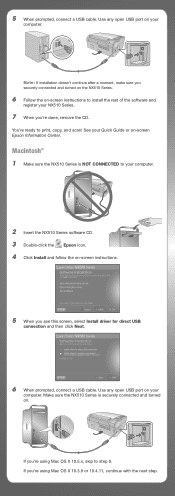
... the NX510 Series. 6 Follow the on your NX510 Series. 7 When you see this screen, select Install driver for direct USB connection and then click Next. 6 When prompted, connect a USB cable. Use any open USB port on -screen instructions to print, copy, and scan! If you 're using Mac OS X 10.3.9 or 10.4.11, continue with the next step. If you 're using Mac OS X 10.5.x, skip to your computer. 2 Insert the NX510 Series software CD. 3 Double-click the Epson...
... the NX510 Series. 6 Follow the on your NX510 Series. 7 When you see this screen, select Install driver for direct USB connection and then click Next. 6 When prompted, connect a USB cable. Use any open USB port on -screen instructions to print, copy, and scan! If you 're using Mac OS X 10.3.9 or 10.4.11, continue with the next step. If you 're using Mac OS X 10.5.x, skip to your computer. 2 Insert the NX510 Series software CD. 3 Double-click the Epson...
Product Brochure
Page 1
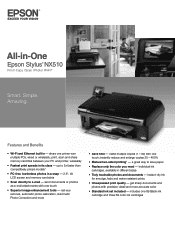
...% • Manual two-sided printing2 - get sharp documents and photos with multiple PCs, wired or wirelessly; share one touch; individual ink cartridges, available in -One Epson Stylus® NX510 Print | Copy | Scan | Photo | Wi-Fi® Smart. up to 2x faster than competitively priced models1 • PC-free, borderless photos in a snap - 2.5", tilt LCD screen and memory card slots • Scan directly to save paper • Replace only the color you need - instant-dry ink for smudge...
...% • Manual two-sided printing2 - get sharp documents and photos with multiple PCs, wired or wirelessly; share one touch; individual ink cartridges, available in -One Epson Stylus® NX510 Print | Copy | Scan | Photo | Wi-Fi® Smart. up to 2x faster than competitively priced models1 • PC-free, borderless photos in a snap - 2.5", tilt LCD screen and memory card slots • Scan directly to save paper • Replace only the color you need - instant-dry ink for smudge...
Product Brochure
Page 2
... used for both black and color printing. Epson disclaims any and all -in-one . and Canada Epson Stylus NX510 all-in-one, instruction booklet, CD-ROM containing printer drivers and software (Windows and Macintosh®), one 69 Black ink cartridge, one 69 Cyan ink cartridge, one 69 Magenta ink cartridge, and one 69 Yellow ink cartridge For more information about yields for this all rights in the U.S. Epson does not guarantee the longevity of paper feed. Color photo in Draft Mode on accelerated testing of prints displayed...
... used for both black and color printing. Epson disclaims any and all -in-one . and Canada Epson Stylus NX510 all-in-one, instruction booklet, CD-ROM containing printer drivers and software (Windows and Macintosh®), one 69 Black ink cartridge, one 69 Cyan ink cartridge, one 69 Magenta ink cartridge, and one 69 Yellow ink cartridge For more information about yields for this all rights in the U.S. Epson does not guarantee the longevity of paper feed. Color photo in Draft Mode on accelerated testing of prints displayed...


