

Before You Begin...
Page 1
But before you create your own photo book. The Epson® StoryTeller™ kit includes everything you 've read through this sheet, see Creating a Photo Book for a smooth StoryTeller experience. After you need to make your book, there are a few things you should keep in mind for step-by-step instructions on installing the software and making a photo book.
But before you create your own photo book. The Epson® StoryTeller™ kit includes everything you 've read through this sheet, see Creating a Photo Book for a smooth StoryTeller experience. After you need to make your book, there are a few things you should keep in mind for step-by-step instructions on installing the software and making a photo book.
Before You Begin...
Page 2
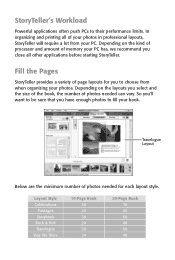
...recommend you select and the size of the book, the number of page layouts for each layout style. Fill the Pages StoryTeller provides a variety of photos needed for you have enough photos to fill your PC. In organizing and printing all other applications before starting StoryTeller. So you'll want...number of memory your photos. Layout Style Celebrations Passages Storybook Rock & Roll Travelogue Way We Were 10-Page Book 38 20 30 24 30 24 20-Page Book 76 40 60 48 60 48 Depending on the kind of processor and amount of photos needed can vary. StoryTeller's Workload Powerful...
...recommend you select and the size of the book, the number of page layouts for each layout style. Fill the Pages StoryTeller provides a variety of photos needed for you have enough photos to fill your PC. In organizing and printing all other applications before starting StoryTeller. So you'll want...number of memory your photos. Layout Style Celebrations Passages Storybook Rock & Roll Travelogue Way We Were 10-Page Book 38 20 30 24 30 24 20-Page Book 76 40 60 48 60 48 Depending on the kind of processor and amount of photos needed can vary. StoryTeller's Workload Powerful...
Before You Begin...
Page 4
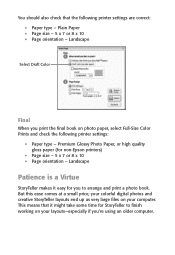
... quality gloss paper (for non-Epson printers) • Page size - 5 x 7 or 8 x 10 • Page orientation - You should also check that it easy for you to finish working on your layouts-especially if you print the final book on your colorful digital photos and creative StoryTeller layouts end up as very large files on photo paper, select Full-Size Color Prints and check the...
... quality gloss paper (for non-Epson printers) • Page size - 5 x 7 or 8 x 10 • Page orientation - You should also check that it easy for you to finish working on your layouts-especially if you print the final book on your colorful digital photos and creative StoryTeller layouts end up as very large files on photo paper, select Full-Size Color Prints and check the...
Creating a Photo Book
Page 2
... are registered trademarks of Epson America, Inc. Trademarks Epson and Epson Stylus are for identification purposes only and may be trademarks of Epson America, Inc. Epson disclaims any means, electronic, mechanical, photocopying, recording, or otherwise, without the prior written permission of Seiko Epson Corporation. Epson StoryTeller is a trademark, and Epson Store is a service mark of their respective owners. No part of this publication may...
... are registered trademarks of Epson America, Inc. Trademarks Epson and Epson Stylus are for identification purposes only and may be trademarks of Epson America, Inc. Epson disclaims any means, electronic, mechanical, photocopying, recording, or otherwise, without the prior written permission of Seiko Epson Corporation. Epson StoryTeller is a trademark, and Epson Store is a service mark of their respective owners. No part of this publication may...

Creating a Photo Book
Page 3
Contents Welcome 6 System Requirements 6 Your StoryTeller Kit 7 Installing the Software 8 Start Your Book 10 Starting StoryTeller Publisher 10 Selecting Your Photos 11 Fixing Your Photos 16 Saving Your Photo Changes 17 Create Your Photo Book Pages 18 Adding Photos to Your Page Layouts 18 Making Changes to Your Page Layouts 22 Replacing One Photo with Another 22 Resizing, Repositioning, or Rotating a Photo 23 Adding, Deleting, and Locking Pages 24 Adding Captions to Your Page Layouts 25 Saving Your Photo Book to Your Computer 26 3
Contents Welcome 6 System Requirements 6 Your StoryTeller Kit 7 Installing the Software 8 Start Your Book 10 Starting StoryTeller Publisher 10 Selecting Your Photos 11 Fixing Your Photos 16 Saving Your Photo Changes 17 Create Your Photo Book Pages 18 Adding Photos to Your Page Layouts 18 Making Changes to Your Page Layouts 22 Replacing One Photo with Another 22 Resizing, Repositioning, or Rotating a Photo 23 Adding, Deleting, and Locking Pages 24 Adding Captions to Your Page Layouts 25 Saving Your Photo Book to Your Computer 26 3
Creating a Photo Book
Page 6
... everyone, for your cover, and easy-to make sure your photos tell your digital camera? The Epson StoryTeller™ kit includes everything you took with all those photos you need to make arranging your photo book, and creating and printing a cover page. Ever wonder what to do with your story. And you how to 20 pre-designed page layouts that captures the family...
... everyone, for your cover, and easy-to make sure your photos tell your digital camera? The Epson StoryTeller™ kit includes everything you took with all those photos you need to make arranging your photo book, and creating and printing a cover page. Ever wonder what to do with your story. And you how to 20 pre-designed page layouts that captures the family...
Creating a Photo Book
Page 10
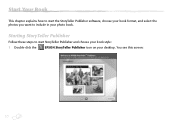
You see this screen: 10 Starting StoryTeller Publisher Follow these steps to start the StoryTeller Publisher software, choose your book format, and select the photos you want to start StoryTeller Publisher and choose your book style: 1 Double-click the EPSON StoryTeller Publisher icon on your photo book. Start Your Book This chapter explains how to include in your desktop.
You see this screen: 10 Starting StoryTeller Publisher Follow these steps to start the StoryTeller Publisher software, choose your book format, and select the photos you want to start StoryTeller Publisher and choose your book style: 1 Double-click the EPSON StoryTeller Publisher icon on your photo book. Start Your Book This chapter explains how to include in your desktop.
Creating a Photo Book
Page 11
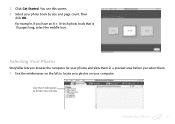
For example, if you select them in a preview area before you have an 8 × 10-inch photo book that is 10 pages long, select the middle icon. Then click OK. You see this screen: 3 Select your photos and view them . 1 Use the minibrowser on the left to locate your photos on your computer: Use the minibrowser to locate your photos Selecting Your Photos 11 Selecting Your Photos StoryTeller lets you browse the computer for your photo book by size and page count. 2 Click Get Started.
For example, if you select them in a preview area before you have an 8 × 10-inch photo book that is 10 pages long, select the middle icon. Then click OK. You see this screen: 3 Select your photos and view them . 1 Use the minibrowser on the left to locate your photos on your computer: Use the minibrowser to locate your photos Selecting Your Photos 11 Selecting Your Photos StoryTeller lets you browse the computer for your photo book by size and page count. 2 Click Get Started.
Creating a Photo Book
Page 16
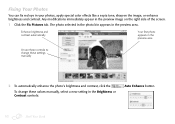
... area Or use these controls to change these settings manually 2 To automatically enhance the photo's brightness and contrast, click the To change these values manually, select a new setting in the preview image on the right side of the screen. 1 Click the Fix Pictures tab. Any modifications immediately appear in the Brightness or Contrast controls: Auto Enhance button. 16 Start Your Book The photo selected in the photo bin appears...
... area Or use these controls to change these settings manually 2 To automatically enhance the photo's brightness and contrast, click the To change these values manually, select a new setting in the preview image on the right side of the screen. 1 Click the Fix Pictures tab. Any modifications immediately appear in the Brightness or Contrast controls: Auto Enhance button. 16 Start Your Book The photo selected in the photo bin appears...

Creating a Photo Book
Page 17
... 're ready to add photos to save it and click Save. 3 To automatically fix red eye, click Fix Red Eye. 4 To sharpen the image, click Sharpen. undo icon at the top of the screen. Continue with the instructions in the Sharpen control. 5 To add a special color effect, click Color Effects. Then select one of the color effects settings. 6 To rotate the image 90°...
... 're ready to add photos to save it and click Save. 3 To automatically fix red eye, click Fix Red Eye. 4 To sharpen the image, click Sharpen. undo icon at the top of the screen. Continue with the instructions in the Sharpen control. 5 To add a special color effect, click Color Effects. Then select one of the color effects settings. 6 To rotate the image 90°...
Creating a Photo Book
Page 18
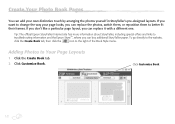
... don't like a particular page layout, you can buy additional StoryTeller paper. If you can replace it with a different one. Click Customize Book 18 Adding Photos to troubleshooting information and the Epson StoreSM, where you want to change the way your own distinctive touch by arranging the photos yourself in StoryTeller's pre-designed layouts. Tip: The official Epson StoryTeller Internet site has more...
... don't like a particular page layout, you can buy additional StoryTeller paper. If you can replace it with a different one. Click Customize Book 18 Adding Photos to troubleshooting information and the Epson StoreSM, where you want to change the way your own distinctive touch by arranging the photos yourself in StoryTeller's pre-designed layouts. Tip: The official Epson StoryTeller Internet site has more...

Creating a Photo Book
Page 23
... . You see this window: ● Reposition the photo in the frame. icon to enlarge the ● Click the icon to reduce it. ● Click the icon to the right. Resizing, Repositioning, or Rotating a Photo You can double-click a photo on a page to close the window. Indicates overlap of the pointer turns into a hand, drag the photo up, down, left or...
... . You see this window: ● Reposition the photo in the frame. icon to enlarge the ● Click the icon to reduce it. ● Click the icon to the right. Resizing, Repositioning, or Rotating a Photo You can double-click a photo on a page to close the window. Indicates overlap of the pointer turns into a hand, drag the photo up, down, left or...
Creating a Photo Book
Page 28
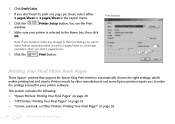
... 4 pages/sheet. 6 Click the Print button. Print window Printing Your Final Photo Book Pages Those Epson® printers that support the Epson Easy Print interface automatically choose the right settings, which makes printing fast and simple. Note: If you decide to make the settings yourself in your printer is selected in the Layout menu. 4 Click the window: Printer Setup button. You see the Print 5 Make sure your printer software.
... 4 pages/sheet. 6 Click the Print button. Print window Printing Your Final Photo Book Pages Those Epson® printers that support the Epson Easy Print interface automatically choose the right settings, which makes printing fast and simple. Note: If you decide to make the settings yourself in your printer is selected in the Layout menu. 4 Click the window: Printer Setup button. You see the Print 5 Make sure your printer software.
Creating a Photo Book
Page 33
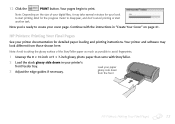
... printing or start printing. Note: Avoid touching the glossy surface of the StoryTeller paper as much as possible to avoid fingerprints. 1 Unwrap the 8 × 10-inch or 5 × 7-inch glossy photo paper that came with the instructions in your printer documentation for detailed paper loading and printing instructions. 12 Click the PRINT button. HP Printers: Printing Your Final Pages See your...
... printing or start printing. Note: Avoid touching the glossy surface of the StoryTeller paper as much as possible to avoid fingerprints. 1 Unwrap the 8 × 10-inch or 5 × 7-inch glossy photo paper that came with the instructions in your printer documentation for detailed paper loading and printing instructions. 12 Click the PRINT button. HP Printers: Printing Your Final Pages See your...
Creating a Photo Book
Page 64
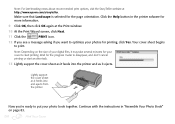
... the Help button in "Assemble Your Photo Book" on the size of your digital files, it ejects. Note: Depending on page 83. 64 Print Your Cover Continue with the instructions in the printer sofware for more information. 9 Click OK, then click OK again at http://www.epson.com/storyteller. Wait for the progress meter to start another task. 13 Lightly support the cover...
... the Help button in "Assemble Your Photo Book" on the size of your digital files, it ejects. Note: Depending on page 83. 64 Print Your Cover Continue with the instructions in the printer sofware for more information. 9 Click OK, then click OK again at http://www.epson.com/storyteller. Wait for the progress meter to start another task. 13 Lightly support the cover...

Creating a Photo Book
Page 90
... rotate a photo. icon below the preview area. See ● Replace pages in Auto Book mode. You can 't reposition or rotate your book pages and cover. Your photos are some troubleshooting tips if you can 't select or edit text in the preview area with page layouts from different Book Styles. See page 25 for instructions. Click Customize Book to unlock it in Auto Book mode. Here are turned...
... rotate a photo. icon below the preview area. See ● Replace pages in Auto Book mode. You can 't reposition or rotate your book pages and cover. Your photos are some troubleshooting tips if you can 't select or edit text in the preview area with page layouts from different Book Styles. See page 25 for instructions. Click Customize Book to unlock it in Auto Book mode. Here are turned...
Creating a Photo Book
Page 91
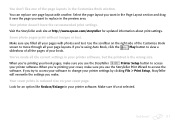
... photo pages print without images or text. If you want to move through all the correct settings in your cover, make . Problems? 91 Select the page layout you try to access your software to access your printer software. Make sure it over the page you 're using Auto Book, click the Play button to access the software. Make sure you make sure you use the StoryTeller Printer Setup button to change your printer settings...
... photo pages print without images or text. If you want to move through all the correct settings in your cover, make . Problems? 91 Select the page layout you try to access your software to access your printer software. Make sure it over the page you 're using Auto Book, click the Play button to access the software. Make sure you make sure you use the StoryTeller Printer Setup button to change your printer settings...
Creating a Photo Book
Page 92
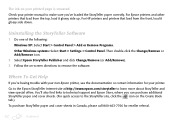
... technical support and Epson Store, where you can purchase additional StoryTeller paper and cover sheets. (For quick access to remove the software. Uninstalling the StoryTeller Software 1 Do one of the following: Windows XP: Select Start > Control Panel > Add or Remove Programs. Other Windows systems: Select Start > Settings > Control Panel. Where To Get Help If you 've loaded the StoryTeller paper correctly. Check your printer manual to learn more about StoryTeller and view special...
... technical support and Epson Store, where you can purchase additional StoryTeller paper and cover sheets. (For quick access to remove the software. Uninstalling the StoryTeller Software 1 Do one of the following: Windows XP: Select Start > Control Panel > Add or Remove Programs. Other Windows systems: Select Start > Settings > Control Panel. Where To Get Help If you 've loaded the StoryTeller paper correctly. Check your printer manual to learn more about StoryTeller and view special...
Creating a Photo Book
Page 96
... enhancing, 16 to 17 problems, 90 to 91 removing from photo bin, 14 replacing on page, 22 saving adjustments, 17 viewing, 12 Play button, 91 Preview area, 12, 16, 19, 41, 42, 44 Print Wizard button, 55, 61, 66, 72, 78 Printer Setup button, 31, 55, 91 Printing cover, 48 to 82 photo book pages, 28 to 40 problems, 91 to 92 Problems adding text, 90...
... enhancing, 16 to 17 problems, 90 to 91 removing from photo bin, 14 replacing on page, 22 saving adjustments, 17 viewing, 12 Play button, 91 Preview area, 12, 16, 19, 41, 42, 44 Print Wizard button, 55, 61, 66, 72, 78 Printer Setup button, 31, 55, 91 Printing cover, 48 to 82 photo book pages, 28 to 40 problems, 91 to 92 Problems adding text, 90...
Supplemental / Late Breaking Information
Page 1
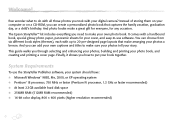
If you own the StoryTeller 5x7 kit, go to: http://support.epson.com/storyteller1 If you own the StoryTeller 8x10 (10-page) kit, go to: http://support.epson.com/storyteller2 If you own the StoryTeller 8x10 (20-page) kit, go to one of the following web sites to : http://support.epson.com/storyteller3 6 © Epson America, Inc. Printed in U.S.A. 4/05 CPD-19908 Software Update After installing StoryTeller™ Publisher, please go to download any updates that might be available.
If you own the StoryTeller 5x7 kit, go to: http://support.epson.com/storyteller1 If you own the StoryTeller 8x10 (10-page) kit, go to: http://support.epson.com/storyteller2 If you own the StoryTeller 8x10 (20-page) kit, go to one of the following web sites to : http://support.epson.com/storyteller3 6 © Epson America, Inc. Printed in U.S.A. 4/05 CPD-19908 Software Update After installing StoryTeller™ Publisher, please go to download any updates that might be available.


