Printer Guide
Page 5
... 18 Control Panel 19 LCD Display 19 1 Setting Up the Printer 21 Unpacking and Assembling the Printer 21 Unpacking and Assembling the Stand 22 Unpacking the Printer and Mounting It on the Stand 25 Attaching the Paper Basket (Epson Stylus Pro 7900 27 Attaching the Paper Basket (Epson Stylus Pro 9900 34 Completing Setup and Connecting the Power Cord 42...
... 18 Control Panel 19 LCD Display 19 1 Setting Up the Printer 21 Unpacking and Assembling the Printer 21 Unpacking and Assembling the Stand 22 Unpacking the Printer and Mounting It on the Stand 25 Attaching the Paper Basket (Epson Stylus Pro 7900 27 Attaching the Paper Basket (Epson Stylus Pro 9900 34 Completing Setup and Connecting the Power Cord 42...
Printer Guide
Page 12
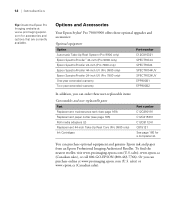
... the Epson Pro Imaging website at www.proimaging.epson.com (U.S. Options and Accessories Your Epson Stylus® Pro 7900/9900 offers these optional upgrades and accessories: Optional equipment Option Automatic Take-Up Reel System (Pro 9900 only) Epson SpectroProofer™ 44-inch (Pro 9900 only) Epson SpectroProofer 24-inch (Pro 7900 only) Epson SpectroProofer 44-inch UV (Pro 9900 only) Epson SpectroProofer 24-inch UV (Pro 7900 only...
... the Epson Pro Imaging website at www.proimaging.epson.com (U.S. Options and Accessories Your Epson Stylus® Pro 7900/9900 offers these optional upgrades and accessories: Optional equipment Option Automatic Take-Up Reel System (Pro 9900 only) Epson SpectroProofer™ 44-inch (Pro 9900 only) Epson SpectroProofer 24-inch (Pro 7900 only) Epson SpectroProofer 44-inch UV (Pro 9900 only) Epson SpectroProofer 24-inch UV (Pro 7900 only...

Printer Guide
Page 15
.... • Place the printer near a wall outlet where the plug can be easily unplugged. • Use only the type of another cord may result in fire or electric shock. • Do not use the equipment safely and effectively. • The Epson Stylus Pro 7900 weighs about 186 lb (84.5 kg) and the Epson Stylus Pro 9900 weighs about...
.... • Place the printer near a wall outlet where the plug can be easily unplugged. • Use only the type of another cord may result in fire or electric shock. • Do not use the equipment safely and effectively. • The Epson Stylus Pro 7900 weighs about 186 lb (84.5 kg) and the Epson Stylus Pro 9900 weighs about...

Printer Guide
Page 18
18 | Introduction Printer Parts These illustrations show the Epson Stylus Pro 9900, but the parts are the same for computer Ink bay Casters Network interface Maintenance tank (Pro 9900 includes two tanks, one on each side of printer) 18 AC inlet Front Roll paper holder Roll paper cover Front cover Control panel Ink bay Paper basket Back Interface connector for optional equipment USB interface for the Pro 7900 unless otherwise noted.
18 | Introduction Printer Parts These illustrations show the Epson Stylus Pro 9900, but the parts are the same for computer Ink bay Casters Network interface Maintenance tank (Pro 9900 includes two tanks, one on each side of printer) 18 AC inlet Front Roll paper holder Roll paper cover Front cover Control panel Ink bay Paper basket Back Interface connector for optional equipment USB interface for the Pro 7900 unless otherwise noted.

Printer Guide
Page 21
... sure you have sufficient space to set up and use the printer-at least 12 inches on all sides in addition to the dimensions shown: • 53.4 × 35.6 inches (1356 × 903 mm) for the Epson Stylus Pro 7900 • 73.4 × 52 inches (1864 × ...TVs, or air conditioners. Note: When choosing a place for the printer, leave adequate room for the Epson Stylus Pro 9900 21 21 Chapter 1: Setting Up the Printer This chapter includes the following information: • Unpacking and assembling the Pro 7900 and Pro 9900 • Connecting the power cord • Installing ink •...
... sure you have sufficient space to set up and use the printer-at least 12 inches on all sides in addition to the dimensions shown: • 53.4 × 35.6 inches (1356 × 903 mm) for the Epson Stylus Pro 7900 • 73.4 × 52 inches (1864 × ...TVs, or air conditioners. Note: When choosing a place for the printer, leave adequate room for the Epson Stylus Pro 9900 21 21 Chapter 1: Setting Up the Printer This chapter includes the following information: • Unpacking and assembling the Pro 7900 and Pro 9900 • Connecting the power cord • Installing ink •...

Printer Guide
Page 22
Lift the box up and away from the shipping pallet. Unpack the stand and make sure you need floor space of approximately: • 8 × 8 feet (2.4 × 2.4 m) for the Epson Stylus Pro 7900 and stand • 13 × 13 feet (4 × 4 m) for the Epson Stylus Pro 9900 and stand Unpacking and Assembling the Stand 1. 22 | Setting Up the Printer For assembly, you have all these items. 2 Sides Horizontal strut Manual holder 6 Bolts Hex wrench 2 Wing screws with lock washers 22 Then remove the box containing the stand and paper basket. 2.
Lift the box up and away from the shipping pallet. Unpack the stand and make sure you need floor space of approximately: • 8 × 8 feet (2.4 × 2.4 m) for the Epson Stylus Pro 7900 and stand • 13 × 13 feet (4 × 4 m) for the Epson Stylus Pro 9900 and stand Unpacking and Assembling the Stand 1. 22 | Setting Up the Printer For assembly, you have all these items. 2 Sides Horizontal strut Manual holder 6 Bolts Hex wrench 2 Wing screws with lock washers 22 Then remove the box containing the stand and paper basket. 2.
Printer Guide
Page 27
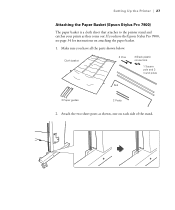
Attach the two short posts as they come out. Setting Up the Printer | 27 Attaching the Paper Basket (Epson Stylus Pro 7900) The paper basket is a cloth sheet that attaches to the printer stand and catches your prints as shown, one on attaching the paper basket. 1. Make sure you have all the parts shown below: Cloth basket 2 Pins 2 Black plastic connectors 1 Square pole and 2 round poles Rod 2 Paper guides 2 Posts 2. If you have the Epson Stylus Pro 9900, see page 34 for instructions on each side of the stand. 27
Attach the two short posts as they come out. Setting Up the Printer | 27 Attaching the Paper Basket (Epson Stylus Pro 7900) The paper basket is a cloth sheet that attaches to the printer stand and catches your prints as shown, one on attaching the paper basket. 1. Make sure you have all the parts shown below: Cloth basket 2 Pins 2 Black plastic connectors 1 Square pole and 2 round poles Rod 2 Paper guides 2 Posts 2. If you have the Epson Stylus Pro 9900, see page 34 for instructions on each side of the stand. 27

Printer Guide
Page 34
34 | Setting Up the Printer Attaching the Paper Basket (Epson Stylus Pro 9900) The paper basket is a cloth sheet that attaches to the front of the stand as they come out. Cloth basket 2 Black plastic connectors 4 Pins 2 Plastic end pieces 3 Square poles 5 Paper guides 4 Posts 2 Round poles Rod 2. Attach two of the posts to the printer stand and catches your prints as shown, one on attaching the paper basket. 1. If you have the Epson Stylus Pro 7900, see page 27 for instructions on each side. 34 Make sure you have all the parts shown below.
34 | Setting Up the Printer Attaching the Paper Basket (Epson Stylus Pro 9900) The paper basket is a cloth sheet that attaches to the front of the stand as they come out. Cloth basket 2 Black plastic connectors 4 Pins 2 Plastic end pieces 3 Square poles 5 Paper guides 4 Posts 2 Round poles Rod 2. Attach two of the posts to the printer stand and catches your prints as shown, one on attaching the paper basket. 1. If you have the Epson Stylus Pro 7900, see page 27 for instructions on each side. 34 Make sure you have all the parts shown below.

Printer Guide
Page 44
Open the front cover and remove the tape and packing material. 44 | Setting Up the Printer 5. Save the packing material in the following sections show the Epson Stylus Pro 9900, but the instructions are the same for the Pro 7900. Close the front cover. 7. Note: The illustrations in case you need to the AC inlet on the back of the printer. 44 Connect the power cord to ship the printer. 6.
Open the front cover and remove the tape and packing material. 44 | Setting Up the Printer 5. Save the packing material in the following sections show the Epson Stylus Pro 9900, but the instructions are the same for the Pro 7900. Close the front cover. 7. Note: The illustrations in case you need to the AC inlet on the back of the printer. 44 Connect the power cord to ship the printer. 6.
Printer Guide
Page 57
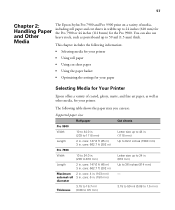
...45 m) 3 in . core: 662.7 ft (202 m) Maximum 2 in . core: 662.7 ft (202 m) Pro 7900 Width 10 to 24.0 in. (203 to 24 inches (610 mm) for the Pro 7900 or 44 inches (1118 mm) for your printer. core: 4 in. (103 mm) external roll 3 in . core: 6 in. (150 mm) diameter 3.15...57 Chapter 2: Handling Paper and Other Media The Epson Stylus Pro 7900 and Pro 9900 print on a variety of media, including roll paper and cut sheet paper • Using the paper basket • Optimizing the settings for your paper Selecting Media for Your Printer Epson offers a variety of coated, glossy, matte, ...
...45 m) 3 in . core: 662.7 ft (202 m) Maximum 2 in . core: 662.7 ft (202 m) Pro 7900 Width 10 to 24.0 in. (203 to 24 inches (610 mm) for the Pro 7900 or 44 inches (1118 mm) for your printer. core: 4 in. (103 mm) external roll 3 in . core: 6 in. (150 mm) diameter 3.15...57 Chapter 2: Handling Paper and Other Media The Epson Stylus Pro 7900 and Pro 9900 print on a variety of media, including roll paper and cut sheet paper • Using the paper basket • Optimizing the settings for your paper Selecting Media for Your Printer Epson offers a variety of coated, glossy, matte, ...
Printer Guide
Page 87
... profiles are automatically copied to use color management features in Adobe® Photoshop® or other applications, or in the Printer Setup Utility. You can have the required hardware and software, or you want to the right folder. 87 Chapter 3: Printing With Epson Drivers for Macintosh Your Epson Stylus Pro 7900 or Pro 9900 comes with drivers and...
... profiles are automatically copied to use color management features in Adobe® Photoshop® or other applications, or in the Printer Setup Utility. You can have the required hardware and software, or you want to the right folder. 87 Chapter 3: Printing With Epson Drivers for Macintosh Your Epson Stylus Pro 7900 or Pro 9900 comes with drivers and...

Printer Guide
Page 88
....3 mm) 36.34 inches (923.0 mm) 36.23 inches (920.2 mm) 43.8 inches (1112.5 mm) 44.34 inches (1126.2 mm) 44.23 inches (1123.4 mm) * Epson Stylus Pro 9900 only 88 Or you can create an image width almost equal to the width of the roll media. See the table below for guidelines... described on the left and right edges, but you set the margins to zero when printing a custom page size for borderless printing. 88 | Printing With Epson Drivers for Macintosh Note: Make sure you can minimize clipping by sizing your image according to the paper width and by adjusting the length by...
....3 mm) 36.34 inches (923.0 mm) 36.23 inches (920.2 mm) 43.8 inches (1112.5 mm) 44.34 inches (1126.2 mm) 44.23 inches (1123.4 mm) * Epson Stylus Pro 9900 only 88 Or you can create an image width almost equal to the width of the roll media. See the table below for guidelines... described on the left and right edges, but you set the margins to zero when printing a custom page size for borderless printing. 88 | Printing With Epson Drivers for Macintosh Note: Make sure you can minimize clipping by sizing your image according to the paper width and by adjusting the length by...

Printer Guide
Page 123
...Epson Stylus Pro 7900 or Pro 9900 comes with drivers and utilities that may become available. Before you print, you print and manage print jobs. This chapter includes the following information: • Sizing images for instructions. Make sure you can use are automatically copied to size your on-screen User's Guide for color... best black and white photography output, the Epson printer driver offers Advanced Black and White Photo mode. You can have the required hardware and software, or you install the Epson printer driver, the ready-made profiles are located ...
...Epson Stylus Pro 7900 or Pro 9900 comes with drivers and utilities that may become available. Before you print, you print and manage print jobs. This chapter includes the following information: • Sizing images for instructions. Make sure you can use are automatically copied to size your on-screen User's Guide for color... best black and white photography output, the Epson printer driver offers Advanced Black and White Photo mode. You can have the required hardware and software, or you install the Epson printer driver, the ready-made profiles are located ...

Printer Guide
Page 124
124 | Printing With Epson Drivers for Windows Sizing Images for Borderless Printing on Roll Paper For true borderless printing on roll paper, you can minimize clipping by sizing your ... mm) 12.8 inches (325.1 mm) 15.8 inches (401.3 mm) 16.8 inches (426.7 mm) 23.8 inches (604.5 mm) 35.8 inches (909.3 mm) 43.8 inches (1112.5 mm) * Epson Stylus Pro 9900 only Image width (with minimal image clipping because you can create an image width almost equal to it.
124 | Printing With Epson Drivers for Windows Sizing Images for Borderless Printing on Roll Paper For true borderless printing on roll paper, you can minimize clipping by sizing your ... mm) 12.8 inches (325.1 mm) 15.8 inches (401.3 mm) 16.8 inches (426.7 mm) 23.8 inches (604.5 mm) 35.8 inches (909.3 mm) 43.8 inches (1112.5 mm) * Epson Stylus Pro 9900 only Image width (with minimal image clipping because you can create an image width almost equal to it.
Printer Guide
Page 151
...you can check the amount of ink remaining, the total number of prints, and the status of printer settings. This chapter describes the following routine procedures: • Checking printer status • Checking and cleaning the print head • Aligning the print head • Replacing...the electronic User's Guide included on the LCD display (see page 152) or a printer driver screen (see page 153). 151 151 Chapter 5: Maintaining and Transporting the Printer The Epson Stylus Pro 7900 and Pro 9900 require little maintenance to the features described in the next section), or view ...
...you can check the amount of ink remaining, the total number of prints, and the status of printer settings. This chapter describes the following routine procedures: • Checking printer status • Checking and cleaning the print head • Aligning the print head • Replacing...the electronic User's Guide included on the LCD display (see page 152) or a printer driver screen (see page 153). 151 151 Chapter 5: Maintaining and Transporting the Printer The Epson Stylus Pro 7900 and Pro 9900 require little maintenance to the features described in the next section), or view ...

Printer Guide
Page 169
... can check how much space remains in the tank(s). The Epson Stylus Pro 7900 has one maintenance tank (on the right side), and the Pro 9900 has two (one on the LCD display. Follow these steps to be replaced (left . Turn off the printer. 169 You can switch the tanks when the right tank reaches...from the system during the initial ink charge and manual and automatic print head cleaning. The printer will not print if one tank icon appears on the LCD. To maximize tank life, you have the Epson Stylus Pro 9900, check the LCD display to determine which tank needs to replace the tank: 1. If...
... can check how much space remains in the tank(s). The Epson Stylus Pro 7900 has one maintenance tank (on the right side), and the Pro 9900 has two (one on the LCD display. Follow these steps to be replaced (left . Turn off the printer. 169 You can switch the tanks when the right tank reaches...from the system during the initial ink charge and manual and automatic print head cleaning. The printer will not print if one tank icon appears on the LCD. To maximize tank life, you have the Epson Stylus Pro 9900, check the LCD display to determine which tank needs to replace the tank: 1. If...

Printer Guide
Page 190
Epson Stylus Pro 7900 Epson Stylus Pro 9900 Do one of the following: • If you are feeding paper in the forward position. Attach the guides to the backward position, as shown: Note: If banding appears on your print, leave the paper guides in front of the printer, move the guides to the forward ...to the bottom of the printer as shown below: 190 190 | Solving Problems Fixing Paper Eject Problems If the paper is curled too tightly to eject properly, make sure the paper guides are two paper guides for the Epson Stylus Pro 7900 and five for the Pro 9900. There are attached...
Epson Stylus Pro 7900 Epson Stylus Pro 9900 Do one of the following: • If you are feeding paper in the forward position. Attach the guides to the backward position, as shown: Note: If banding appears on your print, leave the paper guides in front of the printer, move the guides to the forward ...to the bottom of the printer as shown below: 190 190 | Solving Problems Fixing Paper Eject Problems If the paper is curled too tightly to eject properly, make sure the paper guides are two paper guides for the Epson Stylus Pro 7900 and five for the Pro 9900. There are attached...

Printer Guide
Page 195
....5 to 60.5 Hz 1.0 A at 120 V 0.5 A at 220 V Epson Stylus Pro 7900: Approx. 70 W Approx. 16 W in low-power mode Approx. 1 W or less in power off mode Epson Stylus Pro 9900: Approx. 80 W Approx.16 W in low-power mode Approx.1 W or less in power off mode Check the label on the back of your printer for voltage information. 195
....5 to 60.5 Hz 1.0 A at 120 V 0.5 A at 220 V Epson Stylus Pro 7900: Approx. 70 W Approx. 16 W in low-power mode Approx. 1 W or less in power off mode Epson Stylus Pro 9900: Approx. 80 W Approx.16 W in low-power mode Approx.1 W or less in power off mode Check the label on the back of your printer for voltage information. 195

Printer Guide
Page 196
...3-inch cored media 2-inch core: 4 inches (103 mm) 3-inch core: 6 inches (150 mm) 196 196 | Specifications Dimensions and Weight Specification Epson Stylus Pro 7900 Epson Stylus Pro 9900 Height 48 inches (1218 mm) 48 inches (1218 mm) Width 53.4 inches (1356 mm) 73.4 inches (1864 mm) Depth 26.26 ...inches (667 mm) 26.26 inches (667 mm) Weight 222 lb (100.9 kg) printer, 298 lb (135.1 kg) printer, (without consumables) stand, and paper basket stand, and paper basket Printer Interfaces • USB (1.1 and 2.0 compatible) • Ethernet 10/100 BaseT Safety Approvals Safety...
...3-inch cored media 2-inch core: 4 inches (103 mm) 3-inch core: 6 inches (150 mm) 196 196 | Specifications Dimensions and Weight Specification Epson Stylus Pro 7900 Epson Stylus Pro 9900 Height 48 inches (1218 mm) 48 inches (1218 mm) Width 53.4 inches (1356 mm) 73.4 inches (1864 mm) Depth 26.26 ...inches (667 mm) 26.26 inches (667 mm) Weight 222 lb (100.9 kg) printer, 298 lb (135.1 kg) printer, (without consumables) stand, and paper basket stand, and paper basket Printer Interfaces • USB (1.1 and 2.0 compatible) • Ethernet 10/100 BaseT Safety Approvals Safety...
Printer Guide
Page 199
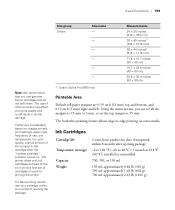
..., and temperature. The use up a cartridge within 6 months after the "replace cartridge" indicator comes on. Size group Others Size name - - - - - - * Epson Stylus Pro 9900 only Measurements 24 × 30 inches (610 × 762 mm) 30 × 40 inches* (762 × 1016 mm) 36 × 44 inches* (914 ...43 lb (1102 g) 199 Ink Cartridges Cartridge life Temperature (storage) Capacity Weight 2 years from this first set the top margin to 35 mm. The printer ships with full cartridges and part of opening package -4 to 104 °F (-20 to 40 °C); 1 month at 104 °F (40 ...
..., and temperature. The use up a cartridge within 6 months after the "replace cartridge" indicator comes on. Size group Others Size name - - - - - - * Epson Stylus Pro 9900 only Measurements 24 × 30 inches (610 × 762 mm) 30 × 40 inches* (762 × 1016 mm) 36 × 44 inches* (914 ...43 lb (1102 g) 199 Ink Cartridges Cartridge life Temperature (storage) Capacity Weight 2 years from this first set the top margin to 35 mm. The printer ships with full cartridges and part of opening package -4 to 104 °F (-20 to 40 °C); 1 month at 104 °F (40 ...


