
Printer Guide
Page 8
... Cutter 165 Removing the Old Cutter 165 Installing the New Cutter 167 Replacing the Maintenance Tank 169 Cleaning the Printer 171 Transporting or Storing the Printer 173 Preparing the Printer for Shipment 173 Moving the Printer on the Stand 175 Setting Up the Printer After Transportation 176 6 Solving Problems 177 Diagnosing Problems 177 Checking Error Messages and...
... Cutter 165 Removing the Old Cutter 165 Installing the New Cutter 167 Replacing the Maintenance Tank 169 Cleaning the Printer 171 Transporting or Storing the Printer 173 Preparing the Printer for Shipment 173 Moving the Printer on the Stand 175 Setting Up the Printer After Transportation 176 6 Solving Problems 177 Diagnosing Problems 177 Checking Error Messages and...
Printer Guide
Page 12
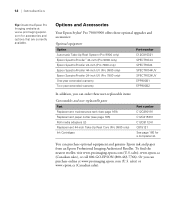
Options and Accessories Your Epson Stylus® Pro 7900/9900 offers these user-replaceable items: Consumables and user-replaceable parts Part Replacement maintenance tank (see page 169) Replacement paper cutter (see page 165) Roll media adapters (2) Replacement 44-inch Take-Up Reel Core (Pro 9900 only) Ink Cartridges Part number C12C890191 C12C815331 C12C811241 C815121 See page 160 for...
Options and Accessories Your Epson Stylus® Pro 7900/9900 offers these user-replaceable items: Consumables and user-replaceable parts Part Replacement maintenance tank (see page 169) Replacement paper cutter (see page 165) Roll media adapters (2) Replacement 44-inch Take-Up Reel Core (Pro 9900 only) Ink Cartridges Part number C12C890191 C12C815331 C12C811241 C815121 See page 160 for...

Printer Guide
Page 18
Front Roll paper holder Roll paper cover Front cover Control panel Ink bay Paper basket Back Interface connector for optional equipment USB interface for the Pro 7900 unless otherwise noted. 18 | Introduction Printer Parts These illustrations show the Epson Stylus Pro 9900, but the parts are the same for computer Ink bay Casters Network interface Maintenance tank (Pro 9900 includes two tanks, one on each side of printer) 18 AC inlet
Front Roll paper holder Roll paper cover Front cover Control panel Ink bay Paper basket Back Interface connector for optional equipment USB interface for the Pro 7900 unless otherwise noted. 18 | Introduction Printer Parts These illustrations show the Epson Stylus Pro 9900, but the parts are the same for computer Ink bay Casters Network interface Maintenance tank (Pro 9900 includes two tanks, one on each side of printer) 18 AC inlet
Printer Guide
Page 19
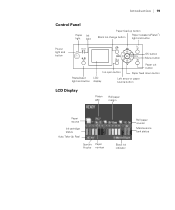
Introduction | 19 Control Panel Paper Ink light light Paper feed up button Black ink change button Paper release (ePlaten™) light and button Power light and button OK button Menu button Pause/reset light and button Ink open button Paper cut button Paper feed down button LCD display Left arrow or paper source button LCD Display Platen gap Roll paper margin Paper source Ink cartridge status Auto Take-Up Reel Spectro Paper Proofer number Roll paper counter Maintenance tank status Black ink indicator 19
Introduction | 19 Control Panel Paper Ink light light Paper feed up button Black ink change button Paper release (ePlaten™) light and button Power light and button OK button Menu button Pause/reset light and button Ink open button Paper cut button Paper feed down button LCD display Left arrow or paper source button LCD Display Platen gap Roll paper margin Paper source Ink cartridge status Auto Take-Up Reel Spectro Paper Proofer number Roll paper counter Maintenance tank status Black ink indicator 19
Printer Guide
Page 43
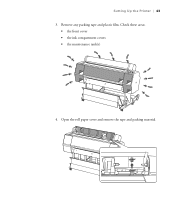
Remove any packing tape and plastic film. Open the roll paper cover and remove the tape and packing material. 43 Setting Up the Printer | 43 3. Check these areas: • the front cover • the ink compartment covers • the maintenance tank(s) 4.
Remove any packing tape and plastic film. Open the roll paper cover and remove the tape and packing material. 43 Setting Up the Printer | 43 3. Check these areas: • the front cover • the ink compartment covers • the maintenance tank(s) 4.
Printer Guide
Page 48
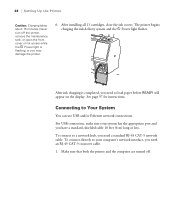
...the P Power light flashes. For USB connection, make sure your computer's network interface, you may damage the printer. 6. Make sure that both the printer and the computer are turned off the printer, remove the maintenance tank, or open the front cover or ink covers while the P Power light is completed, you need to your... instructions. Never turn off . 48 Connecting to a network hub, you have a standard, shielded cable 10 feet (6 m) long or less. 48 | Setting Up the Printer Caution: Charging takes about 15 minutes. After installing all 11 cartridges, close the ink covers.
...the P Power light flashes. For USB connection, make sure your computer's network interface, you may damage the printer. 6. Make sure that both the printer and the computer are turned off the printer, remove the maintenance tank, or open the front cover or ink covers while the P Power light is completed, you need to your... instructions. Never turn off . 48 Connecting to a network hub, you have a standard, shielded cable 10 feet (6 m) long or less. 48 | Setting Up the Printer Caution: Charging takes about 15 minutes. After installing all 11 cartridges, close the ink covers.
Printer Guide
Page 151
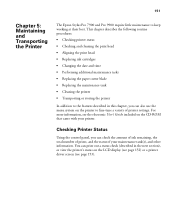
...check (described in this chapter, you can also use the menu system on the CD-ROM that came with your maintenance tank(s), and other information. Checking Printer Status Using the control panel, you can check the amount of ink remaining, the total number of prints, and... or view the printer's status on the LCD display (see page 152) or a printer driver screen (see the electronic User's Guide included on the printer to keep working at their best. 151 Chapter 5: Maintaining and Transporting the Printer The Epson Stylus Pro 7900 and Pro 9900 require little maintenance to fine-tune a...
...check (described in this chapter, you can also use the menu system on the CD-ROM that came with your maintenance tank(s), and other information. Checking Printer Status Using the control panel, you can check the amount of ink remaining, the total number of prints, and... or view the printer's status on the LCD display (see page 152) or a printer driver screen (see the electronic User's Guide included on the printer to keep working at their best. 151 Chapter 5: Maintaining and Transporting the Printer The Epson Stylus Pro 7900 and Pro 9900 require little maintenance to fine-tune a...
Printer Guide
Page 152
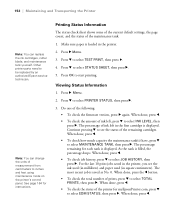
... measurement from centimeters to inches and feet using maintenance mode on the printer's control panel. Press d to be replaced by an authorized Epson service technician. Do one of prints, press d to select TOTAL PRINTS, then press r. When done, press l. • To check the amount of the maintenance tank. 1. When done, press l. 152 The percentage remaining...
... measurement from centimeters to inches and feet using maintenance mode on the printer's control panel. Press d to be replaced by an authorized Epson service technician. Do one of prints, press d to select TOTAL PRINTS, then press r. When done, press l. • To check the amount of the maintenance tank. 1. When done, press l. 152 The percentage remaining...
Printer Guide
Page 153
... page 150 to check the status. 1. Maintaining and Transporting the Printer | 153 4. Do one of the maintenance tank(s). Select your printer icon and select Printing Preferences. Press to access the printer utilities: • Mac OS X: Open the EPSON Printer Utility3 in your Applications folder. If you want to run maintenance utilities by clicking the Utility button in the...
... page 150 to check the status. 1. Maintaining and Transporting the Printer | 153 4. Do one of the maintenance tank(s). Select your printer icon and select Printing Preferences. Press to access the printer utilities: • Mac OS X: Open the EPSON Printer Utility3 in your Applications folder. If you want to run maintenance utilities by clicking the Utility button in the...

Printer Guide
Page 154
...shows a color shift or horizontal lines, you want to run a cleaning cycle to clear the nozzles. Right-click the icon for your printer to the Windows taskbar, you can also turn on the printer settings screen. You can also run maintenance utilities ...EPSON Printer Utility3 in your Applications folder. Select your printer and click OK. • Windows Vista: Click , select Control Panel, select Hardware and Sound, and click Printers. Click the Utility tab. 154 154 | Maintaining and Transporting the Printer The software checks the amount of ink in the printer and maintenance tank...
...shows a color shift or horizontal lines, you want to run a cleaning cycle to clear the nozzles. Right-click the icon for your printer to the Windows taskbar, you can also turn on the printer settings screen. You can also run maintenance utilities ...EPSON Printer Utility3 in your Applications folder. Select your printer and click OK. • Windows Vista: Click , select Control Panel, select Hardware and Sound, and click Printers. Click the Utility tab. 154 154 | Maintaining and Transporting the Printer The software checks the amount of ink in the printer and maintenance tank...

Printer Guide
Page 169
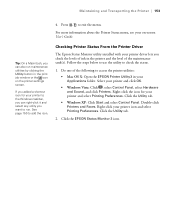
... 152), using your printer software (see page 153), or by printing a nozzle check sheet (see page 156). The Epson Stylus Pro 7900 has one maintenance tank (on the right side), and the Pro 9900 has two (one tank icon appears on the control panel, shown below. On the Epson Stylus Pro 9900, the right tank is almost full, the message MAINTENANCE TANK NEARLY FULL appears...
... 152), using your printer software (see page 153), or by printing a nozzle check sheet (see page 156). The Epson Stylus Pro 7900 has one maintenance tank (on the right side), and the Pro 9900 has two (one tank icon appears on the control panel, shown below. On the Epson Stylus Pro 9900, the right tank is almost full, the message MAINTENANCE TANK NEARLY FULL appears...
Printer Guide
Page 170
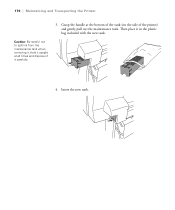
Insert the new tank. 170 Hold it carefully. 3. Then place it . Grasp the handle at all times and dispose of it upright at the bottom of the tank (on the side of the printer) and gently pull out the maintenance tank. 170 | Maintaining and Transporting the Printer Caution: Be careful not to spill ink from the maintenance tank when removing it in the plastic bag included with the new tank. 4.
Insert the new tank. 170 Hold it carefully. 3. Then place it . Grasp the handle at all times and dispose of it upright at the bottom of the tank (on the side of the printer) and gently pull out the maintenance tank. 170 | Maintaining and Transporting the Printer Caution: Be careful not to spill ink from the maintenance tank when removing it in the plastic bag included with the new tank. 4.
Printer Guide
Page 179
... for head cleaning. Replace the ink cartridge; Select DECLINE and replace the ink cartridge with a genuine installed. Epson ink cartridge; CUTTER UNIT NEARING END OF SERVICE LIFE. Restart the printer, then update the firmware again; INK LOW REPLACE INK CARTRIDGE INK CARTRIDGE NON-GENUINE CARTRIDGE! A non-genuine... ink cover Remove the obstruction and press the button again. Select Yes and replace the cartridge (see page 159) or maintenance tank (see page 54. Then turn the printer off and back on again. YES (RECOMMENDED) NO Not enough ink or not enough...
... for head cleaning. Replace the ink cartridge; Select DECLINE and replace the ink cartridge with a genuine installed. Epson ink cartridge; CUTTER UNIT NEARING END OF SERVICE LIFE. Restart the printer, then update the firmware again; INK LOW REPLACE INK CARTRIDGE INK CARTRIDGE NON-GENUINE CARTRIDGE! A non-genuine... ink cover Remove the obstruction and press the button again. Select Yes and replace the cartridge (see page 159) or maintenance tank (see page 54. Then turn the printer off and back on again. YES (RECOMMENDED) NO Not enough ink or not enough...

Printer Guide
Page 180
... be used with a genuine Epson ink cartridge. if the contact or condensation. Replace the cartridge(s) before cleaning; After cleaning is nearly full; For the Pro 9900, note which tank is not installed. If the error remains, replace the maintenance tank. Do not an incorrect cartridge is full; see page 159. MAINTENANCE REQUEST A printer part may have a replacement...
... be used with a genuine Epson ink cartridge. if the contact or condensation. Replace the cartridge(s) before cleaning; After cleaning is nearly full; For the Pro 9900, note which tank is not installed. If the error remains, replace the maintenance tank. Do not an incorrect cartridge is full; see page 159. MAINTENANCE REQUEST A printer part may have a replacement...
Printer Guide
Page 181
... EMPTY SPACE REPLACE THE RIGHT SIDE MAINTENANCE TANK NOZZLE CHECK ERROR PRESS THE BUTTON NOZZLE CLOG DETECTED NOT ENOUGH INK OR SPACE IN MAINT TANK PAPER CUT ERROR REMOVE UNCUT PAPER PAPER EJECT ERROR REMOVE PAPER FROM PRINTER PAPER ERROR LOAD PAPER CORRECTLY PAPER...SENSOR ERROR PRESS THE BUTTON LOAD DIFFERENT PAPER Explanation The maintenance tank is almost finished. Response Replace the maintenance tank; If necessary, cancel cleaning from the computer, then restart the printer. replace the ink cartridge or maintenance tank. Roll paper is loaded. Press the button and open...
... EMPTY SPACE REPLACE THE RIGHT SIDE MAINTENANCE TANK NOZZLE CHECK ERROR PRESS THE BUTTON NOZZLE CLOG DETECTED NOT ENOUGH INK OR SPACE IN MAINT TANK PAPER CUT ERROR REMOVE UNCUT PAPER PAPER EJECT ERROR REMOVE PAPER FROM PRINTER PAPER ERROR LOAD PAPER CORRECTLY PAPER...SENSOR ERROR PRESS THE BUTTON LOAD DIFFERENT PAPER Explanation The maintenance tank is almost finished. Response Replace the maintenance tank; If necessary, cancel cleaning from the computer, then restart the printer. replace the ink cartridge or maintenance tank. Roll paper is loaded. Press the button and open...
Printer Guide
Page 203
... 178 Loading cut sheet paper, 74 to 75 roll paper, 59 to 69 M Mac OS X checking printer status, 153 to 154 installing software, 49 to 52 system requirements, 13 uninstalling software, 193 Mac OS ... and white photos, 116 to 119 borderless printing, 88, 106 to 108 canceling print jobs, 120 color management, 112 to 113, 116 to 119 ColorSync settings, 113 custom paper size, 106 to 108 ...page setup options, 89 to 92 roll paper settings, 98 to 99 Maintenance, 151 to 173 Maintenance menu, 158, 165 Maintenance mode, 164 to 165 Maintenance tank checking status, 151 to 154 ordering, 12 replacing, 169 to 170...
... 178 Loading cut sheet paper, 74 to 75 roll paper, 59 to 69 M Mac OS X checking printer status, 153 to 154 installing software, 49 to 52 system requirements, 13 uninstalling software, 193 Mac OS ... and white photos, 116 to 119 borderless printing, 88, 106 to 108 canceling print jobs, 120 color management, 112 to 113, 116 to 119 ColorSync settings, 113 custom paper size, 106 to 108 ...page setup options, 89 to 92 roll paper settings, 98 to 99 Maintenance, 151 to 173 Maintenance menu, 158, 165 Maintenance mode, 164 to 165 Maintenance tank checking status, 151 to 154 ordering, 12 replacing, 169 to 170...

Product Brochure
Page 8
...Epson Stylus Pro 7900 and 9900 Print Engine Specifications Printing Technology Advanced MicroPiezo TFP print head with one Ethernet port (10/100Base-T) Dimensions SP7900 54" (W) x 27" (D) x 48" (H) Weight: 187 lb SP9900 74" (W) x 27" (D) x 48" (H) Weight: 256 lb Dimensions and weight include printer... Replacement Printer Cutter Blade C12C815331 C12C815331 Replacement Ink Maintenance Tank C12C890191 C12C890191 Extended Service Programs Additional One-year Epson Preferred Plus service Additional Two-year Epson Preferred Plus service Additional One-year Epson Preferred ...
...Epson Stylus Pro 7900 and 9900 Print Engine Specifications Printing Technology Advanced MicroPiezo TFP print head with one Ethernet port (10/100Base-T) Dimensions SP7900 54" (W) x 27" (D) x 48" (H) Weight: 187 lb SP9900 74" (W) x 27" (D) x 48" (H) Weight: 256 lb Dimensions and weight include printer... Replacement Printer Cutter Blade C12C815331 C12C815331 Replacement Ink Maintenance Tank C12C890191 C12C890191 Extended Service Programs Additional One-year Epson Preferred Plus service Additional Two-year Epson Preferred Plus service Additional One-year Epson Preferred ...

Quick Reference Guide
Page 2
Printer Parts Front Roll paper holder Front cover Ink bay Paper basket Back Interface connector for optional equipment USB interface Roll paper cover Control panel Ink bay Casters Network interface AC inlet Maintenance tank (Pro 9900 includes two tanks, one on each side of printer) 1
Printer Parts Front Roll paper holder Front cover Ink bay Paper basket Back Interface connector for optional equipment USB interface Roll paper cover Control panel Ink bay Casters Network interface AC inlet Maintenance tank (Pro 9900 includes two tanks, one on each side of printer) 1

Quick Reference Guide
Page 7
...it . 4 Remove the expended ink cartridge from the control panel. Checking Ink and Maintenance Tank Levels The easiest way to release the ink cover. If ink gets on your ink... levels. Or you should check your hands, wash them immediately with soap and water. Epson UltraChrome® HDR ink cartridges Ink Slot Cartridge bay no. 350 ml 700 ml 150 ml Left 1...T636B00 T636900 T636600 T642300 T642700 T642B00 T642900 T642600 3 Push in the printer. If necessary, select the ink bay for Pro 7900) Replacing Ink Cartridges When one of your eyes, flush them ...
...it . 4 Remove the expended ink cartridge from the control panel. Checking Ink and Maintenance Tank Levels The easiest way to release the ink cover. If ink gets on your ink... levels. Or you should check your hands, wash them immediately with soap and water. Epson UltraChrome® HDR ink cartridges Ink Slot Cartridge bay no. 350 ml 700 ml 150 ml Left 1...T636B00 T636900 T636600 T642300 T642700 T642B00 T642900 T642600 3 Push in the printer. If necessary, select the ink bay for Pro 7900) Replacing Ink Cartridges When one of your eyes, flush them ...
Quick Reference Guide
Page 9
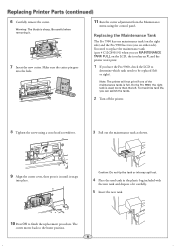
..., then press it in the plastic bag included with the new tank and dispose of the maintenance tanks is sharp. Replacing the Maintenance Tank The Pro 7900 has one maintenance tank (on the LCD, the icon has an X, and the printer won't print. 1 If you can switch the tanks. 2 Turn off the printer. 8 Tighten the screw using the control panel. To maximize...
..., then press it in the plastic bag included with the new tank and dispose of the maintenance tanks is sharp. Replacing the Maintenance Tank The Pro 7900 has one maintenance tank (on the LCD, the icon has an X, and the printer won't print. 1 If you can switch the tanks. 2 Turn off the printer. 8 Tighten the screw using the control panel. To maximize...


