
User Manual
Page 2
... means, mechanical, photocopying, recording, or otherwise, without the prior written permission of Seiko Epson Corporation. Neither is assumed with Seiko Epson Corporation's operating and maintenance instructions. Microsoft®, Windows®, and Windows Vista® are registered trademarks of Microsoft Corporation. EPSON, EPSON EXCEED YOUR VISION, EXCEED YOUR VISION, and their respective owners. Copyright and Trademarks...
... means, mechanical, photocopying, recording, or otherwise, without the prior written permission of Seiko Epson Corporation. Neither is assumed with Seiko Epson Corporation's operating and maintenance instructions. Microsoft®, Windows®, and Windows Vista® are registered trademarks of Microsoft Corporation. EPSON, EPSON EXCEED YOUR VISION, EXCEED YOUR VISION, and their respective owners. Copyright and Trademarks...

User Manual
Page 4
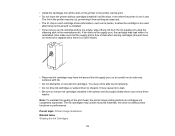
After unpacking the printer and stand, save the box and packaging in case you need to ship the printer later. For more information on their use, see the Quick Reference or online User's Guide. 4 | Unpacking and assembling the printer Auto take-up reel and media feeding unit : Print drying system (included with SC-S60600) Maintenance supplies Note: The maintenance supplies are not required for setup.
After unpacking the printer and stand, save the box and packaging in case you need to ship the printer later. For more information on their use, see the Quick Reference or online User's Guide. 4 | Unpacking and assembling the printer Auto take-up reel and media feeding unit : Print drying system (included with SC-S60600) Maintenance supplies Note: The maintenance supplies are not required for setup.
User Manual
Page 4
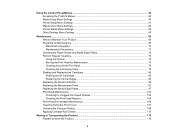
... Menu Settings ...60 Printer Setup Menu Settings ...61 Maintenance Menu Settings...63 Printer Status Menu Settings...64 Other Settings Menu Settings ...65 Maintenance...66 When to Maintain Your Product ...66 Preparing for Maintenance ...69 Maintenance Supplies ...70 Maintenance Precautions ...71 Cleaning the Platen Heater and Media Edge... Plates 72 Perform Regular Cleaning...74 Using Ink Cleaner ...74 Moving the Print Head for Maintenance 75 Cleaning Around the Print Head ...76 Cleaning the Anti-drying Caps ...78 Shaking and Replacing Ink Cartridges 85 Shaking ...
... Menu Settings ...60 Printer Setup Menu Settings ...61 Maintenance Menu Settings...63 Printer Status Menu Settings...64 Other Settings Menu Settings ...65 Maintenance...66 When to Maintain Your Product ...66 Preparing for Maintenance ...69 Maintenance Supplies ...70 Maintenance Precautions ...71 Cleaning the Platen Heater and Media Edge... Plates 72 Perform Regular Cleaning...74 Using Ink Cleaner ...74 Moving the Print Head for Maintenance 75 Cleaning Around the Print Head ...76 Cleaning the Anti-drying Caps ...78 Shaking and Replacing Ink Cartridges 85 Shaking ...

User Manual
Page 9
Front 1 Left maintenance cover 2 Print drying system (included with SC-S60600 and optional for SC-S40600) 3 After heater 4 Tension bar 5 Takeup reel roll core holder 6 Takeup roll support 7 Auto switch 8 Manual switch 9 Ink cartridges (one set for SC-S40600) 10 ink cartridge lock levers 11 Cartridge check light 12 Right maintenance cover 13 Media loading lever 14 Alert light 9 Product Parts -
Front 1 Left maintenance cover 2 Print drying system (included with SC-S60600 and optional for SC-S40600) 3 After heater 4 Tension bar 5 Takeup reel roll core holder 6 Takeup roll support 7 Auto switch 8 Manual switch 9 Ink cartridges (one set for SC-S40600) 10 ink cartridge lock levers 11 Cartridge check light 12 Right maintenance cover 13 Media loading lever 14 Alert light 9 Product Parts -

User Manual
Page 14
11 The 12 The 13 The maintenance button pause/cancel button light button LCD Screen Display 1 Printer status and error messages 2 Heater temperature status : Heater is at the selected temperature : Heater has not yet reached the selected temperature 3 Feed adjustment information, if you have entered a value during printing 4 Media information Displays the number for the selected media, the platen gap setting, the media width, and media remaining : Platen gap is 1.6 : Platen gap is 2.0 : Platen gap is 2.5 14
11 The 12 The 13 The maintenance button pause/cancel button light button LCD Screen Display 1 Printer status and error messages 2 Heater temperature status : Heater is at the selected temperature : Heater has not yet reached the selected temperature 3 Feed adjustment information, if you have entered a value during printing 4 Media information Displays the number for the selected media, the platen gap setting, the media width, and media remaining : Platen gap is 1.6 : Platen gap is 2.0 : Platen gap is 2.5 14
User Manual
Page 17
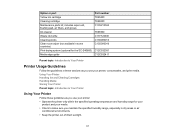
... Printer Follow these sections as you use your printer: • Operate the printer only within the specified operating temperature and humidity range for the SC-S40600) Media edge guide Part number T890400 T696000 C13S210044 T699300 C13T724000 C13S090013 C13S090016 C12C932381 C12C932411 Parent topic: Introduction to make sure you use your media. •... in some countries) Print drying system (optional for your product and your printer, consumables, and print media. Option or part Yellow ink cartridge Cleaning cartridge Maintenance parts kit;
... Printer Follow these sections as you use your printer: • Operate the printer only within the specified operating temperature and humidity range for the SC-S40600) Media edge guide Part number T890400 T696000 C13S210044 T699300 C13T724000 C13S090013 C13S090016 C12C932381 C12C932411 Parent topic: Introduction to make sure you use your media. •... in some countries) Print drying system (optional for your product and your printer, consumables, and print media. Option or part Yellow ink cartridge Cleaning cartridge Maintenance parts kit;
User Manual
Page 18
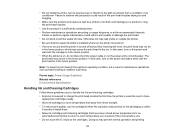
...while until the carriage is in the home position. • When the printer is in the home position. Failure to perform regular maintenance could damage your product or clog the print head nozzles. • Use the product in a sufficiently ventilated area. • Perform... not bend or pull the waste ink tube. Note: To keep the print head in the optimum operating condition, ink is used in maintenance operations such as head cleaning in addition to printing. Parent topic: Printer Usage Guidelines Related references Environmental Specifications Handling Ink and Cleaning Cartridges Follow...
...while until the carriage is in the home position. • When the printer is in the home position. Failure to perform regular maintenance could damage your product or clog the print head nozzles. • Use the product in a sufficiently ventilated area. • Perform... not bend or pull the waste ink tube. Note: To keep the print head in the optimum operating condition, ink is used in maintenance operations such as head cleaning in addition to printing. Parent topic: Printer Usage Guidelines Related references Environmental Specifications Handling Ink and Cleaning Cartridges Follow...
User Manual
Page 19
... head, the printer stops printing before it is reinstalled. Parent topic: Printer Usage Guidelines Related tasks Shaking the Ink Cartridges 19 The ink in the maintenance kit. this does not affect printer functions or performance. If ink dries on the supply port, the cartridge may contain recycled materials; The ink cartridges...
... head, the printer stops printing before it is reinstalled. Parent topic: Printer Usage Guidelines Related tasks Shaking the Ink Cartridges 19 The ink in the maintenance kit. this does not affect printer functions or performance. If ink dries on the supply port, the cartridge may contain recycled materials; The ink cartridges...

User Manual
Page 20
...be used for an extended period of time with the power off, wash the print heads with cleaning cartridges (not included) and perform pre-storage maintenance. If it with an anti-static cloth or other cover. If the printer will be not be used for an extended period of time, ...these guidelines as instructed in the media documentation. • When you are unable to wash the print heads with cleaning cartridges and perform pre-storage maintenance, turn on the printer at least once every seven days to automatically clean the print head and prevent the nozzles from clogging. • Remove ...
...be used for an extended period of time with the power off, wash the print heads with cleaning cartridges (not included) and perform pre-storage maintenance. If it with an anti-static cloth or other cover. If the printer will be not be used for an extended period of time, ...these guidelines as instructed in the media documentation. • When you are unable to wash the print heads with cleaning cartridges and perform pre-storage maintenance, turn on the printer at least once every seven days to automatically clean the print head and prevent the nozzles from clogging. • Remove ...

User Manual
Page 60
... types. Caution: Follow the instructions in the highlighted menu, press the OK button. 4. Accessing the Printer's Menus Media Setup Menu Settings Printer Setup Menu Settings Maintenance Menu Settings Printer Status Menu Settings Other Settings Menu Settings Accessing the Printer's Menus You can access the menu directly by pressing the media setup...
... types. Caution: Follow the instructions in the highlighted menu, press the OK button. 4. Accessing the Printer's Menus Media Setup Menu Settings Printer Setup Menu Settings Maintenance Menu Settings Printer Status Menu Settings Other Settings Menu Settings Accessing the Printer's Menus You can access the menu directly by pressing the media setup...
User Manual
Page 63
...LCD screen. Select Replace Ink Bottle if you need to replace parts before a message appears telling you see the message to perform head maintenance on the media. Description Prints a nozzle check pattern in the topic links below the table to use these menu settings correctly. Select ...the lightest cleaning level first. Select Auto Head Maintenance if the nozzles are still clogged, select a heavier cleaning level. Select Replace Parts if you need to replace the ink bottle before a...
...LCD screen. Select Replace Ink Bottle if you need to replace parts before a message appears telling you see the message to perform head maintenance on the media. Description Prints a nozzle check pattern in the topic links below the table to use these menu settings correctly. Select ...the lightest cleaning level first. Select Auto Head Maintenance if the nozzles are still clogged, select a heavier cleaning level. Select Replace Parts if you need to replace the ink bottle before a...

User Manual
Page 64
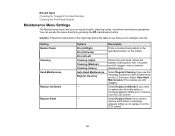
... Panel Menus Related tasks Checking for Clogged Print Head Nozzles Cleaning the Print Head Nozzles Replacing the Waste Ink Bottle Replacing the Maintenance Parts Performing Pre-storage Maintenance Applying Carriage Rod Grease Printer Status Menu Settings The Printer Status menu lets you will not use this option if the nozzles ...'s firmware version. Lets you apply grease to use the printer for more than one month. Prints a sheet showing current printer settings. Setting Other maintenance Options Head Washing Pre-Storage Maint. Grease Carriage Rod Description Select this feature.
... Panel Menus Related tasks Checking for Clogged Print Head Nozzles Cleaning the Print Head Nozzles Replacing the Waste Ink Bottle Replacing the Maintenance Parts Performing Pre-storage Maintenance Applying Carriage Rod Grease Printer Status Menu Settings The Printer Status menu lets you will not use this option if the nozzles ...'s firmware version. Lets you apply grease to use the printer for more than one month. Prints a sheet showing current printer settings. Setting Other maintenance Options Head Washing Pre-Storage Maint. Grease Carriage Rod Description Select this feature.

User Manual
Page 66
... Edge Plates Perform Regular Cleaning Shaking and Replacing Ink Cartridges Replacing the Waste Ink Bottle Replacing the Maintenance Parts Replacing the Media Edge Plates Print Head Maintenance Performing Pre-storage Maintenance Cleaning Inside the Front Cover Cleaning the Pressure Rollers Applying Carriage Rod Grease When to Maintain Your ...automatically using settings on your printer for optimum results. If you need to maintain your product, or replace or refill consumables. Maintenance See the instructions in these sections to perform an operation, use the links at the end of this topic.
... Edge Plates Perform Regular Cleaning Shaking and Replacing Ink Cartridges Replacing the Waste Ink Bottle Replacing the Maintenance Parts Replacing the Media Edge Plates Print Head Maintenance Performing Pre-storage Maintenance Cleaning Inside the Front Cover Cleaning the Pressure Rollers Applying Carriage Rod Grease When to Maintain Your ...automatically using settings on your printer for optimum results. If you need to maintain your product, or replace or refill consumables. Maintenance See the instructions in these sections to perform an operation, use the links at the end of this topic.
User Manual
Page 67
Cleaning Schedule * SC-S40600: Right print head only Number 1 2 3 4 Area to clean Frequency Platen heater and media edge Daily plates Around the print head Around caps Once a month or when you see a message on the LCD screen to perform head maintenance Around flushing pad Once a month or as needed 67
Cleaning Schedule * SC-S40600: Right print head only Number 1 2 3 4 Area to clean Frequency Platen heater and media edge Daily plates Around the print head Around caps Once a month or when you see a message on the LCD screen to perform head maintenance Around flushing pad Once a month or as needed 67

User Manual
Page 68
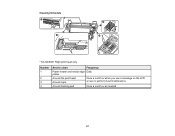
Consumables and Parts Replacement Schedule Number Part to replace 1 Air filters 2 Flushing pad 3 Wiper unit 4 Media edge plates 5 Waste ink bottle 6 Ink cartridge Frequency When you see a message on the LCD screen to replace the part If the plates are deformed or damaged When you see a message on the LCD screen to replace the part When you see an ink low or expended message on the LCD screen Other Maintenance Schedule Procedure Remove and shake ink cartridges Check for clogged nozzles Frequency Once every 3 weeks Each time you print or as needed 68
Consumables and Parts Replacement Schedule Number Part to replace 1 Air filters 2 Flushing pad 3 Wiper unit 4 Media edge plates 5 Waste ink bottle 6 Ink cartridge Frequency When you see a message on the LCD screen to replace the part If the plates are deformed or damaged When you see a message on the LCD screen to replace the part When you see an ink low or expended message on the LCD screen Other Maintenance Schedule Procedure Remove and shake ink cartridges Check for clogged nozzles Frequency Once every 3 weeks Each time you print or as needed 68

User Manual
Page 69
...it is hard to see inside the printer When a greasing message is displayed on the LCD screen Parent topic: Maintenance Related concepts Print Head Maintenance Related tasks Cleaning the Platen Heater and Media Edge Plates Cleaning Around the Print Head Cleaning the Anti-drying Caps ...Replacing the Waste Ink Bottle Replacing the Maintenance Parts Replacing the Media Edge Plates Performing Pre-storage Maintenance Cleaning Inside the Front Cover Cleaning the Pressure Rollers Applying Carriage Rod Grease Related topics Shaking and...
...it is hard to see inside the printer When a greasing message is displayed on the LCD screen Parent topic: Maintenance Related concepts Print Head Maintenance Related tasks Cleaning the Platen Heater and Media Edge Plates Cleaning Around the Print Head Cleaning the Anti-drying Caps ...Replacing the Waste Ink Bottle Replacing the Maintenance Parts Replacing the Media Edge Plates Performing Pre-storage Maintenance Cleaning Inside the Front Cover Cleaning the Pressure Rollers Applying Carriage Rod Grease Related topics Shaking and...
User Manual
Page 70
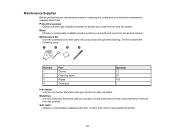
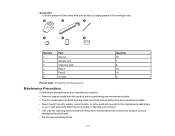
...20 100 1 Ink cleaner Use the ink cleaner that came with your product to hold cleaning tools and consumables you have the maintenance supplies listed here. Metal tray Use the metal tray that came with your product for general cleaning. Protective eyewear Obtain commercially ... available mask to protect your mouth and nose from ink and ink cleaner. Maintenance Supplies Before performing any maintenance tasks or replacing ink, make sure you remove from the product. Maintenance Kit Use the maintenance kit that came with your product to clean inside the printer. 70 Soft cloth...
...20 100 1 Ink cleaner Use the ink cleaner that came with your product to hold cleaning tools and consumables you have the maintenance supplies listed here. Metal tray Use the metal tray that came with your product for general cleaning. Protective eyewear Obtain commercially ... available mask to protect your mouth and nose from ink and ink cleaner. Maintenance Supplies Before performing any maintenance tasks or replacing ink, make sure you remove from the product. Maintenance Kit Use the maintenance kit that came with your product to clean inside the printer. 70 Soft cloth...
User Manual
Page 71
... 16 16 2 Parent topic: Preparing for Maintenance Maintenance Precautions Follow these precautions as you maintain your product: • Remove loaded media from the product before performing any maintenance tasks. • Touch a metal object to discharge any static electricity before performing any maintenance tasks. • Never touch the belts...could adversely affect the print quality or damage your product. • Use only the cleaning sticks included in the product maintenance kit to clean your product to apply grease to avoid damaging the print head. • Do not reuse cleaning ...
... 16 16 2 Parent topic: Preparing for Maintenance Maintenance Precautions Follow these precautions as you maintain your product: • Remove loaded media from the product before performing any maintenance tasks. • Touch a metal object to discharge any static electricity before performing any maintenance tasks. • Never touch the belts...could adversely affect the print quality or damage your product. • Use only the cleaning sticks included in the product maintenance kit to clean your product to apply grease to avoid damaging the print head. • Do not reuse cleaning ...

User Manual
Page 72
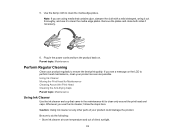
...skin with soapy water. Warning: The heaters and media edge plates may be hot; Parent topic: Preparing for Maintenance Related references Maintenance Supplies Cleaning the Platen Heater and Media Edge Plates Carefully follow the steps here to clean the platen heater and ...out of the reach of children. • Wear protective eyewear, gloves, and a mask when performing maintenance tasks. • Wash your hands after performing maintenance. • Gargle with water after performing maintenance. If you experience eye problems, contact a doctor. • If a substance gets in your ...
...skin with soapy water. Warning: The heaters and media edge plates may be hot; Parent topic: Preparing for Maintenance Related references Maintenance Supplies Cleaning the Platen Heater and Media Edge Plates Carefully follow the steps here to clean the platen heater and ...out of the reach of children. • Wear protective eyewear, gloves, and a mask when performing maintenance tasks. • Wash your hands after performing maintenance. • Gargle with water after performing maintenance. If you experience eye problems, contact a doctor. • If a substance gets in your ...
User Manual
Page 74
... room temperature and out of your product could damage the product. Using Ink Cleaner Moving the Print Head for Maintenance Cleaning Around the Print Head Cleaning the Anti-drying Caps Parent topic: Maintenance Using Ink Cleaner Use the ink cleaner and cup that contains glue, dampen the cloth with a mild detergent, ...head and caps. If you are using media that came in the power cords and turn the product back on the LCD to perform head maintenance, clean your product regularly to clean the media edge plates. Remove the plates and clean both sides if necessary. 6. Parent topic...
... room temperature and out of your product could damage the product. Using Ink Cleaner Moving the Print Head for Maintenance Cleaning Around the Print Head Cleaning the Anti-drying Caps Parent topic: Maintenance Using Ink Cleaner Use the ink cleaner and cup that contains glue, dampen the cloth with a mild detergent, ...head and caps. If you are using media that came in the power cords and turn the product back on the LCD to perform head maintenance, clean your product regularly to clean the media edge plates. Remove the plates and clean both sides if necessary. 6. Parent topic...

