
Technical Brief (Ink Jet Printers)
Page 3
... are designed to meet every printing need. Ink Jet Printer Technical Brief Page 3 Ink System: Epson offers a variety of media selected • Epson printers are for optional cartridges, and you see continuous tone color. Fine Art Pro Advanced Amateur Photo Enthusiast Chief Memory Officer® General Purpose You can find detailed information...
... are designed to meet every printing need. Ink Jet Printer Technical Brief Page 3 Ink System: Epson offers a variety of media selected • Epson printers are for optional cartridges, and you see continuous tone color. Fine Art Pro Advanced Amateur Photo Enthusiast Chief Memory Officer® General Purpose You can find detailed information...

Basics
Page 5
Maintaining Your RX700 69 Replacing Ink Cartridges 69 Checking the Ink Supply 69 Purchasing Ink Cartridges 70 Removing and Installing Ink Cartridges 71 Checking and Cleaning and Print Head 72 Checking the Print Head 72 Cleaning the Print Head 73 Aligning the Print... 78 Paper Feed Problems 80 Scanning Problems 81 Scan Quality Problems 81 RX700 Screen Problems 82 Where To Get Help 83 Epson Support 83 Other Software Technical Support 84 Notices 85 Important Safety Instructions 85 Ink Cartridge Safety Instructions 86 LCD Panel Safety Instructions 87 FCC Compliance Statement 88...
Maintaining Your RX700 69 Replacing Ink Cartridges 69 Checking the Ink Supply 69 Purchasing Ink Cartridges 70 Removing and Installing Ink Cartridges 71 Checking and Cleaning and Print Head 72 Checking the Print Head 72 Cleaning the Print Head 73 Aligning the Print... 78 Paper Feed Problems 80 Scanning Problems 81 Scan Quality Problems 81 RX700 Screen Problems 82 Where To Get Help 83 Epson Support 83 Other Software Technical Support 84 Notices 85 Important Safety Instructions 85 Ink Cartridge Safety Instructions 86 LCD Panel Safety Instructions 87 FCC Compliance Statement 88...

Basics
Page 69
... Press the Setup button to select Ink Levels. 3. See these sections: ■ "Replacing Ink Cartridges" below ■ "Checking and Cleaning and Print Head" on page 72 ■ "Aligning the Print Head" on the RX700 screen. Checking the Ink Supply To check your ink supply, do the following: 1. You see ...a message on page 74 Replacing Ink Cartridges When you print with low ink cartridges, you 're done checking the ink levels, press the OK button. 69 Maintaining Your RX700 If you may decline. Look at this chapter to check and clean the print ...
... Press the Setup button to select Ink Levels. 3. See these sections: ■ "Replacing Ink Cartridges" below ■ "Checking and Cleaning and Print Head" on page 72 ■ "Aligning the Print Head" on the RX700 screen. Checking the Ink Supply To check your ink supply, do the following: 1. You see ...a message on page 74 Replacing Ink Cartridges When you print with low ink cartridges, you 're done checking the ink levels, press the OK button. 69 Maintaining Your RX700 If you may decline. Look at this chapter to check and clean the print ...
Basics
Page 70
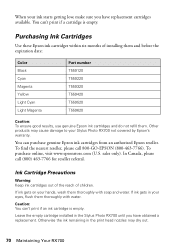
Other products may dry out. 70 Maintaining Your RX700 sales only). If ink gets in your Stylus Photo RX700 not covered by Epson's warranty. Purchasing Ink Cartridges Use these Epson ink cartridges within six months of children. To find the nearest reseller, please call (800) 463-7766 ...You can't print if an ink cartridge is empty. You can purchase genuine Epson ink cartridges from an authorized Epson reseller. Ink Cartridge Precautions Warning: Keep ink cartridges out of the reach of installing them and before the expiration date: Color Black Cyan Magenta Yellow Light Cyan ...
Other products may dry out. 70 Maintaining Your RX700 sales only). If ink gets in your Stylus Photo RX700 not covered by Epson's warranty. Purchasing Ink Cartridges Use these Epson ink cartridges within six months of children. To find the nearest reseller, please call (800) 463-7766 ...You can't print if an ink cartridge is empty. You can purchase genuine Epson ink cartridges from an authorized Epson reseller. Ink Cartridge Precautions Warning: Keep ink cartridges out of the reach of installing them and before the expiration date: Color Black Cyan Magenta Yellow Light Cyan ...

Basics
Page 71
Remove the cartridge you need to replace. (Press in to release it, then pull it clicks into place. Unwrap the new cartridge. 4. Insert the cartridge so it out of its slot.) Dispose of the cartridge carefully. 3. Replacing Ink Cartridges 71 Open the cartridge covers. 2. Removing and Installing Ink Cartridges Follow these steps to replace any other cartridges, repeat steps 2 through 4 before continuing. If you need to replace one or more ink cartridges that are outdated, low on ink, or empty. 1.
Remove the cartridge you need to replace. (Press in to release it, then pull it clicks into place. Unwrap the new cartridge. 4. Insert the cartridge so it out of its slot.) Dispose of the cartridge carefully. 3. Replacing Ink Cartridges 71 Open the cartridge covers. 2. Removing and Installing Ink Cartridges Follow these steps to replace any other cartridges, repeat steps 2 through 4 before continuing. If you need to replace one or more ink cartridges that are outdated, low on ink, or empty. 1.

Basics
Page 72
...and d buttons to maintain good print quality. Checking and Cleaning and Print Head If your RX700 at least once a month to select Nozzle Check, then press OK. 4. This clears the...print head. Press the Setup button. (If you don't use the printer for a long time. The RX700 begins charging the ink delivery system, and you may cause incomplete charging of ink. Make sure plain letter...loaded in the front tray (see page 10). 2. Caution: Never turn on your printouts are unexpectedly light, colors are missing, or you see if any print head nozzles are clogged, or to check the results after ...
...and d buttons to maintain good print quality. Checking and Cleaning and Print Head If your RX700 at least once a month to select Nozzle Check, then press OK. 4. This clears the...print head. Press the Setup button. (If you don't use the printer for a long time. The RX700 begins charging the ink delivery system, and you may cause incomplete charging of ink. Make sure plain letter...loaded in the front tray (see page 10). 2. Caution: Never turn on your printouts are unexpectedly light, colors are missing, or you see if any print head nozzles are clogged, or to check the results after ...

Basics
Page 75
... will use extra ink the next time you install ink cartridges, the RX700 must charge its ink delivery system. Tip: It's a good idea to check Epson's web site periodically for the RX700 to your software. Setup and Software Installation Problems The Stylus Photo RX700 makes noise after ink cartridge installation. ■ When you turn it on the Start...
... will use extra ink the next time you install ink cartridges, the RX700 must charge its ink delivery system. Tip: It's a good idea to check Epson's web site periodically for the RX700 to your software. Setup and Software Installation Problems The Stylus Photo RX700 makes noise after ink cartridge installation. ■ When you turn it on the Start...

Basics
Page 78
... Problems You see banding (light lines) in your paper isn't damp or curled. ■ Use Epson paper for instructions. ■ The ink cartridges may need replacing; see page 72 for proper saturation and absorption of Epson inks. see page 32). ■ If you loaded (see page 69. ■ Select a higher... off High Speed mode in your printer software. ■ Try printing with the printable side face-up in the rear sheet feeder, with Epson paper. Your printout is loaded in the rear sheet feeder. ■ Select the correct paper type setting for the paper you changed the Paper...
... Problems You see banding (light lines) in your paper isn't damp or curled. ■ Use Epson paper for instructions. ■ The ink cartridges may need replacing; see page 72 for proper saturation and absorption of Epson inks. see page 32). ■ If you loaded (see page 69. ■ Select a higher... off High Speed mode in your printer software. ■ Try printing with the printable side face-up in the rear sheet feeder, with Epson paper. Your printout is loaded in the rear sheet feeder. ■ Select the correct paper type setting for the paper you changed the Paper...

Basics
Page 79
...you loaded (see page 32). ■ If the RX700 runs out of your next copy may be incorrect. ■ If you're printing photos from a digital camera, check the Auto Correct and Filter...The ink cartridges may be old or low on -screen colors. However, you want to use a color management system, such as ICM or ColorSync®, to select Photo or Best Photo as possible, or the colors of paper ...during a print job, load additional sheets as soon as the quality setting. Your printout is grainy. ■ Use Epson paper for ...
...you loaded (see page 32). ■ If the RX700 runs out of your next copy may be incorrect. ■ If you're printing photos from a digital camera, check the Auto Correct and Filter...The ink cartridges may be old or low on -screen colors. However, you want to use a color management system, such as ICM or ColorSync®, to select Photo or Best Photo as possible, or the colors of paper ...during a print job, load additional sheets as soon as the quality setting. Your printout is grainy. ■ Use Epson paper for ...

Basics
Page 86
... action such as specifically explained in your hand inside the Stylus Photo RX700 or touch the cartridges during printing. ■ Don't move the print head by the transportation lock. ■ When storing or transporting the Stylus Photo RX700, do not attempt to service the Stylus Photo RX700 yourself. ■ Unplug the Stylus Photo RX700 and refer servicing to handle it, or drink the...
... action such as specifically explained in your hand inside the Stylus Photo RX700 or touch the cartridges during printing. ■ Don't move the print head by the transportation lock. ■ When storing or transporting the Stylus Photo RX700, do not attempt to service the Stylus Photo RX700 yourself. ■ Unplug the Stylus Photo RX700 and refer servicing to handle it, or drink the...

Basics
Page 87
... at least three hours before use may affect normal operation and printing. ■ Store ink cartridges in the same environment as the Stylus Photo RX700. Store each ink cartridge so that the cartridge touches. There is a valve in reduced print quality. ■ Don't use liquid or chemical cleaners. ■ If the LCD display is needed to...
... at least three hours before use may affect normal operation and printing. ■ Store ink cartridges in the same environment as the Stylus Photo RX700. Store each ink cartridge so that the cartridge touches. There is a valve in reduced print quality. ■ Don't use liquid or chemical cleaners. ■ If the LCD display is needed to...
Basics
Page 90
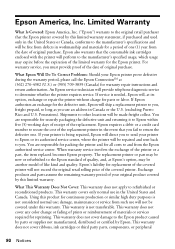
...the replacement. This warranty covers only normal use will , at (562) 276-4382 (U.S.) or (905) 709-3839 (Canada) for a period of one . Epson also warrants that the consumable ink cartridges enclosed with the printer will not exceed the original retail selling price of your printer to...any color change or fading of prints or reimbursement of original purchase. What This Warranty Does Not Cover: This warranty does not apply to the original retail purchaser that you must provide proof of the date of the printer or a part, the item replaced becomes Epson property. If Epson authorizes...
...the replacement. This warranty covers only normal use will , at (562) 276-4382 (U.S.) or (905) 709-3839 (Canada) for a period of one . Epson also warrants that the consumable ink cartridges enclosed with the printer will not exceed the original retail selling price of your printer to...any color change or fading of prints or reimbursement of original purchase. What This Warranty Does Not Cover: This warranty does not apply to the original retail purchaser that you must provide proof of the date of the printer or a part, the item replaced becomes Epson property. If Epson authorizes...

Basics
Page 93
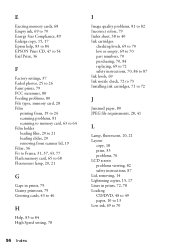
...camera Canceling printing, 15, 17, 24, 30, 31 Card reader, 65 to 66 Cartridges, replacing, 69 to 72 CDs and DVDs adjusting print density, 54, 55, 56 adjusting..., 66 to 67 Checking print nozzles, 72 to 73 Cleaning print head, 73 Color incorrect, 79 restoration, 25 to 26 Contact sheet, 38 to 40 Contrast, 36..., 17, 18, 23 Copying layout options, 18 paper type, 16 to 17 photos, 16 to 17 slides and negatives, 19 to 24 text and graphics, 14 ...off prints, 23, 77 D Dark RX700 screen, 82 Darkening copies, 15, 17 Date format, 36 Declaration of Conformity, 89 Default settings, RX700, 37 Density, 15, 17 Digital...
...camera Canceling printing, 15, 17, 24, 30, 31 Card reader, 65 to 66 Cartridges, replacing, 69 to 72 CDs and DVDs adjusting print density, 54, 55, 56 adjusting..., 66 to 67 Checking print nozzles, 72 to 73 Cleaning print head, 73 Color incorrect, 79 restoration, 25 to 26 Contact sheet, 38 to 40 Contrast, 36..., 17, 18, 23 Copying layout options, 18 paper type, 16 to 17 photos, 16 to 17 slides and negatives, 19 to 24 text and graphics, 14 ...off prints, 23, 77 D Dark RX700 screen, 82 Darkening copies, 15, 17 Date format, 36 Declaration of Conformity, 89 Default settings, RX700, 37 Density, 15, 17 Digital...
Basics
Page 94
...to 70 Energy Star Compliance, 89 Enlarge copy, 15, 17 Epson help, 83 to 84 EPSON Print CD, 47 to 54 Exif Print, 36 F Factory settings, 37 Faded photos, 25 to 26 Faint prints, 79 FCC statement, 88 ...83 to 84 High Speed setting, 78 I Image quality problems, 81 to 82 Incorrect colors, 79 Index sheet, 38 to 40 Ink cartridges checking levels, 69 to 70 low or empty, 69 to 70 part numbers, 70 purchasing...to 72 safety instructions, 70, 86 to 87 Ink levels, 69 Ink nozzle check, 72 to 73 Installing ink cartridges, 71 to 72 J Jammed paper, 80 JPEG file requirements, 28, 41 L Lamp, fluorescent, 20, 21 Layout...
...to 70 Energy Star Compliance, 89 Enlarge copy, 15, 17 Epson help, 83 to 84 EPSON Print CD, 47 to 54 Exif Print, 36 F Factory settings, 37 Faded photos, 25 to 26 Faint prints, 79 FCC statement, 88 ...83 to 84 High Speed setting, 78 I Image quality problems, 81 to 82 Incorrect colors, 79 Index sheet, 38 to 40 Ink cartridges checking levels, 69 to 70 low or empty, 69 to 70 part numbers, 70 purchasing...to 72 safety instructions, 70, 86 to 87 Ink levels, 69 Ink nozzle check, 72 to 73 Installing ink cartridges, 71 to 72 J Jammed paper, 80 JPEG file requirements, 28, 41 L Lamp, fluorescent, 20, 21 Layout...

Basics
Page 96
... to 72 Removing memory cards, 68 Replacing ink cartridges, 69 to 72 Resizing copies, 15, 17 Restoring color, 25 to 26 Restoring default settings, 37 S Safety instructions, 70, 85 to 87 Saturation, 36 Saving files from memory cards, 65 to 67 photos on computer, 65 to 66 Scanner lid, 14 ...RX700 display problems, 82 safety instructions, 87 Setup problems, 75 to 76 Sharpness, 36 Sleep mode, 82 Slides printing from, 19 to 24 printing problems, 77 scanning problems, 81 scanning to memory card, 63 to 64 Slideshow, 34 Slow printing or copying, 77 Smears, 78 Software ArcSoft PhotoImpression, 84 EPSON...
... to 72 Removing memory cards, 68 Replacing ink cartridges, 69 to 72 Resizing copies, 15, 17 Restoring color, 25 to 26 Restoring default settings, 37 S Safety instructions, 70, 85 to 87 Saturation, 36 Saving files from memory cards, 65 to 67 photos on computer, 65 to 66 Scanner lid, 14 ...RX700 display problems, 82 safety instructions, 87 Setup problems, 75 to 76 Sharpness, 36 Sleep mode, 82 Slides printing from, 19 to 24 printing problems, 77 scanning problems, 81 scanning to memory card, 63 to 64 Slideshow, 34 Slow printing or copying, 77 Smears, 78 Software ArcSoft PhotoImpression, 84 EPSON...
Basics
Page 98
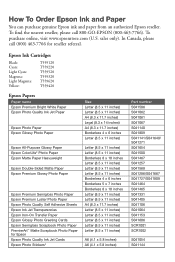
... S041054 S041144 sales only). In Canada, please call 800-GO-EPSON (800-463-7766). Epson Ink Cartridges Black: Cyan: Light Cyan: Magenta: Light Magenta: Yellow: T559120 T559220 T559520 T559320 T559620 T559420 Epson Papers Paper name Epson Premium Bright White Paper Epson Photo Quality Ink Jet Paper Epson Photo Paper Epson Glossy Photo Paper Size Letter (8.5 x 11 inches) Letter (8.5 x 11 inches) A4...
... S041054 S041144 sales only). In Canada, please call 800-GO-EPSON (800-463-7766). Epson Ink Cartridges Black: Cyan: Light Cyan: Magenta: Light Magenta: Yellow: T559120 T559220 T559520 T559320 T559620 T559420 Epson Papers Paper name Epson Premium Bright White Paper Epson Photo Quality Ink Jet Paper Epson Photo Paper Epson Glossy Photo Paper Size Letter (8.5 x 11 inches) Letter (8.5 x 11 inches) A4...
Product Information Guide
Page 2
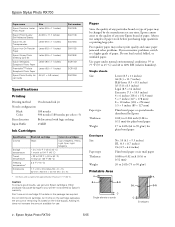
... jet Nozzle configuration Black Color 180 nozzles 900 nozzles (180 nozzles per color × 5) Print direction Bidirectional with logic seeking Input Buffer 256KB Ink Cartridges Specification Color(s) Storage temperature Transit temperature Freezing temperature* Dimensions Black ink cartridge Color ink cartridges Black Cyan, Magenta,...for plain bond paper 17 to 24 lb (64 to 90 g/m2) for use genuine Epson cartridges. Epson Stylus Photo RX700 5/05 An IC chip on the cartridge calculates the amount of remaining ink based on the package has expired. Caution: To ensure good...
... jet Nozzle configuration Black Color 180 nozzles 900 nozzles (180 nozzles per color × 5) Print direction Bidirectional with logic seeking Input Buffer 256KB Ink Cartridges Specification Color(s) Storage temperature Transit temperature Freezing temperature* Dimensions Black ink cartridge Color ink cartridges Black Cyan, Magenta,...for plain bond paper 17 to 24 lb (64 to 90 g/m2) for use genuine Epson cartridges. Epson Stylus Photo RX700 5/05 An IC chip on the cartridge calculates the amount of remaining ink based on the package has expired. Caution: To ensure good...

Product Information Guide
Page 15
... purchase online, visit www.epsonstore.com (U.S. In Canada, please call 800-GO-EPSON (800-463-7766). Unwrap the new cartridge. 4. sales only). Insert the cartridge so it out of its slot.) Dispose of ink. 5/05 Epson Stylus Photo RX700 - 15 Caution: Never turn off the RX700 during charging. Use the u and d buttons to replace one or more than...
... purchase online, visit www.epsonstore.com (U.S. In Canada, please call 800-GO-EPSON (800-463-7766). Unwrap the new cartridge. 4. sales only). Insert the cartridge so it out of its slot.) Dispose of ink. 5/05 Epson Stylus Photo RX700 - 15 Caution: Never turn off the RX700 during charging. Use the u and d buttons to replace one or more than...

Product Information Guide
Page 16
... box or one . 7. After transporting the RX700, unlock the transportation lock and print a test copy. Related Documentation CPD-19734 CPD-19735 CPD-19736 Epson Stylus Photo RX700 CD-ROM (includes electronic Reference Guide) Epson Stylus Photo RX700 Start Here Epson Stylus Photo RX700 Basics 16 - Press OK again to select the... to align the print head. 1. If you transport it . Caution: To avoid damage, always leave the ink cartridges installed when transporting the RX700. Press OK to return to use the l and r buttons to the locked position. For each of streaking (...
... box or one . 7. After transporting the RX700, unlock the transportation lock and print a test copy. Related Documentation CPD-19734 CPD-19735 CPD-19736 Epson Stylus Photo RX700 CD-ROM (includes electronic Reference Guide) Epson Stylus Photo RX700 Start Here Epson Stylus Photo RX700 Basics 16 - Press OK again to select the... to align the print head. 1. If you transport it . Caution: To avoid damage, always leave the ink cartridges installed when transporting the RX700. Press OK to return to use the l and r buttons to the locked position. For each of streaking (...

Start Here Card
Page 1
Epson Stylus Photo RX700 Basics book Ink cartridges (6 total) Film holder (in XXXXXX XX-XX.XX XXX CPD-19735 Printed in protective cardboard sleeve) Software CD-ROM 8-cm CD/DVD adapter Blank cardboard CD printing check disk CD/DVD tray 2 Remove all the parts shown here. Start Here Epson Stylus® Photo RX700 1 Unpack and Assemble 1 Make sure you have all the blue packing tape from the Stylus Photo RX700. 2 Connect Cable and Unlock 1 Connect the scanner lid cable. If any parts are missing, contact Epson® as described on the back of this sheet.
Epson Stylus Photo RX700 Basics book Ink cartridges (6 total) Film holder (in XXXXXX XX-XX.XX XXX CPD-19735 Printed in protective cardboard sleeve) Software CD-ROM 8-cm CD/DVD adapter Blank cardboard CD printing check disk CD/DVD tray 2 Remove all the parts shown here. Start Here Epson Stylus® Photo RX700 1 Unpack and Assemble 1 Make sure you have all the blue packing tape from the Stylus Photo RX700. 2 Connect Cable and Unlock 1 Connect the scanner lid cable. If any parts are missing, contact Epson® as described on the back of this sheet.


