
Basics
Page 54
...these instructions to print a color saturation check pattern and make the Print Color Correction (Windows) or Color Correction (Macintosh) setting lighter or darker as necessary. 1. If you want to try a third Color Correction setting, you may need to adjust the color saturation or ink density. Then check the ...6. See the EPSON Print CD on-screen Help for at least 24 hours. Adjusting the Print Density If ink smears on your printed CDs or DVDs, you can repeat steps 4 through 6, selecting Second or Second Time to print the second pattern. 8. Make sure Stylus Photo R700 is printed,...
...these instructions to print a color saturation check pattern and make the Print Color Correction (Windows) or Color Correction (Macintosh) setting lighter or darker as necessary. 1. If you want to try a third Color Correction setting, you may need to adjust the color saturation or ink density. Then check the ...6. See the EPSON Print CD on-screen Help for at least 24 hours. Adjusting the Print Density If ink smears on your printed CDs or DVDs, you can repeat steps 4 through 6, selecting Second or Second Time to print the second pattern. 8. Make sure Stylus Photo R700 is printed,...

Basics
Page 55
You can 't print text on your printed disks, you may need to copy in color, or the x B&W button to adjust the ink density. Place the design you want to scan an image (such as needed, then press OK. Press the Copy button, then select CD Copy as ... automatically cropped and resized to print a colorful design directly onto a CD or DVD without using your computer. After making your disk this way, but you may need to copy a photo or other printed image onto your disk. 1. Printing a CD/DVD Without a Computer You can use your Stylus Photo RX700 to fit on the disk. 2. Using...
You can 't print text on your printed disks, you may need to copy in color, or the x B&W button to adjust the ink density. Place the design you want to scan an image (such as needed, then press OK. Press the Copy button, then select CD Copy as ... automatically cropped and resized to print a colorful design directly onto a CD or DVD without using your computer. After making your disk this way, but you may need to copy a photo or other printed image onto your disk. 1. Printing a CD/DVD Without a Computer You can use your Stylus Photo RX700 to fit on the disk. 2. Using...
Basics
Page 70
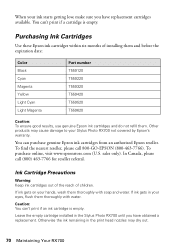
... before the expiration date: Color Black Cyan Magenta Yellow Light Cyan Light Magenta Part number T559120 T559220 T559320 T559420 T559520 T559620 Caution: To ensure good results, use genuine Epson ink cartridges and do not refill them thoroughly with soap and water. Leave the empty cartridge installed in the Stylus Photo RX700 until you have obtained a replacement...
... before the expiration date: Color Black Cyan Magenta Yellow Light Cyan Light Magenta Part number T559120 T559220 T559320 T559420 T559520 T559620 Caution: To ensure good results, use genuine Epson ink cartridges and do not refill them thoroughly with soap and water. Leave the empty cartridge installed in the Stylus Photo RX700 until you have obtained a replacement...
Basics
Page 73
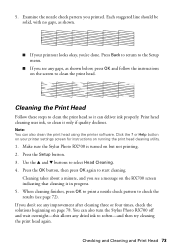
...four times, check the solutions beginning on page 78. or Help button on your printout looks okay, you printed. You can also turn the Stylus Photo RX700 off and wait overnight-this allows any gaps, as shown. ■ If your printer settings screen for instructions on but not printing. 2....only if quality declines. If you don't see page 72). Checking and Cleaning and Print Head 73 Make sure the Stylus Photo RX700 is in progress. 5. Print head cleaning uses ink, so clean it can also clean the print head using the printer software. Press Back to return to the Setup ...
...four times, check the solutions beginning on page 78. or Help button on your printout looks okay, you printed. You can also turn the Stylus Photo RX700 off and wait overnight-this allows any gaps, as shown. ■ If your printer settings screen for instructions on but not printing. 2....only if quality declines. If you don't see page 72). Checking and Cleaning and Print Head 73 Make sure the Stylus Photo RX700 is in progress. 5. Print head cleaning uses ink, so clean it can also clean the print head using the printer software. Press Back to return to the Setup ...

Basics
Page 75
...epson.com and check the section for the RX700 to see "Problems and Solutions" below if you're having trouble using your computer. See these sections: ■ "Problems and Solutions" below ■ "Where To Get Help" on the Start Here sheet. Setup and Software Installation Problems The Stylus Photo RX700 makes noise after ink... and Solutions Check the solutions below . The Stylus Photo RX700 makes noise after you turn it on . 75 Tip: It's a good idea to check Epson's web site periodically for downloading to your Stylus Photo RX700, check the messages on . Solving Problems If...
...epson.com and check the section for the RX700 to see "Problems and Solutions" below if you're having trouble using your computer. See these sections: ■ "Problems and Solutions" below ■ "Where To Get Help" on the Start Here sheet. Setup and Software Installation Problems The Stylus Photo RX700 makes noise after ink... and Solutions Check the solutions below . The Stylus Photo RX700 makes noise after you turn it on . 75 Tip: It's a good idea to check Epson's web site periodically for downloading to your Stylus Photo RX700, check the messages on . Solving Problems If...

Basics
Page 86
...damaged; Adjust only those controls that are covered by the operating instructions. ■ Before transporting the Stylus Photo RX700, make sure the print head is capped in the far right position, the ink cartridges are communicating (when the memory card light is performing an action such as printing. If ...after a thorough flushing, see a doctor immediately. ■ Do not put your hand inside the Stylus Photo RX700 or touch the cartridges during printing. ■ Don't move the print head by hand; If ink gets on its side, or turn off with soap and water. Do not allow children to ...
...damaged; Adjust only those controls that are covered by the operating instructions. ■ Before transporting the Stylus Photo RX700, make sure the print head is capped in the far right position, the ink cartridges are communicating (when the memory card light is performing an action such as printing. If ...after a thorough flushing, see a doctor immediately. ■ Do not put your hand inside the Stylus Photo RX700 or touch the cartridges during printing. ■ Don't move the print head by hand; If ink gets on its side, or turn off with soap and water. Do not allow children to ...

Basics
Page 87
...There is a valve in the ink supply port, making covers or plugs unnecessary, but care is damaged, contact your skin, wash it off thoroughly with water. Don't use , protect the ink supply area from dirt and store it in the same environment as the Stylus Photo RX700. this can cause leakage. ...■ Install the ink cartridge immediately after you remove them from their packages; you could damage the print...
...There is a valve in the ink supply port, making covers or plugs unnecessary, but care is damaged, contact your skin, wash it off thoroughly with water. Don't use , protect the ink supply area from dirt and store it in the same environment as the Stylus Photo RX700. this can cause leakage. ...■ Install the ink cartridge immediately after you remove them from their packages; you could damage the print...
Product Information Guide
Page 2
... the initial supply. Do not refill the ink cartridge. Epson Stylus Photo RX700 5/05 Do not load curled, folded, or wrinkled paper. Epson Stylus Photo RX700 Paper name Epson Premium Luster Photo Paper Epson Photo Quality Self Adhesive Sheets Epson Ink Jet Transparencies Epson Iron-On Transfer Paper Epson Glossy Photo Greeting Card Kit Epson Semigloss Scrapbook Photo Paper PremierArtTM Matte Scrapbook Photo Paper Epson Photo Quality Ink Jet Cards Size Letter (8.5 × 11...
... the initial supply. Do not refill the ink cartridge. Epson Stylus Photo RX700 5/05 Do not load curled, folded, or wrinkled paper. Epson Stylus Photo RX700 Paper name Epson Premium Luster Photo Paper Epson Photo Quality Self Adhesive Sheets Epson Ink Jet Transparencies Epson Iron-On Transfer Paper Epson Glossy Photo Greeting Card Kit Epson Semigloss Scrapbook Photo Paper PremierArtTM Matte Scrapbook Photo Paper Epson Photo Quality Ink Jet Cards Size Letter (8.5 × 11...

Product Information Guide
Page 5
... the type of paper you have to specify Plain(Back) as the Paper Type when printing (see page 7). 5/05 Epson Stylus Photo RX700 - 5 Open the front cover. 5. Note: Epson paper is designed to make sure it . Extend the output tray. To ensure good results, always: ■ Load ... the edge guide lightly against the left side of paper should be loaded in the rear sheet feeder only. 4. Epson Stylus Photo RX700 2. Plain paper may not get the results you 're using Epson paper, follow any instructions that came with Epson printers and ink. Note: If you expect. 1.
... the type of paper you have to specify Plain(Back) as the Paper Type when printing (see page 7). 5/05 Epson Stylus Photo RX700 - 5 Open the front cover. 5. Note: Epson paper is designed to make sure it . Extend the output tray. To ensure good results, always: ■ Load ... the edge guide lightly against the left side of paper should be loaded in the rear sheet feeder only. 4. Epson Stylus Photo RX700 2. Plain paper may not get the results you 're using Epson paper, follow any instructions that came with Epson printers and ink. Note: If you expect. 1.

Product Information Guide
Page 6
... them to 99), use the Borderless layout setting and select an Epson photo paper in one of the glass to print a photo without white borders around the edges (not available when printing on the glass. Epson Stylus Photo RX700 5/05 Selecting Copy Settings and Printing 1. When copying text and ... paper, select Draft for quick copies or Text for black-and-white copies). Epson Stylus Photo RX700 Copying Without a Computer You can be combined for improved results over black ink alone. Press the Copy button. Color inks can make sure they're the ones you 're printing black-and-white...
... them to 99), use the Borderless layout setting and select an Epson photo paper in one of the glass to print a photo without white borders around the edges (not available when printing on the glass. Epson Stylus Photo RX700 5/05 Selecting Copy Settings and Printing 1. When copying text and ... paper, select Draft for quick copies or Text for black-and-white copies). Epson Stylus Photo RX700 Copying Without a Computer You can be combined for improved results over black ink alone. Press the Copy button. Color inks can make sure they're the ones you 're printing black-and-white...

Product Information Guide
Page 7
...Epson Premium Glossy Photo Paper Epson Ink Jet Transparencies Epson Glossy Photo Paper Epson Photo Paper Epson All-Purpose Glossy Paper Epson Glossy Photo Greeting Cards Prem.Glossy Glossy Photo Epson Premium Semigloss Photo Paper Epson ColorLife Photo Paper Epson Semigloss Scrapbook Photo Paper SemiGloss Epson Premium Luster Photo Paper Epson Matte Paper Heavyweight Epson Double-Sided Matte Paper PremierArt Matte Scrapbook Photo... the first original on the RX700, press the x Color or x B&W button. Repeat for your paper. 5/05 Epson Stylus Photo RX700 - 7 Restoring Default Settings ...
...Epson Premium Glossy Photo Paper Epson Ink Jet Transparencies Epson Glossy Photo Paper Epson Photo Paper Epson All-Purpose Glossy Paper Epson Glossy Photo Greeting Cards Prem.Glossy Glossy Photo Epson Premium Semigloss Photo Paper Epson ColorLife Photo Paper Epson Semigloss Scrapbook Photo Paper SemiGloss Epson Premium Luster Photo Paper Epson Matte Paper Heavyweight Epson Double-Sided Matte Paper PremierArt Matte Scrapbook Photo... the first original on the RX700, press the x Color or x B&W button. Repeat for your paper. 5/05 Epson Stylus Photo RX700 - 7 Restoring Default Settings ...

Product Information Guide
Page 11
...aligned. At the preview screen, press the x Color button to copy on the CD/DVD tray with a variety of it onto the disk or use thermal-printable or regular CDs or DVDs. Place the design you want to print your photos. Place your computer. Epson Stylus Photo RX700 4. You can use the + and - Align...OK. Make sure the arrow marks are scanned. 6. Caution: Use only ink jet-printable CDs or DVDs for details. Turn on your designs with the label surface up to fit on the tray first. 3. You can import your photos, add text, and modify your disk this way, but you can ...
...aligned. At the preview screen, press the x Color button to copy on the CD/DVD tray with a variety of it onto the disk or use thermal-printable or regular CDs or DVDs. Place the design you want to print your photos. Place your computer. Epson Stylus Photo RX700 4. You can use the + and - Align...OK. Make sure the arrow marks are scanned. 6. Caution: Use only ink jet-printable CDs or DVDs for details. Turn on your designs with the label surface up to fit on the tray first. 3. You can import your photos, add text, and modify your disk this way, but you can ...

Product Information Guide
Page 12
... camera's memory card. 1. Use the u, d, l, r arrow buttons to adjust the ink density. At the preview screen, press the x Color button to print in color, or the x B&W button to copy in grayscale. To cancel printing, press the y Stop button. 5. Your disk is printed. Epson Stylus Photo RX700 4. You see page 7). ❏ Paper Size: Select the size of the...
... camera's memory card. 1. Use the u, d, l, r arrow buttons to adjust the ink density. At the preview screen, press the x Color button to print in color, or the x B&W button to copy in grayscale. To cancel printing, press the y Stop button. 5. Your disk is printed. Epson Stylus Photo RX700 4. You see page 7). ❏ Paper Size: Select the size of the...

Product Information Guide
Page 13
...; Data storage device, such as a slide show. (You cannot select the number of photos you can also select photos for more information. 5/05 Epson Stylus Photo RX700 - 13 If you print, select with step 8. 4. Then use the + and - You see your photos. Color inks can print photos by -one, use the + and - Then press the Options button and turn off...
...; Data storage device, such as a slide show. (You cannot select the number of photos you can also select photos for more information. 5/05 Epson Stylus Photo RX700 - 13 If you print, select with step 8. 4. Then use the + and - You see your photos. Color inks can print photos by -one, use the + and - Then press the Options button and turn off...

Product Information Guide
Page 14
... dark lines across the page, you see the File Save Settings window: Cleaning the Print Head Nozzles If printouts are unexpectedly light, colors are clogged, or to clean the print head. 5. Examine the nozzle check pattern you 're done. Type a name for your... again to start cleaning. Note: You can deliver ink properly. If you manually configure advanced image settings. Macintosh: Double-click EPSON Scan in the Type box. 7. Cleaning the Print Head Follow these steps to scan directly to select Head Cleaning. 3. Epson Stylus Photo RX700 5/05 Place your computer: 1. Use the u ...
... dark lines across the page, you see the File Save Settings window: Cleaning the Print Head Nozzles If printouts are unexpectedly light, colors are clogged, or to clean the print head. 5. Examine the nozzle check pattern you 're done. Type a name for your... again to start cleaning. Note: You can deliver ink properly. If you manually configure advanced image settings. Macintosh: Double-click EPSON Scan in the Type box. 7. Cleaning the Print Head Follow these steps to scan directly to select Head Cleaning. 3. Epson Stylus Photo RX700 5/05 Place your computer: 1. Use the u ...

Product Information Guide
Page 15
... (U.S. sales only). If ink gets in your RX700 not covered by Epson's warranty. You see a message on the RX700 screen. Purchasing Ink Cartridges Use the Epson ink cartridges listed on ink, or empty. 1. You can 't print if a cartridge is more ink cartridges that are outdated, low on page 1 within six months of ink. 5/05 Epson Stylus Photo RX700 - 15 Epson Stylus Photo RX700 Replacing Ink Cartridges When you print...
... (U.S. sales only). If ink gets in your RX700 not covered by Epson's warranty. You see a message on the RX700 screen. Purchasing Ink Cartridges Use the Epson ink cartridges listed on ink, or empty. 1. You can 't print if a cartridge is more ink cartridges that are outdated, low on page 1 within six months of ink. 5/05 Epson Stylus Photo RX700 - 15 Epson Stylus Photo RX700 Replacing Ink Cartridges When you print...

Product Information Guide
Page 16
.... Then close the scanner lid. 4. Caution: Keep the RX700 level as you transport it . Caution: To avoid damage, always leave the ink cartridges installed when transporting the RX700. Press the POn button to select the circled number for transportation... then unplug the RX700 from the electrical outlet and disconnect the USB cable from the RX700. Related Documentation CPD-19734 CPD-19735 CPD-19736 Epson Stylus Photo RX700 CD-ROM (includes electronic Reference Guide) Epson Stylus Photo RX700 Start Here Epson Stylus Photo RX700 Basics 16 - Epson Stylus Photo RX700 5/05 Press the ...
.... Then close the scanner lid. 4. Caution: Keep the RX700 level as you transport it . Caution: To avoid damage, always leave the ink cartridges installed when transporting the RX700. Press the POn button to select the circled number for transportation... then unplug the RX700 from the electrical outlet and disconnect the USB cable from the RX700. Related Documentation CPD-19734 CPD-19735 CPD-19736 Epson Stylus Photo RX700 CD-ROM (includes electronic Reference Guide) Epson Stylus Photo RX700 Start Here Epson Stylus Photo RX700 Basics 16 - Epson Stylus Photo RX700 5/05 Press the ...

Start Here Card
Page 1
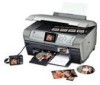
If any parts are missing, contact Epson® as described on the back of this sheet. Epson Stylus Photo RX700 Basics book Ink cartridges (6 total) Film holder (in XXXXXX XX-XX.XX XXX Start Here Epson Stylus® Photo RX700 1 Unpack and Assemble 1 Make sure you have all the blue packing tape from the Stylus Photo RX700. 2 Connect Cable and Unlock 1 Connect the scanner lid cable. CPD-19735 Printed in protective cardboard sleeve) Software CD-ROM 8-cm CD/DVD adapter Blank cardboard CD printing check disk CD/DVD tray 2 Remove all the parts shown here.
If any parts are missing, contact Epson® as described on the back of this sheet. Epson Stylus Photo RX700 Basics book Ink cartridges (6 total) Film holder (in XXXXXX XX-XX.XX XXX Start Here Epson Stylus® Photo RX700 1 Unpack and Assemble 1 Make sure you have all the blue packing tape from the Stylus Photo RX700. 2 Connect Cable and Unlock 1 Connect the scanner lid cable. CPD-19735 Printed in protective cardboard sleeve) Software CD-ROM 8-cm CD/DVD adapter Blank cardboard CD printing check disk CD/DVD tray 2 Remove all the parts shown here.

Start Here Card
Page 2
Note: You can store the film holder in the scanner lid behind the white document mat. 3 Install Ink Cartridges 1 Plug your Stylus Photo RX700 into the correct slot for its color. 2 Open the scanner lid and remove the yellow UNLOCK sticker. Then unlock the scanner as shown. On button 2 Open the ink cartridge covers. 3 Remove the ink cartridges from their package. 4 Insert each ink cartridge into an electrical outlet, then press the On button. The green power light comes on.
Note: You can store the film holder in the scanner lid behind the white document mat. 3 Install Ink Cartridges 1 Plug your Stylus Photo RX700 into the correct slot for its color. 2 Open the scanner lid and remove the yellow UNLOCK sticker. Then unlock the scanner as shown. On button 2 Open the ink cartridge covers. 3 Remove the ink cartridges from their package. 4 Insert each ink cartridge into an electrical outlet, then press the On button. The green power light comes on.

Start Here Card
Page 3
... against the right side of the sheet feeder. Load letter-size plain paper only. It takes about 31/2 minutes for both plain paper and special Epson papers). Here's how to 150 sheets. Caution: Do not push the paper in Edges not even Make sure the paper is equipped with the line... a front sheet feeder (for plain letter-size paper) and a rear sheet feeder (for charging to load paper while charging is in progress. 4 Load Paper Your Stylus Photo RX700 is stacked evenly. 5 Close the ink cartridge covers to push it in too far. Too far in too far.
... against the right side of the sheet feeder. Load letter-size plain paper only. It takes about 31/2 minutes for both plain paper and special Epson papers). Here's how to 150 sheets. Caution: Do not push the paper in Edges not even Make sure the paper is equipped with the line... a front sheet feeder (for plain letter-size paper) and a rear sheet feeder (for charging to load paper while charging is in progress. 4 Load Paper Your Stylus Photo RX700 is stacked evenly. 5 Close the ink cartridge covers to push it in too far. Too far in too far.


