
Basics
Page 7
... you make photo reprints directly from your slides and negatives. ■ Color Restoration technology that allows you to restore faded color photos to their original brilliance. ■ CD/DVD printing so you can enhance your collection by printing photos and colorful designs directly...Epson specialty papers. ■ 2.5-inch Epson® PhotoFineTM display for everyday printing, while using the RX700 without a computer, follow the instructions in this Basics guide. The Epson Stylus® Photo RX700 combines the convenience of your desktop. 7 To view the guide, just click the Epson RX700...
... you make photo reprints directly from your slides and negatives. ■ Color Restoration technology that allows you to restore faded color photos to their original brilliance. ■ CD/DVD printing so you can enhance your collection by printing photos and colorful designs directly...Epson specialty papers. ■ 2.5-inch Epson® PhotoFineTM display for everyday printing, while using the RX700 without a computer, follow the instructions in this Basics guide. The Epson Stylus® Photo RX700 combines the convenience of your desktop. 7 To view the guide, just click the Epson RX700...

Basics
Page 9
If your photos are old and faded, you can use your Stylus Photo RX700 to life with Color Restoration. Copying You can bring them back to copy all sorts of materials, such as scrapbooking elements, 4 × 6 photos, and 35-mm slides and negatives. See these sections: ■ "Loading Paper" on page 10 ■ "Copying Text and Graphics" on page 14 ■ "Copying a Photo" on page 16 ■ "Making Prints From Slides or Negatives" on page 19 ■ "Restoring Color From Faded Slides, Negatives, and Photos" on page 25 9
If your photos are old and faded, you can use your Stylus Photo RX700 to life with Color Restoration. Copying You can bring them back to copy all sorts of materials, such as scrapbooking elements, 4 × 6 photos, and 35-mm slides and negatives. See these sections: ■ "Loading Paper" on page 10 ■ "Copying Text and Graphics" on page 14 ■ "Copying a Photo" on page 16 ■ "Making Prints From Slides or Negatives" on page 19 ■ "Restoring Color From Faded Slides, Negatives, and Photos" on page 25 9

Basics
Page 10
Load the paper. Press 2. Loading Paper Your Stylus Photo RX700 lets you load plain, letter-size paper in the front tray (for everyday printing) and special Epson papers in the rear sheet feeder for loading letter-size plain paper only (8.5 × 11-inch photocopier paper). Caution: All other types of plain paper ...
Load the paper. Press 2. Loading Paper Your Stylus Photo RX700 lets you load plain, letter-size paper in the front tray (for everyday printing) and special Epson papers in the rear sheet feeder for loading letter-size plain paper only (8.5 × 11-inch photocopier paper). Caution: All other types of plain paper ...

Basics
Page 19
... the Document Mat and Film Holder 1. Making Prints From Slides or Negatives 19 Place your film in your Stylus Photo RX700 to scan 35-mm slides or strips of these special Epson papers: ■ Premium Glossy Photo Paper-available in sizes perfect for displaying in the holder as shown. 3. Open the scanner lid and remove...
... the Document Mat and Film Holder 1. Making Prints From Slides or Negatives 19 Place your film in your Stylus Photo RX700 to scan 35-mm slides or strips of these special Epson papers: ■ Premium Glossy Photo Paper-available in sizes perfect for displaying in the holder as shown. 3. Open the scanner lid and remove...

Basics
Page 27
..., handwritten message (see page 43). After connecting your camera or inserting its memory card, select photos by inserting its memory card in your RX700 (see page 28). Compatible Memory Cards You can use the following types of your Stylus Photo RX700: CompactFlashTM Type I and Type II IBM MicrodriveTM MagicGate Memory Stick MagicGate Memory Stick Duo...
..., handwritten message (see page 43). After connecting your camera or inserting its memory card, select photos by inserting its memory card in your RX700 (see page 28). Compatible Memory Cards You can use the following types of your Stylus Photo RX700: CompactFlashTM Type I and Type II IBM MicrodriveTM MagicGate Memory Stick MagicGate Memory Stick Duo...

Basics
Page 41
...the printer can read from 120 × 120 to 4600 × 4600 pixels ■ No more than 999 photos on the Stylus Photo RX700 and your photos. 4. Remove any memory cards from the RX700. (If you leave a card in your camera.) 2. EXT. If necessary, turn on your camera to the... EXT. Load the type of the Stylus Photo RX700. Connecting Your Camera Directly 41 I /F port on (see all the settings. Press the Setup button. 6. I /F port 3. After a moment, the RX700 reads and counts your camera. Use the d button to highlight PictBridge Setup or...
...the printer can read from 120 × 120 to 4600 × 4600 pixels ■ No more than 999 photos on the Stylus Photo RX700 and your photos. 4. Remove any memory cards from the RX700. (If you leave a card in your camera.) 2. EXT. If necessary, turn on your camera to the... EXT. Load the type of the Stylus Photo RX700. Connecting Your Camera Directly 41 I /F port on (see all the settings. Press the Setup button. 6. I /F port 3. After a moment, the RX700 reads and counts your camera. Use the d button to highlight PictBridge Setup or...
Basics
Page 52
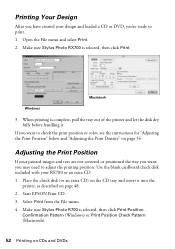
... and insert it . Start EPSON Print CD. 3. Macintosh Windows 3. Printing Your Design After you have created your design and loaded a CD or DVD, you're ready to adjust the printing position. Adjusting the Print Position If your RX700 or an extra CD. 1. Make sure Stylus Photo RX700 is selected, then click Print... with your printed images and text are not centered or positioned the way you want, you want to check the print position or color, see the instructions for "Adjusting the Print Position" below and "Adjusting the Print Density" on CDs and DVDs Select Print from the ...
... and insert it . Start EPSON Print CD. 3. Macintosh Windows 3. Printing Your Design After you have created your design and loaded a CD or DVD, you're ready to adjust the printing position. Adjusting the Print Position If your RX700 or an extra CD. 1. Make sure Stylus Photo RX700 is selected, then click Print... with your printed images and text are not centered or positioned the way you want, you want to check the print position or color, see the instructions for "Adjusting the Print Position" below and "Adjusting the Print Density" on CDs and DVDs Select Print from the ...

Basics
Page 54
...on-screen Help for printing, as described on CDs and DVDs Make sure Stylus Photo R700 is printed in EPSON Print CD to print a color saturation check pattern and make the Print Color Correction (Windows) or Color Correction (Macintosh) setting lighter or darker as necessary. 1. You can print... steps 4 through 6, selecting Second or Second Time to adjust the density for at least 24 hours. Start EPSON Print CD. 3. Follow these instructions to adjust color saturation. After the first pattern is printed, examine the print and make adjustments as necessary. Select Print from ...
...on-screen Help for printing, as described on CDs and DVDs Make sure Stylus Photo R700 is printed in EPSON Print CD to print a color saturation check pattern and make the Print Color Correction (Windows) or Color Correction (Macintosh) setting lighter or darker as necessary. 1. You can print... steps 4 through 6, selecting Second or Second Time to adjust the density for at least 24 hours. Start EPSON Print CD. 3. Follow these instructions to adjust color saturation. After the first pattern is printed, examine the print and make adjustments as necessary. Select Print from ...

Basics
Page 55
... image is printed. Tip: If ink smears on the scanner glass (see page 14). Place the design you may need to print a colorful design directly onto a CD or DVD without using your computer. Using a Printed Image Follow these steps to copy on your printed disks, you... as the Copy Layout. 3. Select Text as a drawing or 4 × 6-inch photo) or use an image from your digital camera's memory card. Printing a CD/DVD Without a Computer You can use your Stylus Photo RX700 to adjust the ink density. Disks from different manufacturers absorb ink differently, so you can either...
... image is printed. Tip: If ink smears on the scanner glass (see page 14). Place the design you may need to print a colorful design directly onto a CD or DVD without using your computer. Using a Printed Image Follow these steps to copy on your printed disks, you... as the Copy Layout. 3. Select Text as a drawing or 4 × 6-inch photo) or use an image from your digital camera's memory card. Printing a CD/DVD Without a Computer You can use your Stylus Photo RX700 to adjust the ink density. Disks from different manufacturers absorb ink differently, so you can either...

Basics
Page 61
...■ "Scanning a Photo" on page 62 ■ "Scanning Film or Slides" on page 63 Inserting a Memory Card You can scan to any compatible type of a memory card (see the instructions in your on-screen Reference Guide). Scanning to a Memory Card You can use your Epson Stylus Photo RX700 as a stand-alone ...scanner to save scans of photos, film, and slides to your card or turning off the RX700, or you may lose data on the card. 1. Caution: Do not insert more ...
...■ "Scanning a Photo" on page 62 ■ "Scanning Film or Slides" on page 63 Inserting a Memory Card You can scan to any compatible type of a memory card (see the instructions in your on-screen Reference Guide). Scanning to a Memory Card You can use your Epson Stylus Photo RX700 as a stand-alone ...scanner to save scans of photos, film, and slides to your card or turning off the RX700, or you may lose data on the card. 1. Caution: Do not insert more ...

Basics
Page 63
5. Press the x Color button. Caution: Do not remove the card or turn off the Stylus Photo RX700 while the memory card light is flashing, or you 've stored it under the document mat. 2. Close the scanner lid. The photo is finished, you can scan film or slides to your memory card. 8. ... 35-mm Film Strips in these steps: 1. Scanning Film or Slides After inserting a memory card (see page 61), you see page 19). Place your photos in color, select Max area) ■ Document Type: select Graphics ■ Quality: select Text and Image (for best quality) or Normal (for smaller file size...
5. Press the x Color button. Caution: Do not remove the card or turn off the Stylus Photo RX700 while the memory card light is flashing, or you 've stored it under the document mat. 2. Close the scanner lid. The photo is finished, you can scan film or slides to your memory card. 8. ... 35-mm Film Strips in these steps: 1. Scanning Film or Slides After inserting a memory card (see page 61), you see page 19). Place your photos in color, select Max area) ■ Document Type: select Graphics ■ Quality: select Text and Image (for best quality) or Normal (for smaller file size...

Basics
Page 64
... the + and - Choose Normal (for good quality) or Photo (for each photo. buttons to Memory Card, then press the OK button. 6. Note the name given to a Memory Card Caution: Do not remove the card or turn off the Stylus Photo RX700 while the memory card light is flashing, or you 're scanning slides, select Color slide.
... the + and - Choose Normal (for good quality) or Photo (for each photo. buttons to Memory Card, then press the OK button. 6. Note the name given to a Memory Card Caution: Do not remove the card or turn off the Stylus Photo RX700 while the memory card light is flashing, or you 're scanning slides, select Color slide.

Basics
Page 65
... you see a screen like this. Make sure your Stylus Photo RX700 is set to allow writing to the card.) 3. See these sections: ■ "Copying Photos to Your Computer" below ■ "Copying Photos to a USB Drive" on page 66 Copying Photos to Your Computer Before using this automatically installs the necessary ... Me, make sure you've installed your Stylus Photo RX700 software as described on page 28. (If you delete the photos on and connected to your computer. 2. Saving and Storing Photos You can use your RX700 as a card reader to copy photos and other Windows systems, double-click My ...
... you see a screen like this. Make sure your Stylus Photo RX700 is set to allow writing to the card.) 3. See these sections: ■ "Copying Photos to Your Computer" below ■ "Copying Photos to a USB Drive" on page 66 Copying Photos to Your Computer Before using this automatically installs the necessary ... Me, make sure you've installed your Stylus Photo RX700 software as described on page 28. (If you delete the photos on and connected to your computer. 2. Saving and Storing Photos You can use your RX700 as a card reader to copy photos and other Windows systems, double-click My ...

Basics
Page 66
...card and reuse it , so be sure to a USB storage device for printing (see a drive icon appear on page 68. Make sure the Stylus Photo RX700 is erased.) 1. You can retrieve them as described on your originals. The CD-ROM or Zip drive must receive power from your camera. Note... card from an external power supply or adapter. This lets you delete the photos on and the memory card containing your photos to open the drive and copy your photos is connected, iPhoto opens. 4. If the Stylus Photo RX700 is connected to your computer, unplug the USB cable that is empty or ...
...card and reuse it , so be sure to a USB storage device for printing (see a drive icon appear on page 68. Make sure the Stylus Photo RX700 is erased.) 1. You can retrieve them as described on your originals. The CD-ROM or Zip drive must receive power from your camera. Note... card from an external power supply or adapter. This lets you delete the photos on and the memory card containing your photos to open the drive and copy your photos is connected, iPhoto opens. 4. If the Stylus Photo RX700 is connected to your computer, unplug the USB cable that is empty or ...

Basics
Page 67
... OK. 6. Note: When backing up to the EXT. If you 're using a thumb drive, plug it in the previous section. Copying Photos to a CD-R/RW, the Stylus Photo RX700 creates a folder for each backup session. Depending on a CD-R/RW. I/F port on your storage drive, you may take several minutes. 7. ...Press the Setup button. 5. All the photos on the front of the Stylus Photo RX700. (If you need to your card are , this way only if they have copied photos to stop the backup, press the y Stop button. You can store multiple backup sessions...
... OK. 6. Note: When backing up to the EXT. If you 're using a thumb drive, plug it in the previous section. Copying Photos to a CD-R/RW, the Stylus Photo RX700 creates a folder for each backup session. Depending on a CD-R/RW. I/F port on your storage drive, you may take several minutes. 7. ...Press the Setup button. 5. All the photos on the front of the Stylus Photo RX700. (If you need to your card are , this way only if they have copied photos to stop the backup, press the y Stop button. You can store multiple backup sessions...
Basics
Page 70
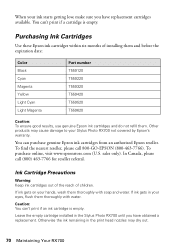
... Ink Cartridge Precautions Warning: Keep ink cartridges out of the reach of installing them and before the expiration date: Color Black Cyan Magenta Yellow Light Cyan Light Magenta Part number T559120 T559220 T559320 T559420 T559520 T559620 Caution: To ensure good results, use...have replacement cartridges available. Other products may dry out. 70 Maintaining Your RX700 To purchase online, visit www.epsonstore.com (U.S. In Canada, please call 800-GO-EPSON (800-463-7766). If ink gets in the Stylus Photo RX700 until you have obtained a replacement. sales only). Caution: You can...
... Ink Cartridge Precautions Warning: Keep ink cartridges out of the reach of installing them and before the expiration date: Color Black Cyan Magenta Yellow Light Cyan Light Magenta Part number T559120 T559220 T559320 T559420 T559520 T559620 Caution: To ensure good results, use...have replacement cartridges available. Other products may dry out. 70 Maintaining Your RX700 To purchase online, visit www.epsonstore.com (U.S. In Canada, please call 800-GO-EPSON (800-463-7766). If ink gets in the Stylus Photo RX700 until you have obtained a replacement. sales only). Caution: You can...
Basics
Page 73
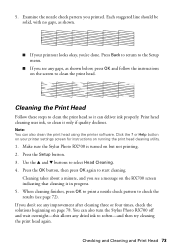
Cleaning the Print Head Follow these steps to soften-and then try cleaning the print head again. You can also turn the Stylus Photo RX700 off and wait overnight-this allows any dried ink to clean the print head so it only if quality declines. Each staggered line should ... on running the print head cleaning utility. 1. Note: You can deliver ink properly. Click the ? If you 're done. Make sure the Stylus Photo RX700 is turned on the RX700 screen indicating that cleaning is in progress. 5. Use the u and d buttons to clean the print head. Press Back to return to the Setup...
Cleaning the Print Head Follow these steps to soften-and then try cleaning the print head again. You can also turn the Stylus Photo RX700 off and wait overnight-this allows any dried ink to clean the print head so it only if quality declines. Each staggered line should ... on running the print head cleaning utility. 1. Note: You can deliver ink properly. Click the ? If you 're done. Make sure the Stylus Photo RX700 is turned on the RX700 screen indicating that cleaning is in progress. 5. Use the u and d buttons to clean the print head. Press Back to return to the Setup...

Basics
Page 74
Make sure the Stylus Photo RX700 is complete. Load several sheets of plain letter-size paper in section #1. 7. Examine the printout. Press OK when done. 9. You may need to use the l ..., you may need to select the number of streaking (light or dark vertical lines). Press OK again to the Setup menu. 74 Maintaining Your RX700 On the RX700 screen, use a magnifying glass or loupe. 6. Press the Setup button, select Head Alignment, then press the OK button. 4. Press the d button to select the...
Make sure the Stylus Photo RX700 is complete. Load several sheets of plain letter-size paper in section #1. 7. Examine the printout. Press OK when done. 9. You may need to use the l ..., you may need to select the number of streaking (light or dark vertical lines). Press OK again to the Setup menu. 74 Maintaining Your RX700 On the RX700 screen, use a magnifying glass or loupe. 6. Press the Setup button, select Head Alignment, then press the OK button. 4. Press the d button to select the...

Basics
Page 75
... then turn it on. Solving Problems If you have a problem with your Stylus Photo RX700, check the messages on the RX700 screen, run a nozzle check (see page 72), or see if there is normal for the RX700 to make whirring sounds after you turn it on. ■ Make sure the... and Solutions" below if you install ink cartridges, the RX700 must charge its ink delivery system. Tip: It's a good idea to check Epson's web site periodically for your product to your RX700. Setup and Software Installation Problems The Stylus Photo RX700 makes noise after ink cartridge installation. ■ When you...
... then turn it on. Solving Problems If you have a problem with your Stylus Photo RX700, check the messages on the RX700 screen, run a nozzle check (see page 72), or see if there is normal for the RX700 to make whirring sounds after you turn it on. ■ Make sure the... and Solutions" below if you install ink cartridges, the RX700 must charge its ink delivery system. Tip: It's a good idea to check Epson's web site periodically for your product to your RX700. Setup and Software Installation Problems The Stylus Photo RX700 makes noise after ink cartridge installation. ■ When you...

Basics
Page 76
... Bus (USB) Controller is the wrong size. ■ When you can use the Zoom In/Out settings to connect the RX700 at the correct time in Device Manager; See your Windows documentation or contact your system administrator for additional software installation steps. Make... on uninstalling the software. screen Reference Guide. see your software. You cancelled software installation or connected the Stylus Photo RX700 before installing the software. Your Epson software may not have software installation privileges. You need to adjust the size of the printed image.
... Bus (USB) Controller is the wrong size. ■ When you can use the Zoom In/Out settings to connect the RX700 at the correct time in Device Manager; See your Windows documentation or contact your system administrator for additional software installation steps. Make... on uninstalling the software. screen Reference Guide. see your software. You cancelled software installation or connected the Stylus Photo RX700 before installing the software. Your Epson software may not have software installation privileges. You need to adjust the size of the printed image.


