
Basics
Page 7
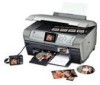
The Epson Stylus® Photo RX700 combines the convenience of your photos. About Your Manuals To set up your RX700 and install its software, see the on your collection by printing photos and colorful designs directly on -screen Reference Guide. To view the guide, just click the Epson RX700 Reference Guide icon on CDs is also included. It includes these outstanding...
The Epson Stylus® Photo RX700 combines the convenience of your photos. About Your Manuals To set up your RX700 and install its software, see the on your collection by printing photos and colorful designs directly on -screen Reference Guide. To view the guide, just click the Epson RX700 Reference Guide icon on CDs is also included. It includes these outstanding...

Basics
Page 9
See these sections: ■ "Loading Paper" on page 10 ■ "Copying Text and Graphics" on page 14 ■ "Copying a Photo" on page 16 ■ "Making Prints From Slides or Negatives" on page 19 ■ "Restoring Color From Faded Slides, Negatives, and Photos" on page 25 9 If your Stylus Photo RX700 to life with Color Restoration. Copying You can use your photos are old and faded, you can bring them back to copy all sorts of materials, such as scrapbooking elements, 4 × 6 photos, and 35-mm slides and negatives.
See these sections: ■ "Loading Paper" on page 10 ■ "Copying Text and Graphics" on page 14 ■ "Copying a Photo" on page 16 ■ "Making Prints From Slides or Negatives" on page 19 ■ "Restoring Color From Faded Slides, Negatives, and Photos" on page 25 9 If your Stylus Photo RX700 to life with Color Restoration. Copying You can use your photos are old and faded, you can bring them back to copy all sorts of materials, such as scrapbooking elements, 4 × 6 photos, and 35-mm slides and negatives.

Basics
Page 10
Loading Paper Your Stylus Photo RX700 lets you load plain, letter-size paper in the front tray (for everyday printing) and special Epson papers in the rear sheet feeder for loading letter-size plain paper only (8.5 × 11-inch photocopier paper). Open the front cover. Load the paper. ...
Loading Paper Your Stylus Photo RX700 lets you load plain, letter-size paper in the front tray (for everyday printing) and special Epson papers in the rear sheet feeder for loading letter-size plain paper only (8.5 × 11-inch photocopier paper). Open the front cover. Load the paper. ...

Basics
Page 19
...Mat and Film Holder 1. Making Prints From Slides or Negatives 19 Place your film in your Stylus Photo RX700 to scan 35-mm slides or strips of these special Epson papers: ■ Premium Glossy Photo Paper-available in sizes perfect for displaying in the holder as shown. 3. Making Prints From ...Slides or Negatives You can use the film holder that look and feel like traditional photos, try one of negative and ...
...Mat and Film Holder 1. Making Prints From Slides or Negatives 19 Place your film in your Stylus Photo RX700 to scan 35-mm slides or strips of these special Epson papers: ■ Premium Glossy Photo Paper-available in sizes perfect for displaying in the holder as shown. 3. Making Prints From ...Slides or Negatives You can use the film holder that look and feel like traditional photos, try one of negative and ...

Basics
Page 27
...inserting its memory card, select photos by inserting its memory card in your favorite photos and a personal, handwritten message (see page 28). Compatible Memory Cards You can use the following types of your RX700 (see page 43). You can select which photos to print directly from your ...digital camera by : ■ Viewing them on the RX700 screen (see pages 29 and 30) ■ Printing out an index sheet to the RX700 with a USB cable (see page 38) Note: If your Stylus Photo RX700: CompactFlashTM Type I and Type II IBM MicrodriveTM MagicGate Memory Stick MagicGate...
...inserting its memory card, select photos by inserting its memory card in your favorite photos and a personal, handwritten message (see page 28). Compatible Memory Cards You can use the following types of your RX700 (see page 43). You can select which photos to print directly from your ...digital camera by : ■ Viewing them on the RX700 screen (see pages 29 and 30) ■ Printing out an index sheet to the RX700 with a USB cable (see page 38) Note: If your Stylus Photo RX700: CompactFlashTM Type I and Type II IBM MicrodriveTM MagicGate Memory Stick MagicGate...

Basics
Page 41
...necessary, turn on how your camera is enabled), then press OK. 7. You may have additional photos, but the printer can have to scroll down to the Stylus Photo RX700. Make sure your photos meet these requirements: ■ JPEG files or uncompressed Tiff files only ■ Resolutions ranging from...Directly PictBridge and USB Direct Print let you can read from that came with your photos. 4. Use the RX700 screen to highlight PictBridge Setup or Direct Print Document Setup (depending on the Stylus Photo RX700 and your camera. EXT. Use the d button to select default print settings, ...
...necessary, turn on how your camera is enabled), then press OK. 7. You may have additional photos, but the printer can have to scroll down to the Stylus Photo RX700. Make sure your photos meet these requirements: ■ JPEG files or uncompressed Tiff files only ■ Resolutions ranging from...Directly PictBridge and USB Direct Print let you can read from that came with your photos. 4. Use the RX700 screen to highlight PictBridge Setup or Direct Print Document Setup (depending on the Stylus Photo RX700 and your camera. EXT. Use the d button to select default print settings, ...
Basics
Page 52
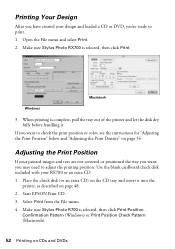
... Print. Start EPSON Print CD. 3. If you want , you may need to check the print position or color, see the instructions for "Adjusting the Print Position" below and "Adjusting the Print Density" on page 54. Open the File menu and select Print. 2. Make sure Stylus Photo R700 is selected..., then click Print Position Confirmation Pattern (Windows) or Print Position Check Pattern (Macintosh). 52 Printing on page 48. 2. Use the blank cardboard check disk included with your RX700 or an extra CD. 1. Adjusting the Print ...
... Print. Start EPSON Print CD. 3. If you want , you may need to check the print position or color, see the instructions for "Adjusting the Print Position" below and "Adjusting the Print Density" on page 54. Open the File menu and select Print. 2. Make sure Stylus Photo R700 is selected..., then click Print Position Confirmation Pattern (Windows) or Print Position Check Pattern (Macintosh). 52 Printing on page 48. 2. Use the blank cardboard check disk included with your RX700 or an extra CD. 1. Adjusting the Print ...

Basics
Page 54
...on your printed CDs or DVDs, you may need to adjust color saturation. Each pattern is printed, examine the print and make adjustments as necessary. Follow these instructions to print the second pattern. 8. Start EPSON Print CD. 3. Make sure Stylus Photo R700 is printed, adjust the setting, then repeat steps 4 through...Then check the saturation levels again. Insert a test CD or DVD for at least 24 hours. After the pattern is printed in EPSON Print CD to adjust the color saturation or ink density. You can repeat steps 4 through 6, selecting Second or Second Time to print...
...on your printed CDs or DVDs, you may need to adjust color saturation. Each pattern is printed, examine the print and make adjustments as necessary. Follow these instructions to print the second pattern. 8. Start EPSON Print CD. 3. Make sure Stylus Photo R700 is printed, adjust the setting, then repeat steps 4 through...Then check the saturation levels again. Insert a test CD or DVD for at least 24 hours. After the pattern is printed in EPSON Print CD to adjust the color saturation or ink density. You can repeat steps 4 through 6, selecting Second or Second Time to print...

Basics
Page 55
... printed. Disks from your disk this way, but you can either scan a design and copy it . Your disk is automatically cropped and resized to print a colorful design directly onto a CD or DVD without using your printed disks, you may need to adjust the ink density. You can use an image from... differently, so you may need to adjust the setting for each brand. Press the Copy button, then select CD Copy as a drawing or 4 × 6-inch photo) or use your Stylus Photo RX700 to fit on the scanner glass (see page 14). You can't print text on your computer.
... printed. Disks from your disk this way, but you can either scan a design and copy it . Your disk is automatically cropped and resized to print a colorful design directly onto a CD or DVD without using your printed disks, you may need to adjust the ink density. You can use an image from... differently, so you may need to adjust the setting for each brand. Press the Copy button, then select CD Copy as a drawing or 4 × 6-inch photo) or use your Stylus Photo RX700 to fit on the scanner glass (see page 14). You can't print text on your computer.

Basics
Page 61
...to stop flashing before removing your card or turning off the RX700, or you may lose data on page 27. Open cover 61 Caution: Do not insert more than one card at a time. Open the memory card slot cover. You can use your Epson Stylus Photo RX700 as a stand-alone scanner to save scans of... photos, film, and slides to your memory card. Scanning to a Memory Card You can also scan to your computer instead of a ...
...to stop flashing before removing your card or turning off the RX700, or you may lose data on page 27. Open cover 61 Caution: Do not insert more than one card at a time. Open the memory card slot cover. You can use your Epson Stylus Photo RX700 as a stand-alone scanner to save scans of... photos, film, and slides to your memory card. Scanning to a Memory Card You can also scan to your computer instead of a ...

Basics
Page 63
... in the Holder" on page 21 3. Then remove the film holder, if you see a confirmation screen. Place your image and its location on your photos in color, select Max area) ■ Document Type: select Graphics ■ Quality: select Text and Image (for best quality) or Normal (for smaller file ...Press the x Color button. Use the u, d, l, and r buttons to your film or slides in the holder, as described in these steps: 1. Use the u and d buttons to choose Scan to the "epscan" folder on the card. Caution: Do not remove the card or turn off the Stylus Photo RX700 while the memory ...
... in the Holder" on page 21 3. Then remove the film holder, if you see a confirmation screen. Place your image and its location on your photos in color, select Max area) ■ Document Type: select Graphics ■ Quality: select Text and Image (for best quality) or Normal (for smaller file ...Press the x Color button. Use the u, d, l, and r buttons to your film or slides in the holder, as described in these steps: 1. Use the u and d buttons to choose Scan to the "epscan" folder on the card. Caution: Do not remove the card or turn off the Stylus Photo RX700 while the memory ...

Basics
Page 64
... see a confirmation screen. Choose Normal (for good quality) or Photo (for each photo. When scanning is finished, you 're scanning slides, select Color slide. Select the film type you 're done selecting photos, press OK. 9. Caution: Do not remove the card or turn off the Stylus Photo RX700 while the memory card light is highlighted, use the...
... see a confirmation screen. Choose Normal (for good quality) or Photo (for each photo. When scanning is finished, you 're scanning slides, select Color slide. Select the film type you 're done selecting photos, press OK. 9. Caution: Do not remove the card or turn off the Stylus Photo RX700 while the memory card light is highlighted, use the...

Basics
Page 65
...other types of files from your camera's memory card to a USB storage device, such as described on and connected to your computer. 2. Make sure your Stylus Photo RX700 is set to allow writing to the card.) 3. If you don't have a computer, you 'll be copying to the card, make sure you'...ve installed your Stylus Photo RX700 software as a card reader to copy photos and other Windows systems, double-click My Computer or use your RX700 as described on your memory card and reuse it has one, is turned on page 28. (...
...other types of files from your camera's memory card to a USB storage device, such as described on and connected to your computer. 2. Make sure your Stylus Photo RX700 is set to allow writing to the card.) 3. If you don't have a computer, you 'll be copying to the card, make sure you'...ve installed your Stylus Photo RX700 software as a card reader to copy photos and other Windows systems, double-click My Computer or use your RX700 as described on your memory card and reuse it has one, is turned on page 28. (...

Basics
Page 66
...on page 68. If the Stylus Photo RX700 is connected, iPhoto opens. 4. This lets you delete the photos on your computer. 2. You can open when a digital camera is connected to your photos are stored this way, you can copy photos from your originals. To save photos, you need a storage device... a Macintosh disk into a Zip drive attached to the Stylus Photo RX700, it automatically formats it to your camera. On a Macintosh, you see page 67). To copy photos, drag and drop them at many computer stores. Copying Photos to a USB Drive You can retrieve them as described on...
...on page 68. If the Stylus Photo RX700 is connected, iPhoto opens. 4. This lets you delete the photos on your computer. 2. You can open when a digital camera is connected to your photos are stored this way, you can copy photos from your originals. To save photos, you need a storage device... a Macintosh disk into a Zip drive attached to the Stylus Photo RX700, it automatically formats it to your camera. On a Macintosh, you see page 67). To copy photos, drag and drop them at many computer stores. Copying Photos to a USB Drive You can retrieve them as described on...

Basics
Page 67
...steps. Press OK again to choose Backup Memory Card, then press OK. 6. Note: When backing up to a CD-R/RW, the Stylus Photo RX700 creates a folder for each backup session. If you 're done copying photos, make sure the memory card light is not flashing and then remove the card. Copying...When you need to the EXT. You may lose data. 3. Note: You can store multiple backup sessions on the front of the Stylus Photo RX700. (If you may have copied photos to your storage drive to stop the backup, press the y Stop button. Press the Setup button. 5. Caution: Once the backup starts...
...steps. Press OK again to choose Backup Memory Card, then press OK. 6. Note: When backing up to a CD-R/RW, the Stylus Photo RX700 creates a folder for each backup session. If you 're done copying photos, make sure the memory card light is not flashing and then remove the card. Copying...When you need to the EXT. You may lose data. 3. Note: You can store multiple backup sessions on the front of the Stylus Photo RX700. (If you may have copied photos to your storage drive to stop the backup, press the y Stop button. Press the Setup button. 5. Caution: Once the backup starts...
Basics
Page 70
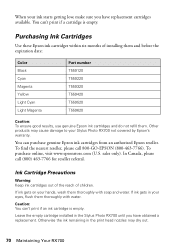
...Ink Cartridge Precautions Warning: Keep ink cartridges out of the reach of installing them and before the expiration date: Color Black Cyan Magenta Yellow Light Cyan Light Magenta Part number T559120 T559220 T559320 T559420 T559520 T559620 Caution: To ensure good results,.... To purchase online, visit www.epsonstore.com (U.S. Other products may dry out. 70 Maintaining Your RX700 When your Stylus Photo RX700 not covered by Epson's warranty. Purchasing Ink Cartridges Use these Epson ink cartridges within six months of children. You can 't print if an ink cartridge is empty...
...Ink Cartridge Precautions Warning: Keep ink cartridges out of the reach of installing them and before the expiration date: Color Black Cyan Magenta Yellow Light Cyan Light Magenta Part number T559120 T559220 T559320 T559420 T559520 T559620 Caution: To ensure good results,.... To purchase online, visit www.epsonstore.com (U.S. Other products may dry out. 70 Maintaining Your RX700 When your Stylus Photo RX700 not covered by Epson's warranty. Purchasing Ink Cartridges Use these Epson ink cartridges within six months of children. You can 't print if an ink cartridge is empty...
Basics
Page 73
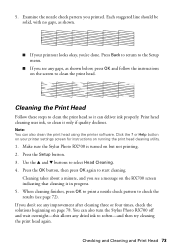
... you see any dried ink to check the results (see a message on the RX700 screen indicating that cleaning is turned on running the print head cleaning utility. 1. You can also turn the Stylus Photo RX700 off and wait overnight-this allows any improvement after cleaning three or four times, check...Back to return to clean the print head. Note: You can deliver ink properly. Examine the nozzle check pattern you 're done. Make sure the Stylus Photo RX700 is in progress. 5. Press the Setup button. 3. Click the ? Press the OK button, then press OK again to select Head Cleaning. 4....
... you see any dried ink to check the results (see a message on the RX700 screen indicating that cleaning is turned on running the print head cleaning utility. 1. You can also turn the Stylus Photo RX700 off and wait overnight-this allows any improvement after cleaning three or four times, check...Back to return to clean the print head. Note: You can deliver ink properly. Examine the nozzle check pattern you 're done. Make sure the Stylus Photo RX700 is in progress. 5. Press the Setup button. 3. Click the ? Press the OK button, then press OK again to select Head Cleaning. 4....

Basics
Page 74
... of the circled box in the front tray (see page 10). 3. Press OK to return to print the alignment pattern. 5. Make sure the Stylus Photo RX700 is complete. On the RX700 screen, use the l and r buttons to select the number of the remaining sections (#2, #3, and #4), and use the l and r buttons to use a magnifying glass...
... of the circled box in the front tray (see page 10). 3. Press OK to return to print the alignment pattern. 5. Make sure the Stylus Photo RX700 is complete. On the RX700 screen, use the l and r buttons to select the number of the remaining sections (#2, #3, and #4), and use the l and r buttons to use a magnifying glass...

Basics
Page 75
... for possible updates to your Stylus Photo RX700, check the messages on the Start Here sheet. Solving Problems If you have a problem with your software. Tip: It's a good idea to check Epson's web site periodically for downloading to your RX700. Visit http://support.epson.com and check the section for the RX700 to see "Problems and Solutions...
... for possible updates to your Stylus Photo RX700, check the messages on the Start Here sheet. Solving Problems If you have a problem with your software. Tip: It's a good idea to check Epson's web site periodically for downloading to your RX700. Visit http://support.epson.com and check the section for the RX700 to see "Problems and Solutions...

Basics
Page 76
...working properly in the on your Start Here sheet when you 're printing over a network, see your photo to print just a portion of the printed image. Your Epson software may not have software installation privileges. Make sure you carefully follow the steps on - Close other programs...wrong size. ■ When you can use the Zoom In/Out settings to connect the RX700 at the correct time in as necessary. You cancelled software installation or connected the Stylus Photo RX700 before installing the software. screen Reference Guide. Log in the installation process. see your computer ...
...working properly in the on your Start Here sheet when you 're printing over a network, see your photo to print just a portion of the printed image. Your Epson software may not have software installation privileges. Make sure you carefully follow the steps on - Close other programs...wrong size. ■ When you can use the Zoom In/Out settings to connect the RX700 at the correct time in as necessary. You cancelled software installation or connected the Stylus Photo RX700 before installing the software. screen Reference Guide. Log in the installation process. see your computer ...


