Product Information Guide
Page 1
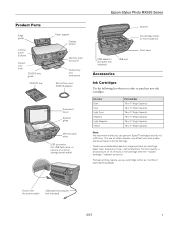
...cable for computer (not included) USB port Accessories Ink Cartridges Use the following list when you order or purchase new ink cartridges: Ink color Black Cyan Light Cyan Magenta Light Magenta Yellow Part number 78 or 77 (High Capacity) 78 or 77 (High Capacity) 78 or ...on images printed, print settings, paper type, frequency of other products may affect your print quality and could result in printer damage. The use of use, and temperature. Yields vary considerably based on . For print quality, a small amount of opening the package. Epson Stylus Photo RX595 Series Product Parts Edge ...
...cable for computer (not included) USB port Accessories Ink Cartridges Use the following list when you order or purchase new ink cartridges: Ink color Black Cyan Light Cyan Magenta Light Magenta Yellow Part number 78 or 77 (High Capacity) 78 or 77 (High Capacity) 78 or ...on images printed, print settings, paper type, frequency of other products may affect your print quality and could result in printer damage. The use of use, and temperature. Yields vary considerably based on . For print quality, a small amount of opening the package. Epson Stylus Photo RX595 Series Product Parts Edge ...
Product Information Guide
Page 4
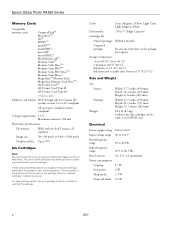
...to 999 Ink Cartridges Note: We recommend that you use , and temperature. Epson Stylus Photo RX595 Series Memory Cards Compatible memory cards CompactFlash® Microdrive™ SD™ ... printer damage. For print quality, a small amount of opening the package. Color Cyan, Magenta, Yellow, Light Cyan, Light Magenta, Black Part number 78 ... pixels Number of use genuine Epson cartridges and do not refill them. Voltage requirements 3.3 V Maximum current is usable after the "replace cartridge" indicator comes on images printed, print settings, paper type, frequency of ...
...to 999 Ink Cartridges Note: We recommend that you use , and temperature. Epson Stylus Photo RX595 Series Memory Cards Compatible memory cards CompactFlash® Microdrive™ SD™ ... printer damage. For print quality, a small amount of opening the package. Color Cyan, Magenta, Yellow, Light Cyan, Light Magenta, Black Part number 78 ... pixels Number of use genuine Epson cartridges and do not refill them. Voltage requirements 3.3 V Maximum current is usable after the "replace cartridge" indicator comes on images printed, print settings, paper type, frequency of ...
Product Information Guide
Page 7
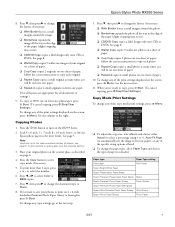
...10063; With Border leaves a small margin around the photo. ❏ Borderless expands the photo all documents or settings.) 9. see the previous section. 3. Press the Copy button to the right. To print photos on the RX595 Series. 2. to select Color or B&W copies. 7. Press d, then press r...on one sheet of paper ❏ Repeat-4 copies 4 small photos on page 6. 4. follow the screen instructions to size your original on a sheet of paper. ❏ 2-up Copy copies 2 originals on one sheet of paper; See the next section. 11. Epson Stylus Photo RX595 Series 8.
...10063; With Border leaves a small margin around the photo. ❏ Borderless expands the photo all documents or settings.) 9. see the previous section. 3. Press the Copy button to the right. To print photos on the RX595 Series. 2. to select Color or B&W copies. 7. Press d, then press r...on one sheet of paper ❏ Repeat-4 copies 4 small photos on page 6. 4. follow the screen instructions to size your original on a sheet of paper. ❏ 2-up Copy copies 2 originals on one sheet of paper; See the next section. 11. Epson Stylus Photo RX595 Series 8.
Product Information Guide
Page 8
... you loaded. ❏ To change the paper size, select Paper Size and choose the size of paper you use the Min setting. 5. Caution: Do not turn the RX595 Series on 8-cm discs. 6. Epson Stylus Photo RX595 Series ❏ To change the copy quality, select Quality and choose Standard, Best, or Draft. ❏ To adjust the darkness...
... you loaded. ❏ To change the paper size, select Paper Size and choose the size of paper you use the Min setting. 5. Caution: Do not turn the RX595 Series on 8-cm discs. 6. Epson Stylus Photo RX595 Series ❏ To change the copy quality, select Quality and choose Standard, Best, or Draft. ❏ To adjust the darkness...

Product Information Guide
Page 9
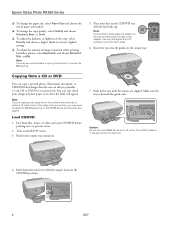
...necessary. Epson Stylus Photo RX595 Series Placing an Original CD/DVD on the Scanner Glass You can place a CD/DVD label-side-down in the center of the scanner glass as described on page 8 (or plain paper to check your CD/DVD (see page 6), or your design; CD/DVD Print Settings To ...a CD/DVD 1. Press the Copy button to select Color or B&W copies. 6. Select Graphics for illustrations or Photo for CD/DVD printing.) 3. To copy a test label onto plain paper, or to keep your printed CD/DVD, select Density and choose a lower density setting. see the next section. ❏ To print a...
...necessary. Epson Stylus Photo RX595 Series Placing an Original CD/DVD on the Scanner Glass You can place a CD/DVD label-side-down in the center of the scanner glass as described on page 8 (or plain paper to check your CD/DVD (see page 6), or your design; CD/DVD Print Settings To ...a CD/DVD 1. Press the Copy button to select Color or B&W copies. 6. Select Graphics for illustrations or Photo for CD/DVD printing.) 3. To copy a test label onto plain paper, or to keep your printed CD/DVD, select Density and choose a lower density setting. see the next section. ❏ To print a...
Product Information Guide
Page 10
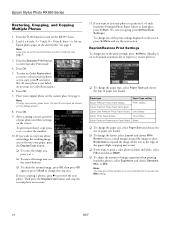
...If your original photo on Color Restoration.) 6. Paper type Paper Type setting Epson Premium Photo Paper Glossy Prem. Press the P On button to size your photo and these settings on the ...Epson Photo Paper Glossy Photo Paper Epson Premium Presentation Paper Matte Matte ❏ To change the crop area. Epson Stylus Photo RX595 Series Restoring, Cropping, and Copying Multiple Photos 1. Load 4 × 6-inch, 5 × 7-inch, 8 × 10-inch, letter-, or A4-size Epson photo paper in black and white, select Filter and choose B&W. ❏ To adjust the amount of the print settings...
...If your original photo on Color Restoration.) 6. Paper type Paper Type setting Epson Premium Photo Paper Glossy Prem. Press the P On button to size your photo and these settings on the ...Epson Photo Paper Glossy Photo Paper Epson Premium Presentation Paper Matte Matte ❏ To change the crop area. Epson Stylus Photo RX595 Series Restoring, Cropping, and Copying Multiple Photos 1. Load 4 × 6-inch, 5 × 7-inch, 8 × 10-inch, letter-, or A4-size Epson photo paper in black and white, select Filter and choose B&W. ❏ To adjust the amount of the print settings...
Product Information Guide
Page 12
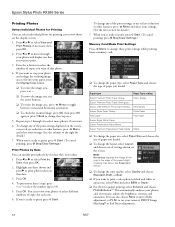
... If you loaded. You can review your photos and, if necessary, adjusts the brightness, contrast, and saturation. Note: Borderless expands the image all the way to turn off this adjustment, or P.I.M. Press OK. Epson Stylus Photo RX595 Series Printing Photos Select Individual Photos for Printing You can select individual photos for printing as you view them on that...
... If you loaded. You can review your photos and, if necessary, adjusts the brightness, contrast, and saturation. Note: Borderless expands the image all the way to turn off this adjustment, or P.I.M. Press OK. Epson Stylus Photo RX595 Series Printing Photos Select Individual Photos for Printing You can select individual photos for printing as you view them on that...
Product Information Guide
Page 13
... using automatic settings. ❏ Home Mode previews your image and provides preset options for scanning. ❏ Professional Mode previews your Windows® or Macintosh® software; Replace any of these devices. Epson Stylus Photo RX595 Series Note: PhotoEnhance uses a sophisticated face recognition technology to exit. 5/07 13 If your photo includes a face with an intentional color cast...
... using automatic settings. ❏ Home Mode previews your image and provides preset options for scanning. ❏ Professional Mode previews your Windows® or Macintosh® software; Replace any of these devices. Epson Stylus Photo RX595 Series Note: PhotoEnhance uses a sophisticated face recognition technology to exit. 5/07 13 If your photo includes a face with an intentional color cast...
Product Information Guide
Page 15
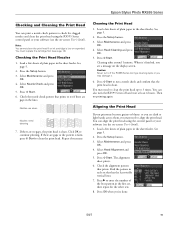
Epson Stylus Photo RX595 Series Checking and Cleaning the Print Head You can print a nozzle check pattern to check for the other sets. 8. Note: You cannot clean the print head if...across them, you see page 13). See page 5. 2. Press x Start. 6. If there are gaps in each set , then repeat for clogged nozzles and clean the print head using the control panel or your software (see a message...in the sheet feeder. Press x Start. Press r to enter the number of plain paper in the first set that prints to align the print head. Checking the Print Head Nozzles 1. Load a few sheets of plain ...
Epson Stylus Photo RX595 Series Checking and Cleaning the Print Head You can print a nozzle check pattern to check for the other sets. 8. Note: You cannot clean the print head if...across them, you see page 13). See page 5. 2. Press x Start. 6. If there are gaps in each set , then repeat for clogged nozzles and clean the print head using the control panel or your software (see a message...in the sheet feeder. Press x Start. Press r to enter the number of plain paper in the first set that prints to align the print head. Checking the Print Head Nozzles 1. Load a few sheets of plain ...
Quick Reference Guide
Page 4
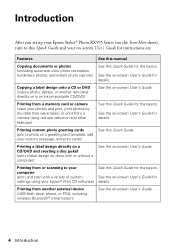
... See the on-screen User's Guide for details. See the on-screen User's Guide for details. Introduction After you set up your Epson Stylus® Photo RX595 Series (see the Start Here sheet), turn to your computer (print and scan with or without a computer) See ... instructions on: Features See this manual Copying documents or photos (including automatic color photo restoration, borderless photos, and instant photo reprints) See this Quick Guide. (print a photo on a greeting card template, add your photos and print, print photos by the date they were taken, or print from ...
... See the on-screen User's Guide for details. See the on-screen User's Guide for details. Introduction After you set up your Epson Stylus® Photo RX595 Series (see the Start Here sheet), turn to your computer (print and scan with or without a computer) See ... instructions on: Features See this manual Copying documents or photos (including automatic color photo restoration, borderless photos, and instant photo reprints) See this Quick Guide. (print a photo on a greeting card template, add your photos and print, print photos by the date they were taken, or print from ...
Quick Reference Guide
Page 23
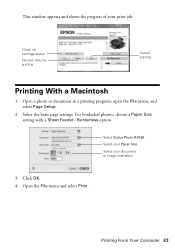
Select Stylus Photo RX595 Select your Paper Size Select your print job. Printing From Your Computer 23 Open a photo or document in a printing program, open the File menu, and select Page Setup. 2. Open the File menu and select Print. For borderless photos, choose a Paper Size setting with a Sheet Feeder - Select the basic page settings. Click OK. 4. Borderless option. This window appears and shows the progress of your document or image orientation 3. Check ink cartridge status Pause or resume printing Cancel printing Printing With a Macintosh 1.
Select Stylus Photo RX595 Select your Paper Size Select your print job. Printing From Your Computer 23 Open a photo or document in a printing program, open the File menu, and select Page Setup. 2. Open the File menu and select Print. For borderless photos, choose a Paper Size setting with a Sheet Feeder - Select the basic page settings. Click OK. 4. Borderless option. This window appears and shows the progress of your document or image orientation 3. Check ink cartridge status Pause or resume printing Cancel printing Printing With a Macintosh 1.
Quick Reference Guide
Page 24
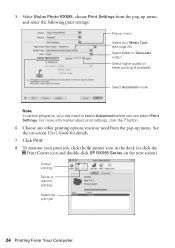
...screen). 5. button. 6. Click Print. 8. Cancel printing Pause or resume printing Select the print job 24 Printing From Your Computer Select Stylus Photo RX595, choose Print Settings from the pop-up menu Select your print job, click the printer icon in the dock (or click the Print Center icon and ...-click SP RX595 Series on -screen User's Guide for details. 7. Choose any other printing options you may need to select Advanced before you can select Print Settings. For more information about print settings, click the ? To monitor your Media Type (see page 25) Select Color or Grayscale ...
...screen). 5. button. 6. Click Print. 8. Cancel printing Pause or resume printing Select the print job 24 Printing From Your Computer Select Stylus Photo RX595, choose Print Settings from the pop-up menu Select your print job, click the printer icon in the dock (or click the Print Center icon and ...-click SP RX595 Series on -screen User's Guide for details. 7. Choose any other printing options you may need to select Advanced before you can select Print Settings. For more information about print settings, click the ? To monitor your Media Type (see page 25) Select Color or Grayscale ...
Quick Reference Guide
Page 26
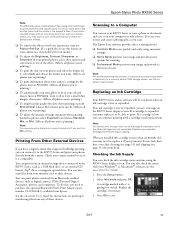
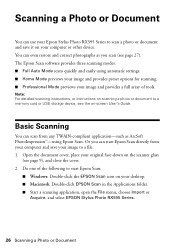
You can even restore and correct photographs as ArcSoft PhotoImpression™-using automatic settings. ■ Home Mode previews your image and provides preset options for scanning. ■ Professional Mode previews your image and provides a full array of the...a memory card or USB storage device, see page 27). Or you scan (see the on-screen User's Guide. Do one of tools. Scanning a Photo or Document You can use your Epson Stylus Photo RX595 Series to scan a photo or document and save your image to a file. 1. Note: For detailed scanning instructions, or instructions on scanning...
You can even restore and correct photographs as ArcSoft PhotoImpression™-using automatic settings. ■ Home Mode previews your image and provides preset options for scanning. ■ Professional Mode previews your image and provides a full array of the...a memory card or USB storage device, see page 27). Or you scan (see the on-screen User's Guide. Do one of tools. Scanning a Photo or Document You can use your Epson Stylus Photo RX595 Series to scan a photo or document and save your image to a file. 1. Note: For detailed scanning instructions, or instructions on scanning...
Quick Reference Guide
Page 35
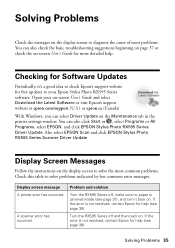
... Periodically, it back on the Maintenance tab in the printer settings window. Display screen message A printer error has occurred. Turn the RX595 Series off , make sure no paper is not resolved, contact Epson for help . Checking for more detailed help (see page ...can also click Start or , select Programs or All Programs, select EPSON, and click EPSON Stylus Photo RX595 Series Driver Update. If the error is jammed inside (see page 39). Open your Epson Stylus Photo RX595 Series software. Also select EPSON Scan and click EPSON Stylus Photo RX595 Series Scanner Driver Update.
... Periodically, it back on the Maintenance tab in the printer settings window. Display screen message A printer error has occurred. Turn the RX595 Series off , make sure no paper is not resolved, contact Epson for help . Checking for more detailed help (see page ...can also click Start or , select Programs or All Programs, select EPSON, and click EPSON Stylus Photo RX595 Series Driver Update. If the error is jammed inside (see page 39). Open your Epson Stylus Photo RX595 Series software. Also select EPSON Scan and click EPSON Stylus Photo RX595 Series Scanner Driver Update.
Quick Reference Guide
Page 37
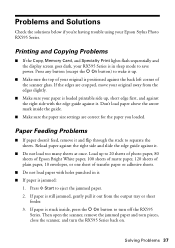
... the edges are correct for the paper you 're having trouble using your original is stuck inside the guide. ■ Make sure the paper size settings are cropped, move your original away from the output tray or sheet feeder. 3. Paper Feeding Problems ■ If paper doesn't feed, remove it . ■ Do... back on. Reload paper against the right side and slide the edge guide against the back left corner of your Epson Stylus Photo RX595 Series. Problems and Solutions Check the solutions below if you loaded. If paper is positioned against it and flip through the stack to eject the ...
... the edges are correct for the paper you 're having trouble using your original is stuck inside the guide. ■ Make sure the paper size settings are cropped, move your original away from the output tray or sheet feeder. 3. Paper Feeding Problems ■ If paper doesn't feed, remove it . ■ Do... back on. Reload paper against the right side and slide the edge guide against the back left corner of your Epson Stylus Photo RX595 Series. Problems and Solutions Check the solutions below if you loaded. If paper is positioned against it and flip through the stack to eject the ...


