Product Information Guide
Page 1
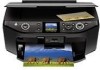
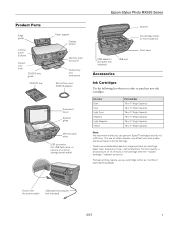
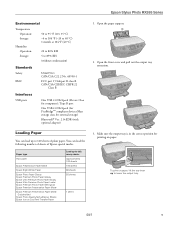
... amount of use genuine Epson® cartridges and do not refill them. Power inlet (for power cable) USB cable for computer (not included) USB port Accessories Ink Cartridges Use the following list when you order or purchase new ink cartridges: Ink color Black Cyan Light Cyan ... (High Capacity) 78 or 77 (High Capacity) Note: We recommend that you use , and temperature. For best printing results, use of opening the package. Epson Stylus Photo RX595 Series Product Parts Edge guide Control panel buttons Output tray lever CD/DVD tray guide CD/DVD tray Paper support Display ...
... amount of use genuine Epson® cartridges and do not refill them. Power inlet (for power cable) USB cable for computer (not included) USB port Accessories Ink Cartridges Use the following list when you order or purchase new ink cartridges: Ink color Black Cyan Light Cyan ... (High Capacity) 78 or 77 (High Capacity) Note: We recommend that you use , and temperature. For best printing results, use of opening the package. Epson Stylus Photo RX595 Series Product Parts Edge guide Control panel buttons Output tray lever CD/DVD tray guide CD/DVD tray Paper support Display ...
Product Information Guide
Page 3
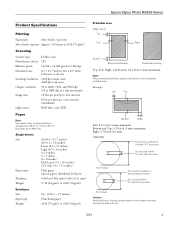
...3.2 inch (80 mm) area Do not print within 0.7 inch (18 mm) area 8 cm discs Caution: Avoid printing in the expanded printable area. Epson Stylus Photo RX595 Series Product Specifications Printing Paper path Sheet feeder, top entry Sheet... feeder capacity Approx. 120 sheets at 20 lb (75 g/m2) Scanning Scanner type Photoelectric device Effective pixels Document size Scanning resolution Output resolution Image data Light source Flatbed color...
...3.2 inch (80 mm) area Do not print within 0.7 inch (18 mm) area 8 cm discs Caution: Avoid printing in the expanded printable area. Epson Stylus Photo RX595 Series Product Specifications Printing Paper path Sheet feeder, top entry Sheet... feeder capacity Approx. 120 sheets at 20 lb (75 g/m2) Scanning Scanner type Photoelectric device Effective pixels Document size Scanning resolution Output resolution Image data Light source Flatbed color...
Product Information Guide
Page 4
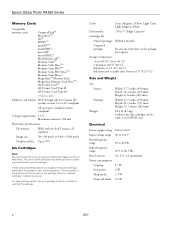
...49.5 to 999 Ink Cartridges Note: We recommend that you use of ink remains in printer damage. For best printing results, use , and temperature. Color Cyan, Magenta, Yellow, Light Cyan, Light Magenta, Black Part number 78 or 77 (High Capacity) Cartridge life ...on images printed, print settings, paper type, frequency of use up a cartridge within six months of files: Up to 60.5 Hz 0.6 A (1.2 A maximum) 15 W 4W 1.3 W 0.2 W 4 5/07 Voltage requirements 3.3 V Maximum current is usable after the "replace cartridge" indicator comes on. Epson Stylus Photo RX595 Series Memory ...
...49.5 to 999 Ink Cartridges Note: We recommend that you use of ink remains in printer damage. For best printing results, use , and temperature. Color Cyan, Magenta, Yellow, Light Cyan, Light Magenta, Black Part number 78 or 77 (High Capacity) Cartridge life ...on images printed, print settings, paper type, frequency of use up a cartridge within six months of files: Up to 60.5 Hz 0.6 A (1.2 A maximum) 15 W 4W 1.3 W 0.2 W 4 5/07 Voltage requirements 3.3 V Maximum current is usable after the "replace cartridge" indicator comes on. Epson Stylus Photo RX595 Series Memory ...
Product Information Guide
Page 5
...Epson Presentation Paper Matte Epson Bright White Paper Epson Photo Paper Glossy Epson Premium Photo Paper Glossy Epson Ultra Premium Photo Paper Glossy Epson Ultra Premium Photo Paper Luster Epson Premium Photo Paper Semi-gloss Epson Premium Presentation Paper Matte Epson Premium Presentation Paper Matte Double-sided Epson Photo Quality Self-adhesive Sheets Epson Iron-on paper. To print... Hi-Speed (for PictBridge™ compliant devices/Mass storage class for computers); Epson Stylus Photo RX595 Series Environmental Temperature Operation: Storage: Humidity Operation: Storage: 50 to 95 ...
...Epson Presentation Paper Matte Epson Bright White Paper Epson Photo Paper Glossy Epson Premium Photo Paper Glossy Epson Ultra Premium Photo Paper Glossy Epson Ultra Premium Photo Paper Luster Epson Premium Photo Paper Semi-gloss Epson Premium Presentation Paper Matte Epson Premium Presentation Paper Matte Double-sided Epson Photo Quality Self-adhesive Sheets Epson Iron-on paper. To print... Hi-Speed (for PictBridge™ compliant devices/Mass storage class for computers); Epson Stylus Photo RX595 Series Environmental Temperature Operation: Storage: Humidity Operation: Storage: 50 to 95 ...
Product Information Guide
Page 6
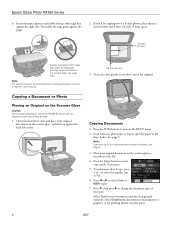
...see page 5. 3. To print more than 1 copy, press + or - Press d, then press r to enter copy mode, if necessary. 5. Insert the paper, glossy or printable side up to select Color or B&W copies. 7. Copying Documents 1. Load letter-size plain paper or Epson specialty paper in the ... inch (5 mm) apart. 1/4 inch (5 mm) Always load paper short edge first, even for landscape printing. to select the number (up , short edge first, against the right side. Epson Stylus Photo RX595 Series 4. Note: For details on paper and instructions on the scanner glass, with the top against the ...
...see page 5. 3. To print more than 1 copy, press + or - Press d, then press r to enter copy mode, if necessary. 5. Insert the paper, glossy or printable side up to select Color or B&W copies. 7. Copying Documents 1. Load letter-size plain paper or Epson specialty paper in the ... inch (5 mm) apart. 1/4 inch (5 mm) Always load paper short edge first, even for landscape printing. to select the number (up , short edge first, against the right side. Epson Stylus Photo RX595 Series 4. Note: For details on paper and instructions on the scanner glass, with the top against the ...
Product Information Guide
Page 7
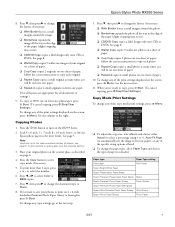
Epson Stylus Photo RX595 Series 8. Press the P On button to select Color or B&W copies. 7. Load 4 × 6-inch, 5 × 7-inch, 8 × 10-inch, letter-, or A4-size Epson photo paper in the sheet feeder. See page 5. Note: Load only up to copy each original. ❏ Repeat Copy copies a small original... Type and choose the type of paper you 're ready to copy, press x Start. (To cancel copying, press y Stop/Clear Settings.) Copy Mode Print Settings To change any of paper. 10. To change the layout, if necessary. ❏ With Border leaves a small margin around the image. ❏...
Epson Stylus Photo RX595 Series 8. Press the P On button to select Color or B&W copies. 7. Load 4 × 6-inch, 5 × 7-inch, 8 × 10-inch, letter-, or A4-size Epson photo paper in the sheet feeder. See page 5. Note: Load only up to copy each original. ❏ Repeat Copy copies a small original... Type and choose the type of paper you 're ready to copy, press x Start. (To cancel copying, press y Stop/Clear Settings.) Copy Mode Print Settings To change any of paper. 10. To change the layout, if necessary. ❏ With Border leaves a small margin around the image. ❏...
Product Information Guide
Page 8
... guide rails. Caution: Do not turn the RX595 Series on plain paper to within 0.16 inch (4 mm) of the edge of image expansion when printing borderless photos, select Expansion and choose Standard, Min, or Mid. You can copy a printed photo, illustration, document, or CD/DVD label design... may see how the label will appear. Place your printed photo if you may need to prevent errors. 2. Load CD/DVD 1. Note: For small 8-cm discs, place the adapter on the RX595 Series. 3. Always remove the disc first. 4. Epson Stylus Photo RX595 Series ❏ To change the paper size, select ...
... guide rails. Caution: Do not turn the RX595 Series on plain paper to within 0.16 inch (4 mm) of the edge of image expansion when printing borderless photos, select Expansion and choose Standard, Min, or Mid. You can copy a printed photo, illustration, document, or CD/DVD label design... may see how the label will appear. Place your printed photo if you may need to prevent errors. 2. Load CD/DVD 1. Note: For small 8-cm discs, place the adapter on the RX595 Series. 3. Always remove the disc first. 4. Epson Stylus Photo RX595 Series ❏ To change the paper size, select ...

Product Information Guide
Page 9
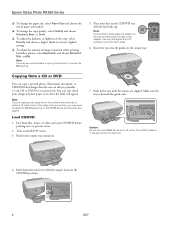
... cover gently to keep your design onto a CD or DVD, press x Start. To print more than 1 copy, press + or - Press l or r to enter copy mode, if necessary. 4. To copy your CD/DVD in place. Epson Stylus Photo RX595 Series Placing an Original CD/DVD on the Scanner Glass You can place a CD/DVD... paper to check your design; Place your original CD/DVD label-side-down on your RX595 Series to print a design directly onto ink jet-printable CDs or DVDs to create a custom label. Press the Copy button to select Color or B&W copies. 6. Press d, then press r to change the layout to change...
... cover gently to keep your design onto a CD or DVD, press x Start. To print more than 1 copy, press + or - Press l or r to enter copy mode, if necessary. 4. To copy your CD/DVD in place. Epson Stylus Photo RX595 Series Placing an Original CD/DVD on the Scanner Glass You can place a CD/DVD... paper to check your design; Place your original CD/DVD label-side-down on your RX595 Series to print a design directly onto ink jet-printable CDs or DVDs to create a custom label. Press the Copy button to select Color or B&W copies. 6. Press d, then press r to change the layout to change...
Product Information Guide
Page 10
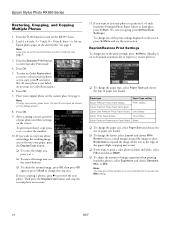
...change any of paper you copy, press r and select On. (If your printed photo if you want to size your photos to restore colors in the sheet feeder. Glossy Epson Premium Photo Paper Semi-gloss Epson Ultra Premium Photo Paper Glossy Ultra Glossy Epson Photo Paper Glossy Photo Paper Epson Premium Presentation Paper Matte Matte ❏ To change the paper size, select... to the edge of the paper (slight cropping may see white borders on the screen, press x Menu and see a preview of sheets. See page 5. 3. Epson Stylus Photo RX595 Series Restoring, Cropping, and Copying Multiple...
...change any of paper you copy, press r and select On. (If your printed photo if you want to size your photos to restore colors in the sheet feeder. Glossy Epson Premium Photo Paper Semi-gloss Epson Ultra Premium Photo Paper Glossy Ultra Glossy Epson Photo Paper Glossy Photo Paper Epson Premium Presentation Paper Matte Matte ❏ To change the paper size, select... to the edge of the paper (slight cropping may see white borders on the screen, press x Menu and see a preview of sheets. See page 5. 3. Epson Stylus Photo RX595 Series Restoring, Cropping, and Copying Multiple...
Product Information Guide
Page 11
...light Caution: Do not remove a card or turn off the RX595 Series when the memory card access light is one of files JPEG with your RX595 Series. Epson Stylus Photo RX595 Series Printing From a Memory Card You can print photos directly from your digital camera's memory card by the date they ...were taken. File format Image size Number of the RX595 Series memory card slots. Insert your card...
...light Caution: Do not remove a card or turn off the RX595 Series when the memory card access light is one of files JPEG with your RX595 Series. Epson Stylus Photo RX595 Series Printing From a Memory Card You can print photos directly from your digital camera's memory card by the date they ...were taken. File format Image size Number of the RX595 Series memory card slots. Insert your card...
Product Information Guide
Page 12
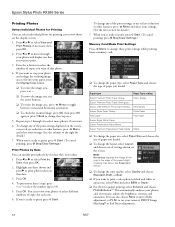
... image all the way to print a color photo in black and white or sepia tone, select Filter and select B&W or Sepia. ❏ For the best quality printing, select Enhance and choose PhotoEnhance.™ This automatically analyzes your photos and, if necessary, adjusts ...brightness, contrast, and saturation. see Expansion below). ❏ To change any of the print settings displayed on the display screen. 1. Epson Stylus Photo RX595 Series Printing Photos Select Individual Photos for Printing You can review your photos or select different numbers of copies for each one. 6. Press l or r to...
... image all the way to print a color photo in black and white or sepia tone, select Filter and select B&W or Sepia. ❏ For the best quality printing, select Enhance and choose PhotoEnhance.™ This automatically analyzes your photos and, if necessary, adjusts ...brightness, contrast, and saturation. see Expansion below). ❏ To change any of the print settings displayed on the display screen. 1. Epson Stylus Photo RX595 Series Printing Photos Select Individual Photos for Printing You can review your photos or select different numbers of copies for each one. 6. Press l or r to...
Product Information Guide
Page 13
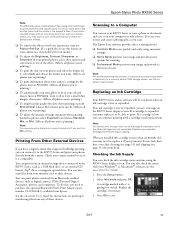
... feature on your camera too, if included with an intentional color cast, such as a USB flash drive, or an external CD burner, Zip® drive, or magneto-optical drive. Epson Stylus Photo RX595 Series Note: PhotoEnhance uses a sophisticated face recognition technology to optimize photos that supports PictBridge printing, you can check the ink cartridge status anytime using...
... feature on your camera too, if included with an intentional color cast, such as a USB flash drive, or an external CD burner, Zip® drive, or magneto-optical drive. Epson Stylus Photo RX595 Series Note: PhotoEnhance uses a sophisticated face recognition technology to optimize photos that supports PictBridge printing, you can check the ink cartridge status anytime using...
Product Information Guide
Page 14
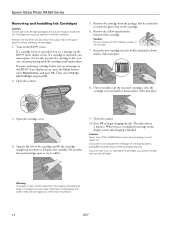
Epson Stylus Photo RX595 Series Removing and Installing Ink Cartridges Caution: Do not open ink cartridge packages until you are vacuum packed to maintain reliability. If you're replacing a cartridge before replacing ink cartridges. 1. Open the cartridge cover. 4. Caution: Never turn off the RX595 Series while ink is low, you can continue printing... from the package, but be able to install the ink. This takes about 2 minutes. Cartridges are ready to print. Remove the cartridge from the bottom of children. 14 5/07 Dispose of it . 9. If ink gets into ...
Epson Stylus Photo RX595 Series Removing and Installing Ink Cartridges Caution: Do not open ink cartridge packages until you are vacuum packed to maintain reliability. If you're replacing a cartridge before replacing ink cartridges. 1. Open the cartridge cover. 4. Caution: Never turn off the RX595 Series while ink is low, you can continue printing... from the package, but be able to install the ink. This takes about 2 minutes. Cartridges are ready to print. Remove the cartridge from the bottom of children. 14 5/07 Dispose of it . 9. If ink gets into ...
Product Information Guide
Page 15
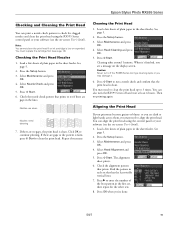
... you may damage it 's finished, you 're done. 5/07 15 See page 5. 2. Select Head Alignment and press OK. 5. Epson Stylus Photo RX595 Series Checking and Cleaning the Print Head You can align the print head using the RX595 Series control panel or your software (see the on-screen User's Guide). You must replace the cartridge first (see...
... you may damage it 's finished, you 're done. 5/07 15 See page 5. 2. Select Head Alignment and press OK. 5. Epson Stylus Photo RX595 Series Checking and Cleaning the Print Head You can align the print head using the RX595 Series control panel or your software (see the on-screen User's Guide). You must replace the cartridge first (see...
Product Information Guide
Page 16
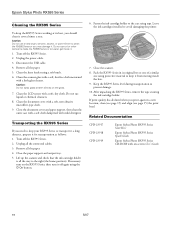
... print head. Fasten the ink cartridge holder to clean the RX595 Series or you should clean it from moving inside it . Caution: Do not use a hard brush, benzine, alcohol, or paint thinner to the case using a soft brush. 6. Disconnect the USB cable. 4. Do not use liquid or chemical cleansers. 8. Epson Stylus Photo RX595 Series Cleaning the RX595...
... print head. Fasten the ink cartridge holder to clean the RX595 Series or you should clean it from moving inside it . Caution: Do not use a hard brush, benzine, alcohol, or paint thinner to the case using a soft brush. 6. Disconnect the USB cable. 4. Do not use liquid or chemical cleansers. 8. Epson Stylus Photo RX595 Series Cleaning the RX595...
Quick Reference Guide
Page 1
Quick Guide Basic Copying, Printing, and Scanning Maintaining Your All-in-One Solving Problems
Quick Guide Basic Copying, Printing, and Scanning Maintaining Your All-in-One Solving Problems
Quick Reference Guide
Page 2
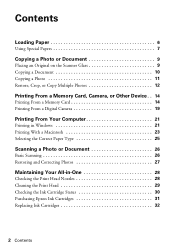
... Your Computer 21 Printing in Windows 21 Printing With a Macintosh 23 Selecting the Correct Paper Type 25 Scanning a Photo or Document 26 Basic Scanning 26 Restoring and Correcting Photos 27 Maintaining Your All-in-One 28 Checking the Print Head Nozzles 28 Cleaning the Print Head 29 Checking the Ink Cartridge Status 30 Purchasing Epson Ink Cartridges...
... Your Computer 21 Printing in Windows 21 Printing With a Macintosh 23 Selecting the Correct Paper Type 25 Scanning a Photo or Document 26 Basic Scanning 26 Restoring and Correcting Photos 27 Maintaining Your All-in-One 28 Checking the Print Head Nozzles 28 Cleaning the Print Head 29 Checking the Ink Cartridge Status 30 Purchasing Epson Ink Cartridges...
Quick Reference Guide
Page 4
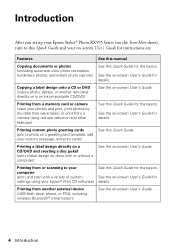
... manual Copying documents or photos (including automatic color photo restoration, borderless photos, and instant photo reprints) See this Quick Guide. (print a photo on a greeting card template, add your custom message, and print cards) Printing a label design directly on a CD/DVD and creating a disc jacket (print a label design on discs.... See the on -screen User's Guide for details. Introduction After you set up your Epson Stylus® Photo RX595 Series (see the Start Here sheet), turn to your computer (print and scan with or without a computer) See the on -screen User's Guide.
... manual Copying documents or photos (including automatic color photo restoration, borderless photos, and instant photo reprints) See this Quick Guide. (print a photo on a greeting card template, add your custom message, and print cards) Printing a label design directly on a CD/DVD and creating a disc jacket (print a label design on discs.... See the on -screen User's Guide for details. Introduction After you set up your Epson Stylus® Photo RX595 Series (see the Start Here sheet), turn to your computer (print and scan with or without a computer) See the on -screen User's Guide.
Quick Reference Guide
Page 5
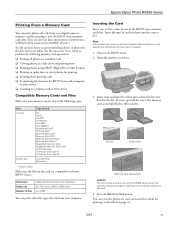
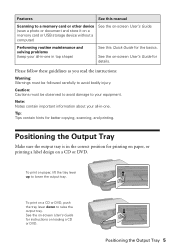
... about your all -in the correct position for printing on paper, or printing a label design on -screen User's Guide. Tip: Tips contain hints for details. Positioning the Output Tray 5 Caution: Cautions must be observed to avoid damage to a memory card or other device (scan a photo or document and store it on a memory card...
... about your all -in the correct position for printing on paper, or printing a label design on -screen User's Guide. Tip: Tips contain hints for details. Positioning the Output Tray 5 Caution: Cautions must be observed to avoid damage to a memory card or other device (scan a photo or document and store it on a memory card...
Quick Reference Guide
Page 6
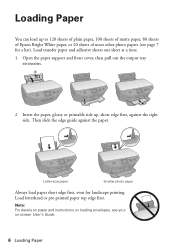
... sheets of plain paper, 100 sheets of matte paper, 80 sheets of Epson Bright White paper, or 20 sheets of most other photo papers (see your on-screen User's Guide. 6 Loading Paper Letter-size paper Smaller photo paper Always load paper short edge first, even for a list). Then... the paper support and front cover, then pull out the output tray extensions. 2. Load letterhead or pre-printed paper top edge first. Note: For details on paper and instructions on loading envelopes, see page 7 for landscape printing. Load transfer paper and adhesive sheets one sheet at a time. 1.
... sheets of plain paper, 100 sheets of matte paper, 80 sheets of Epson Bright White paper, or 20 sheets of most other photo papers (see your on-screen User's Guide. 6 Loading Paper Letter-size paper Smaller photo paper Always load paper short edge first, even for a list). Then... the paper support and front cover, then pull out the output tray extensions. 2. Load letterhead or pre-printed paper top edge first. Note: For details on paper and instructions on loading envelopes, see page 7 for landscape printing. Load transfer paper and adhesive sheets one sheet at a time. 1.


