Product Information Guide
Page 1
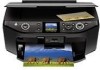
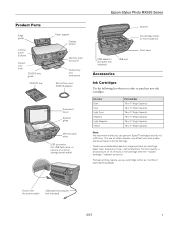
Epson Stylus Photo RX595 Series Product Parts Edge guide Control panel buttons Output tray lever CD/DVD tray guide CD/DVD tray Paper support Display screen Memory card slot cover Output tray and extensions Mini or 8-cm mini CD/DVD adapter Document cover Scanner glass Memory card slots USB connector (for USB flash...USB cable for computer (not included) USB port Accessories Ink Cartridges Use the following list when you order or purchase new ink cartridges: Ink color Black Cyan Light Cyan Magenta Light Magenta Yellow Part number 78 or 77 (High Capacity) 78 or 77 (High Capacity) 78 or 77 (...
Epson Stylus Photo RX595 Series Product Parts Edge guide Control panel buttons Output tray lever CD/DVD tray guide CD/DVD tray Paper support Display screen Memory card slot cover Output tray and extensions Mini or 8-cm mini CD/DVD adapter Document cover Scanner glass Memory card slots USB connector (for USB flash...USB cable for computer (not included) USB port Accessories Ink Cartridges Use the following list when you order or purchase new ink cartridges: Ink color Black Cyan Light Cyan Magenta Light Magenta Yellow Part number 78 or 77 (High Capacity) 78 or 77 (High Capacity) 78 or 77 (...
Product Information Guide
Page 3
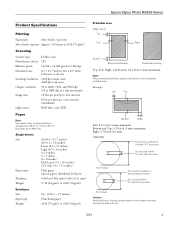
...area. Epson Stylus Photo RX595 Series Product Specifications Printing Paper path Sheet feeder, top entry Sheet feeder capacity Approx. 120 sheets at 20 lb (75 g/m2) Scanning Scanner type Photoelectric device Effective pixels Document size Scanning resolution Output resolution Image data Light source Flatbed color CIS...5 × 7 inches 8 × 10 inches Half Letter (5.5 × 8.5 inches) 16:9 wide (4 × 7.11 inches) Plain paper Special papers distributed by Epson 0.003 to 0.004 inch (0.08 to 0.11 mm) 17 lb (64 g/m2) to 24 lb (90 g/m2) Envelopes Size Paper type Weight No. 10 (4.1 ...
...area. Epson Stylus Photo RX595 Series Product Specifications Printing Paper path Sheet feeder, top entry Sheet feeder capacity Approx. 120 sheets at 20 lb (75 g/m2) Scanning Scanner type Photoelectric device Effective pixels Document size Scanning resolution Output resolution Image data Light source Flatbed color CIS...5 × 7 inches 8 × 10 inches Half Letter (5.5 × 8.5 inches) 16:9 wide (4 × 7.11 inches) Plain paper Special papers distributed by Epson 0.003 to 0.004 inch (0.08 to 0.11 mm) 17 lb (64 g/m2) to 24 lb (90 g/m2) Envelopes Size Paper type Weight No. 10 (4.1 ...
Product Information Guide
Page 6
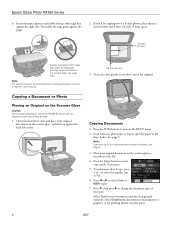
.... Place your original face-down on the scanner glass, with the top against the right side. Press the Copy button to 99). 6. Note: Load only up to the recommended number of the RX595 Series or use the document cover as described to select Color or B&W copies. 7. Epson Stylus Photo RX595 Series 4. Insert the paper, glossy or printable...
.... Place your original face-down on the scanner glass, with the top against the right side. Press the Copy button to 99). 6. Note: Load only up to the recommended number of the RX595 Series or use the document cover as described to select Color or B&W copies. 7. Epson Stylus Photo RX595 Series 4. Insert the paper, glossy or printable...
Product Information Guide
Page 7
...as many times as described on one sheet of paper ❏ Repeat-4 copies 4 small photos on page 6. 4. See page 5. Place your photos to size your original photo on the scanner glass, as it will fit on one sheet of paper; If you want to print... to the edge of paper. ❏ 2-up Copy copies 2 originals on the RX595 Series. 2. Epson Stylus Photo RX595 Series 8. Press the P On button to Photo. 8. see the previous section. 3. To print more than 1 copy, press + or - to select Color or B&W copies. 7. Press l or r to select the number. 6. See ...
...as many times as described on one sheet of paper ❏ Repeat-4 copies 4 small photos on page 6. 4. See page 5. Place your photos to size your original photo on the scanner glass, as it will fit on one sheet of paper; If you want to print... to the edge of paper. ❏ 2-up Copy copies 2 originals on the RX595 Series. 2. Epson Stylus Photo RX595 Series 8. Press the P On button to Photo. 8. see the previous section. 3. To print more than 1 copy, press + or - to select Color or B&W copies. 7. Press l or r to select the number. 6. See ...

Product Information Guide
Page 9
...to select Color or B&W copies. 6. Press d, then press r to 99). 5. To copy a test label onto plain paper, or to adjust the position or ink density of the label, press x Menu and see the previous section) on the scanner glass. 3. Adjusting the ink density may be necessary for photos. (... printing.) 3. Place your design onto a CD or DVD, press x Start. Epson Stylus Photo RX595 Series Placing an Original CD/DVD on the Scanner Glass You can place a CD/DVD label-side-down in the center of the scanner glass as described on page 8 (or plain paper to keep your printed CD/DVD...
...to select Color or B&W copies. 6. Press d, then press r to 99). 5. To copy a test label onto plain paper, or to adjust the position or ink density of the label, press x Menu and see the previous section) on the scanner glass. 3. Adjusting the ink density may be necessary for photos. (... printing.) 3. Place your design onto a CD or DVD, press x Start. Epson Stylus Photo RX595 Series Placing an Original CD/DVD on the Scanner Glass You can place a CD/DVD label-side-down in the center of the scanner glass as described on page 8 (or plain paper to keep your printed CD/DVD...
Product Information Guide
Page 10
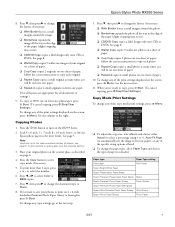
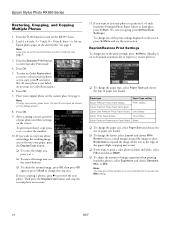
...the scanner glass. Then press the Display/Crop button and crop the second photo as you want to size your photos to print on Color Restoration to fit onto your original photo on Color Restoration.) 6. Paper type Paper Type setting Epson Premium Photo Paper ...photo is set to Standard automatically to print a color photo in black and white, select Filter and choose B&W. ❏ To adjust the amount of image expansion when printing borderless photos, select Expansion and choose Standard, Min, or Mid. Epson Stylus Photo RX595 Series Restoring, Cropping, and Copying Multiple Photos...
...the scanner glass. Then press the Display/Crop button and crop the second photo as you want to size your photos to print on Color Restoration to fit onto your original photo on Color Restoration.) 6. Paper type Paper Type setting Epson Premium Photo Paper ...photo is set to Standard automatically to print a color photo in black and white, select Filter and choose B&W. ❏ To adjust the amount of image expansion when printing borderless photos, select Expansion and choose Standard, Min, or Mid. Epson Stylus Photo RX595 Series Restoring, Cropping, and Copying Multiple Photos...
Product Information Guide
Page 14
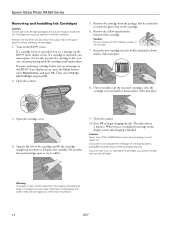
... Change Ink Cartridge and press OK. 2. Remove the yellow tape from the package, but be able to print. Dispose of it . Close the scanner. 10. Open the cartridge cover. 4. This takes about 2 minutes. If a cartridge is low, you can continue printing until the cartridge needs...to install the ink. Open the scanner. 5. Caution: Do not remove any other labels or seals, or ink will leak. 7. Warning: If ink gets on the RX595 Series display screen. Keep ink cartridges out of the reach of the cartridge. Epson Stylus Photo RX595 Series Removing and Installing Ink Cartridges ...
... Change Ink Cartridge and press OK. 2. Remove the yellow tape from the package, but be able to print. Dispose of it . Close the scanner. 10. Open the cartridge cover. 4. This takes about 2 minutes. If a cartridge is low, you can continue printing until the cartridge needs...to install the ink. Open the scanner. 5. Caution: Do not remove any other labels or seals, or ink will leak. 7. Warning: If ink gets on the RX595 Series display screen. Keep ink cartridges out of the reach of the cartridge. Epson Stylus Photo RX595 Series Removing and Installing Ink Cartridges ...
Product Information Guide
Page 16
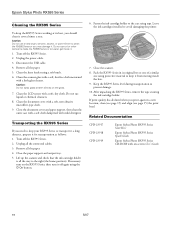
...the scanner glass with a soft, lint-free cloth moistened with mild detergent. Close the paper support and output tray. 5. Related Documentation CPD-23917 CPD-23918 CPD-23919 Epson Stylus Photo RX595 Series Start Here Epson Stylus Photo RX595 Series Quick Guide Epson Stylus Photo RX595 Series CD-ROM with on the RX595 ...: 1. Unplug all the paper. 4. Leave the ink cartridges installed to prevent damage. 10. Epson Stylus Photo RX595 Series Cleaning the RX595 Series To keep the RX595 Series working at its original box or one of a similar size using protective material to keep ...
...the scanner glass with a soft, lint-free cloth moistened with mild detergent. Close the paper support and output tray. 5. Related Documentation CPD-23917 CPD-23918 CPD-23919 Epson Stylus Photo RX595 Series Start Here Epson Stylus Photo RX595 Series Quick Guide Epson Stylus Photo RX595 Series CD-ROM with on the RX595 ...: 1. Unplug all the paper. 4. Leave the ink cartridges installed to prevent damage. 10. Epson Stylus Photo RX595 Series Cleaning the RX595 Series To keep the RX595 Series working at its original box or one of a similar size using protective material to keep ...
Quick Reference Guide
Page 26
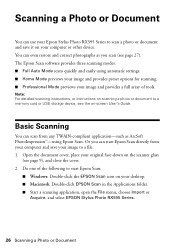
...such as you can start Epson Scan: ■ Windows: Double-click the EPSON Scan icon on your computer or other device. Scanning a Photo or Document You can use your Epson Stylus Photo RX595 Series to scan a photo or document and save your image to a file. 1. The Epson Scan software provides three scanning... following to a memory card or USB storage device, see the on the scanner glass (see page 27). Note: For detailed scanning instructions, or instructions on scanning a photo or document to start Epson Scan directly from your computer and save it on your desktop. ■ Macintosh...
...such as you can start Epson Scan: ■ Windows: Double-click the EPSON Scan icon on your computer or other device. Scanning a Photo or Document You can use your Epson Stylus Photo RX595 Series to scan a photo or document and save your image to a file. 1. The Epson Scan software provides three scanning... following to a memory card or USB storage device, see the on the scanner glass (see page 27). Note: For detailed scanning instructions, or instructions on scanning a photo or document to start Epson Scan directly from your computer and save it on your desktop. ■ Macintosh...
Quick Reference Guide
Page 32
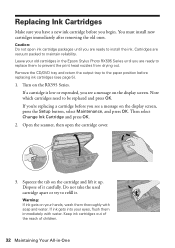
You must install new cartridges immediately after removing the old ones. Dispose of children. 32 Maintaining Your All-in the Epson Stylus Photo RX595 Series until you begin. Keep ink cartridges out of the reach of it up. Leave your old cartridges in -One If a cartridge is low ... button, select Maintenance, and press OK. Cartridges are ready to install the ink. If you're replacing a cartridge before you see page 5). 1. Open the scanner, then open ink cartridge packages until you are ready to replace them to prevent the print head nozzles from drying out. Squeeze the tab on...
You must install new cartridges immediately after removing the old ones. Dispose of children. 32 Maintaining Your All-in the Epson Stylus Photo RX595 Series until you begin. Keep ink cartridges out of the reach of it up. Leave your old cartridges in -One If a cartridge is low ... button, select Maintenance, and press OK. Cartridges are ready to install the ink. If you're replacing a cartridge before you see page 5). 1. Open the scanner, then open ink cartridge packages until you are ready to replace them to prevent the print head nozzles from drying out. Squeeze the tab on...
Quick Reference Guide
Page 35
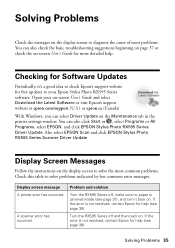
... Software Updates Periodically, it back on. Open your Epson Stylus Photo RX595 Series software. Problem and solution Turn the RX595 Series off and then back on. Turn the RX595 Series off , make sure no paper is jammed inside (see page 39). Also select EPSON Scan and click EPSON Stylus Photo RX595 Series Scanner Driver Update. Solving Problems Check the messages on the...
... Software Updates Periodically, it back on. Open your Epson Stylus Photo RX595 Series software. Problem and solution Turn the RX595 Series off and then back on. Turn the RX595 Series off , make sure no paper is jammed inside (see page 39). Also select EPSON Scan and click EPSON Stylus Photo RX595 Series Scanner Driver Update. Solving Problems Check the messages on the...
Quick Reference Guide
Page 37
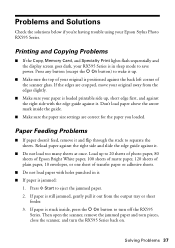
...or sheet feeder. 3. Reload paper against the right side and slide the edge guide against the back left corner of the scanner glass. Press x Start to turn the RX595 Series back on. Don't load paper above the arrow mark inside , press the P On button to eject the jammed ..., close the scanner, and turn off the RX595 Series. Problems and Solutions Check the solutions below if you loaded. If paper is still jammed, gently pull it . ■ If paper is stuck inside the guide. ■ Make sure the paper size settings are cropped, move your Epson Stylus Photo RX595 Series.
...or sheet feeder. 3. Reload paper against the right side and slide the edge guide against the back left corner of the scanner glass. Press x Start to turn the RX595 Series back on. Don't load paper above the arrow mark inside , press the P On button to eject the jammed ..., close the scanner, and turn off the RX595 Series. Problems and Solutions Check the solutions below if you loaded. If paper is still jammed, gently pull it . ■ If paper is stuck inside the guide. ■ Make sure the paper size settings are cropped, move your Epson Stylus Photo RX595 Series.


