
Basics Guide
Page 4
...45 Inserting a CD or DVD 46 Printing Photos on a CD or DVD 48 Copying onto a CD/DVD 51 Returning the Front Tray to the Paper Position 54 Printing a CD/DVD Jewel Case Insert 55 Printing From Your Computer 56 Printing With Windows 56 Printing From a Macintosh 59 Selecting the ... Scanning to Your Computer 63 Scanning to a Memory Card 66 Backing Up Your Photos 67 Maintaining Your RX580 69 Checking the Print Head Nozzles 69 Cleaning the Print Head 70 Replacing Ink Cartridges 71 Aligning the Print Head 77 Solving Problems 78 Error Messages 78 Problems and Solutions 79 Where To Get ...
...45 Inserting a CD or DVD 46 Printing Photos on a CD or DVD 48 Copying onto a CD/DVD 51 Returning the Front Tray to the Paper Position 54 Printing a CD/DVD Jewel Case Insert 55 Printing From Your Computer 56 Printing With Windows 56 Printing From a Macintosh 59 Selecting the ... Scanning to Your Computer 63 Scanning to a Memory Card 66 Backing Up Your Photos 67 Maintaining Your RX580 69 Checking the Print Head Nozzles 69 Cleaning the Print Head 70 Replacing Ink Cartridges 71 Aligning the Print Head 77 Solving Problems 78 Error Messages 78 Problems and Solutions 79 Where To Get ...
Basics Guide
Page 69
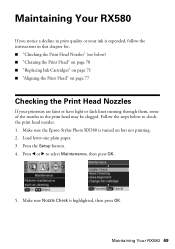
... the Epson Stylus Photo RX580 is highlighted, then press OK. Make sure Nozzle Check is turned on page 77 Checking the Print Head Nozzles If your ink is expended, follow the instructions in this chapter for: ■ "Checking the Print Head Nozzles" (see below to select Maintenance, then press OK. 5. Follow the steps below ) ■ "Cleaning the Print Head" on...
... the Epson Stylus Photo RX580 is highlighted, then press OK. Make sure Nozzle Check is turned on page 77 Checking the Print Head Nozzles If your ink is expended, follow the instructions in this chapter for: ■ "Checking the Print Head Nozzles" (see below to select Maintenance, then press OK. 5. Follow the steps below ) ■ "Cleaning the Print Head" on...
Basics Guide
Page 71
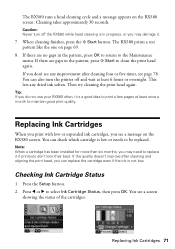
... no gaps in the pattern, press OK to return to the Maintenance menu. This lets any improvement after cleaning and aligning the print head, you may need to maintain good print quality. You can replace the cartridge even if the ink is not low. You can also turn off and wait ...least once a month to replace it . 7. Then try cleaning the print head again. Replacing Ink Cartridges When you print with low or expended ink cartridges, you do not use your RX580 often, it is low or needs to clean the print head again. If the quality doesn't improve after cleaning four or five times...
... no gaps in the pattern, press OK to return to the Maintenance menu. This lets any improvement after cleaning and aligning the print head, you may need to maintain good print quality. You can replace the cartridge even if the ink is not low. You can also turn off and wait ...least once a month to replace it . 7. Then try cleaning the print head again. Replacing Ink Cartridges When you print with low or expended ink cartridges, you do not use your RX580 often, it is low or needs to clean the print head again. If the quality doesn't improve after cleaning four or five times...

Basics Guide
Page 77
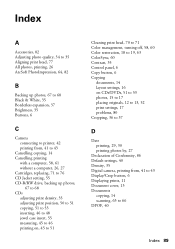
... select the number for that is not inserted. 1. Load several sheets of alignment patterns are done, press OK. Make sure the RX580 is turned on the nozzle check pattern, you are printed. 7. Four rows of plain, letter-size paper. 3. Aligning the Print Head 77 Press OK. 10. You may need to select the next pattern, then...
... select the number for that is not inserted. 1. Load several sheets of alignment patterns are done, press OK. Make sure the RX580 is turned on the nozzle check pattern, you are printed. 7. Four rows of plain, letter-size paper. 3. Aligning the Print Head 77 Press OK. 10. You may need to select the next pattern, then...

Basics Guide
Page 81
... lines, you may need to clean the print head. This unclogs the nozzles so they are too faint, you may need to align the print head. If you are printing on CDs or DVDs, push in the ...If you are copying, make sure the document is placed flat against the document table glass and the RX580 is not tilted or placed on an uneven surface. ■ Load the paper printable side up ...with a soft, dry, lint-free cloth (paper towels are not recommended), or use Epson special paper (see page 62) and genuine Epson ink cartridges (see page 72). ■ Set the tray lever to the paper position ...
... lines, you may need to clean the print head. This unclogs the nozzles so they are too faint, you may need to align the print head. If you are printing on CDs or DVDs, push in the ...If you are copying, make sure the document is placed flat against the document table glass and the RX580 is not tilted or placed on an uneven surface. ■ Load the paper printable side up ...with a soft, dry, lint-free cloth (paper towels are not recommended), or use Epson special paper (see page 62) and genuine Epson ink cartridges (see page 72). ■ Set the tray lever to the paper position ...
Basics Guide
Page 89
..., 82 Adjusting photo quality, 34 to 35 Aligning print head, 77 All photos, printing, 26 ArcSoft PhotoImpression, 64, 82 B Backing up photos, 67 to 68 Black & White, 35 Borderless expansion, 37 Brightness, 35 Buttons, 6 C Camera connecting to printer, 42 printing from, 41 to 43 Cancelling copying, 14 Cancelling printing with a computer...photos, 67 to 68 CDs adjusting print density, 35 adjusting print position, 50 to 51 copying, 51 to 53 inserting, 46 to 48 jewel case insert, 55 measuring, 45 to 46 printing on, 45 to 51 Cleaning print head, 70 to 71 Color management, turning off, 58, 60 Color...
..., 82 Adjusting photo quality, 34 to 35 Aligning print head, 77 All photos, printing, 26 ArcSoft PhotoImpression, 64, 82 B Backing up photos, 67 to 68 Black & White, 35 Borderless expansion, 37 Brightness, 35 Buttons, 6 C Camera connecting to printer, 42 printing from, 41 to 43 Cancelling copying, 14 Cancelling printing with a computer...photos, 67 to 68 CDs adjusting print density, 35 adjusting print position, 50 to 51 copying, 51 to 53 inserting, 46 to 48 jewel case insert, 55 measuring, 45 to 46 printing on, 45 to 51 Cleaning print head, 70 to 71 Color management, turning off, 58, 60 Color...

Basics Guide
Page 91
... Card button, 6, 24 Messages, error, 78 to 79 Mobile phone, printing from, 41 to 44 Mode button, 6 Modes, scanning, 63 N Noise problems, 79 Nozzle check, 69 to 70 O Originals, placing on glass, 12 to 13, 52 P Paper Epson, 10, 28 feeding problems, 80 loading, 7 to 9 special types,...printing all, 26 printing by date, 27 restoring color, 18 to 19 scanning, 63 to 66 sizing, 17, 36 to 37 storing, 11 viewing, 24 viewing and printing, 25 PictBridge, 41 Premium photo papers, 10 Print head aligning, 77 cleaning, 70 to 71 Print quality problems, 81 Print settings, 28 to 30, 34 to 35 Printing all photos...
... Card button, 6, 24 Messages, error, 78 to 79 Mobile phone, printing from, 41 to 44 Mode button, 6 Modes, scanning, 63 N Noise problems, 79 Nozzle check, 69 to 70 O Originals, placing on glass, 12 to 13, 52 P Paper Epson, 10, 28 feeding problems, 80 loading, 7 to 9 special types,...printing all, 26 printing by date, 27 restoring color, 18 to 19 scanning, 63 to 66 sizing, 17, 36 to 37 storing, 11 viewing, 24 viewing and printing, 25 PictBridge, 41 Premium photo papers, 10 Print head aligning, 77 cleaning, 70 to 71 Print quality problems, 81 Print settings, 28 to 30, 34 to 35 Printing all photos...
Product Information Guide
Page 11
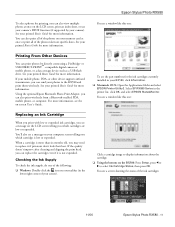
... the icon on specific dates. Epson Stylus Photo RX580 To select photos for printing, you can also view multiple photos at once or print all of the ink cartridges: 11/06 Epson Stylus Photo RX580 - 11 If the quality doesn't improve after cleaning and aligning the print head, you may need to the RX580 and print them wirelessly. or USB DIRECT-PRINT™-compatible digital camera or mobile...
... the icon on specific dates. Epson Stylus Photo RX580 To select photos for printing, you can also view multiple photos at once or print all of the ink cartridges: 11/06 Epson Stylus Photo RX580 - 11 If the quality doesn't improve after cleaning and aligning the print head, you may need to the RX580 and print them wirelessly. or USB DIRECT-PRINT™-compatible digital camera or mobile...

Product Information Guide
Page 15
... Removing the cartridges can dehydrate the print head and may need to the Maintenance menu. 6. Remove all paper from printing. 1. Your RX580 prints an alignment sheet like this one is loaded in the memory card slots. 11/06 Epson Stylus Photo RX580 - 15 Turn the RX580 off and wait for each of squares...7. Make sure letter-size plain paper is not, lift the tray lever up vertically, or turn the RX580 off . 3. Epson Stylus Photo RX580 6. The nozzle check pattern prints. 7. The alignment sheet contains four sets of the four sets, press OK. Note: You may also see light or ...
... Removing the cartridges can dehydrate the print head and may need to the Maintenance menu. 6. Remove all paper from printing. 1. Your RX580 prints an alignment sheet like this one is loaded in the memory card slots. 11/06 Epson Stylus Photo RX580 - 15 Turn the RX580 off and wait for each of squares...7. Make sure letter-size plain paper is not, lift the tray lever up vertically, or turn the RX580 off . 3. Epson Stylus Photo RX580 6. The nozzle check pattern prints. 7. The alignment sheet contains four sets of the four sets, press OK. Note: You may also see light or ...
Product Information Guide
Page 16
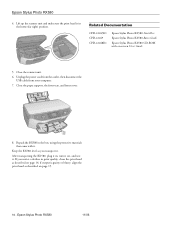
... front tray, and front cover. 8. Repack the RX580 in the home (far right) position. Related Documentation CPD-22267R1 CPD-22269 CPD-22268R1 Epson Stylus Photo RX580 Start Here Epson Stylus Photo RX580 Basics Guide Epson Stylus Photo RX580 CD-ROM with it . Epson Stylus Photo RX580 4. Lift up the scanner unit and make sure the print head is grainy or blurry, align the print head as described on page 14; Epson Stylus Photo RX580 11/06
... front tray, and front cover. 8. Repack the RX580 in the home (far right) position. Related Documentation CPD-22267R1 CPD-22269 CPD-22268R1 Epson Stylus Photo RX580 Start Here Epson Stylus Photo RX580 Basics Guide Epson Stylus Photo RX580 CD-ROM with it . Epson Stylus Photo RX580 4. Lift up the scanner unit and make sure the print head is grainy or blurry, align the print head as described on page 14; Epson Stylus Photo RX580 11/06


