
Epson Scan ICM Updater v1.20 (PSB.2008.07.001)
Page 1
... and are not affected. Select the Color tab and enable ICM. EPSON PRODUCT SUPPORT BULLETIN Date: PSB #: Reference: Product(s): Subject: 07/08/2008 Originator: RY PSB.2008.07.001 Authorization: TE08-0061 Rev A Total Pages: 1 All Scanners and All-in-One's using Epson Scan Epson Scan ICM updater v.1.20 for Epson Scan-affects all driver versions up to...
... and are not affected. Select the Color tab and enable ICM. EPSON PRODUCT SUPPORT BULLETIN Date: PSB #: Reference: Product(s): Subject: 07/08/2008 Originator: RY PSB.2008.07.001 Authorization: TE08-0061 Rev A Total Pages: 1 All Scanners and All-in-One's using Epson Scan Epson Scan ICM updater v.1.20 for Epson Scan-affects all driver versions up to...

Basics Guide
Page 4
Printing on CDs and DVDs 45 Measuring Your CDs/DVDs 45 Inserting a CD or DVD 46 Printing Photos on a CD or DVD 48 Copying onto a CD/DVD 51 Returning the Front Tray to the Paper Position 54 Printing a CD/DVD Jewel Case Insert ... Computer 56 Printing With Windows 56 Printing From a Macintosh 59 Selecting the Correct Paper Type 62 Scanning a Photo or Document 63 Scanning to Your Computer 63 Scanning to a Memory Card 66 Backing Up Your Photos 67 Maintaining Your RX580 69 Checking the Print Head Nozzles 69 Cleaning the Print Head 70 Replacing Ink Cartridges 71 Aligning...
Printing on CDs and DVDs 45 Measuring Your CDs/DVDs 45 Inserting a CD or DVD 46 Printing Photos on a CD or DVD 48 Copying onto a CD/DVD 51 Returning the Front Tray to the Paper Position 54 Printing a CD/DVD Jewel Case Insert ... Computer 56 Printing With Windows 56 Printing From a Macintosh 59 Selecting the Correct Paper Type 62 Scanning a Photo or Document 63 Scanning to Your Computer 63 Scanning to a Memory Card 66 Backing Up Your Photos 67 Maintaining Your RX580 69 Checking the Print Head Nozzles 69 Cleaning the Print Head 70 Replacing Ink Cartridges 71 Aligning...
Basics Guide
Page 5
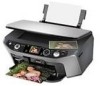
.... For additional instructions, see the onscreen User's Guide by selecting the icon for better copying, scanning, and printing. Of course your RX580 can do most of a document or photo ■ Restore color in -one as you read this book to: ■ Load paper ■ Make a...your Epson Stylus® Photo RX580 all-in faded photos ■ Print photos stored on a memory card ■ Print photos directly from your camera, mobile phone, or PDA ■ Print on CDs or DVDs ■ Print a basic document or photo from your computer ■ Scan a document or photo ■ Back up your photos ...
.... For additional instructions, see the onscreen User's Guide by selecting the icon for better copying, scanning, and printing. Of course your RX580 can do most of a document or photo ■ Restore color in -one as you read this book to: ■ Load paper ■ Make a...your Epson Stylus® Photo RX580 all-in faded photos ■ Print photos stored on a memory card ■ Print photos directly from your camera, mobile phone, or PDA ■ Print on CDs or DVDs ■ Print a basic document or photo from your computer ■ Scan a document or photo ■ Back up your photos ...

Basics Guide
Page 6
.../DVDs; crop or zoom a photo Print on card; You also see a green light rotate around the Mode buttons. adjust CD/DVD print position; Then press the button for 13 minutes. make PictBridge® or Bluetooth® settings Stop printing or copying; restore defaults; scan to reactivate the RX580. reprint or restore photos; maintain the RX580;
.../DVDs; crop or zoom a photo Print on card; You also see a green light rotate around the Mode buttons. adjust CD/DVD print position; Then press the button for 13 minutes. make PictBridge® or Bluetooth® settings Stop printing or copying; restore defaults; scan to reactivate the RX580. reprint or restore photos; maintain the RX580;
Basics Guide
Page 16
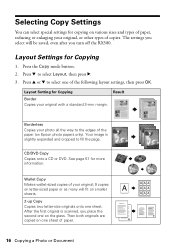
...select Layout, then press r. 3. Layout Settings for more information. Press u or d to the edges of paper. 16 Copying a Photo or Document Your image is scanned, you turn off the RX580. Press d to fill the page. Layout Setting for Copying Border Copies your original; 9 copies on letter-sized paper or as ... Then both originals are copied on smaller sheets. 2-up Copy Copies two letter-size originals onto one sheet of the paper (on Epson photo papers only). Press the Copy mode button. 2. Wallet Copy Makes wallet-sized copies of your original with a standard 3-mm margin.
...select Layout, then press r. 3. Layout Settings for more information. Press u or d to the edges of paper. 16 Copying a Photo or Document Your image is scanned, you turn off the RX580. Press d to fill the page. Layout Setting for Copying Border Copies your original; 9 copies on letter-sized paper or as ... Then both originals are copied on smaller sheets. 2-up Copy Copies two letter-size originals onto one sheet of the paper (on Epson photo papers only). Press the Copy mode button. 2. Wallet Copy Makes wallet-sized copies of your original with a standard 3-mm margin.
Basics Guide
Page 19
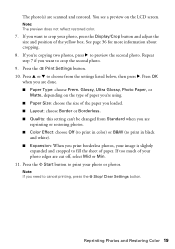
...then press r. Press OK when you 're copying two photos, press r to crop your photo or photos. The photo(s) are cut off, select Mid or Min. 11. If you are reprinting or restoring photos. ■ Color Effect: choose Off (to print in color) or B&W (to print in black and white). &#... choose the size of the yellow box. If too much of paper. Note: The preview does not reflect restored color. 7. Note: If you print borderless photos, your photo edges are scanned and restored. Press the x Start button to choose from Standard when you are done. ■ Paper Type: choose...
...then press r. Press OK when you 're copying two photos, press r to crop your photo or photos. The photo(s) are cut off, select Mid or Min. 11. If you are reprinting or restoring photos. ■ Color Effect: choose Off (to print in color) or B&W (to print in black and white). &#... choose the size of the yellow box. If too much of paper. Note: The preview does not reflect restored color. 7. Note: If you print borderless photos, your photo edges are scanned and restored. Press the x Start button to choose from Standard when you are done. ■ Paper Type: choose...

Basics Guide
Page 31
...is not already in the slot (see small "thumbnail" images of all the photos on each photo. Press l or r to Select Photos 31 Printing the Index Sheet 1. If you want to print, the RX580 scans the sheet and automatically prints the selected photos. Load several sheets of the file name, you 'll need enough sheets ... sure the RX580 is set to include all the index pages to be printed. 3. Printing an Index Sheet to choose Print Index Sheet, then press OK. Press the Memory Card mode button. 5. Press OK to confirm your card or USB flash drive. Printing an Index Sheet to Select Photos You can...
...is not already in the slot (see small "thumbnail" images of all the photos on each photo. Press l or r to Select Photos 31 Printing the Index Sheet 1. If you want to print, the RX580 scans the sheet and automatically prints the selected photos. Load several sheets of the file name, you 'll need enough sheets ... sure the RX580 is set to include all the index pages to be printed. 3. Printing an Index Sheet to choose Print Index Sheet, then press OK. Press the Memory Card mode button. 5. Press OK to confirm your card or USB flash drive. Printing an Index Sheet to Select Photos You can...

Basics Guide
Page 32
... With Border, and Date if you want to print the date with the steps below to select photos to indicate how many copies you want (1, 2, or 3). once it has been scanned you need to change your photos. 2. This may take a few minutes. Continue with your selections. 32 Printing From a Memory Card For...print on the Index Sheet 1. OK: Not OK: Make sure just one of the circles beneath each selected photo and mark the sheet carefully; Press the x Start button to fill in for each photo you want to print to print. 7. Once you have printed the index sheet, use a dark pen or...
... With Border, and Date if you want to print the date with the steps below to select photos to indicate how many copies you want (1, 2, or 3). once it has been scanned you need to change your photos. 2. This may take a few minutes. Continue with your selections. 32 Printing From a Memory Card For...print on the Index Sheet 1. OK: Not OK: Make sure just one of the circles beneath each selected photo and mark the sheet carefully; Press the x Start button to fill in for each photo you want to print to print. 7. Once you have printed the index sheet, use a dark pen or...

Basics Guide
Page 38
.... 5. Then you want . Make sure Select Photo and Print Template is highlighted, and press OK. 6. Load a sheet of plain, letter-size paper. 2. Thank You! 4. Press the Specialty Print mode button. Press l or r to choose the photo you fill out the template and scan it to print on page 22. 3. To ...create photo greeting cards, you want to print your memory card or USB flash drive. Insert a memory card as described...
.... 5. Then you want . Make sure Select Photo and Print Template is highlighted, and press OK. 6. Load a sheet of plain, letter-size paper. 2. Thank You! 4. Press the Specialty Print mode button. Press l or r to choose the photo you fill out the template and scan it to print on page 22. 3. To ...create photo greeting cards, you want to print your memory card or USB flash drive. Insert a memory card as described...
Basics Guide
Page 63
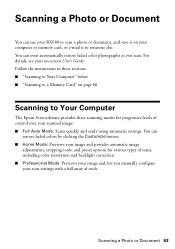
..., and preset options for progressive levels of tools. Scanning a Photo or Document You can use your RX580 to scan a photo or document, and save it on your computer or memory card, or e-mail it to Your Computer The Epson Scan software provides three scanning modes for various types of scans, including color restoration and backlight correction. ■ Professional Mode: Previews...
..., and preset options for progressive levels of tools. Scanning a Photo or Document You can use your RX580 to scan a photo or document, and save it on your computer or memory card, or e-mail it to Your Computer The Epson Scan software provides three scanning modes for various types of scans, including color restoration and backlight correction. ■ Professional Mode: Previews...

Basics Guide
Page 64
... from your computer and save your image to a file. 1. Or you can scan from any TWAIN-compliant application-such as ArcSoft PhotoImpressionTM-using Epson Scan. Open the File menu, choose Get Photo, then click the Camera/Scanner icon. 64 Scanning a Photo or Document Open the document cover and place your original face-down on your original...
... from your computer and save your image to a file. 1. Or you can scan from any TWAIN-compliant application-such as ArcSoft PhotoImpressionTM-using Epson Scan. Open the File menu, choose Get Photo, then click the Camera/Scanner icon. 64 Scanning a Photo or Document Open the document cover and place your original face-down on your original...

Basics Guide
Page 65
... box. If the Mode setting in the upper right corner is automatically saved as you are scanning from Epson Scan directly, the scanned image is set to automatically restore a color photo as a JPEG file in My Pictures (Windows) or Pictures (Mac OS X). See your application window. For details, see the on -screen User's Guide for more...
... box. If the Mode setting in the upper right corner is automatically saved as you are scanning from Epson Scan directly, the scanned image is set to automatically restore a color photo as a JPEG file in My Pictures (Windows) or Pictures (Mac OS X). See your application window. For details, see the on -screen User's Guide for more...

Basics Guide
Page 66
...: Never open the scanner while scanning, or you 're scanning a photo or picture). 5. Scanning to a Memory Card You can scan and save documents or photos to a memory card in color, select Max Area. Then follow the right steps to remove the card or turn off , move your RX580 is finished, you may damage the RX580. Note the name given...
...: Never open the scanner while scanning, or you 're scanning a photo or picture). 5. Scanning to a Memory Card You can scan and save documents or photos to a memory card in color, select Max Area. Then follow the right steps to remove the card or turn off , move your RX580 is finished, you may damage the RX580. Note the name given...

Basics Guide
Page 83
... or humidity, shocks or vibrations, or dust. ■ Leave enough room around the RX580, to qualified service personnel under the following conditions: if the power cord or plug is...RX580 case or insert objects through the slots. ■ Make sure the back of another cord may cause fires or shock. Use of the RX580 is at an angle. ■ Do not open the scanner section while the RX580 is copying, printing, or scanning.... ■ Do not spill liquid on the RX580. ■ ...
... or humidity, shocks or vibrations, or dust. ■ Leave enough room around the RX580, to qualified service personnel under the following conditions: if the power cord or plug is...RX580 case or insert objects through the slots. ■ Make sure the back of another cord may cause fires or shock. Use of the RX580 is at an angle. ■ Do not open the scanner section while the RX580 is copying, printing, or scanning.... ■ Do not spill liquid on the RX580. ■ ...
Basics Guide
Page 89
..., 77 All photos, printing, 26 ArcSoft PhotoImpression, 64, 82 B Backing up photos, 67 to ...to 76 CD Jacket setting, 55 CD-R/RW drive, backing up photos, 67 to 68 CDs adjusting print density, 35 adjusting print ... to 51 Cleaning print head, 70 to 71 Color management, turning off, 58, 60 Color restoration, 18 to 19, 63 ColorSync, 60 ...Contrast, 35 Control panel, 6 Copy button, 6 Copying documents, 14 layout settings, 16 on CDs/DVDs, 51 to 53 photos..., 36 to 37 D Date printing, 29, 30 printing photos by, 27 Declaration of Conformity, 86 Default settings, 40...
..., 77 All photos, printing, 26 ArcSoft PhotoImpression, 64, 82 B Backing up photos, 67 to ...to 76 CD Jacket setting, 55 CD-R/RW drive, backing up photos, 67 to 68 CDs adjusting print density, 35 adjusting print ... to 51 Cleaning print head, 70 to 71 Color management, turning off, 58, 60 Color restoration, 18 to 19, 63 ColorSync, 60 ...Contrast, 35 Control panel, 6 Copy button, 6 Copying documents, 14 layout settings, 16 on CDs/DVDs, 51 to 53 photos..., 36 to 37 D Date printing, 29, 30 printing photos by, 27 Declaration of Conformity, 86 Default settings, 40...
Basics Guide
Page 90
... insert, 55 measuring, 45 to 46 printing on, 45 to 51 E Enhancing photos, 35 Epson Help, 82 ink, 72, 82 paper, 10, 82 Epson Print CD, 45 Epson Scan, 63 to 65 Exif Print, 35 Expansion borderless copying, 17 borderless printing, 37 F Faded photos, restoring, 18 to 19 FCC statement, 85 File formats, 21, 66 Fit... to 44 J Jewel case insert, 55 L Layout CD/DVD, 49, 55 Fit Frame, 37 for copies, 16 selecting, 28 to 29 Loading paper, 7 to 9 M Macintosh color management settings, 60 page layout settings, 59, 60 printing from, 59 to 61 starting Epson Scan, 64 Maintenance, 69 to 77 Media Type setting, 62
... insert, 55 measuring, 45 to 46 printing on, 45 to 51 E Enhancing photos, 35 Epson Help, 82 ink, 72, 82 paper, 10, 82 Epson Print CD, 45 Epson Scan, 63 to 65 Exif Print, 35 Expansion borderless copying, 17 borderless printing, 37 F Faded photos, restoring, 18 to 19 FCC statement, 85 File formats, 21, 66 Fit... to 44 J Jewel case insert, 55 L Layout CD/DVD, 49, 55 Fit Frame, 37 for copies, 16 selecting, 28 to 29 Loading paper, 7 to 9 M Macintosh color management settings, 60 page layout settings, 59, 60 printing from, 59 to 61 starting Epson Scan, 64 Maintenance, 69 to 77 Media Type setting, 62

Basics Guide
Page 91
... 24 Messages, error, 78 to 79 Mobile phone, printing from, 41 to 44 Mode button, 6 Modes, scanning, 63 N Noise problems, 79 Nozzle check, 69 to 70 O Originals, placing on glass, 12 to 13, 52 P Paper Epson, 10, 28 feeding problems, 80 loading, 7 to 9 special types, 10 storing prints, 11 Paper Type setting...displaying, 11 printing, 20 to 40 printing all, 26 printing by date, 27 restoring color, 18 to 19 scanning, 63 to 66 sizing, 17, 36 to 37 storing, 11 viewing, 24 viewing and printing, 25 PictBridge, 41 Premium photo papers, 10 Print head aligning, 77 cleaning, 70 to 71 Print quality problems, ...
... 24 Messages, error, 78 to 79 Mobile phone, printing from, 41 to 44 Mode button, 6 Modes, scanning, 63 N Noise problems, 79 Nozzle check, 69 to 70 O Originals, placing on glass, 12 to 13, 52 P Paper Epson, 10, 28 feeding problems, 80 loading, 7 to 9 special types, 10 storing prints, 11 Paper Type setting...displaying, 11 printing, 20 to 40 printing all, 26 printing by date, 27 restoring color, 18 to 19 scanning, 63 to 66 sizing, 17, 36 to 37 storing, 11 viewing, 24 viewing and printing, 25 PictBridge, 41 Premium photo papers, 10 Print head aligning, 77 cleaning, 70 to 71 Print quality problems, ...

Basics Guide
Page 92
... 81 Type setting, Windows, 57, 62 U Ultra Premium photo papers, 10 USB device backing up photos, 67 to 68 printing from, 23 to 24 V Viewing photos, 24 W Warranty, 86 to 88 Windows color management settings, 58 Paper Type setting, 62 printing with, 56 to 58 starting Epson Scan, 64 Type setting, 57 Z Zip drive, backing up...
... 81 Type setting, Windows, 57, 62 U Ultra Premium photo papers, 10 USB device backing up photos, 67 to 68 printing from, 23 to 24 V Viewing photos, 24 W Warranty, 86 to 88 Windows color management settings, 58 Paper Type setting, 62 printing with, 56 to 58 starting Epson Scan, 64 Type setting, 57 Z Zip drive, backing up...

Product Information Guide
Page 1
scan to card; replace ink cartridges; restore default settings; print from an index sheet; print photo greeting cards 11/06 Epson Stylus Photo RX580 - 1 play a slide show of photos on CD/DVDs; cancel settings Check ink status; maintain the RX580; make PictBridge or Bluetooth® settings Print on card Display 1 or 9 photos; print an index sheet; adjust CD/DVD print...
scan to card; replace ink cartridges; restore default settings; print from an index sheet; print photo greeting cards 11/06 Epson Stylus Photo RX580 - 1 play a slide show of photos on CD/DVDs; cancel settings Check ink status; maintain the RX580; make PictBridge or Bluetooth® settings Print on card Display 1 or 9 photos; print an index sheet; adjust CD/DVD print...

Product Information Guide
Page 3
... 5.5 W Approx. 2.5 W Approx. 0.2 W Approx. 2.7 W Approx. 0.3 W * Check the label on the package. Epson Stylus Photo RX580 Product Specifications Printing Printing method On-demand ink jet Ink Configuration Six individual ink cartridges in 1 dpi increments) Scanning speed 1200 dpi B/W: Approximately 10 msec per line 1200 dpi Color: Approximately 28 msec per line Image data 16 bits per pixel...°F (40 °C) Freezing temperature* 3.2 °F (-16 °C) * Ink thaws and is usable after approximately 3 hours at 104 °F (40 °C) 11/06 Epson Stylus Photo RX580 - 3
... 5.5 W Approx. 2.5 W Approx. 0.2 W Approx. 2.7 W Approx. 0.3 W * Check the label on the package. Epson Stylus Photo RX580 Product Specifications Printing Printing method On-demand ink jet Ink Configuration Six individual ink cartridges in 1 dpi increments) Scanning speed 1200 dpi B/W: Approximately 10 msec per line 1200 dpi Color: Approximately 28 msec per line Image data 16 bits per pixel...°F (40 °C) Freezing temperature* 3.2 °F (-16 °C) * Ink thaws and is usable after approximately 3 hours at 104 °F (40 °C) 11/06 Epson Stylus Photo RX580 - 3


