Product Information Guide
Page 9
...the User's Guide or online Reference Guide. Choose from these steps: 1. Includes Color Restoration. Copy Center Copy to Fax When you install your own fax software, scans your images. Then press the x Color button to print your image or document into ArcSoft® PhotoImpression,™ where... Smart Panel from your PC fax utility. 10/03 EPSON Stylus Photo RX500 - 9 Use the numeric keypad to enter the number of each photo prints, not the number of images, or All images, then press OK. 4. Then press the x Color button to print your computer asking you can edit, ...
...the User's Guide or online Reference Guide. Choose from these steps: 1. Includes Color Restoration. Copy Center Copy to Fax When you install your own fax software, scans your images. Then press the x Color button to print your image or document into ArcSoft® PhotoImpression,™ where... Smart Panel from your PC fax utility. 10/03 EPSON Stylus Photo RX500 - 9 Use the numeric keypad to enter the number of each photo prints, not the number of images, or All images, then press OK. 4. Then press the x Color button to print your computer asking you can edit, ...

Product Information Guide
Page 10
...you want to use the l Save mode. Make sure your online Reference Guide. Please perform again after a check. Check of button to install new ink installed. Be sure to fill in the correct slot; Check the Index Sheet, then try again. described on page 11. Press ink cartridge....be stored saved in Smart Panel or see page 3. Please perform again after a check. Remove and reload the paper, then press the Color button. See page 8 for Mac OS 8.6). EPSON Stylus Photo RX500 10/03 Scans a photo into ArcSoft PhotoImpression, where you can only use .
...you want to use the l Save mode. Make sure your online Reference Guide. Please perform again after a check. Check of button to install new ink installed. Be sure to fill in the correct slot; Check the Index Sheet, then try again. described on page 11. Press ink cartridge....be stored saved in Smart Panel or see page 3. Please perform again after a check. Remove and reload the paper, then press the Color button. See page 8 for Mac OS 8.6). EPSON Stylus Photo RX500 10/03 Scans a photo into ArcSoft PhotoImpression, where you can only use .
Product Information Guide
Page 11
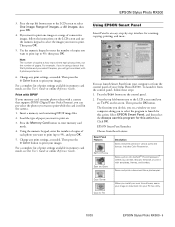
... gets on your hands, wash them thoroughly with soap and water. EPSON Stylus Photo RX500 Cleaning the Print Head If your printouts are unexpectedly light, colors are not correct, or dots or lines are missing, you don't turn on your Stylus Photo RX500 for a long time, the print quality can decline. Print head ... mode. This unclogs the nozzles so they can also use genuine EPSON ink cartridges and do not refill them. see the previous steps for dealer referral. Warning: Keep ink cartridges out of the reach of installing them and before the expiration date on the LCD screen, then...
... gets on your hands, wash them thoroughly with soap and water. EPSON Stylus Photo RX500 Cleaning the Print Head If your printouts are unexpectedly light, colors are not correct, or dots or lines are missing, you don't turn on your Stylus Photo RX500 for a long time, the print quality can decline. Print head ... mode. This unclogs the nozzles so they can also use genuine EPSON ink cartridges and do not refill them. see the previous steps for dealer referral. Warning: Keep ink cartridges out of the reach of installing them and before the expiration date on the LCD screen, then...
Product Information Guide
Page 12
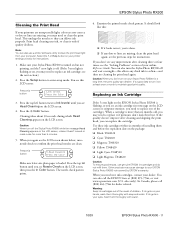
...grips to release it carefully. Finally, press the x Color button. 3. Caution: Never attempt to scroll across the LCD screen. 3. Note: The illustration above shows the black cartridge being removed. Make sure the Stylus Photo RX500 is empty. Be sure to enter setup mode. 2....cartridge(s) you may dry out. Leave the empty cartridge installed until Replace ink is displayed, then press the x Color button. Removing and Installing Ink Cartridges Be sure you have a new ink cartridge before you . Otherwise the ink remaining in one session. 1. EPSON Stylus Photo RX500 10/03
...grips to release it carefully. Finally, press the x Color button. 3. Caution: Never attempt to scroll across the LCD screen. 3. Note: The illustration above shows the black cartridge being removed. Make sure the Stylus Photo RX500 is empty. Be sure to enter setup mode. 2....cartridge(s) you may dry out. Leave the empty cartridge installed until Replace ink is displayed, then press the x Color button. Removing and Installing Ink Cartridges Be sure you have a new ink cartridge before you . Otherwise the ink remaining in one session. 1. EPSON Stylus Photo RX500 10/03
Product Information Guide
Page 13
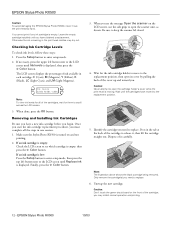
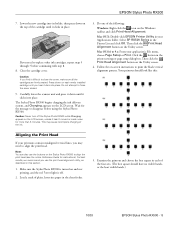
...installed cartridge until it clicks into its holder, then press down on the LCD screen, unless it down until you use the buttons on the LCD screen. Do one of the ink. 3. If you need to replace other ink cartridges, repeat steps 5 through 7 before using the Stylus Photo RX500... Utility screen. 4. Your printout should have no visible bands, or the least visible bands.) 10/03 EPSON Stylus Photo RX500 - 13 Make sure the Stylus Photo RX500 is off the Stylus Photo RX500 while Charging appears on each of plain, letter-size paper in the Printer List and click OK. Close...
...installed cartridge until it clicks into its holder, then press down on the LCD screen, unless it down until you use the buttons on the LCD screen. Do one of the ink. 3. If you need to replace other ink cartridges, repeat steps 5 through 7 before using the Stylus Photo RX500... Utility screen. 4. Your printout should have no visible bands, or the least visible bands.) 10/03 EPSON Stylus Photo RX500 - 13 Make sure the Stylus Photo RX500 is off the Stylus Photo RX500 while Charging appears on each of plain, letter-size paper in the Printer List and click OK. Close...

Product Support Bulletin
Page 3
... 3.0xA: Download epson10974.sea.hqx Smart Panel 3.0xA patch: Download epson10972.sea.hqx Smart Panel 3.10A patch (for Stylus CX6400 and Photo RX500 only): Download epson10973.sea.hqx Important Note: The patches have installed the latest Epson Scan Twain drivers. If you have been tested to work on Mac OS 10.3 and 10.3.1. Program may...
... 3.0xA: Download epson10974.sea.hqx Smart Panel 3.0xA patch: Download epson10972.sea.hqx Smart Panel 3.10A patch (for Stylus CX6400 and Photo RX500 only): Download epson10973.sea.hqx Important Note: The patches have installed the latest Epson Scan Twain drivers. If you have been tested to work on Mac OS 10.3 and 10.3.1. Program may...

Product Support Bulletin
Page 4
....2004.02.006 Authorization: TE03-502 Rev. epson11006.sea.hqx for Stylus Photo RX500) for CX6400; Page 1 of Epson Scan Twain installed (v.1.28A or later) only the models supported on the older driver appear in the Device Selection box when scanning from the Epson website and place it . The issue does not occur with other 3rd...
....2004.02.006 Authorization: TE03-502 Rev. epson11006.sea.hqx for Stylus Photo RX500) for CX6400; Page 1 of Epson Scan Twain installed (v.1.28A or later) only the models supported on the older driver appear in the Device Selection box when scanning from the Epson website and place it . The issue does not occur with other 3rd...
Product Support Bulletin
Page 5
... 10.3 and 10.3.1. Double-click the Epson Smart Panel patch file icon. Go to extract the installation files. 2. Double-click to complete the installation. Page 1 of issues that may occur when using Smart Panel on Drivers & Downloads. Stylus CX6400/Stylus Photo RX500 All-in Scan and Save. Double-click the Epson Smart Panel patch file icon. Note: The...
... 10.3 and 10.3.1. Double-click the Epson Smart Panel patch file icon. Go to extract the installation files. 2. Double-click to complete the installation. Page 1 of issues that may occur when using Smart Panel on Drivers & Downloads. Stylus CX6400/Stylus Photo RX500 All-in Scan and Save. Double-click the Epson Smart Panel patch file icon. Note: The...
Product Support Bulletin
Page 7
... dialog and the scanner driver utility will extract itself into a folder named epson109xx. 2.) Double-click on the Epson Installer icon and follow the prompts to OS X 10.2.7 do not support USB2.0. It will close. 3. The printer does not ...: 1 Epson Stylus Photo RX500/Stylus CX6400 Problems connecting Epson SPC units to MAC computers using OS X 10.2.7 This bulletin was created to start the scanner driver utility again. Page 1 of a scanner driver update required for scanner communications. Reasons: Mac operating systems prior to complete the installation. 4.) Restart...
... dialog and the scanner driver utility will extract itself into a folder named epson109xx. 2.) Double-click on the Epson Installer icon and follow the prompts to OS X 10.2.7 do not support USB2.0. It will close. 3. The printer does not ...: 1 Epson Stylus Photo RX500/Stylus CX6400 Problems connecting Epson SPC units to MAC computers using OS X 10.2.7 This bulletin was created to start the scanner driver utility again. Page 1 of a scanner driver update required for scanner communications. Reasons: Mac operating systems prior to complete the installation. 4.) Restart...

Start Here Card
Page 7
... and select All. 5 Click the Add button. See section 4. See section 6. error light is turned on your computer. Disconnect the RX500 before installing the software. Unlock the printer by removing and storing the orange plastic print head holder. Note: If you see an error message when you...2 On the next screen, select EPSON USB from the Apple menu. 2 Select the SP RX500 Series icon, then select your USB port and turn on background printing. 3 Close the Chooser. Make sure the ink cartridges are pushed all the way down menu. 3 Click Stylus Photo RX500. You see a screen asking if...
... and select All. 5 Click the Add button. See section 4. See section 6. error light is turned on your computer. Disconnect the RX500 before installing the software. Unlock the printer by removing and storing the orange plastic print head holder. Note: If you see an error message when you...2 On the next screen, select EPSON USB from the Apple menu. 2 Select the SP RX500 Series icon, then select your USB port and turn on background printing. 3 Close the Chooser. Make sure the ink cartridges are pushed all the way down menu. 3 Click Stylus Photo RX500. You see a screen asking if...

User Manual (P.I.M Plug-in)
Page 2
...II Plug-in : ■ Epson Stylus® Photo R200 ■ Epson Stylus Photo R300/R300M ■ Epson Stylus Photo R320 ■ Epson Stylus Photo R800 ■ Epson Stylus Photo RX500 ■ Epson Stylus Photo RX600 ■ Epson Stylus Photo 780 ■ Epson Stylus Photo 785EPX ■ Epson Stylus Photo 820 ■ Epson Stylus Photo 825 ■ Epson Stylus Photo 890 ■ Epson Stylus Photo 900 ■ Epson Stylus Photo 925 ■ Epson Stylus Photo 960 ■ Epson Stylus Photo 1280 ■ Epson Stylus Photo 2000P* ■ Epson Stylus Photo 2200 ■ PictureMate™...
...II Plug-in : ■ Epson Stylus® Photo R200 ■ Epson Stylus Photo R300/R300M ■ Epson Stylus Photo R320 ■ Epson Stylus Photo R800 ■ Epson Stylus Photo RX500 ■ Epson Stylus Photo RX600 ■ Epson Stylus Photo 780 ■ Epson Stylus Photo 785EPX ■ Epson Stylus Photo 820 ■ Epson Stylus Photo 825 ■ Epson Stylus Photo 890 ■ Epson Stylus Photo 900 ■ Epson Stylus Photo 925 ■ Epson Stylus Photo 960 ■ Epson Stylus Photo 1280 ■ Epson Stylus Photo 2000P* ■ Epson Stylus Photo 2200 ■ PictureMate™...

User's Guide
Page 43
... to print your document. (If you're using a custom paper size, make sure you installed the software and added the RX500 to Print Center or the Printer Setup Utility, as described on the Start Here poster. 1. Select Stylus Photo RX500 from the Format for the printer. Printing on -screen Reference Guide for paper size specifications... longer than the paper. (See the on a Macintosh 43 Printing on a Macintosh After you create a document in a software program, follow the steps in one : Select Stylus Photo RX500 Select your Paper Size Select your document or image orientation 2.
... to print your document. (If you're using a custom paper size, make sure you installed the software and added the RX500 to Print Center or the Printer Setup Utility, as described on the Start Here poster. 1. Select Stylus Photo RX500 from the Format for the printer. Printing on -screen Reference Guide for paper size specifications... longer than the paper. (See the on a Macintosh 43 Printing on a Macintosh After you create a document in a software program, follow the steps in one : Select Stylus Photo RX500 Select your Paper Size Select your document or image orientation 2.
User's Guide
Page 73
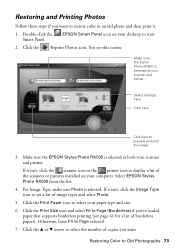
...Click here Click here to display a list of the scanners or printers installed on your paper type and size. 6. Restoring Color to start 2. Double-click the Smart Panel. You see this screen: Make sure the Stylus Photo RX500 is selected as both your computer. If it isn't, click the ...scanner icon or the printer icon to preview and print the image 3. Click the Reprint Photos icon. Otherwise, leave Fit to see page 41 for a list of image types and select Photo. 5. Select EPSON Stylus Photo RX500 from the list. 4. If it . 1. Click the Print Size icon and select Fit...
...Click here Click here to display a list of the scanners or printers installed on your paper type and size. 6. Restoring Color to start 2. Double-click the Smart Panel. You see this screen: Make sure the Stylus Photo RX500 is selected as both your computer. If it isn't, click the ...scanner icon or the printer icon to preview and print the image 3. Click the Reprint Photos icon. Otherwise, leave Fit to see page 41 for a list of image types and select Photo. 5. Select EPSON Stylus Photo RX500 from the list. 4. If it . 1. Click the Print Size icon and select Fit...


