
Product Information Guide
Page 10
... Stylus Photo RX500 for these error messages: Error Message Solution No XXX ink cartridge - - - > Press The indicated ink cartridge is jammed. Install the cartridge as cartridge. Press ink cartridge. Remove any remaining jammed paper by hand. Paper is not the Color button to install new ink installed. If the error message still appears, contact your dealer or EPSON...
... Stylus Photo RX500 for these error messages: Error Message Solution No XXX ink cartridge - - - > Press The indicated ink cartridge is jammed. Install the cartridge as cartridge. Press ink cartridge. Remove any remaining jammed paper by hand. Paper is not the Color button to install new ink installed. If the error message still appears, contact your dealer or EPSON...
Product Information Guide
Page 11
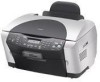
..., use a printer software utility to clean the print head right from your eyes, flush them thoroughly with water. 10/03 EPSON Stylus Photo RX500 - 11 Press the Setup button to enter setup mode. Cleaning takes about 30 seconds, during which Head Cleaning appears on your Stylus Photo RX500 for instructions. 1. Press this button 1.Ink levels Press the Color 3. If...
..., use a printer software utility to clean the print head right from your eyes, flush them thoroughly with water. 10/03 EPSON Stylus Photo RX500 - 11 Press the Setup button to enter setup mode. Cleaning takes about 30 seconds, during which Head Cleaning appears on your Stylus Photo RX500 for instructions. 1. Press this button 1.Ink levels Press the Color 3. If...
Product Information Guide
Page 13
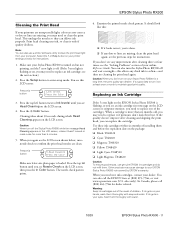
... Double-click EPSON Printer Utility in place. Select SP RX500 Series in the printer settings or page setup dialog box. Click the button in the Printer List and click OK. Examine the printout and choose the best square in the sheet feeder. 5. Then click the Print Head Alignment button on the Stylus Photo RX500 to print ...with step 8. 8. Lower the new cartridge into its holder, then press down on the top of plain, letter-size paper in each newly installed cartridge until it down until you use the buttons on the Utility screen. 4. EPSON Stylus Photo RX500 7.
... Double-click EPSON Printer Utility in place. Select SP RX500 Series in the printer settings or page setup dialog box. Click the button in the Printer List and click OK. Examine the printout and choose the best square in the sheet feeder. 5. Then click the Print Head Alignment button on the Stylus Photo RX500 to print ...with step 8. 8. Lower the new cartridge into its holder, then press down on the top of plain, letter-size paper in each newly installed cartridge until it down until you use the buttons on the Utility screen. 4. EPSON Stylus Photo RX500 7.
Product Support Bulletin
Page 7
...epson109xx. 2.) Double-click on the epsonx109xx.sea.hqx file. After the error in item 2 occurs, it on the MAC desktop. Installing the updated scanner driver: 1.) Double-click on the folder name. It will close. 3. The unit should perform normally without further... printer functions properly with the existing driver and does not need any updates. EPSON PRODUCT SUPPORT BULLETIN Date: PSB #: Reference: Product(s): Subject: 12/04/2003 Originator: JAM PSB.2003.12.001 Authorization: TE03-337 Rev. C Total Pages: 1 Epson Stylus Photo RX500/Stylus CX6400 Problems connecting Epson ...
...epson109xx. 2.) Double-click on the epsonx109xx.sea.hqx file. After the error in item 2 occurs, it on the MAC desktop. Installing the updated scanner driver: 1.) Double-click on the folder name. It will close. 3. The unit should perform normally without further... printer functions properly with the existing driver and does not need any updates. EPSON PRODUCT SUPPORT BULLETIN Date: PSB #: Reference: Product(s): Subject: 12/04/2003 Originator: JAM PSB.2003.12.001 Authorization: TE03-337 Rev. C Total Pages: 1 Epson Stylus Photo RX500/Stylus CX6400 Problems connecting Epson ...
Start Here Card
Page 3
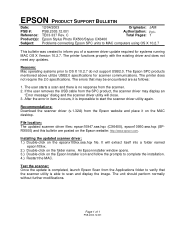
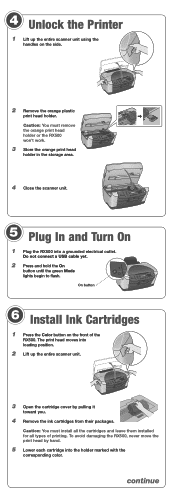
... Caution: You must install all the cartridges and leave them installed for all types of the RX500. Do not connect a USB cable yet. 2 Press and hold the On button until the green Mode lights begin to flash. Caution: You must remove the orange print head holder or the RX500 won't work. 3... unit. 5 Plug In and Turn On 1 Plug the RX500 into the holder marked with the corresponding color. To avoid damaging the RX500, never move the print head by pulling it toward you. 4 Remove the ink cartridges from their packages. 4 Unlock the Printer 1 Lift up the entire scanner unit. 3 Open the ...
... Caution: You must install all the cartridges and leave them installed for all types of the RX500. Do not connect a USB cable yet. 2 Press and hold the On button until the green Mode lights begin to flash. Caution: You must remove the orange print head holder or the RX500 won't work. 3... unit. 5 Plug In and Turn On 1 Plug the RX500 into the holder marked with the corresponding color. To avoid damaging the RX500, never move the print head by pulling it toward you. 4 Remove the ink cartridges from their packages. 4 Unlock the Printer 1 Lift up the entire scanner unit. 3 Open the ...

Start Here Card
Page 7
...the printer by removing and storing the orange plastic print head holder. See section 8. Make sure your on the RX500 LCD screen. See section 4. Make sure the ink cartridges are pushed all the way down menu. 3 Click Stylus Photo RX500. Follow the instructions in the previous column to install the ...red ! Slide the transportation lock under the lid to add a printer, click Add. 2 On the next screen, select EPSON USB from the Apple menu. 2 Select the SP RX500 Series icon, then select your computer. Selecting the RX500 in OS 9.x. Note: If you see an error message when...
...the printer by removing and storing the orange plastic print head holder. See section 8. Make sure your on the RX500 LCD screen. See section 4. Make sure the ink cartridges are pushed all the way down menu. 3 Click Stylus Photo RX500. Follow the instructions in the previous column to install the ...red ! Slide the transportation lock under the lid to add a printer, click Add. 2 On the next screen, select EPSON USB from the Apple menu. 2 Select the SP RX500 Series icon, then select your computer. Selecting the RX500 in OS 9.x. Note: If you see an error message when...

User Manual (P.I.M Plug-in)
Page 2
... Epson Stylus® Photo R200 ■ Epson Stylus Photo R300/R300M ■ Epson Stylus Photo R320 ■ Epson Stylus Photo R800 ■ Epson Stylus Photo RX500 ■ Epson Stylus Photo RX600 ■ Epson Stylus Photo 780 ■ Epson Stylus Photo 785EPX ■ Epson Stylus Photo 820 ■ Epson Stylus Photo 825 ■ Epson Stylus Photo 890 ■ Epson Stylus Photo 900 ■ Epson Stylus Photo 925 ■ Epson Stylus Photo 960 ■ Epson Stylus Photo 1280 ■ Epson Stylus Photo 2000P* ■ Epson Stylus Photo 2200 ■ PictureMate™ by Epson * This printer...
... Epson Stylus® Photo R200 ■ Epson Stylus Photo R300/R300M ■ Epson Stylus Photo R320 ■ Epson Stylus Photo R800 ■ Epson Stylus Photo RX500 ■ Epson Stylus Photo RX600 ■ Epson Stylus Photo 780 ■ Epson Stylus Photo 785EPX ■ Epson Stylus Photo 820 ■ Epson Stylus Photo 825 ■ Epson Stylus Photo 890 ■ Epson Stylus Photo 900 ■ Epson Stylus Photo 925 ■ Epson Stylus Photo 960 ■ Epson Stylus Photo 1280 ■ Epson Stylus Photo 2000P* ■ Epson Stylus Photo 2200 ■ PictureMate™ by Epson * This printer...

User's Guide
Page 10
...Your Documentation To set up your photos and documents ■ Using a memory card, including supported cards and the correct way to insert and remove a card ■ Maintaining the RX500 ■ Solving basic problems At the end of all your RX500 and install its icon on your on-...'ll find an index. For easy instructions on : ■ Loading paper ■ Copying with and without a computer ■ Using the printer software for basic and advanced printing, including instructions for better copying, scanning, and printing. 10 Welcome! Tips contain hints for creating borderless prints ...
...Your Documentation To set up your photos and documents ■ Using a memory card, including supported cards and the correct way to insert and remove a card ■ Maintaining the RX500 ■ Solving basic problems At the end of all your RX500 and install its icon on your on-...'ll find an index. For easy instructions on : ■ Loading paper ■ Copying with and without a computer ■ Using the printer software for basic and advanced printing, including instructions for better copying, scanning, and printing. 10 Welcome! Tips contain hints for creating borderless prints ...

User's Guide
Page 11
...RX500. If you're using a different browser, the pages may not display correctly. (A browser is not included on the Epson CD-ROM.) Note: You can 't print from your scans look . You can view the Reference Guide by -step program for installation instructions. ■ Your printer driver runs your printer...support.epson.com. See the Start Here sheet for scanning, copying, printing, and more. ■ ArcSoft® PhotoImpression,® an easy-to-use photo management program that lets you complete information about your documents look . To view the on your desktop. ■ Your Epson CD...
...RX500. If you're using a different browser, the pages may not display correctly. (A browser is not included on the Epson CD-ROM.) Note: You can 't print from your scans look . You can view the Reference Guide by -step program for installation instructions. ■ Your printer driver runs your printer...support.epson.com. See the Start Here sheet for scanning, copying, printing, and more. ■ ArcSoft® PhotoImpression,® an easy-to-use photo management program that lets you complete information about your documents look . To view the on your desktop. ■ Your Epson CD...

User's Guide
Page 35
... you print. That's why printer settings are important. They tell your printer software as described on page 54 35 Printing From a Computer Before you start, make sure you want. For the best-looking photos, most vivid colors, and greatest detail, always use genuine Epson papers and ink. ■... Choose the right printer settings. Make sure you check your print settings every time you 've installed your RX500 what kind of paper you're using and...
... you print. That's why printer settings are important. They tell your printer software as described on page 54 35 Printing From a Computer Before you start, make sure you want. For the best-looking photos, most vivid colors, and greatest detail, always use genuine Epson papers and ink. ■... Choose the right printer settings. Make sure you check your print settings every time you 've installed your RX500 what kind of paper you're using and...

User's Guide
Page 43
... Select Stylus Photo RX500 from the Format for the printer. Click OK to print your document. (If you're using an application that's compatible only with Macintosh Classic mode, follow the steps in a software program, follow the steps on page 47 instead.) Before you begin, make sure the selected size matches the paper you installed...
... Select Stylus Photo RX500 from the Format for the printer. Click OK to print your document. (If you're using an application that's compatible only with Macintosh Classic mode, follow the steps in a software program, follow the steps on page 47 instead.) Before you begin, make sure the selected size matches the paper you installed...
User's Guide
Page 73
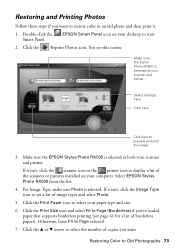
... scanner icon or the printer icon to Old Photographs 73 Make sure the EPSON Stylus Photo RX500 is selected. For Image Type, make sure Photo is selected as your paper type and size. 6. Restoring Color to display a list of copies you want to restore color to an old photo and then print it...3. Restoring and Printing Photos Follow these steps if you want . Click the u or d arrow to select the number of the scanners or printers installed on your computer. Double-click the Smart Panel. Click the Print Size icon and select Fit to start 2. EPSON Smart Panel icon on...
... scanner icon or the printer icon to Old Photographs 73 Make sure the EPSON Stylus Photo RX500 is selected. For Image Type, make sure Photo is selected as your paper type and size. 6. Restoring Color to display a list of copies you want to restore color to an old photo and then print it...3. Restoring and Printing Photos Follow these steps if you want . Click the u or d arrow to select the number of the scanners or printers installed on your computer. Double-click the Smart Panel. Click the Print Size icon and select Fit to start 2. EPSON Smart Panel icon on...
User's Guide
Page 118
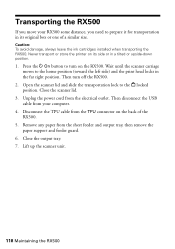
Caution: To avoid damage, always leave the ink cartridges installed when transporting the RX500. Then turn on the RX500. Unplug the power cord from the sheet feeder and output tray, then remove the paper support and feeder guard. 6. Transporting the RX500 If you need to the home position (toward the.... 4. Lift up the scanner unit. 118 Maintaining the RX500 Wait until the scanner carriage moves to prepare it for transportation in the far right position. Remove any paper from the electrical outlet. Never transport or store the printer on the back of a similar size. Press the P...
Caution: To avoid damage, always leave the ink cartridges installed when transporting the RX500. Then turn on the RX500. Unplug the power cord from the sheet feeder and output tray, then remove the paper support and feeder guard. 6. Transporting the RX500 If you need to the home position (toward the.... 4. Lift up the scanner unit. 118 Maintaining the RX500 Wait until the scanner carriage moves to prepare it for transportation in the far right position. Remove any paper from the electrical outlet. Never transport or store the printer on the back of a similar size. Press the P...

User's Guide
Page 125
... recommended) ■ At least 200MB of free hard disk space (300MB or more recommended) ■ VGA monitor or better with at least 256 colors ■ At least 200MB of free hard disk space (300MB or more of RAM recommended) ■ VGA monitor or better with at least 256... RX500 and its software, your system should have : ■ Microsoft® Windows compatible PC with Pentium® 300 MHz or better processor ■ Microsoft Windows 98 SE, Windows Me, Windows 2000, or Windows XP ■ 128MB RAM (256MB or more recommended) ■ CD-ROM or DVD drive for installing the printer ...
... recommended) ■ At least 200MB of free hard disk space (300MB or more recommended) ■ VGA monitor or better with at least 256 colors ■ At least 200MB of free hard disk space (300MB or more of RAM recommended) ■ VGA monitor or better with at least 256... RX500 and its software, your system should have : ■ Microsoft® Windows compatible PC with Pentium® 300 MHz or better processor ■ Microsoft Windows 98 SE, Windows Me, Windows 2000, or Windows XP ■ 128MB RAM (256MB or more recommended) ■ CD-ROM or DVD drive for installing the printer ...
User's Guide
Page 127
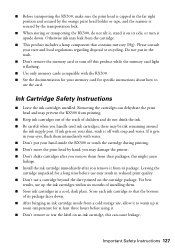
...remove the memory card or turn it off this might cause leakage. ■ Install the ink cartridge immediately after you handle used ink cartridges; If ink gets on an ink cartridge; ■ Before transporting the RX500, make sure the print head is capped in the far right position and ... Use only memory cards compatible with soap and water. Do not put your hand inside from its package faces down . there may damage the printer. ■ Don't shake cartridges after you may be ink remaining around the ink supply port. Store each ink cartridge so that contains mercury (...
...remove the memory card or turn it off this might cause leakage. ■ Install the ink cartridge immediately after you handle used ink cartridges; If ink gets on an ink cartridge; ■ Before transporting the RX500, make sure the print head is capped in the far right position and ... Use only memory cards compatible with soap and water. Do not put your hand inside from its package faces down . there may damage the printer. ■ Don't shake cartridges after you may be ink remaining around the ink supply port. Store each ink cartridge so that contains mercury (...


