
Technical Brief (Ink Jet Printers)
Page 3
Fine Art Pro Advanced Amateur Photo Enthusiast Chief Memory Officer® General Purpose You can find detailed information, comparisons, and FAQs on breathtaking large format prints, Epson has the right ink for optional cartridges, and you see continuous tone color. The Epson printer drivers use a halftoning module that places ink droplets to the page, based...
Fine Art Pro Advanced Amateur Photo Enthusiast Chief Memory Officer® General Purpose You can find detailed information, comparisons, and FAQs on breathtaking large format prints, Epson has the right ink for optional cartridges, and you see continuous tone color. The Epson printer drivers use a halftoning module that places ink droplets to the page, based...

Product Brochure
Page 1
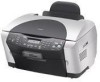
...) scanning Convenient built-in under 39 seconds Cost-saving individual ink cartridges Scan slides and negatives Epson Prints. Prints a 4" x 6" color photo in card slots - Offers innovative scan-to their original brilliance True BorderFree™ printing (4" x 6," 5" x 7," 8" x 10," 8.5" x 11" and panoramic sizes) Fast print speeds* - Brilliance that lasts. PRINTER, COPIER, SCANNER, CARD READER STYLUS® PHOTO RX500 Your home photo center.
...) scanning Convenient built-in under 39 seconds Cost-saving individual ink cartridges Scan slides and negatives Epson Prints. Prints a 4" x 6" color photo in card slots - Offers innovative scan-to their original brilliance True BorderFree™ printing (4" x 6," 5" x 7," 8" x 10," 8.5" x 11" and panoramic sizes) Fast print speeds* - Brilliance that lasts. PRINTER, COPIER, SCANNER, CARD READER STYLUS® PHOTO RX500 Your home photo center.
Product Brochure
Page 2
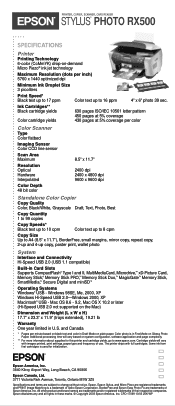
...; Copyright 2003 Epson America, Inc. Epson, Epson Stylus, and Micro Piezo are trademarks and/or registered trademarks of Seiko Epson Corporation. The printer ships with images printed, print settings, paper type and frequency of Epson America, Inc. PRINTER, COPIER, SCANNER, CARD READER STYLUS® PHOTO RX500 SPECIFICATIONS Printer Printing Technology 6-color (CcMmYK) drop-on-demand Micro Piezo® ink jet technology...
...; Copyright 2003 Epson America, Inc. Epson, Epson Stylus, and Micro Piezo are trademarks and/or registered trademarks of Seiko Epson Corporation. The printer ships with images printed, print settings, paper type and frequency of Epson America, Inc. PRINTER, COPIER, SCANNER, CARD READER STYLUS® PHOTO RX500 SPECIFICATIONS Printer Printing Technology 6-color (CcMmYK) drop-on-demand Micro Piezo® ink jet technology...
Product Information Guide
Page 2
... paper 17 to 24 lb (64 to 90 g/m2) for use genuine EPSON cartridges. See page 1 for single sheets and envelopes listed below, the Stylus Photo RX500 supports a variety of ink. ** Ink thaws and is usable after approximately 3 hours at 140 °F (60 ...ink jet Nozzle configuration Black 90 nozzles Color 450 nozzles (90 nozzles per color × 5) Print direction Bidirectional with logic seeking Resolution Up to 5760 × 1440 on various papers using Photo RPM Noise level 45dB Input Buffer 64KB Ink Cartridges Specification Black ink cartridge Color ink cartridges Color...
... paper 17 to 24 lb (64 to 90 g/m2) for use genuine EPSON cartridges. See page 1 for single sheets and envelopes listed below, the Stylus Photo RX500 supports a variety of ink. ** Ink thaws and is usable after approximately 3 hours at 140 °F (60 ...ink jet Nozzle configuration Black 90 nozzles Color 450 nozzles (90 nozzles per color × 5) Print direction Bidirectional with logic seeking Resolution Up to 5760 × 1440 on various papers using Photo RPM Noise level 45dB Input Buffer 64KB Ink Cartridges Specification Black ink cartridge Color ink cartridges Color...

Product Information Guide
Page 10
...lets you can send it is necessary. Replace the cartridge as cartridge. Replace the cartridge the Color button to turn off the Stylus Photo RX500, then turn off the Stylus Photo RX500. Remove any remaining jammed paper by hand. Press the x Color button to EPSON's photosharing web site. Load paper in . Cannot..., enhance, and print it does, then format the card or insert a new memory card. Press ink cartridge. The Stylus Photo RX500 has fed more than one sheet into place. Cannot be stored saved in correctly. see page 3. Scan to Application Scans...
...lets you can send it is necessary. Replace the cartridge as cartridge. Replace the cartridge the Color button to turn off the Stylus Photo RX500, then turn off the Stylus Photo RX500. Remove any remaining jammed paper by hand. Press the x Color button to EPSON's photosharing web site. Load paper in . Cannot..., enhance, and print it does, then format the card or insert a new memory card. Press ink cartridge. The Stylus Photo RX500 has fed more than one sheet into place. Cannot be stored saved in correctly. see page 3. Scan to Application Scans...
Product Information Guide
Page 11
...see the next section.) 2. Press this allows any dried ink to replace an ink cartridge; Examine the printed nozzle check pattern. Caution: When you may need new ink cartridges, contact your EPSON Stylus Photo RX500 not covered by EPSON's warranty. If the quality doesn't improve after cleaning three ... Reference Guide. It should look their best. Replacing an Ink Cartridge If the ! When a cartridge is turned on , you don't turn the Stylus Photo RX500 off and wait overnight-this button 3.Head Cleaning Press the Color Make sure letter-size plain paper is flashing or on...
...see the next section.) 2. Press this allows any dried ink to replace an ink cartridge; Examine the printed nozzle check pattern. Caution: When you may need new ink cartridges, contact your EPSON Stylus Photo RX500 not covered by EPSON's warranty. If the quality doesn't improve after cleaning three ... Reference Guide. It should look their best. Replacing an Ink Cartridge If the ! When a cartridge is turned on , you don't turn the Stylus Photo RX500 off and wait overnight-this button 3.Head Cleaning Press the Color Make sure letter-size plain paper is flashing or on...
Product Information Guide
Page 12
...'s cover while the print head is displayed, then press the x Color button. Only remove the cartridge(s) you need to the replacement position. 5. EPSON Stylus Photo RX500 Caution: To avoid damaging the EPSON Stylus Photo RX500, never move to the LCD screen until Ink levels is moving. If an ink cartridge is empty: Check the LCD screen to open the scanner unit, as shown...
...'s cover while the print head is displayed, then press the x Color button. Only remove the cartridge(s) you need to the replacement position. 5. EPSON Stylus Photo RX500 Caution: To avoid damaging the EPSON Stylus Photo RX500, never move to the LCD screen until Ink levels is moving. If an ink cartridge is empty: Check the LCD screen to open the scanner unit, as shown...
Product Information Guide
Page 13
... each of the cartridge until you need to replace other ink cartridges, repeat steps 5 through 7 before using the Stylus Photo RX500. Make sure the Stylus Photo RX500 is off the Stylus Photo RX500 while Charging appears on -screen instructions to force the cover closed. 9. error light is turned on the LCD screen. Close the cartridge cover. Mac OS X: Double-click EPSON Printer Utility in...
... each of the cartridge until you need to replace other ink cartridges, repeat steps 5 through 7 before using the Stylus Photo RX500. Make sure the Stylus Photo RX500 is off the Stylus Photo RX500 while Charging appears on -screen instructions to force the cover closed. 9. error light is turned on the LCD screen. Close the cartridge cover. Mac OS X: Double-click EPSON Printer Utility in...

Start Here Card
Page 1
Software CD-ROM Ink cartridges (6 total) Document mat continue EPSON Stylus Photo RX500 EPSON Stylus® Photo RX500 Start Here 4043426-00 Printed in XXX CPD-16980R2 4051205-00 XXX 1 Unpack 1 Make sure you have all the tape. Stylus Photo RX500 User's Guide How To Copy and Print Film holder Paper support 2 Remove all the parts shown here. If any parts are missing, contact Epson® as described on the back of this sheet.
Software CD-ROM Ink cartridges (6 total) Document mat continue EPSON Stylus Photo RX500 EPSON Stylus® Photo RX500 Start Here 4043426-00 Printed in XXX CPD-16980R2 4051205-00 XXX 1 Unpack 1 Make sure you have all the tape. Stylus Photo RX500 User's Guide How To Copy and Print Film holder Paper support 2 Remove all the parts shown here. If any parts are missing, contact Epson® as described on the back of this sheet.
Start Here Card
Page 3
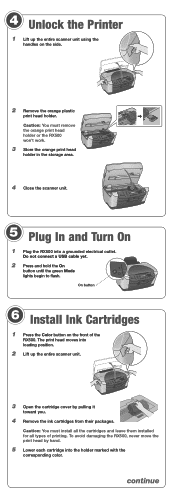
...orange print head holder or the RX500 won't work. 3 Store the orange print head holder in the storage area. 4 Close the scanner unit. 5 Plug In and Turn On 1 Plug the RX500 into a grounded electrical outlet. On button 6 Install Ink Cartridges 1 Press the Color button on the side. 2 Remove... the orange plastic print head holder. continue Caution: You must install all the cartridges and leave them installed for all types of the...
...orange print head holder or the RX500 won't work. 3 Store the orange print head holder in the storage area. 4 Close the scanner unit. 5 Plug In and Turn On 1 Plug the RX500 into a grounded electrical outlet. On button 6 Install Ink Cartridges 1 Press the Color button on the side. 2 Remove... the orange plastic print head holder. continue Caution: You must install all the cartridges and leave them installed for all types of the...

Start Here Card
Page 4
..., open it and make sure all the ink cartridges are firmly seated. 7 Lower the scanner unit. Note: Don't turn the RX500 off while you see the Initial Charge message or you forget to the round connector on the RX500 screen. 6 Press down on each cartridge until it . 3 Open the output tray... Flip the feeder guard forward. 5 Place a stack of the RX500, between the edge guides and beneath their tabs. The RX500 begins charging the ink delivery system. Position the connector as shown here before pushing it doesn't close the ink cartridge cover. If it in the top of paper in . Then ...
..., open it and make sure all the ink cartridges are firmly seated. 7 Lower the scanner unit. Note: Don't turn the RX500 off while you see the Initial Charge message or you forget to the round connector on the RX500 screen. 6 Press down on each cartridge until it . 3 Open the output tray... Flip the feeder guard forward. 5 Place a stack of the RX500, between the edge guides and beneath their tabs. The RX500 begins charging the ink delivery system. Position the connector as shown here before pushing it doesn't close the ink cartridge cover. If it in the top of paper in . Then ...

Start Here Card
Page 7
...ready to copy, scan, and print. Now you 'd like to add a printer, click Add. 2 On the next screen, select EPSON USB from the Apple menu. 2 Select the SP RX500 Series icon, then select your printer. 6 Close Print Center or the Printer Setup Utility. 7 Now start Print Center or the Printer...Open the Page Setup menu at the bottom of the screen and select All. 5 Click the Add button. Make sure the ink cartridges are pushed all the way down menu. 3 Click Stylus Photo RX500. See section 8. See section 2. If it is turned on and securely connected to your problem is on, check the messages ...
...ready to copy, scan, and print. Now you 'd like to add a printer, click Add. 2 On the next screen, select EPSON USB from the Apple menu. 2 Select the SP RX500 Series icon, then select your printer. 6 Close Print Center or the Printer Setup Utility. 7 Now start Print Center or the Printer...Open the Page Setup menu at the bottom of the screen and select All. 5 Click the Add button. Make sure the ink cartridges are pushed all the way down menu. 3 Click Stylus Photo RX500. See section 8. See section 2. If it is turned on and securely connected to your problem is on, check the messages ...

User's Guide
Page 5
Printing From a Memory Card 89 Printing an Index Form 89 Selecting Photos To Print 92 Printing With DPOF 94 Choosing Print Settings 96 Scanning a Photo to a Memory Card 105 Maintaining the RX500 109 Cleaning the Print Head 109 Replacing Ink Cartridges 111 Installing New Cartridges 111 Aligning the Print Head 115 Transporting the RX500 118 Solving Problems 121 Problems and Solutions 121 Copying Problems 121 Paper Feeding Problems 122 Copy Quality Problems 122 Where To Get Help 123 Epson Support 123 Other Software Technical Support 124 Contents 5
Printing From a Memory Card 89 Printing an Index Form 89 Selecting Photos To Print 92 Printing With DPOF 94 Choosing Print Settings 96 Scanning a Photo to a Memory Card 105 Maintaining the RX500 109 Cleaning the Print Head 109 Replacing Ink Cartridges 111 Installing New Cartridges 111 Aligning the Print Head 115 Transporting the RX500 118 Solving Problems 121 Problems and Solutions 121 Copying Problems 121 Paper Feeding Problems 122 Copy Quality Problems 122 Where To Get Help 123 Epson Support 123 Other Software Technical Support 124 Contents 5

User's Guide
Page 6
Requirements and Notices 125 Windows System Requirements 125 Macintosh System Requirements 125 Important Safety Instructions 126 Ink Cartridge Safety Instructions 127 LCD Panel Safety Instructions 128 Legal Notices 129 FCC Compliance Statement 129 Declaration of Conformity 130 ENERGY STAR Compliance 130 Epson America, Inc. Limited Warranty 131 Index 133 6 Contents
Requirements and Notices 125 Windows System Requirements 125 Macintosh System Requirements 125 Important Safety Instructions 126 Ink Cartridge Safety Instructions 127 LCD Panel Safety Instructions 128 Legal Notices 129 FCC Compliance Statement 129 Declaration of Conformity 130 ENERGY STAR Compliance 130 Epson America, Inc. Limited Warranty 131 Index 133 6 Contents
User's Guide
Page 109
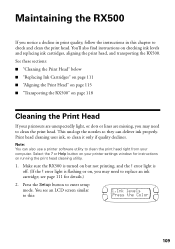
... ■ "Replacing Ink Cartridges" on page 111 ■ "Aligning the Print Head" on page 115 ■ "Transporting the RX500" on , you may need to clean the print head. Note: You can deliver ink properly. Maintaining the RX500 If you notice a decline in print quality, follow the instructions in this : 1.Ink levels Press the Color 109 Make sure...
... ■ "Replacing Ink Cartridges" on page 111 ■ "Aligning the Print Head" on page 115 ■ "Transporting the RX500" on , you may need to clean the print head. Note: You can deliver ink properly. Maintaining the RX500 If you notice a decline in print quality, follow the instructions in this : 1.Ink levels Press the Color 109 Make sure...

User's Guide
Page 111
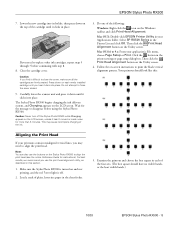
... setup mode. 2. You can't print if a cartridge is displayed, then press the x Color button. Replacing Ink Cartridges To check ink levels, follow these cartridges: Color Black Cyan Magenta Yellow Light Cyan Light Magenta Part number T048120 T048220 T048320 T048420 T048520 T048620 Replacing Ink Cartridges 111 Tip: To view all the steps in each cartridge: C (Cyan), M (Magenta), Y (Yellow), K (Black), LC (Light...
... setup mode. 2. You can't print if a cartridge is displayed, then press the x Color button. Replacing Ink Cartridges To check ink levels, follow these cartridges: Color Black Cyan Magenta Yellow Light Cyan Light Magenta Part number T048120 T048220 T048320 T048420 T048520 T048620 Replacing Ink Cartridges 111 Tip: To view all the steps in each cartridge: C (Cyan), M (Magenta), Y (Yellow), K (Black), LC (Light...

User's Guide
Page 112
...the scanner on the LCD screen, use genuine Epson ink cartridges and do not refill them. Then press the x Color button. 2. Warning: Keep ink cartridges out of the reach of children. If ink gets on top. 112 Maintaining the RX500 When you need new ink cartridges, contact your eyes, flush them thoroughly with ...to keep the scanner lid closed on your RX500 not covered by Epson's warranty. If an ink cartridge is empty: Look at (800) 873-7766 or visit www.epsonstore.com (U.S. You can 't print if an ink cartridge is empty, then press the x Color button. You can also call (800) ...
...the scanner on the LCD screen, use genuine Epson ink cartridges and do not refill them. Then press the x Color button. 2. Warning: Keep ink cartridges out of the reach of children. If ink gets on top. 112 Maintaining the RX500 When you need new ink cartridges, contact your eyes, flush them thoroughly with ...to keep the scanner lid closed on your RX500 not covered by Epson's warranty. If an ink cartridge is empty: Look at (800) 873-7766 or visit www.epsonstore.com (U.S. You can 't print if an ink cartridge is empty, then press the x Color button. You can also call (800) ...

User's Guide
Page 113
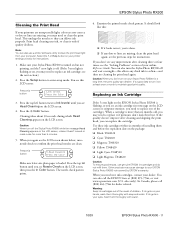
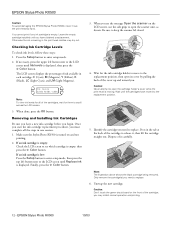
... release it carefully. Press in the tab at the back of it , then lift the cartridge straight out. Only remove the cartridge(s) you . Open the cover from the cartridge. Unwrap the new cartridge. Dispose of the cartridge to replace. Replacing Ink Cartridges 113 Caution: Don't remove any labels or seals from the back 4. 3. Note: The illustration above...
... release it carefully. Press in the tab at the back of it , then lift the cartridge straight out. Only remove the cartridge(s) you . Open the cover from the cartridge. Unwrap the new cartridge. Dispose of the cartridge to replace. Replacing Ink Cartridges 113 Caution: Don't remove any labels or seals from the back 4. 3. Note: The illustration above...
User's Guide
Page 114
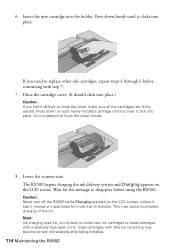
... each newly installed cartridge until it difficult to replace other ink cartridges, repeat steps 4 through 6 before using the RX500. This may become empty immediately after being installed. 114 Maintaining the RX500 Note: Ink charging uses ink, so it's best to install new ink cartridges or used cartridges with little ink remaining may cause incomplete charging of ink. Close the cartridge cover. (It should...
... each newly installed cartridge until it difficult to replace other ink cartridges, repeat steps 4 through 6 before using the RX500. This may become empty immediately after being installed. 114 Maintaining the RX500 Note: Ink charging uses ink, so it's best to install new ink cartridges or used cartridges with little ink remaining may cause incomplete charging of ink. Close the cartridge cover. (It should...
User's Guide
Page 118
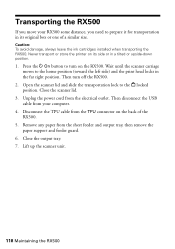
... electrical outlet. Lift up the scanner unit. 118 Maintaining the RX500 Caution: To avoid damage, always leave the ink cartridges installed when transporting the RX500. Then turn on its original box or one of the RX500. 5. Transporting the RX500 If you move your computer. 4. Open the scanner lid and... position. 1. Close the scanner lid. 3. Close the output tray. 7. Never transport or store the printer on the RX500. Disconnect the TPU cable from your RX500 some distance, you need to the locked position. Unplug the power cord from the sheet feeder and output tray, then ...
... electrical outlet. Lift up the scanner unit. 118 Maintaining the RX500 Caution: To avoid damage, always leave the ink cartridges installed when transporting the RX500. Then turn on its original box or one of the RX500. 5. Transporting the RX500 If you move your computer. 4. Open the scanner lid and... position. 1. Close the scanner lid. 3. Close the output tray. 7. Never transport or store the printer on the RX500. Disconnect the TPU cable from your RX500 some distance, you need to the locked position. Unplug the power cord from the sheet feeder and output tray, then ...


