User's Guide
Page 5
Settings Menu 82 Projector Setup Settings - Extended Menu 85 Projector Information Display - Info Menu 87 Projector Reset Options - Image Menu 78 Input Signal Settings - Changing the Color Mode...60 Available Color Modes...61 Turning On Auto Iris...61 Controlling the Volume With the Volume Buttons 62 Projecting a Slide Show ...63 Supported Slideshow File Types 63 Starting a Slide Show ...64 Slideshow Display Options ...65 Adjusting Projector Features ...67 Shutting Off the Picture and Sound Temporarily 67 Stopping Video Action Temporarily ...68 Zooming Into and Out of Images ...68...
Settings Menu 82 Projector Setup Settings - Extended Menu 85 Projector Information Display - Info Menu 87 Projector Reset Options - Image Menu 78 Input Signal Settings - Changing the Color Mode...60 Available Color Modes...61 Turning On Auto Iris...61 Controlling the Volume With the Volume Buttons 62 Projecting a Slide Show ...63 Supported Slideshow File Types 63 Starting a Slide Show ...64 Slideshow Display Options ...65 Adjusting Projector Features ...67 Shutting Off the Picture and Sound Temporarily 67 Stopping Video Action Temporarily ...68 Zooming Into and Out of Images ...68...

User's Guide
Page 6
... Air Filter and Vents 91 Replacing the Air Filter...92 Projector Lamp Maintenance...94 Replacing the Lamp ...95 Resetting the Lamp Timer...100 Replacing the Remote Control Batteries 101 Transporting the Projector...103 Solving Problems ...104 Projection Problem Tips ...104 Projector Light Status ...104 Using the Projector Help Displays ...107 Solving Image or Sound Problems 107 Solutions When No Image Appears 108 Solutions When Image is Incorrect Using the USB Display Function 109 Solutions When "No Signal" Message Appears 109 Displaying From a PC Laptop 110 Displaying From a Mac Laptop...
... Air Filter and Vents 91 Replacing the Air Filter...92 Projector Lamp Maintenance...94 Replacing the Lamp ...95 Resetting the Lamp Timer...100 Replacing the Remote Control Batteries 101 Transporting the Projector...103 Solving Problems ...104 Projection Problem Tips ...104 Projector Light Status ...104 Using the Projector Help Displays ...107 Solving Image or Sound Problems 107 Solutions When No Image Appears 108 Solutions When Image is Incorrect Using the USB Display Function 109 Solutions When "No Signal" Message Appears 109 Displaying From a PC Laptop 110 Displaying From a Mac Laptop...

User's Guide
Page 9
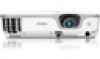
... -1 USB projection, audio, and mouse control for instant setup • PC Free photo slide shows via connected USB memory devices • HDMI port for computer or video device connection (PowerLite X12) • Port for connecting an external monitor and external speakers (PowerLite S11) Easy-to learn more about your projector and this manual, unless noted otherwise. Product Box Contents 9 Introduction to Your Projector Refer to these special features: Bright, high-resolution projection system...
... -1 USB projection, audio, and mouse control for instant setup • PC Free photo slide shows via connected USB memory devices • HDMI port for computer or video device connection (PowerLite X12) • Port for connecting an external monitor and external speakers (PowerLite S11) Easy-to learn more about your projector and this manual, unless noted otherwise. Product Box Contents 9 Introduction to Your Projector Refer to these special features: Bright, high-resolution projection system...

User's Guide
Page 22
... Locations 22 2 Computer button (cycles through connected computer sources) 3 Video button (cycles through connected video sources) 4 Numeric buttons (enter numbers) 5 Auto button (automatically adjusts position, tracking, and sync settings) 6 Aspect button (selects the image aspect ratio) 7 Num button (when held down, switches Numeric buttons to number function) 8 Menu button (accesses projector menu system) 9 Arrow buttons (move through on -screen pointer) 19 Esc button (cancels/exits functions and controls wireless mouse functions) 20 Color Mode button (selects display modes) 21 LAN button...
... Locations 22 2 Computer button (cycles through connected computer sources) 3 Video button (cycles through connected video sources) 4 Numeric buttons (enter numbers) 5 Auto button (automatically adjusts position, tracking, and sync settings) 6 Aspect button (selects the image aspect ratio) 7 Num button (when held down, switches Numeric buttons to number function) 8 Menu button (accesses projector menu system) 9 Arrow buttons (move through on -screen pointer) 19 Esc button (cancels/exits functions and controls wireless mouse functions) 20 Color Mode button (selects display modes) 21 LAN button...
User's Guide
Page 26
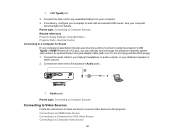
... connect the projector to a variety of computer, video, and audio sources to display presentations, movies, or other images, with or without sound. • Connect any type of computer that has a USB port, standard video output (monitor) port, or HDMI port (PowerLite X12). • For video projection, connect devices such as DVD players, gaming consoles, digital cameras, and camera phones with compatible video output ports. • If your presentation or video includes sound, you can connect audio input cables...
... connect the projector to a variety of computer, video, and audio sources to display presentations, movies, or other images, with or without sound. • Connect any type of computer that has a USB port, standard video output (monitor) port, or HDMI port (PowerLite X12). • For video projection, connect devices such as DVD players, gaming consoles, digital cameras, and camera phones with compatible video output ports. • If your presentation or video includes sound, you can connect audio input cables...

User's Guide
Page 29
... a wireless mouse. Connect the other end to the projector's HDMI port. 1 HDMI port Parent topic: Connecting to Computer Sources Connecting to a Computer for HDMI Video and Audio If your computer. Tighten the screws on the projector, you control computer presentations at a distance from your computer has an HDMI port, you can set up the remote control to a Computer, USB TypeB, or HDMI (PowerLite X12) port on the VGA connectors. Connect the HDMI cable to your computer's HDMI output port. 3. Connect the USB cable to your projector's USB...
... a wireless mouse. Connect the other end to the projector's HDMI port. 1 HDMI port Parent topic: Connecting to Computer Sources Connecting to a Computer for HDMI Video and Audio If your computer. Tighten the screws on the projector, you control computer presentations at a distance from your computer has an HDMI port, you can set up the remote control to a Computer, USB TypeB, or HDMI (PowerLite X12) port on the VGA connectors. Connect the HDMI cable to your computer's HDMI output port. 3. Connect the USB cable to your projector's USB...
User's Guide
Page 30
... using the projector's USB TypeB or HDMI (PowerLite X12) port, you can still play sound through the projector's speaker system. Connect the audio cable to a Composite Video Source 30 Connecting to an HDMI Video Source Connecting to a Component-to-VGA Video Source Connecting to your laptop's headphone or audio-out jack, or your computer. 3. Connect the other end to the projector's Audio ports. 1 Audio ports Parent topic: Connecting to Computer Sources Connecting to Video Sources Follow the instructions in these sections to connect video devices to any available USB port...
... using the projector's USB TypeB or HDMI (PowerLite X12) port, you can still play sound through the projector's speaker system. Connect the audio cable to a Composite Video Source 30 Connecting to an HDMI Video Source Connecting to a Component-to-VGA Video Source Connecting to your laptop's headphone or audio-out jack, or your computer. 3. Connect the other end to the projector's Audio ports. 1 Audio ports Parent topic: Connecting to Computer Sources Connecting to Video Sources Follow the instructions in these sections to connect video devices to any available USB port...

User's Guide
Page 31
...projector using an optional HDMI cable (PowerLite X12). 1. Make sure the projector and your video source are using a componentto-VGA video cable. Connect the component connectors to your component video cable. 31 If you can connect it to the projector using an adapter, connect these connectors to -VGA Video Source If your video source has component video ports, you are turned off . 2. Connect the other end to the projector's HDMI port. 1 HDMI port Parent topic: Connecting to Video Sources Connecting to a Component-to your video source's color-coded component video output ports...
...projector using an optional HDMI cable (PowerLite X12). 1. Make sure the projector and your video source are using a componentto-VGA video cable. Connect the component connectors to your component video cable. 31 If you can connect it to the projector using an adapter, connect these connectors to -VGA Video Source If your video source has component video ports, you are turned off . 2. Connect the other end to the projector's HDMI port. 1 HDMI port Parent topic: Connecting to Video Sources Connecting to a Component-to your video source's color-coded component video output ports...

User's Guide
Page 69
... Password Security Types Entering a Password to Use the Projector Saving a User's Logo Image to Display Parent topic: Projector Security Features Setting a Password To use password security, you use by identifying the projector's owner. Password Security Types Locking the Projector's Buttons Installing a Security Cable Parent topic: Adjusting Projector Features Password Security Types You can set up the following security features: • Password security to prevent the projector from being turned on, and prevent changes to the startup screen and other settings. • Button lock...
... Password Security Types Entering a Password to Use the Projector Saving a User's Logo Image to Display Parent topic: Projector Security Features Setting a Password To use password security, you use by identifying the projector's owner. Password Security Types Locking the Projector's Buttons Installing a Security Cable Parent topic: Adjusting Projector Features Password Security Types You can set up the following security features: • Password security to prevent the projector from being turned on, and prevent changes to the startup screen and other settings. • Button lock...

User's Guide
Page 73
... called the User's Logo screen. You see a prompt asking if you want to use the displayed image as the User's Logo. 2. Select the User's Logo setting and press Enter. You see a prompt asking if you want to project as a user's logo. 4. This transferred image is not receiving an input signal or when you want to Epson for it whenever the projector turns on the remote control to surround...
... called the User's Logo screen. You see a prompt asking if you want to use the displayed image as the User's Logo. 2. Select the User's Logo setting and press Enter. You see a prompt asking if you want to project as a user's logo. 4. This transferred image is not receiving an input signal or when you want to Epson for it whenever the projector turns on the remote control to surround...
User's Guide
Page 89
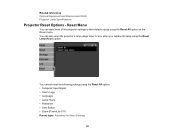
... reset the projector's lamp usage timer to their default values using the Reset All option: • Computer Input Signal • User's Logo • Language • Lamp Hours • Password • User Button • Zoom (PowerLite S11) Parent topic: Adjusting the Menu Settings 89 You cannot reset the following settings using the Reset All option on the Reset menu. You can reset most of the projector settings to zero when you replace the lamp using the Reset Lamp Hours option. Related references Optional Equipment and Replacement Parts Projector Lamp Specifications Projector...
... reset the projector's lamp usage timer to their default values using the Reset All option: • Computer Input Signal • User's Logo • Language • Lamp Hours • Password • User Button • Zoom (PowerLite S11) Parent topic: Adjusting the Menu Settings 89 You cannot reset the following settings using the Reset All option on the Reset menu. You can reset most of the projector settings to zero when you replace the lamp using the Reset Lamp Hours option. Related references Optional Equipment and Replacement Parts Projector Lamp Specifications Projector...

User's Guide
Page 90
... authorized Epson servicer. Never open any cover on the surface. • To remove dust or smudges, gently wipe the lens with lens-cleaning paper. 90 Dangerous electrical voltages in the projector can injure you should replace are the lamp, air filter, and remote control batteries. If any part of the projector, turn it from overheating due to blocked ventilation. Warning: Do not try to service this product yourself, except as specifically explained...
... authorized Epson servicer. Never open any cover on the surface. • To remove dust or smudges, gently wipe the lens with lens-cleaning paper. 90 Dangerous electrical voltages in the projector can injure you should replace are the lamp, air filter, and remote control batteries. If any part of the projector, turn it from overheating due to blocked ventilation. Warning: Do not try to service this product yourself, except as specifically explained...

User's Guide
Page 94
... Projector Lamp Maintenance The projector keeps track of the number of hours the lamp is flashing orange Replacing the Lamp Resetting the Lamp Timer Parent topic: Projector Maintenance Related references Optional Equipment and Replacement Parts Projector Lamp Specifications 94 Place the new air filter in the projector as possible when the following occurs: • The projected image gets darker or starts to deteriorate • A message appears when you turn on the projector telling you to replace the lamp • The projector's lamp light is used and displays...
... Projector Lamp Maintenance The projector keeps track of the number of hours the lamp is flashing orange Replacing the Lamp Resetting the Lamp Timer Parent topic: Projector Maintenance Related references Optional Equipment and Replacement Parts Projector Lamp Specifications 94 Place the new air filter in the projector as possible when the following occurs: • The projected image gets darker or starts to deteriorate • A message appears when you turn on the projector telling you to replace the lamp • The projector's lamp light is used and displays...
User's Guide
Page 106
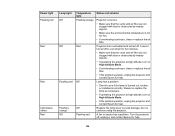
... at high altitude, turn on High Altitude Mode. • If the problem persists, unplug the projector and contact Epson for help . Reseat or replace the lamp as necessary. • If operating the projector at high altitude, turn on High Altitude Mode. • If overheating continues, clean or replace the air filter. • If the problem persists, unplug the projector and contact Epson for help . Power light Flashing red Red Red Light status varies Red Lamp light Off Off Flashing red Flashing orange Off Temperature light Flashing orange Red Off Off Flashing red Status and...
... at high altitude, turn on High Altitude Mode. • If the problem persists, unplug the projector and contact Epson for help . Reseat or replace the lamp as necessary. • If operating the projector at high altitude, turn on High Altitude Mode. • If overheating continues, clean or replace the air filter. • If the problem persists, unplug the projector and contact Epson for help . Power light Flashing red Red Red Light status varies Red Lamp light Off Off Flashing red Flashing orange Off Temperature light Flashing orange Red Off Off Flashing red Status and...
User's Guide
Page 108
... screen size from full screen mode. • For images projected from applications using Windows DirectX, turn on the projector (with Direct Power On enabled). • Check the settings on the Signal menu to make sure Messages is in sleep mode or displaying a blank screen saver. • If you unplugged the projector and plugged it from standby or sleep mode. Also see if the image was temporarily turned off DirectX functions. Parent topic: Solving Image or Sound Problems...
... screen size from full screen mode. • For images projected from applications using Windows DirectX, turn on the projector (with Direct Power On enabled). • Check the settings on the Signal menu to make sure Messages is in sleep mode or displaying a blank screen saver. • If you unplugged the projector and plugged it from standby or sleep mode. Also see if the image was temporarily turned off DirectX functions. Parent topic: Solving Image or Sound Problems...

User's Guide
Page 109
... projecting from full screen mode. • With Windows DirectX, turn the projector and the connected computer or video source off the Transfer layered window setting in the Epson USB Display Settings program on again. Related references Projector Setup Settings - Settings Menu Related tasks Unlocking the Projector's Buttons Solutions When Image is Incorrect Using the USB Display Function If no image appears or if the image appears incorrectly using the USB Display function, try the following solutions: • Press the USB button on the remote control...
... projecting from full screen mode. • With Windows DirectX, turn the projector and the connected computer or video source off the Transfer layered window setting in the Epson USB Display Settings program on again. Related references Projector Setup Settings - Settings Menu Related tasks Unlocking the Projector's Buttons Solutions When Image is Incorrect Using the USB Display Function If no image appears or if the image appears incorrectly using the USB Display function, try the following solutions: • Press the USB button on the remote control...

User's Guide
Page 111
... Keystone Buttons 111 Supported Video Display Formats Solutions When Only a Partial Image Appears If only a partial computer image appears, try the following solutions: • Press the Auto button on the remote control to optimize the image signal. • Try adjusting the image position using the Position menu setting. • Press the Aspect button on the remote control to select a different image aspect ratio. • If you zoomed into or out of the image using the projector...
... Keystone Buttons 111 Supported Video Display Formats Solutions When Only a Partial Image Appears If only a partial computer image appears, try the following solutions: • Press the Auto button on the remote control to optimize the image signal. • Try adjusting the image position using the Position menu setting. • Press the Aspect button on the remote control to select a different image aspect ratio. • If you zoomed into or out of the image using the projector...
User's Guide
Page 114
... video source. • If you do not hear sound from an HDMI source (PowerLite X12), set the connected device to PCM output. • Make sure any connected audio cables are using the USB Display function, turn on the Output audio from the projector setting in the Settings menu. • If the image has been progressively darkening, you may need to replace the projector lamp soon. Parent topic: Solving Image or Sound Problems Related concepts Projector Lamp Maintenance Related references Input Signal Settings...
... video source. • If you do not hear sound from an HDMI source (PowerLite X12), set the connected device to PCM output. • Make sure any connected audio cables are using the USB Display function, turn on the Output audio from the projector setting in the Settings menu. • If the image has been progressively darkening, you may need to replace the projector lamp soon. Parent topic: Solving Image or Sound Problems Related concepts Projector Lamp Maintenance Related references Input Signal Settings...

User's Guide
Page 115
... cord and contact Epson. • If the projector's lamp shuts off unexpectedly, it may be interfering with the projector's remote receivers. Begin a presentation to enter sleep mode. Release the button to a working electrical outlet. • The projector's buttons may be locked for this light status. • If the power button on the remote control does not turn on the projector. • The power cord may have entered sleep mode after a period of the projector. • Check...
... cord and contact Epson. • If the projector's lamp shuts off unexpectedly, it may be interfering with the projector's remote receivers. Begin a presentation to enter sleep mode. Release the button to a working electrical outlet. • The projector's buttons may be locked for this light status. • If the power button on the remote control does not turn on the projector. • The power cord may have entered sleep mode after a period of the projector. • Check...
User's Guide
Page 116
... ID number to the remote control to operate multiple projectors, you may have entered an incorrect password too many times and see a message displaying a request code, write down the code and contact Epson. • If you lose the remote control you need to check or change the ID setting (feature not available with your projector. You can download utilities and documentation, get FAQs and troubleshooting advice, or e-mail Epson with all projectors...
... ID number to the remote control to operate multiple projectors, you may have entered an incorrect password too many times and see a message displaying a request code, write down the code and contact Epson. • If you lose the remote control you need to check or change the ID setting (feature not available with your projector. You can download utilities and documentation, get FAQs and troubleshooting advice, or e-mail Epson with all projectors...


