
User's Guide
Page 4
... Selecting Wired Network Settings 43 Wireless Network Projection ...45 Installing the Wireless LAN Module 46 Using Quick Wireless Connection (Windows Only 49 Selecting Wireless Network Settings Manually 49 Wireless LAN Menu Settings ...52 Selecting Wireless Network Settings in Windows 53 Selecting Wireless Network Settings in Mac OS 53 Setting Up Wireless Network Security 54 Wireless Security Menu Settings 55 Setting...
... Selecting Wired Network Settings 43 Wireless Network Projection ...45 Installing the Wireless LAN Module 46 Using Quick Wireless Connection (Windows Only 49 Selecting Wireless Network Settings Manually 49 Wireless LAN Menu Settings ...52 Selecting Wireless Network Settings in Windows 53 Selecting Wireless Network Settings in Mac OS 53 Setting Up Wireless Network Security 54 Wireless Security Menu Settings 55 Setting...

User's Guide
Page 12
.... See your projector: Option or part Genuine Epson replacement lamp (PowerLite 92/93/95/96W/905) Genuine Epson replacement lamp (PowerLite 915W/1835) Air filter replacement set (2 filters) Wireless LAN module (ELPAP07) (PowerLite 95/96W/905/915W/1835) Quick Wireless Connection USB key (ELPAP08) (PowerLite 95/96W/905/915W/1835) Epson DC-11 document camera Epson DC-10s document camera Part number V13H010L60 V13H010L61...
.... See your projector: Option or part Genuine Epson replacement lamp (PowerLite 92/93/95/96W/905) Genuine Epson replacement lamp (PowerLite 915W/1835) Air filter replacement set (2 filters) Wireless LAN module (ELPAP07) (PowerLite 95/96W/905/915W/1835) Quick Wireless Connection USB key (ELPAP08) (PowerLite 95/96W/905/915W/1835) Epson DC-11 document camera Epson DC-10s document camera Part number V13H010L60 V13H010L61...

User's Guide
Page 16
10 Wireless LAN module indicator light (PowerLite 95/96W/905/915W/1835) 11 Zoom ring 12 Control panel 13 Lamp cover 14 Projector status lights Parent topic: Projector Parts Locations Projector Parts - Rear 1 HDMI port 2 A/C input port 3 S-Video port 4 Video port 5 L-Audio-R audio ports 6 Audio1 port 7 Monitor Out port 8 Audio Out port 9 Audio2 port 10 RS-232C port 11 Mic (microphone) port (PowerLite 95/96W/905/915W/1835) 16
10 Wireless LAN module indicator light (PowerLite 95/96W/905/915W/1835) 11 Zoom ring 12 Control panel 13 Lamp cover 14 Projector status lights Parent topic: Projector Parts Locations Projector Parts - Rear 1 HDMI port 2 A/C input port 3 S-Video port 4 Video port 5 L-Audio-R audio ports 6 Audio1 port 7 Monitor Out port 8 Audio Out port 9 Audio2 port 10 RS-232C port 11 Mic (microphone) port (PowerLite 95/96W/905/915W/1835) 16

User's Guide
Page 45
...your projector through a wireless network (PowerLite 95/96W/905/915W/1835). You must enter a displayed, randomized keyword from the displayed keyboard, press the arrow buttons on the DHCP setting. • If you must install the optional Epson 802.11g/b/n wireless LAN module, and then set ...the PJLink protocol for projector control. • Web Control Password lets you enter a password up your wireless network: • Using the optional Epson Quick Wireless Connection USB key (Windows only) • Configuring the connection manually using the EasyMP Network Projection software...
...your projector through a wireless network (PowerLite 95/96W/905/915W/1835). You must enter a displayed, randomized keyword from the displayed keyboard, press the arrow buttons on the DHCP setting. • If you must install the optional Epson 802.11g/b/n wireless LAN module, and then set ...the PJLink protocol for projector control. • Web Control Password lets you enter a password up your wireless network: • Using the optional Epson Quick Wireless Connection USB key (Windows only) • Configuring the connection manually using the EasyMP Network Projection software...
User's Guide
Page 46
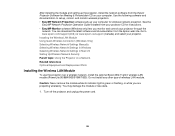
... & Presentation CD on a Network Related references Optional Equipment and Replacement Parts Installing the Wireless LAN Module To use the projector over a wireless network, install the optional Epson 802.11g/b/n wireless LAN module (PowerLite 95/96W/905/915W/1835). Go to set up, control, and monitor wireless projection: • EasyMP Network Projection software sets up the projector, install the network...
... & Presentation CD on a Network Related references Optional Equipment and Replacement Parts Installing the Wireless LAN Module To use the projector over a wireless network, install the optional Epson 802.11g/b/n wireless LAN module (PowerLite 95/96W/905/915W/1835). Go to set up, control, and monitor wireless projection: • EasyMP Network Projection software sets up the projector, install the network...

User's Guide
Page 47
Slide the air filter cover latch and open the air filter cover. 3. Remove the screw securing the wireless LAN module stopper, then remove the stopper. 47 2.
Slide the air filter cover latch and open the air filter cover. 3. Remove the screw securing the wireless LAN module stopper, then remove the stopper. 47 2.

User's Guide
Page 48
Insert the wireless LAN module into the port. 5. Replace the wireless LAN module stopper and secure it using the screw you removed. 6. Close the air filter cover. 7. 4. Plug in and turn on the projector. 48
Insert the wireless LAN module into the port. 5. Replace the wireless LAN module stopper and secure it using the screw you removed. 6. Close the air filter cover. 7. 4. Plug in and turn on the projector. 48

Quick Setup
Page 2
... the steps here to exit the menu system. Your computer must install the optional Epson wireless LAN module (part number V12H418P12). Place it directly in position. 3 Rotate the focus ring to one side of the menu system is English. Power button Power light...on the projector to cool down the projector, press the power button twice, then unplug it . 3 Remove the screw securing the wireless LAN module stopper, then remove the stopper. 4 Insert the wireless LAN module into the port. Adjust the image 1 If you don't see the User's Guide on the projector or remote control. 4 Press...
... the steps here to exit the menu system. Your computer must install the optional Epson wireless LAN module (part number V12H418P12). Place it directly in position. 3 Rotate the focus ring to one side of the menu system is English. Power button Power light...on the projector to cool down the projector, press the power button twice, then unplug it . 3 Remove the screw securing the wireless LAN module stopper, then remove the stopper. 4 Insert the wireless LAN module into the port. Adjust the image 1 If you don't see the User's Guide on the projector or remote control. 4 Press...
Quick Setup
Page 3
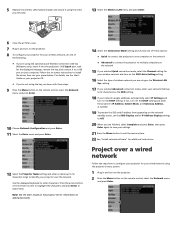
... projector for your wired network using the projector's menu system. 1 Plug in and turn on the projector. 8 To configure your projector for your wireless network, do one computer on the network • Advanced to connect the projector to multiple computers on the remote control to highlight the characters and... message, remove the key, and connect it to Off. 20 When you are using as the Wireless LAN Sys. 5 Replace the wireless LAN module stopper and secure it using the screw you removed. 13 Select the Wireless LAN menu and press Enter. 6 Close the air filter cover. 7 Plug in and turn on...
... projector for your wired network using the projector's menu system. 1 Plug in and turn on the projector. 8 To configure your projector for your wireless network, do one computer on the network • Advanced to connect the projector to multiple computers on the remote control to highlight the characters and... message, remove the key, and connect it to Off. 20 When you are using as the Wireless LAN Sys. 5 Replace the wireless LAN module stopper and secure it using the screw you removed. 13 Select the Wireless LAN menu and press Enter. 6 Close the air filter cover. 7 Plug in and turn on...


