
User Replaceable Parts List
Page 1
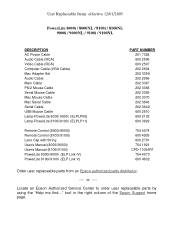
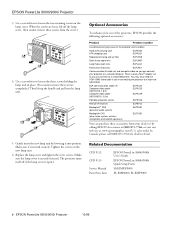
...replaceable parts by using the "Help me find..." tool in the right column of the Epson Support home page. or ---- User Replaceable Items effective 12/01/2005 PowerLite 8000i / 8000NL / 8100i / 8100NL 9000i / 9000NL / 9100i / 9100NL DESCRIPTION AC Power Cable Audio Cable (RCA) Video Cable (RCA) Computer Cable (VGA Cable) Mac Adapter Set Audio Cable Main Cable PS/2 Mouse Cable Serial Mouse Cable Mac Mouse Cable Mac Serial Cable Serial Cable USB Mouse Cable Lamp-PowerLite 8000i 9000i (ELPLP08) Lamp-PowerLite 8100i/9100i (ELPLP11) Remote Control (8000i/9000i) Remote Control (8100i/9100i) Lens...
...replaceable parts by using the "Help me find..." tool in the right column of the Epson Support home page. or ---- User Replaceable Items effective 12/01/2005 PowerLite 8000i / 8000NL / 8100i / 8100NL 9000i / 9000NL / 9100i / 9100NL DESCRIPTION AC Power Cable Audio Cable (RCA) Video Cable (RCA) Computer Cable (VGA Cable) Mac Adapter Set Audio Cable Main Cable PS/2 Mouse Cable Serial Mouse Cable Mac Mouse Cable Mac Serial Cable Serial Cable USB Mouse Cable Lamp-PowerLite 8000i 9000i (ELPLP08) Lamp-PowerLite 8100i/9100i (ELPLP11) Remote Control (8000i/9000i) Remote Control (8100i/9100i) Lens...
Product Information Guide
Page 3
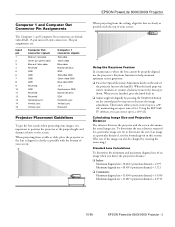
... signals Red video Green video Blue video Monitor (ID bit 2) GND Red video GND Green video GND Blue video GND +5 V Synchronous GND Monitor (ID bit 0) SDA Horizontal sync Vertical sync Reserved Projector Placement Guidelines To get the best results when projecting your images, it clockwise or counter-clockwise to move the lens up or down. Using the ELP Link IV software, you 're finished, press the knob back in this section. (The size...
... signals Red video Green video Blue video Monitor (ID bit 2) GND Red video GND Green video GND Blue video GND +5 V Synchronous GND Monitor (ID bit 0) SDA Horizontal sync Vertical sync Reserved Projector Placement Guidelines To get the best results when projecting your images, it clockwise or counter-clockwise to move the lens up or down. Using the ELP Link IV software, you 're finished, press the knob back in this section. (The size...
Product Information Guide
Page 4
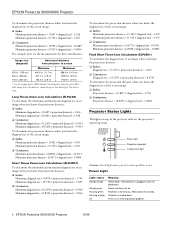
... screen, depending on . Projector is an internal projector problem. 4 - Power light Projection lamp light Temperature light Caution: A red light warns you know the diagonal size of the screen image: t Inches: Maximum projection distance = (1.967 × diagonal size) - 3.224 Minimum projection distance = (1.554 × diagonal size) - 3.563 t Centimeters: Maximum projection distance = (4.996 × diagonal size) - 8.1889 Minimum projection distance = (3.947 × diagonal size) - 9.0500 For example, here are on the setting of the zoom ring. EPSON PowerLite 8000i/9000i Projector...
... screen, depending on . Projector is an internal projector problem. 4 - Power light Projection lamp light Temperature light Caution: A red light warns you know the diagonal size of the screen image: t Inches: Maximum projection distance = (1.967 × diagonal size) - 3.224 Minimum projection distance = (1.554 × diagonal size) - 3.563 t Centimeters: Maximum projection distance = (4.996 × diagonal size) - 8.1889 Minimum projection distance = (3.947 × diagonal size) - 9.0500 For example, here are on the setting of the zoom ring. EPSON PowerLite 8000i/9000i Projector...
Product Information Guide
Page 5
... - Flashing red Problem with the cooling fan or temperature sensor. Clear the screen Note: The projector may be able to access these conditions: the R/C (remote control) ON/OFF switch is present (such as direct sunlight) shines into the infrared receiver; Change the mouse cursor to project image. Front Back Open the cover just below the Esc button to use the remote control, point it to a stamp 2. EPSON PowerLite 8000i/9000i Projector 1 1 Projection Lamp Light Light status Meaning Orange...
... - Flashing red Problem with the cooling fan or temperature sensor. Clear the screen Note: The projector may be able to access these conditions: the R/C (remote control) ON/OFF switch is present (such as direct sunlight) shines into the infrared receiver; Change the mouse cursor to project image. Front Back Open the cover just below the Esc button to use the remote control, point it to a stamp 2. EPSON PowerLite 8000i/9000i Projector 1 1 Projection Lamp Light Light status Meaning Orange...
Product Information Guide
Page 6
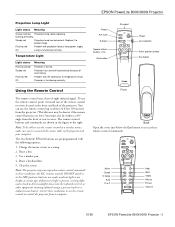
... help displays the previous screen or menu. Pressing the shift and Keystone buttons at the same time increases or decreases the sound volume. EPSON PowerLite 8000i/9000i Projector This table summarizes the functions on the screen. Freeze Keeps the current computer or video image on the remote control. E-Zoom Enlarges or reduces the image size from 1x to the desired session number. Pressing the right side of the button reduces the image. Effects buttons Use...
... help displays the previous screen or menu. Pressing the shift and Keystone buttons at the same time increases or decreases the sound volume. EPSON PowerLite 8000i/9000i Projector This table summarizes the functions on the screen. Freeze Keeps the current computer or video image on the remote control. E-Zoom Enlarges or reduces the image size from 1x to the desired session number. Pressing the right side of the button reduces the image. Effects buttons Use...
Product Information Guide
Page 7
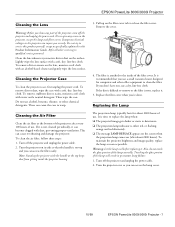
... that you can cause overheating and damage the projector. It is time to replace the lamp when: t The projected image gets darker or starts to remove or the filter is either red, or flashing orange and red alternately. Then wipe the case. Turn the projector on the projector, except the lamp and filter covers. Warning: Let the lamp cool before replacing it . 5. Do not try to clean the filter. t The projection lamp indicator is torn, replace it . Also, do...
... that you can cause overheating and damage the projector. It is time to replace the lamp when: t The projected image gets darker or starts to remove or the filter is either red, or flashing orange and red alternately. Then wipe the case. Turn the projector on the projector, except the lamp and filter covers. Warning: Let the lamp cool before replacing it . 5. Do not try to clean the filter. t The projection lamp indicator is torn, replace it . Also, do...
Product Information Guide
Page 8
... position. Replace the lamp cover and tighten the cover screws. (Make sure the lamp cover is open.) Related Documentation CPD 9112 CPD 9113 Service Manual Parts Price Lists EPSON PowerLite 8000i/9000i User's Guide EPSON PowerLite 8000i/9000i Quick Setup Poster SM-EMP8/9000 PL-EMP8000, PL-EMP9000 8 - EPSON PowerLite 8000i/9000i Projector 10/99 EPSON PowerLite 8000i/9000i Projector 3. When the screws are loose, lift off if the lamp cover is securely fastened. ELP communication cable set so...
... position. Replace the lamp cover and tighten the cover screws. (Make sure the lamp cover is open.) Related Documentation CPD 9112 CPD 9113 Service Manual Parts Price Lists EPSON PowerLite 8000i/9000i User's Guide EPSON PowerLite 8000i/9000i Quick Setup Poster SM-EMP8/9000 PL-EMP8000, PL-EMP9000 8 - EPSON PowerLite 8000i/9000i Projector 10/99 EPSON PowerLite 8000i/9000i Projector 3. When the screws are loose, lift off if the lamp cover is securely fastened. ELP communication cable set so...
Quick Start
Page 1
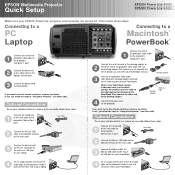
... use your PowerBook. EPSON® Multimedia Projector Quick Setup EPSON PowerLite 8000i EPSON PowerLite 9000i Make sure your EPSON® PowerLite® projector and computer are set correctly for the resolution you want. Connect the other side). Connect the small terminal of the desktop adapter to 2 the other end of the audio cable to the projector's Audio 1 jack and the other end to the projector's Computer 1 port. desktop adapter vidveido-eoou-tout cacblaeble 4 Connect the power cord...
... use your PowerBook. EPSON® Multimedia Projector Quick Setup EPSON PowerLite 8000i EPSON PowerLite 9000i Make sure your EPSON® PowerLite® projector and computer are set correctly for the resolution you want. Connect the other side). Connect the small terminal of the desktop adapter to 2 the other end of the audio cable to the projector's Audio 1 jack and the other end to the projector's Computer 1 port. desktop adapter vidveido-eoou-tout cacblaeble 4 Connect the power cord...
Quick Start
Page 2
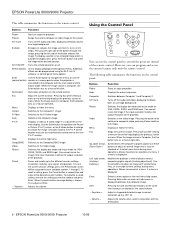
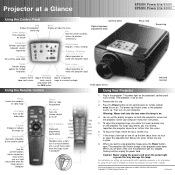
...is green; CPD 9113 Projector at a Glance EPSON PowerLite 8000i EPSON PowerLite 9000i Using the Control Panel Help Displays the projector's Power button online help Turns projector on and off Computer Switches connected computer sources sequentially A/V Mute Turns off the audio-video E-Zoom Enlarges or reduces the image size Illumination Illuminates all buttons on the remote control Esc Ends the current function; Keystone + Adjusts a trapezoid image to match the computer signal - To adjust the projected image size, rotate the zoom (outside) ring Video on your User's Guide...
...is green; CPD 9113 Projector at a Glance EPSON PowerLite 8000i EPSON PowerLite 9000i Using the Control Panel Help Displays the projector's Power button online help Turns projector on and off Computer Switches connected computer sources sequentially A/V Mute Turns off the audio-video E-Zoom Enlarges or reduces the image size Illumination Illuminates all buttons on the remote control Esc Ends the current function; Keystone + Adjusts a trapezoid image to match the computer signal - To adjust the projected image size, rotate the zoom (outside) ring Video on your User's Guide...

User Manual
Page 3
... of fluorescent lighting are used. Ë A strong light source shines into the lens when it is turned on; Caution: When you can operate the projector by the oil on . Refer all servicing to handle the new lamp. Remote Control Information You can always control your eyes. replace them. Ë Dim the ambient lighting and/or turn off other equipment that emits infrared energy, such as specifically explained in...
... of fluorescent lighting are used. Ë A strong light source shines into the lens when it is turned on; Caution: When you can operate the projector by the oil on . Refer all servicing to handle the new lamp. Remote Control Information You can always control your eyes. replace them. Ë Dim the ambient lighting and/or turn off other equipment that emits infrared energy, such as specifically explained in...
User Manual
Page 7
Contents Introduction 1 Getting the Most Out of Your Projector 3 Optional Accessories 4 About This Guide 6 Where to Get Help 7 Electronic Support Services 7 Automated Telephone Services 8 Safety Instructions 9 1 Setting Up the Projector 13 Unpacking the Projector 14 Additional Components 17 Installing the Remote Control Batteries 18 Before You Connect the Projector 19 vii
Contents Introduction 1 Getting the Most Out of Your Projector 3 Optional Accessories 4 About This Guide 6 Where to Get Help 7 Electronic Support Services 7 Automated Telephone Services 8 Safety Instructions 9 1 Setting Up the Projector 13 Unpacking the Projector 14 Additional Components 17 Installing the Remote Control Batteries 18 Before You Connect the Projector 19 vii
User Manual
Page 8
... the Equipment On and Off 57 Turning the Projector On and Off 58 2 Using the Projector 61 Positioning the Projector 62 Calculating Image Size and Projection Distance 65 Focusing and Positioning the Screen Image 69 Resizing the Projected Image 71 Sleep Mode 72 Controlling the Projector 72 Using the Remote Control 73 Using the Control Panel 78 Projector Status Lights 80 Power Light 81 Projection Lamp Light 81 Temperature Light 82 3 Using the Projector Menus 83 Accessing the Main Menu 85 Changing a Menu Setting 86 Video Menu (Image Source = Computer 88 viii
... the Equipment On and Off 57 Turning the Projector On and Off 58 2 Using the Projector 61 Positioning the Projector 62 Calculating Image Size and Projection Distance 65 Focusing and Positioning the Screen Image 69 Resizing the Projected Image 71 Sleep Mode 72 Controlling the Projector 72 Using the Remote Control 73 Using the Control Panel 78 Projector Status Lights 80 Power Light 81 Projection Lamp Light 81 Temperature Light 82 3 Using the Projector Menus 83 Accessing the Main Menu 85 Changing a Menu Setting 86 Video Menu (Image Source = Computer 88 viii
User Manual
Page 10
Controlling Projector Features 117 Using the Quick Change Toolbar 117 Changing Projector Settings 118 Changing the Test Pattern 125 Specifying an Image Gamma 126 Saving Projector Setting Files 127 Opening a Projector Setting File 128 Creating a User Logo 129 Creating Cursors/Stamps 131 Exiting the Software 133 5 Maintenance 135 Cleaning the Lens 136 Cleaning the Projector Case 136 Cleaning the Air Filter 137 Replacing the Lamp 138 Transporting the Projector 141 6 Troubleshooting 143 Problems with the Projector 144 Problems with the Remote Control 147...
Controlling Projector Features 117 Using the Quick Change Toolbar 117 Changing Projector Settings 118 Changing the Test Pattern 125 Specifying an Image Gamma 126 Saving Projector Setting Files 127 Opening a Projector Setting File 128 Creating a User Logo 129 Creating Cursors/Stamps 131 Exiting the Software 133 5 Maintenance 135 Cleaning the Lens 136 Cleaning the Projector Case 136 Cleaning the Air Filter 137 Replacing the Lamp 138 Transporting the Projector 141 6 Troubleshooting 143 Problems with the Projector 144 Problems with the Remote Control 147...
User Manual
Page 16
... to use your EPSON PowerLite projector. About This Guide This guide describes how to both the PowerLite 8000i and the PowerLite 9000i, except where noted otherwise. The instructions apply to set up your projector's warning lights and gives helpful information for transporting it on how to adjust the color and image settings, change the display of the projected image, set up and use the projector's built-in good working order and gives guidelines for avoiding errors, optimizing image...
... to use your EPSON PowerLite projector. About This Guide This guide describes how to both the PowerLite 8000i and the PowerLite 9000i, except where noted otherwise. The instructions apply to set up your projector's warning lights and gives helpful information for transporting it on how to adjust the color and image settings, change the display of the projected image, set up and use the projector's built-in good working order and gives guidelines for avoiding errors, optimizing image...
User Manual
Page 68
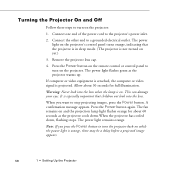
... computer or video signal is projected. Warning: Never look into the lens when the lamp is on yet.) 3. It is especially important that the projector is in sleep mode. (The projector is not turned on . A confirmation message appears. The power light remains orange. Press the Power button on the remote control or control panel to turn on and the projection lamp light flashes orange for full illumination. The fan remains on the projector. Connect one end of the power cord to...
... computer or video signal is projected. Warning: Never look into the lens when the lamp is on yet.) 3. It is especially important that the projector is in sleep mode. (The projector is not turned on . A confirmation message appears. The power light remains orange. Press the Power button on the remote control or control panel to turn on and the projection lamp light flashes orange for full illumination. The fan remains on the projector. Connect one end of the power cord to...
User Manual
Page 74
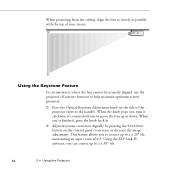
... aspect ratio of the projector (next to move the lens up to increase or decrease the image adjustment. Using the ELP Link IV software, you 're finished, press the knob back in. Ë Adjust keystone correction digitally by pressing the Keystone button on the side of 4:3. When you can correct up or down. When the knob pops out, turn it clockwise or...
... aspect ratio of the projector (next to move the lens up to increase or decrease the image adjustment. Using the ELP Link IV software, you 're finished, press the knob back in. Ë Adjust keystone correction digitally by pressing the Keystone button on the side of 4:3. When you can correct up or down. When the knob pops out, turn it clockwise or...
User Manual
Page 94
Ë The Setting menu allows you to set or adjust such projector options as the Picture in Picture (P in P) video source, blank screen color, image source message prompt, A/V Mute display option, and BNC input source. Ë The User's Logo menu lets you capture and store a custom logo which may be used as a startup screen or with the A/V Mute option. Ë The Reset All menu lets you restore the factory defaults for all the projector settings. Ë The Advanced...
Ë The Setting menu allows you to set or adjust such projector options as the Picture in Picture (P in P) video source, blank screen color, image source message prompt, A/V Mute display option, and BNC input source. Ë The User's Logo menu lets you capture and store a custom logo which may be used as a startup screen or with the A/V Mute option. Ë The Reset All menu lets you restore the factory defaults for all the projector settings. Ë The Advanced...
User Manual
Page 108
... projector to automatically switch wireless mouse control whenever the input source computer is mounted upside-down from behind onto a transparent screen. If you change your mind, select No and then press the Enter button to their initial factory defaults. Turn on , while OFF turns it off (for a normal image). Reset Returns all Advanced menu items to clear the confirmation screen without changing any settings. 98 3 • Using the Projector Menus Rear Projection Mirrors the projected image...
... projector to automatically switch wireless mouse control whenever the input source computer is mounted upside-down from behind onto a transparent screen. If you change your mind, select No and then press the Enter button to their initial factory defaults. Turn on , while OFF turns it off (for a normal image). Reset Returns all Advanced menu items to clear the confirmation screen without changing any settings. 98 3 • Using the Projector Menus Rear Projection Mirrors the projected image...

User Manual
Page 148
... flashing orange and red alternately. Ë The message LAMP REPLACE appears on the screen when the projector lamp comes on (after about 2000 hours of use a dry, lint-free cloth. It is time to replace the lamp when: Ë The projection image gets darker or starts to clean the filter. Request part number ELPLP08. 4. Also, do not touch the glass portion of the lamp will result in premature lamp failure. 138 5 • Maintenance Replacing the Lamp The projection lamp...
... flashing orange and red alternately. Ë The message LAMP REPLACE appears on the screen when the projector lamp comes on (after about 2000 hours of use a dry, lint-free cloth. It is time to replace the lamp when: Ë The projection image gets darker or starts to clean the filter. Request part number ELPLP08. 4. Also, do not touch the glass portion of the lamp will result in premature lamp failure. 138 5 • Maintenance Replacing the Lamp The projection lamp...
User Manual
Page 159
... a Macintosh, choose Control Panels under the Apple menu and then choose Monitors. For supported display settings, see "Supported Monitor Displays" on your software manual for specific information. The message NO SIGNAL is selected correctly. An image source not connected to a Macintosh, make sure Macintosh Hi-Res Display or another 1024 × 768 display for the 8000i or 1366 × 1024 display for a different resolution. If your projector is attached to...
... a Macintosh, choose Control Panels under the Apple menu and then choose Monitors. For supported display settings, see "Supported Monitor Displays" on your software manual for specific information. The message NO SIGNAL is selected correctly. An image source not connected to a Macintosh, make sure Macintosh Hi-Res Display or another 1024 × 768 display for the 8000i or 1366 × 1024 display for a different resolution. If your projector is attached to...


