Operation Guide - EasyMP Monitor v4.52
Page 2
Example: Esc button Indicates the name of the buttons on the projector's remote control or the control panel. Select Timer - Indicates the name of the buttons on the EasyMP Monitor or OS screens. Timer Settings. 2 Notations Used in ...
Example: Esc button Indicates the name of the buttons on the projector's remote control or the control panel. Select Timer - Indicates the name of the buttons on the EasyMP Monitor or OS screens. Timer Settings. 2 Notations Used in ...

User Manual
Page 3
Remote Control 22 Setting Up the Projector ...24 Projector Placement...24 Projector Setup and Installation Options 24 Projection Distance...26 Projector Connections...27 Connecting to Computer ...
Remote Control 22 Setting Up the Projector ...24 Projector Placement...24 Projector Setup and Installation Options 24 Projection Distance...26 Projector Connections...27 Connecting to Computer ...

User Manual
Page 4
... 36 Selecting the Connected USB Source 37 Disconnecting a USB Device or Camera From the Projector 37 Connecting to a Document Camera 37 Installing Batteries in the Remote Control 38 Opening the Lens Cover ...40 Using the Projector on a Network ...41 Wired Network Projection...41 Connecting to a Wired Network ...41 Selecting Wired Network...
... 36 Selecting the Connected USB Source 37 Disconnecting a USB Device or Camera From the Projector 37 Connecting to a Document Camera 37 Installing Batteries in the Remote Control 38 Opening the Lens Cover ...40 Using the Projector on a Network ...41 Wired Network Projection...41 Connecting to a Wired Network ...41 Selecting Wired Network...
User Manual
Page 5
... Quick Corner 79 Resizing the Image With the Zoom Ring 81 Focusing the Image Using the Focus Ring 81 Remote Control Operation ...82 Using the Remote Control as a Wireless Mouse 83 Using the Remote Control as a Presentation Pointer 84 Selecting an Image Source ...85 Projection Modes ...86 Changing the Projection Mode... Using the Remote Control 86 Changing the Projection Mode Using the Menus 87 Image Aspect Ratio ...88 Changing the Image Aspect Ratio 89 Available Image Aspect ...
... Quick Corner 79 Resizing the Image With the Zoom Ring 81 Focusing the Image Using the Focus Ring 81 Remote Control Operation ...82 Using the Remote Control as a Wireless Mouse 83 Using the Remote Control as a Presentation Pointer 84 Selecting an Image Source ...85 Projection Modes ...86 Changing the Projection Mode... Using the Remote Control 86 Changing the Projection Mode Using the Menus 87 Image Aspect Ratio ...88 Changing the Image Aspect Ratio 89 Available Image Aspect ...

User Manual
Page 6
... 114 Unlocking the Projector's Buttons 115 Installing a Security Cable ...115 Projector Identification System for Multiple Projector Control 116 Setting the Projector ID...117 Setting the Remote Control ID...117 Matching Multiple-Projector Display Quality 118 Projecting Two Images Simultaneously 120 Adjusting the Menu Settings ...122 Using the Projector's Menus...122 Image...
... 114 Unlocking the Projector's Buttons 115 Installing a Security Cable ...115 Projector Identification System for Multiple Projector Control 116 Setting the Projector ID...117 Setting the Remote Control ID...117 Matching Multiple-Projector Display Quality 118 Projecting Two Images Simultaneously 120 Adjusting the Menu Settings ...122 Using the Projector's Menus...122 Image...
User Manual
Page 7
...Vents 140 Replacing the Air Filter...141 Projector Lamp Maintenance...143 Replacing the Lamp ...144 Resetting the Lamp Timer...148 Replacing the Remote Control Batteries 148 Transporting the Projector...150 Solving Problems ...151 Projection Problem Tips ...151 Projector Light Status ...151 Using the Projector ... When There is No Sound or Low Volume 161 Solving Projector or Remote Control Operation Problems 161 Solutions to Projector Power or Shut-Off Problems 161 Solutions to Problems with the Remote Control 162 Solutions to Password Problems 163 Solutions When Network Alert E-Mails...
...Vents 140 Replacing the Air Filter...141 Projector Lamp Maintenance...143 Replacing the Lamp ...144 Resetting the Lamp Timer...148 Replacing the Remote Control Batteries 148 Transporting the Projector...150 Solving Problems ...151 Projection Problem Tips ...151 Projector Light Status ...151 Using the Projector ... When There is No Sound or Low Volume 161 Solving Projector or Remote Control Operation Problems 161 Solutions to Projector Power or Shut-Off Problems 161 Solutions to Problems with the Remote Control 162 Solutions to Password Problems 163 Solutions When Network Alert E-Mails...

User Manual
Page 8
Technical Specifications ...165 General Projector Specifications ...165 Projector Lamp Specifications...167 Remote Control Specifications ...168 Projector Dimension Specifications 168 Projector Electrical Specifications ...168 Projector Environmental Specifications 169 Projector Safety and Approvals Specifications 170 Supported Video Display Formats......
Technical Specifications ...165 General Projector Specifications ...165 Projector Lamp Specifications...167 Remote Control Specifications ...168 Projector Dimension Specifications 168 Projector Electrical Specifications ...168 Projector Environmental Specifications 169 Projector Safety and Approvals Specifications 170 Supported Video Display Formats......

User Manual
Page 9
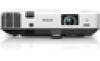
...3-in-1 USB projection, audio, and mouse control for instant setup • Wired and wireless (PowerLite 1945W/1955/1965) network support for projection, monitoring, and control via remote network computer • HDMI port for computer or video device connection • DisplayPort connector for ...shows and presentations via connected USB memory devices or EPSON document camera • Dual VGA ports for connections by multiple presenters • Ports for Additional Information Projector Part Locations Projector Features The PowerLite 1940W, 1945W, 1950, 1955, 1960, and 1965 projectors include...
...3-in-1 USB projection, audio, and mouse control for instant setup • Wired and wireless (PowerLite 1945W/1955/1965) network support for projection, monitoring, and control via remote network computer • HDMI port for computer or video device connection • DisplayPort connector for ...shows and presentations via connected USB memory devices or EPSON document camera • Dual VGA ports for connections by multiple presenters • Ports for Additional Information Projector Part Locations Projector Features The PowerLite 1940W, 1945W, 1950, 1955, 1960, and 1965 projectors include...

User Manual
Page 14
...projector in help system Press the Help button on the remote control or projector to get quick solutions to common problems. • www.epson.com/support (U.S) or www.epson.ca/support (Canada) View FAQs (frequently asked questions) ...• If you still need help after checking this manual and the sources listed above, you can use the EPSON PrivateLine Support service to get help : • Built-in a network environment, see "Where to your projector during... - Rear Projector Parts - Base Projector Parts - Front/Top PowerLite 1940W/1950/1960 14 Front/Top Projector Parts -
...projector in help system Press the Help button on the remote control or projector to get quick solutions to common problems. • www.epson.com/support (U.S) or www.epson.ca/support (Canada) View FAQs (frequently asked questions) ...• If you still need help after checking this manual and the sources listed above, you can use the EPSON PrivateLine Support service to get help : • Built-in a network environment, see "Where to your projector during... - Rear Projector Parts - Base Projector Parts - Front/Top PowerLite 1940W/1950/1960 14 Front/Top Projector Parts -
User Manual
Page 16
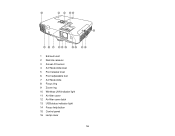
1 Exhaust vent 2 Remote receiver 3 Screen Fit sensor 4 A/V Mute slide lever 5 Foot release lever 6 Front adjustable foot 7 A/V Mute slide 8 Focus ring 9 Zoom ring 10 Wireless LAN indicator light 11 Air filter cover 12 Air filter cover latch 13 USB status indicator light 14 Focus help button 15 Control panel 16 Lamp cover 16
1 Exhaust vent 2 Remote receiver 3 Screen Fit sensor 4 A/V Mute slide lever 5 Foot release lever 6 Front adjustable foot 7 A/V Mute slide 8 Focus ring 9 Zoom ring 10 Wireless LAN indicator light 11 Air filter cover 12 Air filter cover latch 13 USB status indicator light 14 Focus help button 15 Control panel 16 Lamp cover 16
User Manual
Page 22
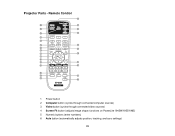
functions on PowerLite 1945W/1955/1965) 5 Numeric buttons (enter numbers) 6 Auto button (automatically adjusts position, tracking, and sync settings) 22 Remote Control 1 Power button 2 Computer button (cycles through connected computer sources) 3 Video button (cycles through connected video sources) 4 Screen Fit button (adjusts image shape; Projector Parts -
functions on PowerLite 1945W/1955/1965) 5 Numeric buttons (enter numbers) 6 Auto button (automatically adjusts position, tracking, and sync settings) 22 Remote Control 1 Power button 2 Computer button (cycles through connected computer sources) 3 Video button (cycles through connected video sources) 4 Screen Fit button (adjusts image shape; Projector Parts -

User Manual
Page 23
...) 10 Arrow buttons (move through on -screen pointer) 21 Esc button (cancels/exits functions and controls wireless mouse functions) 22 ID button (selects projector and remote control ID numbers ) 23 Color Mode button (selects display modes) 24 LAN button (cycles between network and optional Quick Wireless Connection USB Key sources) 25...
...) 10 Arrow buttons (move through on -screen pointer) 21 Esc button (cancels/exits functions and controls wireless mouse functions) 22 ID button (selects projector and remote control ID numbers ) 23 Color Mode button (selects display modes) 24 LAN button (cycles between network and optional Quick Wireless Connection USB Key sources) 25...

User Manual
Page 24
... Distance Parent topic: Setting Up the Projector Projector Setup and Installation Options You can set up or install your projector to view presentations in the Remote Control Opening the Lens Cover Projector Placement You can also install the projector in a ceiling mount if you select a projector location: • Place the projector...
... Distance Parent topic: Setting Up the Projector Projector Setup and Installation Options You can set up or install your projector to view presentations in the Remote Control Opening the Lens Cover Projector Placement You can also install the projector in a ceiling mount if you select a projector location: • Place the projector...

User Manual
Page 30
... using an optional DisplayPort cable. 1. To do this, connect the projector to your computer has a DisplayPort or Mini DisplayPort connector, you can set up the remote control to the projector using a USB cable, if it to act as a wireless mouse. Connect the DisplayPort cable to the projector's DisplayPort connector. Connect the...
... using an optional DisplayPort cable. 1. To do this, connect the projector to your computer has a DisplayPort or Mini DisplayPort connector, you can set up the remote control to the projector using a USB cable, if it to act as a wireless mouse. Connect the DisplayPort cable to the projector's DisplayPort connector. Connect the...

User Manual
Page 31
... Source 31 Parent topic: Connecting to your computer documentation for Sound If your computer. 3. Connect the USB cable to Computer Sources Related tasks Using the Remote Control as described here. 1.
... Source 31 Parent topic: Connecting to your computer documentation for Sound If your computer. 3. Connect the USB cable to Computer Sources Related tasks Using the Remote Control as described here. 1.

User Manual
Page 34
... projector. Note: The projector's built-in amplifiers. Extended Menu Connecting to an External Computer Monitor If you connected the projector to a computer using the projector's remote control. Make sure your external speakers, such as necessary. 34
... projector. Note: The projector's built-in amplifiers. Extended Menu Connecting to an External Computer Monitor If you connected the projector to a computer using the projector's remote control. Make sure your external speakers, such as necessary. 34

User Manual
Page 37
... of the projector. You may be able to connect different EPSON document camera models to your projector's USB-A (PowerLite 1940W/1950/1960) or document camera (PowerLite 1945W/1955/1965) port to project images viewed by software, connect the EPSON DC-06 document camera to External USB Devices Disconnecting a USB...document camera port. Note: For additional features supported by the camera. Make sure the connected USB source is turned on the remote control. 3. Disconnect the USB device or camera from the projector. 1. Connect the USB cable to cycle through other USB sources, if available...
... of the projector. You may be able to connect different EPSON document camera models to your projector's USB-A (PowerLite 1940W/1950/1960) or document camera (PowerLite 1945W/1955/1965) port to project images viewed by software, connect the EPSON DC-06 document camera to External USB Devices Disconnecting a USB...document camera port. Note: For additional features supported by the camera. Make sure the connected USB source is turned on the remote control. 3. Disconnect the USB device or camera from the projector. 1. Connect the USB cable to cycle through other USB sources, if available...

User Manual
Page 38
Caution: Use only the type of the cable to the document camera's USB Type B port. Connect the other end of batteries specified in the Remote Control The remote control uses the two AA batteries that came with the projector. Do not install batteries of different types, or mix new and old batteries. 1. PowerLite 1945W/1955/1965 3. Parent topic: Projector Connections Related references Optional Equipment and Replacement Parts Installing Batteries in this manual. Open the battery cover as shown. 38
Caution: Use only the type of the cable to the document camera's USB Type B port. Connect the other end of batteries specified in the Remote Control The remote control uses the two AA batteries that came with the projector. Do not install batteries of different types, or mix new and old batteries. 1. PowerLite 1945W/1955/1965 3. Parent topic: Projector Connections Related references Optional Equipment and Replacement Parts Installing Batteries in this manual. Open the battery cover as shown. 38
User Manual
Page 44
... characters long for accessing the projector over the web. • Projector Keyword lets you turn on the remote control to highlight characters and press Enter to access the projector. You must enter a displayed, randomized keyword... from a computer using the PJLink protocol for projector control (PowerLite 1940W/1950/1960). • Web Control Password or Web Remote Password lets you enter a password up to 32 alphanumeric characters long for using... access to enter the name, passwords and keyword. PowerLite 1940W/1950/1960 PowerLite 1945W/1955/1965 44 6.
... characters long for accessing the projector over the web. • Projector Keyword lets you turn on the remote control to highlight characters and press Enter to access the projector. You must enter a displayed, randomized keyword... from a computer using the PJLink protocol for projector control (PowerLite 1940W/1950/1960). • Web Control Password or Web Remote Password lets you enter a password up to 32 alphanumeric characters long for using... access to enter the name, passwords and keyword. PowerLite 1940W/1950/1960 PowerLite 1945W/1955/1965 44 6.

User Manual
Page 45
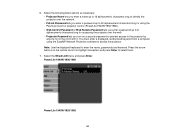
... projector and computer for wireless projection. 45 Note: To highlight the numbers you must set up your projector through a wireless network (PowerLite 1945W/1955/1965). When you must install the optional EPSON 802.11b/g/n wireless LAN module, and then set addresses manually, turn off DHCP and enter the projector's IP Address, Subnet Mask... display of the IP address on the DHCP setting. • If you finish selecting settings, select Complete or Setup Complete and follow the on the remote control. 8. If necessary, select IP Settings and press Enter. 9.
... projector and computer for wireless projection. 45 Note: To highlight the numbers you must set up your projector through a wireless network (PowerLite 1945W/1955/1965). When you must install the optional EPSON 802.11b/g/n wireless LAN module, and then set addresses manually, turn off DHCP and enter the projector's IP Address, Subnet Mask... display of the IP address on the DHCP setting. • If you finish selecting settings, select Complete or Setup Complete and follow the on the remote control. 8. If necessary, select IP Settings and press Enter. 9.


