
User's Guide
Page 4
... Projector on a Network ...45 Wireless Network Projection ...45 Installing the Wireless LAN Module 46 Using Quick Wireless Connection (Windows Only 48 Selecting Wireless Network Settings Manually 49 Wireless LAN Menu Settings ...52 Selecting Wireless Network Settings in Windows 53 Selecting Wireless Network Settings in Mac OS 53 Setting Up Wireless Network...
... Projector on a Network ...45 Wireless Network Projection ...45 Installing the Wireless LAN Module 46 Using Quick Wireless Connection (Windows Only 48 Selecting Wireless Network Settings Manually 49 Wireless LAN Menu Settings ...52 Selecting Wireless Network Settings in Windows 53 Selecting Wireless Network Settings in Mac OS 53 Setting Up Wireless Network...
User's Guide
Page 9
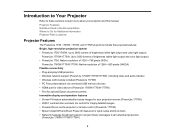
... • Wireless LAN module included (PowerLite 1775W) • PC Free presentations via connected USB memory devices • HDMI port for video devices (PowerLite 1760W/1770W/1775W) • Port for optional Epson document camera Innovative display and operation features • Screen Fit feature automatically resizes images for your projector and this manual. Introduction to Your Projector Refer...
... • Wireless LAN module included (PowerLite 1775W) • PC Free presentations via connected USB memory devices • HDMI port for video devices (PowerLite 1760W/1770W/1775W) • Port for optional Epson document camera Innovative display and operation features • Screen Fit feature automatically resizes images for your projector and this manual. Introduction to Your Projector Refer...
User's Guide
Page 14
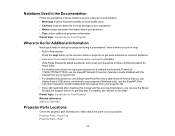
...on converting PowerPoint files into a slide show file format that you can use the Epson PrivateLine Support service to get quick solutions to common problems. • www.epson.com/support (U.S) or www.epson.ca/support (Canada) View FAQs (frequently asked questions) and e-mail your questions...8226; Notes contain important information about the parts on using your projector in a network environment (PowerLite 1760W/1770W/1775W), see the EasyMP Network Projection Operation Guide installed with this manual and the sources listed above, you can display from your projector CD. • If you...
...on converting PowerPoint files into a slide show file format that you can use the Epson PrivateLine Support service to get quick solutions to common problems. • www.epson.com/support (U.S) or www.epson.ca/support (Canada) View FAQs (frequently asked questions) and e-mail your questions...8226; Notes contain important information about the parts on using your projector in a network environment (PowerLite 1760W/1770W/1775W), see the EasyMP Network Projection Operation Guide installed with this manual and the sources listed above, you can display from your projector CD. • If you...
User's Guide
Page 45
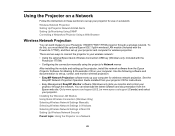
... your projector CD for instructions. • Easy Management EasyMP Monitor software (Windows only) lets you must install the optional Epson 802.11g/b/n wireless LAN module (included with the PowerLite 1775W) • Configuring the connection manually using the projector's Network menus After installing the module and setting up your projector and computer for wireless network...
... your projector CD for instructions. • Easy Management EasyMP Monitor software (Windows only) lets you must install the optional Epson 802.11g/b/n wireless LAN module (included with the PowerLite 1775W) • Configuring the connection manually using the projector's Network menus After installing the module and setting up your projector and computer for wireless network...
User's Guide
Page 49
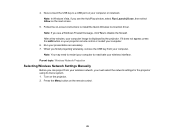
Note: You may need to restart your computer to install the Quick Wireless Connection driver. Parent topic: Wireless Network Projection Selecting Wireless Network Settings Manually Before you can project from your computer. Follow the on the projector. 2. Turn on -screen instructions to reactivate your computer or notebook. Note: If you ...
Note: You may need to restart your computer to install the Quick Wireless Connection driver. Parent topic: Wireless Network Projection Selecting Wireless Network Settings Manually Before you can project from your computer. Follow the on the projector. 2. Turn on -screen instructions to reactivate your computer or notebook. Note: If you ...
User's Guide
Page 53
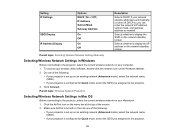
... the SSID on the network standby screen Selects whether to display the IP address on the network standby screen Parent topic: Selecting Wireless Network Settings Manually Selecting Wireless Network Settings in Mac OS Before connecting to the projector, select the correct wireless network on your computer. 1. Click Connect.
... the SSID on the network standby screen Selects whether to display the IP address on the network standby screen Parent topic: Selecting Wireless Network Settings Manually Selecting Wireless Network Settings in Mac OS Before connecting to the projector, select the correct wireless network on your computer. 1. Click Connect.
User's Guide
Page 85
... Customized Description Best for presentations onto a whiteboard (adjusts the colors accordingly) Best for still images projected in a bright room Best for customizing a color mode using manual Color Adjustment settings in the Image menu.
... Customized Description Best for presentations onto a whiteboard (adjusts the colors accordingly) Best for still images projected in a bright room Best for customizing a color mode using manual Color Adjustment settings in the Image menu.
User's Guide
Page 114
... shapes available Normal ECO Varying levels available Front Rear Front/Rear Off 114 Description Adjusts image shape to rectangular (horizontally and vertically) H/V Keystone: lets you manually correct horizontal and vertical sides, or turn automatic correction on -screen display Controls projector button locking to secure the projector Full Lock: locks all buttons...
... shapes available Normal ECO Varying levels available Front Rear Front/Rear Off 114 Description Adjusts image shape to rectangular (horizontally and vertically) H/V Keystone: lets you manually correct horizontal and vertical sides, or turn automatic correction on -screen display Controls projector button locking to secure the projector Full Lock: locks all buttons...
User's Guide
Page 125
... Transporting the Projector Projector Maintenance Your projector needs little maintenance to service this product yourself, except as specifically explained in this manual. Never open any other servicing to maintain your projector and transport it off and unplug the power cord. The only parts...sections to qualified servicers. Warning: Do not try to keep working at its best. Refer all other part needs replacing, contact Epson or an authorized Epson servicer. Warning: Before cleaning any part of the projector, turn it from overheating due to place. You may need to clean...
... Transporting the Projector Projector Maintenance Your projector needs little maintenance to service this product yourself, except as specifically explained in this manual. Never open any other servicing to maintain your projector and transport it off and unplug the power cord. The only parts...sections to qualified servicers. Warning: Do not try to keep working at its best. Refer all other part needs replacing, contact Epson or an authorized Epson servicer. Warning: Before cleaning any part of the projector, turn it from overheating due to place. You may need to clean...
User's Guide
Page 126
..., dry, lint-free cloth. • To remove stubborn dirt, use wax, alcohol, benzene, paint thinner, or other chemicals to clean them as described in this manual. • To remove stubborn smudges, moisten a soft, lint-free cloth with your bare hands to prevent fingerprints on the air filter or vents, clean them...
..., dry, lint-free cloth. • To remove stubborn dirt, use wax, alcohol, benzene, paint thinner, or other chemicals to clean them as described in this manual. • To remove stubborn smudges, moisten a soft, lint-free cloth with your bare hands to prevent fingerprints on the air filter or vents, clean them...
User's Guide
Page 135
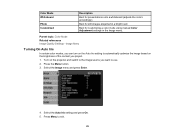
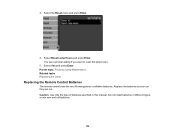
Do not install batteries of batteries specified in this manual. Select Reset Lamp Hours and press Enter. Select Yes and press Enter. Parent topic: Projector Lamp Maintenance Related tasks Replacing the Lamp Replacing the Remote Control Batteries The remote control uses the two AA manganese or alkaline batteries. Replace the batteries as soon as they run out. Select the Reset menu and press Enter. 4. Caution: Use only the type of different types, or mix new and old batteries. 135 You see a prompt asking if you want to reset the lamp hours. 5. 3.
Do not install batteries of batteries specified in this manual. Select Reset Lamp Hours and press Enter. Select Yes and press Enter. Parent topic: Projector Lamp Maintenance Related tasks Replacing the Lamp Replacing the Remote Control Batteries The remote control uses the two AA manganese or alkaline batteries. Replace the batteries as soon as they run out. Select the Reset menu and press Enter. 4. Caution: Use only the type of different types, or mix new and old batteries. 135 You see a prompt asking if you want to reset the lamp hours. 5. 3.
User's Guide
Page 139
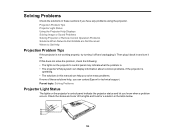
... following: • The lights on the projector's control panel may indicate what the problem is. • The projector's Help system can contact Epson for a solution in these sections if you know when a problem occurs. Parent topic: Solving Problems Projector Light Status The lights on . If this... manual can help , you can display information about common problems, if the projector is not working properly, try turning it off and unplugging it ...
... following: • The lights on the projector's control panel may indicate what the problem is. • The projector's Help system can contact Epson for a solution in these sections if you know when a problem occurs. Parent topic: Solving Problems Projector Light Status The lights on . If this... manual can help , you can display information about common problems, if the projector is not working properly, try turning it off and unplugging it ...

User's Guide
Page 144
Hold down the laptop's Fn key and press the key labelled with a monitor icon or CRT/LCD. (See your laptop manual for details.) Wait a few seconds for an image to appear. • Turn on the connected computer or video source, and press Play to begin your ..., check your video sources. • If you are projecting from a laptop computer, make sure the external monitor port is enabled. (See your computer or Windows manual for an image to make sure it is not displayed by the laptop and projector, check the Windows Display utility to appear. 2. Parent topic: Solving...
Hold down the laptop's Fn key and press the key labelled with a monitor icon or CRT/LCD. (See your laptop manual for details.) Wait a few seconds for an image to appear. • Turn on the connected computer or video source, and press Play to begin your ..., check your video sources. • If you are projecting from a laptop computer, make sure the external monitor port is enabled. (See your computer or Windows manual for an image to make sure it is not displayed by the laptop and projector, check the Windows Display utility to appear. 2. Parent topic: Solving...
User's Guide
Page 145
...display. • Check your computer display settings to disable dual display and set the resolution within the projector's limits. (See your computer manual for details.) • Check the resolution assigned to your presentation files to see if they are created for a different resolution than you... Select the VGA Display or Color LCD option, click the Arrange or Arrangement tab, and check the Mirror Displays checkbox. (See your laptop manual for details.) Parent topic: Solutions When "No Signal" Message Appears Solutions When "Not Supported" Message Appears If the "Not Supported" message ...
...display. • Check your computer display settings to disable dual display and set the resolution within the projector's limits. (See your computer manual for details.) • Check the resolution assigned to your presentation files to see if they are created for a different resolution than you... Select the VGA Display or Color LCD option, click the Arrange or Arrangement tab, and check the Mirror Displays checkbox. (See your laptop manual for details.) Parent topic: Solutions When "No Signal" Message Appears Solutions When "Not Supported" Message Appears If the "Not Supported" message ...
User's Guide
Page 147
... to improve image quality. • If you are projecting from the screen or adjust the image shape manually. • Turn on the screen and manually adjust the Tracking and Sync settings. Signal Menu 147 Parent topic: Solving Image or Sound Problems Related references... Input Signal Settings - Parent topic: Solving Image or Sound Problems Related references Input Signal Settings - • If you adjusted the image shape using the Screen Fit feature (PowerLite 1775W...
... to improve image quality. • If you are projecting from the screen or adjust the image shape manually. • Turn on the screen and manually adjust the Tracking and Sync settings. Signal Menu 147 Parent topic: Solving Image or Sound Problems Related references... Input Signal Settings - Parent topic: Solving Image or Sound Problems Related references Input Signal Settings - • If you adjusted the image shape using the Screen Fit feature (PowerLite 1775W...
User's Guide
Page 148
... cables, try selecting Normal in the Settings menu. • If the image has been progressively darkening, you may need to the projector and your computer manual for the current input source, such as Brightness, Contrast, Tint, Color Adjustment, and/or Color Saturation. • Make sure you are securely connected to replace...
... cables, try selecting Normal in the Settings menu. • If the image has been progressively darkening, you may need to the projector and your computer manual for the current input source, such as Brightness, Contrast, Tint, Color Adjustment, and/or Color Saturation. • Make sure you are securely connected to replace...
User's Guide
Page 154
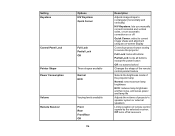
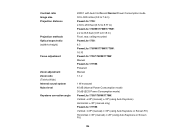
... On and Normal Power Consumption mode 30 to 300 inches (0.8 to 7.6 m) PowerLite 1750: 2.36 to 28.8 feet (0.72 to 8.77 m) PowerLite 1760W/1770W/1775W: 2.2 to 26.8 feet (0.67 to 8.18 m) Front, rear, ceiling-mounted PowerLite 1750: 4:3 PowerLite 1760W/1770W/1775W: 16:10 PowerLite 1750/1760W/1770W: Manual PowerLite 1775W: Powered Manual 1:1.2 1 W monaural 40 dB (Normal Power Consumption mode) 30 dB (ECO...
... On and Normal Power Consumption mode 30 to 300 inches (0.8 to 7.6 m) PowerLite 1750: 2.36 to 28.8 feet (0.72 to 8.77 m) PowerLite 1760W/1770W/1775W: 2.2 to 26.8 feet (0.67 to 8.18 m) Front, rear, ceiling-mounted PowerLite 1750: 4:3 PowerLite 1760W/1770W/1775W: 16:10 PowerLite 1750/1760W/1770W: Manual PowerLite 1775W: Powered Manual 1:1.2 1 W monaural 40 dB (Normal Power Consumption mode) 30 dB (ECO...
User's Guide
Page 158
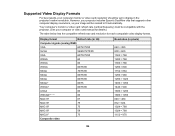
However, your projector includes Epson's SizeWise chip that supports other computer display resolutions, so your image will be resized to display in pixels) 640 × 480 800 × 600 1024 &#... × 870 158 Your computer's monitor or video card refresh rate (vertical frequency) must be compatible with the projector. (See your computer or video card manual for details.) The table below lists the compatible refresh rate and resolution for each compatible video display format. Display format Refresh rate (in Hz) Computer...
However, your projector includes Epson's SizeWise chip that supports other computer display resolutions, so your image will be resized to display in pixels) 640 × 480 800 × 600 1024 &#... × 870 158 Your computer's monitor or video card refresh rate (vertical frequency) must be compatible with the projector. (See your computer or video card manual for details.) The table below lists the compatible refresh rate and resolution for each compatible video display format. Display format Refresh rate (in Hz) Computer...
User's Guide
Page 163
... not place anything that country. • Do not stand on the projector or place heavy objects on the projector except as specifically explained in this manual, do not attempt to service this manual. • Except as specifically explained in this product yourself.
... not place anything that country. • Do not stand on the projector or place heavy objects on the projector except as specifically explained in this manual, do not attempt to service this manual. • Except as specifically explained in this product yourself.
Operation Guide - EasyMP Monitor v4.50
Page 2
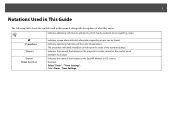
... information and points which may be found. Select Timer - Indicates the name of operations. "Timer Settings". The procedure indicated should be carried out in this manual, along with descriptions of what they mean. Timer Settings. 2 Notations Used in This Guide The following table shows the symbols used in the order of...
... information and points which may be found. Select Timer - Indicates the name of operations. "Timer Settings". The procedure indicated should be carried out in this manual, along with descriptions of what they mean. Timer Settings. 2 Notations Used in This Guide The following table shows the symbols used in the order of...

