
User's Guide
Page 4
... Projector on a Network ...45 Wireless Network Projection ...45 Installing the Wireless LAN Module 46 Using Quick Wireless Connection (Windows Only 48 Selecting Wireless Network Settings Manually 49 Wireless LAN Menu Settings ...52 Selecting Wireless Network Settings in Windows 53 Selecting Wireless Network Settings in Mac OS 53 Setting Up Wireless Network...
... Projector on a Network ...45 Wireless Network Projection ...45 Installing the Wireless LAN Module 46 Using Quick Wireless Connection (Windows Only 48 Selecting Wireless Network Settings Manually 49 Wireless LAN Menu Settings ...52 Selecting Wireless Network Settings in Windows 53 Selecting Wireless Network Settings in Mac OS 53 Setting Up Wireless Network...
User's Guide
Page 9
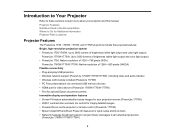
... • Network message broadcast system to project timely messages to learn more about your projection screen (PowerLite 1775W) • 2000:1 contrast ratio and Auto Iris control for crisply detailed images • Powered focus via the projector or remote control (PowerLite 1775W) • Epson Instant Off and Direct Power On features for your projector and this manual.
... • Network message broadcast system to project timely messages to learn more about your projection screen (PowerLite 1775W) • 2000:1 contrast ratio and Auto Iris control for crisply detailed images • Powered focus via the projector or remote control (PowerLite 1775W) • Epson Instant Off and Direct Power On features for your projector and this manual.
User's Guide
Page 14
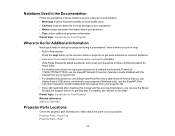
... Help". Rear 14 For details, see the EasyMP Slide Converter Operation Guide installed with this manual from your projector CD. • If you still need help after checking this manual and the sources listed above, you read your documentation: • Warnings must be followed ...these notations as you can use the Epson PrivateLine Support service to get help fast. Notations Used in the Documentation Follow the guidelines in a network environment (PowerLite 1760W/1770W/1775W), see the EasyMP Network Projection Operation Guide installed with this manual from your projector CD. • For...
... Help". Rear 14 For details, see the EasyMP Slide Converter Operation Guide installed with this manual from your projector CD. • If you still need help after checking this manual and the sources listed above, you read your documentation: • Warnings must be followed ...these notations as you can use the Epson PrivateLine Support service to get help fast. Notations Used in the Documentation Follow the guidelines in a network environment (PowerLite 1760W/1770W/1775W), see the EasyMP Network Projection Operation Guide installed with this manual from your projector CD. • For...
User's Guide
Page 45
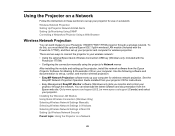
...; Easy Management EasyMP Monitor software (Windows only) lets you must install the optional Epson 802.11g/b/n wireless LAN module (included with the PowerLite 1775W) • Configuring the connection manually using the projector's Network menus After installing the module and setting up the projector,... install the network software from the Epson web site. There are two ways to connect...
...; Easy Management EasyMP Monitor software (Windows only) lets you must install the optional Epson 802.11g/b/n wireless LAN module (included with the PowerLite 1775W) • Configuring the connection manually using the projector's Network menus After installing the module and setting up the projector,... install the network software from the Epson web site. There are two ways to connect...
User's Guide
Page 49
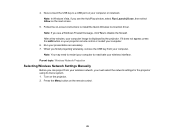
... to restart your computer. If it does not appear, press the LAN button on your computer. 6. Parent topic: Wireless Network Projection Selecting Wireless Network Settings Manually Before you must select the network settings for the projector using its menu system. 1. Now connect the USB key to disable the firewall. 4. Note: In...
... to restart your computer. If it does not appear, press the LAN button on your computer. 6. Parent topic: Wireless Network Projection Selecting Wireless Network Settings Manually Before you must select the network settings for the projector using its menu system. 1. Now connect the USB key to disable the firewall. 4. Note: In...
User's Guide
Page 53
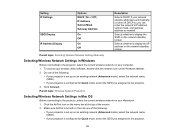
... the SSID on the network standby screen Selects whether to display the IP address on the network standby screen Parent topic: Selecting Wireless Network Settings Manually Selecting Wireless Network Settings in Mac OS Before connecting to the projector, select the correct wireless network on the menu bar at the top of...
... the SSID on the network standby screen Selects whether to display the IP address on the network standby screen Parent topic: Selecting Wireless Network Settings Manually Selecting Wireless Network Settings in Mac OS Before connecting to the projector, select the correct wireless network on the menu bar at the top of...
User's Guide
Page 85
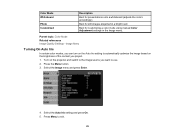
... Customized Description Best for presentations onto a whiteboard (adjusts the colors accordingly) Best for still images projected in a bright room Best for customizing a color mode using manual Color Adjustment settings in the Image menu. Select the Image menu and press Enter. 4.
... Customized Description Best for presentations onto a whiteboard (adjusts the colors accordingly) Best for still images projected in a bright room Best for customizing a color mode using manual Color Adjustment settings in the Image menu. Select the Image menu and press Enter. 4.
User's Guide
Page 114
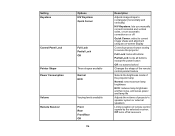
... shapes available Normal ECO Varying levels available Front Rear Front/Rear Off 114 Description Adjusts image shape to rectangular (horizontally and vertically) H/V Keystone: lets you manually correct horizontal and vertical sides, or turn automatic correction on or off all buttons except the power button Off: no buttons locked Changes the shape...
... shapes available Normal ECO Varying levels available Front Rear Front/Rear Off 114 Description Adjusts image shape to rectangular (horizontally and vertically) H/V Keystone: lets you manually correct horizontal and vertical sides, or turn automatic correction on or off all buttons except the power button Off: no buttons locked Changes the shape...
User's Guide
Page 125
... as specifically explained in the projector can injure you should replace are the lamp, air filter, and remote control batteries. Dangerous electrical voltages in this manual. The only parts you severely. Cleaning the Lens Cleaning the Projector Case Air Filter and Vent Maintenance Projector Lamp Maintenance Replacing the Remote Control Batteries... periodically, and clean the air filter and air vents to prevent the projector from place to qualified servicers. Refer all other part needs replacing, contact Epson or an authorized...
... as specifically explained in the projector can injure you should replace are the lamp, air filter, and remote control batteries. Dangerous electrical voltages in this manual. The only parts you severely. Cleaning the Lens Cleaning the Projector Case Air Filter and Vent Maintenance Projector Lamp Maintenance Replacing the Remote Control Batteries... periodically, and clean the air filter and air vents to prevent the projector from place to qualified servicers. Refer all other part needs replacing, contact Epson or an authorized...
User's Guide
Page 126
... clean the projector's air filter or vents if they get dusty, or if you see a message telling you to clean them as described in this manual. Caution: Do not use wax, alcohol, benzene, paint thinner, or other chemicals to clean the projector case. Parent topic: Projector Maintenance Cleaning the Projector Case...
... clean the projector's air filter or vents if they get dusty, or if you see a message telling you to clean them as described in this manual. Caution: Do not use wax, alcohol, benzene, paint thinner, or other chemicals to clean the projector case. Parent topic: Projector Maintenance Cleaning the Projector Case...
User's Guide
Page 135
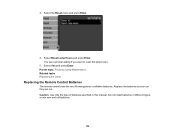
3. Select Yes and press Enter. Parent topic: Projector Lamp Maintenance Related tasks Replacing the Lamp Replacing the Remote Control Batteries The remote control uses the two AA manganese or alkaline batteries. Select the Reset menu and press Enter. 4. You see a prompt asking if you want to reset the lamp hours. 5. Caution: Use only the type of different types, or mix new and old batteries. 135 Do not install batteries of batteries specified in this manual. Select Reset Lamp Hours and press Enter. Replace the batteries as soon as they run out.
3. Select Yes and press Enter. Parent topic: Projector Lamp Maintenance Related tasks Replacing the Lamp Replacing the Remote Control Batteries The remote control uses the two AA manganese or alkaline batteries. Select the Reset menu and press Enter. 4. You see a prompt asking if you want to reset the lamp hours. 5. Caution: Use only the type of different types, or mix new and old batteries. 135 Do not install batteries of batteries specified in this manual. Select Reset Lamp Hours and press Enter. Replace the batteries as soon as they run out.
User's Guide
Page 139
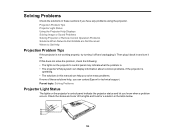
... When Network Alert E-Mails are Not Received Where to Get Help Projection Problem Tips If the projector is operating. • The solutions in this manual can contact Epson for a solution in the table below. 139 Check the status and color of these sections if you have any problems using the projector. Solving...
... When Network Alert E-Mails are Not Received Where to Get Help Projection Problem Tips If the projector is operating. • The solutions in this manual can contact Epson for a solution in the table below. 139 Check the status and color of these sections if you have any problems using the projector. Solving...

User's Guide
Page 144
...the same keys again. 3. Hold down the laptop's Fn key and press the key labelled with a monitor icon or CRT/LCD. (See your laptop manual for details.) Wait a few seconds for instructions.) 4. If necessary, check your video sources. • If you are projecting from a laptop computer, ...make sure it is enabled. (See your computer or Windows manual for an image to appear. • Turn on the connected computer or video source, and press Play to begin your presentation, if necessary. •...
...the same keys again. 3. Hold down the laptop's Fn key and press the key labelled with a monitor icon or CRT/LCD. (See your laptop manual for details.) Wait a few seconds for instructions.) 4. If necessary, check your video sources. • If you are projecting from a laptop computer, ...make sure it is enabled. (See your computer or Windows manual for an image to appear. • Turn on the connected computer or video source, and press Play to begin your presentation, if necessary. •...
User's Guide
Page 145
...display. • Check your computer display settings to disable dual display and set the resolution within the projector's limits. (See your computer manual for details.) • Check the resolution assigned to your presentation files to see if they are created for a different resolution than you... Related references Input Signal Settings - Do one of the following: • Mac OS X 10.6.x: Click Show displays in . (See your laptop manual for details.) Parent topic: Solutions When "No Signal" Message Appears Solutions When "Not Supported" Message Appears If the "Not Supported" message appears,...
...display. • Check your computer display settings to disable dual display and set the resolution within the projector's limits. (See your computer manual for details.) • Check the resolution assigned to your presentation files to see if they are created for a different resolution than you... Related references Input Signal Settings - Do one of the following: • Mac OS X 10.6.x: Click Show displays in . (See your laptop manual for details.) Parent topic: Solutions When "No Signal" Message Appears Solutions When "Not Supported" Message Appears If the "Not Supported" message appears,...
User's Guide
Page 147
...without it to see if it distorts the image. • When using the Screen Fit feature (PowerLite 1775W), position the projector at a compatible distance from the screen or adjust the image shape manually. • Turn on automatic keystone adjustment in the projector's menus. • Adjust the Sharpness ...Note: To avoid condensation on the lens after bringing the projector in from a computer, press the Auto button on the screen and manually adjust the Tracking and Sync settings. Parent topic: Solving Image or Sound Problems Related references Input Signal Settings - Signal Menu 147 If ...
...without it to see if it distorts the image. • When using the Screen Fit feature (PowerLite 1775W), position the projector at a compatible distance from the screen or adjust the image shape manually. • Turn on automatic keystone adjustment in the projector's menus. • Adjust the Sharpness ...Note: To avoid condensation on the lens after bringing the projector in from a computer, press the Auto button on the screen and manually adjust the Tracking and Sync settings. Parent topic: Solving Image or Sound Problems Related references Input Signal Settings - Signal Menu 147 If ...
User's Guide
Page 148
... cables, try selecting Normal in the Settings menu. • If the image has been progressively darkening, you may need to the projector and your computer manual for the current input source, such as Brightness, Contrast, Tint, Color Adjustment, and/or Color Saturation. • Make sure you are securely connected to replace...
... cables, try selecting Normal in the Settings menu. • If the image has been progressively darkening, you may need to the projector and your computer manual for the current input source, such as Brightness, Contrast, Tint, Color Adjustment, and/or Color Saturation. • Make sure you are securely connected to replace...
User's Guide
Page 154
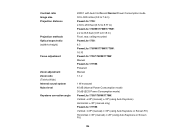
... On and Normal Power Consumption mode 30 to 300 inches (0.8 to 7.6 m) PowerLite 1750: 2.36 to 28.8 feet (0.72 to 8.77 m) PowerLite 1760W/1770W/1775W: 2.2 to 26.8 feet (0.67 to 8.18 m) Front, rear, ceiling-mounted PowerLite 1750: 4:3 PowerLite 1760W/1770W/1775W: 16:10 PowerLite 1750/1760W/1770W: Manual PowerLite 1775W: Powered Manual 1:1.2 1 W monaural 40 dB (Normal Power Consumption mode) 30 dB (ECO...
... On and Normal Power Consumption mode 30 to 300 inches (0.8 to 7.6 m) PowerLite 1750: 2.36 to 28.8 feet (0.72 to 8.77 m) PowerLite 1760W/1770W/1775W: 2.2 to 26.8 feet (0.67 to 8.18 m) Front, rear, ceiling-mounted PowerLite 1750: 4:3 PowerLite 1760W/1770W/1775W: 16:10 PowerLite 1750/1760W/1770W: Manual PowerLite 1775W: Powered Manual 1:1.2 1 W monaural 40 dB (Normal Power Consumption mode) 30 dB (ECO...
User's Guide
Page 158
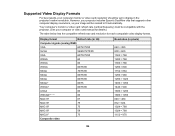
...67 MAC16" 75 MAC19" 75 MAC19" 59 MAC21" 75 Composite video Resolution (in the projector's native resolution. However, your projector includes Epson's SizeWise chip that supports other computer display resolutions, so your image will be compatible with the projector. (See your computer monitor or ...video card resolution should be set to fit automatically. Supported Video Display Formats For best results, your computer or video card manual for details.) The table below lists the compatible refresh rate and resolution for each compatible video display format. Your computer's ...
...67 MAC16" 75 MAC19" 75 MAC19" 59 MAC21" 75 Composite video Resolution (in the projector's native resolution. However, your projector includes Epson's SizeWise chip that supports other computer display resolutions, so your image will be compatible with the projector. (See your computer monitor or ...video card resolution should be set to fit automatically. Supported Video Display Formats For best results, your computer or video card manual for details.) The table below lists the compatible refresh rate and resolution for each compatible video display format. Your computer's ...
User's Guide
Page 163
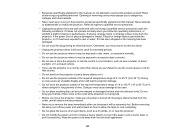
... lead to projector damage. • Do not store the projector outside of the required temperature range of 14 to 140 ºF (-10 to service this manual. If liquid or foreign objects get inside the projector, or if it has been dropped or the housing has been damaged. • Do not touch... disassemble or modify the projector. Never attempt to rain or water; Do not place heavy objects on the projector except as specifically explained in this manual, do not attempt to 60 ºC) or in performance;
... lead to projector damage. • Do not store the projector outside of the required temperature range of 14 to 140 ºF (-10 to service this manual. If liquid or foreign objects get inside the projector, or if it has been dropped or the housing has been damaged. • Do not touch... disassemble or modify the projector. Never attempt to rain or water; Do not place heavy objects on the projector except as specifically explained in this manual, do not attempt to 60 ºC) or in performance;
Operation Guide - EasyMP Monitor v4.50
Page 2
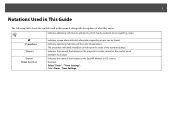
... the order of the numbered steps. q Indicates additional information and points which may be useful to know regarding a topic can be carried out in this manual, along with descriptions of operations.
... the order of the numbered steps. q Indicates additional information and points which may be useful to know regarding a topic can be carried out in this manual, along with descriptions of operations.

