User Manual
Page 3
... Additional Information 14 Projector Part Locations ...15 Projector Parts - Rear ...17 Projector Parts - Control Panel ...19 Projector Parts - Base...18 Projector Parts - Front/Top ...16 Projector Parts - Remote Control 20 Setting Up the Projector ...23 Projector Placement...23 Projector Setup and Installation Options 23 Projection...a Computer for VGA Video 28 Connecting to a Computer for HDMI Video and Audio 28 Connecting to a Computer for USB Mouse Control 29 Connecting to a Computer for Sound 30 Connecting to Video Sources ...30 Connecting to an HDMI Video Source 30 Connecting to a...
... Additional Information 14 Projector Part Locations ...15 Projector Parts - Rear ...17 Projector Parts - Control Panel ...19 Projector Parts - Base...18 Projector Parts - Front/Top ...16 Projector Parts - Remote Control 20 Setting Up the Projector ...23 Projector Placement...23 Projector Setup and Installation Options 23 Projection...a Computer for VGA Video 28 Connecting to a Computer for HDMI Video and Audio 28 Connecting to a Computer for USB Mouse Control 29 Connecting to a Computer for Sound 30 Connecting to Video Sources ...30 Connecting to an HDMI Video Source 30 Connecting to a...
User Manual
Page 4
... USB Source 34 Disconnecting a USB Device or Camera From the Projector 34 Connecting to a Document Camera 34 Installing Batteries in the Remote Control 35 Opening the Lens Cover ...36 Using the Projector on a Network ...37 Wireless Network Projection ...37 Installing the Wireless LAN Module... Menu Settings 47 Setting Up Projector Network E-Mail Alerts 48 Network Projector E-mail Alert Messages 49 Setting Up Monitoring Using SNMP 49 Controlling a Networked Projector Using a Web Browser 50 Using Basic Projector Features ...53 Turning On the Projector ...53 Turning Off the Projector ...
... USB Source 34 Disconnecting a USB Device or Camera From the Projector 34 Connecting to a Document Camera 34 Installing Batteries in the Remote Control 35 Opening the Lens Cover ...36 Using the Projector on a Network ...37 Wireless Network Projection ...37 Installing the Wireless LAN Module... Menu Settings 47 Setting Up Projector Network E-Mail Alerts 48 Network Projector E-mail Alert Messages 49 Setting Up Monitoring Using SNMP 49 Controlling a Networked Projector Using a Web Browser 50 Using Basic Projector Features ...53 Turning On the Projector ...53 Turning Off the Projector ...

User Manual
Page 5
... a Presentation Pointer 67 Selecting an Image Source ...68 Projection Modes ...70 Changing the Projection Mode Using the Remote Control 70 Changing the Projection Mode Using the Menus 71 Image Aspect Ratio ...71 Changing the Image Aspect Ratio 72 Available Image Aspect Ratios ......72 Color Mode...73 Changing the Color Mode...74 Available Color Modes...74 Turning On Auto Iris...75 Controlling the Volume with the Volume Buttons 76 Projecting a Slide Show ...77 Slideshow Presentations ...77 Supported Slideshow File Types 78 Starting a Slide Show ...
... a Presentation Pointer 67 Selecting an Image Source ...68 Projection Modes ...70 Changing the Projection Mode Using the Remote Control 70 Changing the Projection Mode Using the Menus 71 Image Aspect Ratio ...71 Changing the Image Aspect Ratio 72 Available Image Aspect Ratios ......72 Color Mode...73 Changing the Color Mode...74 Available Color Modes...74 Turning On Auto Iris...75 Controlling the Volume with the Volume Buttons 76 Projecting a Slide Show ...77 Slideshow Presentations ...77 Supported Slideshow File Types 78 Starting a Slide Show ...
User Manual
Page 6
... Feature Settings - Extended Menu 108 Projector Network Settings - Projector Identification System for Multiple Projector Control 93 Setting the Projector ID...94 Setting the Remote Control ID...94 Matching Multiple-Projector Display Quality 95 Projecting Two Images Simultaneously 97 Adjusting the Menu ... the Air Filter...119 Projector Lamp Maintenance...121 Replacing the Lamp ...121 Resetting the Lamp Timer...125 Replacing the Remote Control Batteries 126 Transporting the Projector...128 Solving Problems ...129 Projection Problem Tips ...129 Projector Light Status ...129 Using the...
... Feature Settings - Extended Menu 108 Projector Network Settings - Projector Identification System for Multiple Projector Control 93 Setting the Projector ID...94 Setting the Remote Control ID...94 Matching Multiple-Projector Display Quality 95 Projecting Two Images Simultaneously 97 Adjusting the Menu ... the Air Filter...119 Projector Lamp Maintenance...121 Replacing the Lamp ...121 Resetting the Lamp Timer...125 Replacing the Remote Control Batteries 126 Transporting the Projector...128 Solving Problems ...129 Projection Problem Tips ...129 Projector Light Status ...129 Using the...
User Manual
Page 7
... No Sound or Low Volume 139 Solving Projector or Remote Control Operation Problems 139 Solutions to Projector Power or Shut-Off Problems 140 Solutions to Problems with the Remote Control 140 Solutions to Password Problems 141 Solutions When Network Alert...Received 141 Where to Get Help...142 Technical Specifications ...143 General Projector Specifications ...143 Projector Lamp Specifications...145 Remote Control Specifications ...146 Projector Dimension Specifications 146 Projector Electrical Specifications ...147 Projector Environmental Specifications 148 Projector Safety and Approvals ...
... No Sound or Low Volume 139 Solving Projector or Remote Control Operation Problems 139 Solutions to Projector Power or Shut-Off Problems 140 Solutions to Problems with the Remote Control 140 Solutions to Password Problems 141 Solutions When Network Alert...Received 141 Where to Get Help...142 Technical Specifications ...143 General Projector Specifications ...143 Projector Lamp Specifications...145 Remote Control Specifications ...146 Projector Dimension Specifications 146 Projector Electrical Specifications ...147 Projector Environmental Specifications 148 Projector Safety and Approvals ...
User Manual
Page 9
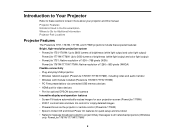
... (white light output and color light output) PowerLite 1771W/1776W: Up to 3000 lumens of brightness (white light output and color light output) • PowerLite 1751: Native resolution of 1024 × 768 pixels (XGA) PowerLite 1761W/1771W/1776W: Native resolution of 1280 &#... (PowerLite 1776W) • 2000:1 contrast ratio and Auto Iris control for crisply detailed images • Powered focus via the projector or remote control (PowerLite 1776W) • Epson's Instant Off and Direct Power On features for Additional Information Projector Part Locations Projector Features The PowerLite 1751, ...
... (white light output and color light output) PowerLite 1771W/1776W: Up to 3000 lumens of brightness (white light output and color light output) • PowerLite 1751: Native resolution of 1024 × 768 pixels (XGA) PowerLite 1761W/1771W/1776W: Native resolution of 1280 &#... (PowerLite 1776W) • 2000:1 contrast ratio and Auto Iris control for crisply detailed images • Powered focus via the projector or remote control (PowerLite 1776W) • Epson's Instant Off and Direct Power On features for Additional Information Projector Part Locations Projector Features The PowerLite 1751, ...
User Manual
Page 14
... States, Canada, or Puerto Rico. Parent topic: Projector Features Notations Used in the Documentation Follow the guidelines in a network environment (PowerLite 1761W/1771W/1776W), see the EasyMP Network Projection Operation Guide. • For detailed instructions on new accessories, products, and services. ...system Press the Help button on the remote control or projector to get quick solutions to common problems. • www.epson.com/support (U.S) or www.epson.ca/support (Canada) View FAQs (frequently asked questions) and e-mail your questions to Epson technical support 24 hours a day. ...
... States, Canada, or Puerto Rico. Parent topic: Projector Features Notations Used in the Documentation Follow the guidelines in a network environment (PowerLite 1761W/1771W/1776W), see the EasyMP Network Projection Operation Guide. • For detailed instructions on new accessories, products, and services. ...system Press the Help button on the remote control or projector to get quick solutions to common problems. • www.epson.com/support (U.S) or www.epson.ca/support (Canada) View FAQs (frequently asked questions) and e-mail your questions to Epson technical support 24 hours a day. ...

User Manual
Page 15
Base Projector Parts - Front/Top Projector Parts - Projector Parts - Control Panel Projector Parts - Remote Control Parent topic: Introduction to Get Help". For details, see "Where to Your Projector 15 Parent topic: Introduction to Your Projector Related references Where to Get Help Projector Part Locations Check the projector part illustrations to get help after checking this manual and the sources listed above, you still need help fast. Rear Projector Parts - • If you can use the EPSON PrivateLine Support service to learn about the parts on your projector.
Base Projector Parts - Front/Top Projector Parts - Projector Parts - Control Panel Projector Parts - Remote Control Parent topic: Introduction to Get Help". For details, see "Where to Your Projector 15 Parent topic: Introduction to Your Projector Related references Where to Get Help Projector Part Locations Check the projector part illustrations to get help after checking this manual and the sources listed above, you still need help fast. Rear Projector Parts - • If you can use the EPSON PrivateLine Support service to learn about the parts on your projector.
User Manual
Page 21
...functions) 22 ID button (specifies which ID is using the remote control) 23 Color Mode button (selects display modes) 24 Numeric buttons (enter numbers) 25 LAN button (switches to available network source; functions only on PowerLite 1761W/1771W/1776W) 21 buttons (zoom into and out ..., and sync settings) 7 Aspect button (selects the image aspect ratio) 8 Num button (when held down buttons (control presentation slides) 14 E-Zoom +/- functions only on PowerLite 1761W/1771W/1776W) 17 Help button (accesses projector help information) 18 Freeze button (stops video action) 19 Volume up...
...functions) 22 ID button (specifies which ID is using the remote control) 23 Color Mode button (selects display modes) 24 Numeric buttons (enter numbers) 25 LAN button (switches to available network source; functions only on PowerLite 1761W/1771W/1776W) 21 buttons (zoom into and out ..., and sync settings) 7 Aspect button (selects the image aspect ratio) 8 Num button (when held down buttons (control presentation slides) 14 E-Zoom +/- functions only on PowerLite 1761W/1771W/1776W) 17 Help button (accesses projector help information) 18 Freeze button (stops video action) 19 Volume up...
User Manual
Page 22
26 USB button (cycles through connected USB sources) 27 Source Search button (searches for connected sources) 28 Remote control light (outputs remote control signals) Parent topic: Projector Part Locations Related tasks Connecting to a Computer for USB Mouse Control 22
26 USB button (cycles through connected USB sources) 27 Source Search button (searches for connected sources) 28 Remote control light (outputs remote control signals) Parent topic: Projector Part Locations Related tasks Connecting to a Computer for USB Mouse Control 22

User Manual
Page 23
... around and under the projector for use it on almost any flat surface to project your presentation. Projector Placement Projector Connections Installing Batteries in the Remote Control Opening the Lens Cover Projector Placement You can set up or install your projector for ventilation, and do not place it in a fixed location. Projector...
... around and under the projector for use it on almost any flat surface to project your presentation. Projector Placement Projector Connections Installing Batteries in the Remote Control Opening the Lens Cover Projector Placement You can set up or install your projector for ventilation, and do not place it in a fixed location. Projector...
User Manual
Page 29
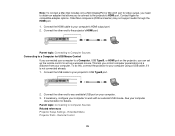
...- Parent topic: Connecting to your computer's HDMI output port. 2. Connect the USB cable to your computer to work with an external USB mouse. Remote Control 29 Note: To connect a Mac that allows you to connect to the projector's HDMI port. If necessary, configure your projector's USB TypeB port.... 2. Contact Apple for video output, you can set up the remote control to your computer using a USB cable, if it is not connected already. 1. Connect the HDMI cable to act as a wireless mouse. Connect...
...- Parent topic: Connecting to your computer's HDMI output port. 2. Connect the USB cable to your computer to work with an external USB mouse. Remote Control 29 Note: To connect a Mac that allows you to connect to the projector's HDMI port. If necessary, configure your projector's USB TypeB port.... 2. Contact Apple for video output, you can set up the remote control to your computer using a USB cable, if it is not connected already. 1. Connect the HDMI cable to act as a wireless mouse. Connect...
User Manual
Page 34
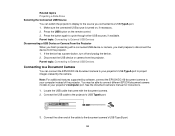
...off and unplug the device. 2. Disconnect the USB device or camera from the projector. 1. Make sure the connected USB source is turned on the remote control. 3. Press the USB button on , if necessary. 2. Parent topic: Connecting to External USB Devices Connecting to a Document Camera You can switch ... topics Projecting a Slide Show Selecting the Connected USB Source You can connect the EPSON DC-06 document camera to your projector's USB TypeA port to project images viewed by software, connect the EPSON DC-06 document camera to your projector's Computer port. Press the button again ...
...off and unplug the device. 2. Disconnect the USB device or camera from the projector. 1. Make sure the connected USB source is turned on the remote control. 3. Press the USB button on , if necessary. 2. Parent topic: Connecting to External USB Devices Connecting to a Document Camera You can switch ... topics Projecting a Slide Show Selecting the Connected USB Source You can connect the EPSON DC-06 document camera to your projector's USB TypeA port to project images viewed by software, connect the EPSON DC-06 document camera to your projector's Computer port. Press the button again ...

User Manual
Page 35
Do not install batteries of batteries specified in the Remote Control The remote control uses the two AA batteries that came with the + and - Open the battery cover as shown. 35 Insert the batteries with the projector. Parent topic: Projector Connections Installing Batteries in this manual. ends facing as shown. 2. Caution: Use only the type of different types, or mix new and old batteries. 1.
Do not install batteries of batteries specified in the Remote Control The remote control uses the two AA batteries that came with the + and - Open the battery cover as shown. 35 Insert the batteries with the projector. Parent topic: Projector Connections Installing Batteries in this manual. ends facing as shown. 2. Caution: Use only the type of different types, or mix new and old batteries. 1.
User Manual
Page 41
... using its menu system. 1. After a few minutes, your wireless LAN connection. Note: You may need to restart your computer to a USB port on your projector remote control or restart your computer. Press the Menu button. 41 If it does not appear, press the LAN button on your computer or notebook. When you...
... using its menu system. 1. After a few minutes, your wireless LAN connection. Note: You may need to restart your computer to a USB port on your projector remote control or restart your computer. Press the Menu button. 41 If it does not appear, press the LAN button on your computer or notebook. When you...

User Manual
Page 43
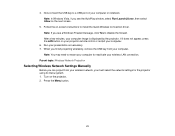
... 32 alphanumeric characters long for using the EasyMP Network Projection software to access the projector. Press the arrow buttons on the remote control to highlight characters and press Enter to select the wireless network on your computer. After you complete the wireless settings for ...keyboard to save your network. 9. You must enter a displayed, randomized keyword from a computer using the PJLink protocol for projector control. • Web Control Password lets you need to select them. 7. Select the settings on the Wireless LAN menu as necessary for accessing the projector...
... 32 alphanumeric characters long for using the EasyMP Network Projection software to access the projector. Press the arrow buttons on the remote control to highlight characters and press Enter to select the wireless network on your computer. After you complete the wireless settings for ...keyboard to save your network. 9. You must enter a displayed, randomized keyword from a computer using the PJLink protocol for projector control. • Web Control Password lets you need to select them. 7. Select the settings on the Wireless LAN menu as necessary for accessing the projector...

User Manual
Page 53
... the Projector Menus Adjusting the Image Height Image Shape Resizing the Image With the Zoom Ring Focusing the Image Remote Control Operation Selecting an Image Source Projection Modes Image Aspect Ratio Color Mode Controlling the Volume with the Volume Buttons Projecting a Slide Show Turning On the Projector Turn on the projector so it...
... the Projector Menus Adjusting the Image Height Image Shape Resizing the Image With the Zoom Ring Focusing the Image Remote Control Operation Selecting an Image Source Projection Modes Image Aspect Ratio Color Mode Controlling the Volume with the Volume Buttons Projecting a Slide Show Turning On the Projector Turn on the projector so it...
User Manual
Page 54
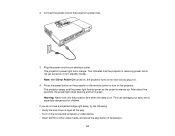
... and is in . 4. Note: With Direct Power On turned on, the projector turns on the projector. Press the power button on the projector or the remote control to the projector's power inlet. 3. Warning: Never look into an electrical outlet. 2. The projector's power light turns orange. Connect the power cord to turn on...
... and is in . 4. Note: With Direct Power On turned on, the projector turns on the projector. Press the power button on the projector or the remote control to the projector's power inlet. 3. Warning: Never look into an electrical outlet. 2. The projector's power light turns orange. Connect the power cord to turn on...
User Manual
Page 55
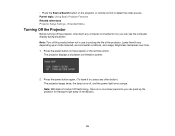
... Projector Before turning off , and the power light turns orange. Brightness decreases over time. 1. Note: With Epson's Instant Off technology, there is no cool-down any computer connected to it on the projector or the remote control. Parent topic: Using Basic Projector Features Related references Projector Setup Settings - The projector displays a shutdown confirmation...
... Projector Before turning off , and the power light turns orange. Brightness decreases over time. 1. Note: With Epson's Instant Off technology, there is no cool-down any computer connected to it on the projector or the remote control. Parent topic: Using Basic Projector Features Related references Projector Setup Settings - The projector displays a shutdown confirmation...

User Manual
Page 60
Press the Screen Fit button on the screen. 2. Fine-tune the image shape as necessary to display the message in the middle of the screen. 4. 1. Press the Screen Fit button again. Move the projector as necessary using the arrow buttons on the control panel. 6. When you are finished, press Esc. 60 Zoom into the image until its yellow frame extends beyond the edges of the screen. 3. You see a message on the projector or remote control. Two displays flash briefly, then this message appears: 5.
Press the Screen Fit button on the screen. 2. Fine-tune the image shape as necessary to display the message in the middle of the screen. 4. 1. Press the Screen Fit button again. Move the projector as necessary using the arrow buttons on the control panel. 6. When you are finished, press Esc. 60 Zoom into the image until its yellow frame extends beyond the edges of the screen. 3. You see a message on the projector or remote control. Two displays flash briefly, then this message appears: 5.


