
Technical Brief (Ink Jet Printers)
Page 3
.... Epson printers use an advanced error diffusion technology to determine the most interested in various patterns so you never have to swap an ink cartridge to receive Epson inks. Epson, Exceed Your Vision, MicroPiezo, AcuPhoto Halftoning, Claria, Epson UltraChrome K3, Epson UltraChrome Hi-Gloss, and PictureMate are specifically designed to get sharp black text, superb photo...
.... Epson printers use an advanced error diffusion technology to determine the most interested in various patterns so you never have to swap an ink cartridge to receive Epson inks. Epson, Exceed Your Vision, MicroPiezo, AcuPhoto Halftoning, Claria, Epson UltraChrome K3, Epson UltraChrome Hi-Gloss, and PictureMate are specifically designed to get sharp black text, superb photo...
Basics
Page 2
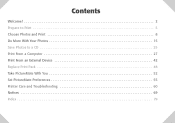
Contents Welcome 2 Prepare to Print 5 Choose Photos and Print 8 Do More With Your Photos 15 Save Photos to a CD 25 Print From a Computer 27 Print From an External Device 42 Replace Print Pack 48 Take PictureMate With You 52 Set PictureMate Preferences 55 Printer Care and Troubleshooting 60 Notices 69 Index 79
Contents Welcome 2 Prepare to Print 5 Choose Photos and Print 8 Do More With Your Photos 15 Save Photos to a CD 25 Print From a Computer 27 Print From an External Device 42 Replace Print Pack 48 Take PictureMate With You 52 Set PictureMate Preferences 55 Printer Care and Troubleshooting 60 Notices 69 Index 79
Basics
Page 3
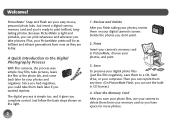
..., or your computer. Save To preserve your digital photo files (just like film negatives), save your photos, review them any time. (On PictureMate Flash, you can print whenever and wherever you could take pictures, leave the film at the photo lab, and come back later for more photos. Just insert a digital camera memory card and you...
..., or your computer. Save To preserve your digital photo files (just like film negatives), save your photos, review them any time. (On PictureMate Flash, you can print whenever and wherever you could take pictures, leave the film at the photo lab, and come back later for more photos. Just insert a digital camera memory card and you...
Basics
Page 4
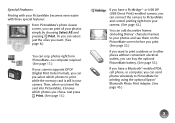
...add decorative frames (including Disney® character frames) to your photos and see them on the PictureMate screen before you print. (See page 22.) If you want . (See page 8.) You can crop photos right from PictureMate-no computer required. (See page 17.) If your camera ...Just press Print. (See page 13.) If you chose. Special Features Printing with your PictureMate becomes even easier with these special features: From PictureMate's photo viewer screen, you can send photos wirelessly to PictureMate for printing using the optional Epson® Bluetooth Photo Print Adapter. (See page 43.) 3
...add decorative frames (including Disney® character frames) to your photos and see them on the PictureMate screen before you print. (See page 22.) If you want . (See page 8.) You can crop photos right from PictureMate-no computer required. (See page 17.) If your camera ...Just press Print. (See page 13.) If you chose. Special Features Printing with your PictureMate becomes even easier with these special features: From PictureMate's photo viewer screen, you can send photos wirelessly to PictureMate for printing using the optional Epson® Bluetooth Photo Print Adapter. (See page 43.) 3
Basics
Page 5
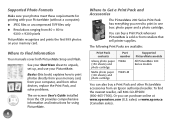
... Resolutions ranging from 80 × 80 to print in one box: photo paper and a photo cartridge. See your Start Here sheet to Find Information Your manuals cover both PictureMate Snap and Flash. You can purchase online at www.epsonstore.com (U.S. The following Print Packs... photo paper (150 sheets) and photo cartridge Matte photo paper (100 sheets) and photo cartridge Part number T5846 T5845-M Supported PictureMate models All PictureMate 200 Series models You can also buy a Print Pack wherever PictureMate is sold or from retailers that sell printer supplies. sales) or www.epson.ca...
... Resolutions ranging from 80 × 80 to print in one box: photo paper and a photo cartridge. See your Start Here sheet to Find Information Your manuals cover both PictureMate Snap and Flash. You can purchase online at www.epsonstore.com (U.S. The following Print Packs... photo paper (150 sheets) and photo cartridge Matte photo paper (100 sheets) and photo cartridge Part number T5846 T5845-M Supported PictureMate models All PictureMate 200 Series models You can also buy a Print Pack wherever PictureMate is sold or from retailers that sell printer supplies. sales) or www.epson.ca...
Basics
Page 6
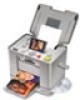
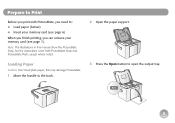
this manual show the PictureMate Snap, but the instructions cover both PictureMate Snap and PictureMate Flash, except where noted. Prepare to Print Before you print with PictureMate, you can remove your memory card (see page 7). Note: The illustrations in this may damage PictureMate. 1 Move the handle to the back. 2 Open the paper support. 3 Press the Open button to : ● Load paper (below) ● Insert your memory card (see page 6) When you finish printing, you need to open the output tray. 5 Loading Paper Caution: Don't load plain paper;
this manual show the PictureMate Snap, but the instructions cover both PictureMate Snap and PictureMate Flash, except where noted. Prepare to Print Before you print with PictureMate, you can remove your memory card (see page 7). Note: The illustrations in this may damage PictureMate. 1 Move the handle to the back. 2 Open the paper support. 3 Press the Open button to : ● Load paper (below) ● Insert your memory card (see page 6) When you finish printing, you need to open the output tray. 5 Loading Paper Caution: Don't load plain paper;

Basics
Page 7
Note: When you may lose photos on the next page. When the card is in, the memory card ...or whiter side up . Load glossy or whiter side up Make sure paper is flashing; Caution: Do not remove a card while the memory card light is beneath arrow on PictureMate. 2 Press the Open button to prevent curling. 4 Slide the edge guides outward..... Load your card. 6 Insert just one card at a time. See page 48 for more paper, order a PictureMate 200 Series Print Pack. Note: PictureMate can't read multiple cards at once. 4 Push the card in carefully until it stops (it won't go in ...
Note: When you may lose photos on the next page. When the card is in, the memory card ...or whiter side up . Load glossy or whiter side up Make sure paper is flashing; Caution: Do not remove a card while the memory card light is beneath arrow on PictureMate. 2 Press the Open button to prevent curling. 4 Slide the edge guides outward..... Load your card. 6 Insert just one card at a time. See page 48 for more paper, order a PictureMate 200 Series Print Pack. Note: PictureMate can't read multiple cards at once. 4 Push the card in carefully until it stops (it won't go in ...
Basics
Page 9
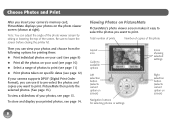
... selected settings Right selection button (selects current option on PictureMate PictureMate's photo viewer screen makes it to pre-select the photos and copies you want to lower the screen before closing the printer lid. Choose Photos and Print After you insert your camera's memory card, PictureMate displays your photos on specific dates (see page 13. Be sure to...
... selected settings Right selection button (selects current option on PictureMate PictureMate's photo viewer screen makes it to pre-select the photos and copies you want to lower the screen before closing the printer lid. Choose Photos and Print After you insert your camera's memory card, PictureMate displays your photos on specific dates (see page 13. Be sure to...
Basics
Page 10
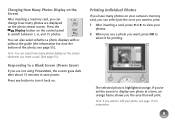
... page 15 for printing. If you've set the screen to display one photo at a time, an orange frame shows you the area that will print. Printing Individual Photos If you have many photos on your camera's memory card, you can select just the ones you want to print. 1 After ...inserting a card, press l or r to view your photos. 2 When you see a photo you want to edit your photo, see page 55). Changing How Many Photos Display on the Screen After inserting a memory card, you can change how many photos are not using PictureMate, the screen goes dark after about 13 minutes to save...
... page 15 for printing. If you've set the screen to display one photo at a time, an orange frame shows you the area that will print. Printing Individual Photos If you have many photos on your camera's memory card, you can select just the ones you want to print. 1 After ...inserting a card, press l or r to view your photos. 2 When you see a photo you want to edit your photo, see page 55). Changing How Many Photos Display on the Screen After inserting a memory card, you can change how many photos are not using PictureMate, the screen goes dark after about 13 minutes to save...
Basics
Page 14
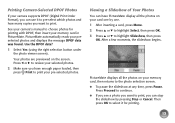
...), you can have enough paper loaded, then press Print to select it to pre-select which photos and how many copies you want to print, you have PictureMate display all the photos on the screen. Use the DPOF data? 1 Select Yes (using the right selection button under... the photo viewer screen). Press Proceed to continue. ● If you see a photo you want to highlight Slideshow, then press OK. PictureMate automatically reads your pre-selected photos. Press l or r to review your selected photos. 2 Make sure you can stop the slideshow by...
...), you can have enough paper loaded, then press Print to select it to pre-select which photos and how many copies you want to print, you have PictureMate display all the photos on the screen. Use the DPOF data? 1 Select Yes (using the right selection button under... the photo viewer screen). Press Proceed to continue. ● If you see a photo you want to highlight Slideshow, then press OK. PictureMate automatically reads your pre-selected photos. Press l or r to review your selected photos. 2 Make sure you can stop the slideshow by...
Basics
Page 15
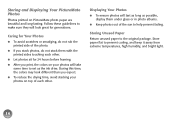
...; To avoid scratches or smudging, do not rub the printed side of the photo. ● If you stack photos, do not stack them under glass or in photo albums. ● Keep photos out of each other . ● Let photos sit for 24 hours before framing. ● After you expect. ● To ... Return unused paper to prevent curling, and keep it away from extreme temperatures, high humidity, and bright light. 14 Storing and Displaying Your PictureMate Photos Photos printed on top of the sun to help prevent fading. Follow these guidelines to make sure they will look different than you print, the...
...; To avoid scratches or smudging, do not rub the printed side of the photo. ● If you stack photos, do not stack them under glass or in photo albums. ● Keep photos out of each other . ● Let photos sit for 24 hours before framing. ● After you expect. ● To ... Return unused paper to prevent curling, and keep it away from extreme temperatures, high humidity, and bright light. 14 Storing and Displaying Your PictureMate Photos Photos printed on top of the sun to help prevent fading. Follow these guidelines to make sure they will look different than you print, the...
Basics
Page 17
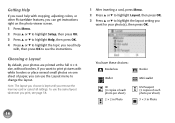
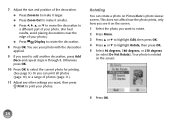
... press OK. You have these choices: Borderless Wallet ID (4 copies of each photo per sheet) 2 × 2 in Photo 16 Getting Help If you need help with cropping, adjusting colors, or other PictureMate features, you can get instructions right on the photo viewer screen. 1 Press Menu. 2 Press u or d to highlight Setup, then press OK. 3 Press...
... press OK. You have these choices: Borderless Wallet ID (4 copies of each photo per sheet) 2 × 2 in Photo 16 Getting Help If you need help with cropping, adjusting colors, or other PictureMate features, you can get instructions right on the photo viewer screen. 1 Press Menu. 2 Press u or d to highlight Setup, then press OK. 3 Press...
Basics
Page 18
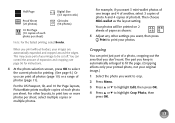
...you print without borders, your photos. When you can control the amount of paper as the layout setting. For the US Passport, ID, and 10 Per Page layouts, PictureMate prints multiple copies of each photo per sheet. You can print all photos (page 10) or a range of photo B. Cropping You can print ...just part of a photo, cropping out the area that you want . This may cause part of...
...you print without borders, your photos. When you can control the amount of paper as the layout setting. For the US Passport, ID, and 10 Per Page layouts, PictureMate prints multiple copies of each photo per sheet. You can print all photos (page 10) or a range of photo B. Cropping You can print ...just part of a photo, cropping out the area that you want . This may cause part of...
Basics
Page 21
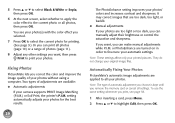
.... If you want , then press Print to print your camera supports PRINT Image Matching (P.I.M.) or Exif Print, the printer's P.I .M. Automatically Fixing Your Photos PictureMate's automatic image adjustments are available: ● Automatic adjustments If your photos. Note: The type of automatic adjustment you choose is kept until you remove the memory card or cancel all...
.... If you want , then press Print to print your camera supports PRINT Image Matching (P.I.M.) or Exif Print, the printer's P.I .M. Automatically Fixing Your Photos PictureMate's automatic image adjustments are available: ● Automatic adjustments If your photos. Note: The type of automatic adjustment you choose is kept until you remove the memory card or cancel all...
Basics
Page 23
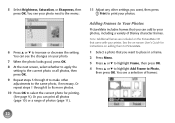
... necessary. You can add to increase or decrease the setting. You see your printer. Note: Additional frames are included on adding them to PictureMate. 1 Select a photo that came with your photo next to the menu: 6 Press u or d to your photos, including a variety of frames: 22 Or repeat steps 1 through 8 to make other settings you can...
... necessary. You can add to increase or decrease the setting. You see your printer. Note: Additional frames are included on adding them to PictureMate. 1 Select a photo that came with your photo next to the menu: 6 Press u or d to your photos, including a variety of frames: 22 Or repeat steps 1 through 8 to make other settings you can...
Basics
Page 24
..., press OK. You see a selection of photos (page 11). 9 Adjust any other settings you can crop it and adjust the picture area. Decorating Photos You can display 1, 6, or 15 frames at full size with the frame. ● If your photos from PictureMate's built-in the frame you selected. ●...; If necessary, press Display to view each photo. 1 Select a photo that you want , then press Print to browse the frames. Tip: You can add fun...
..., press OK. You see a selection of photos (page 11). 9 Adjust any other settings you can crop it and adjust the picture area. Decorating Photos You can display 1, 6, or 15 frames at full size with the frame. ● If your photos from PictureMate's built-in the frame you selected. ●...; If necessary, press Display to view each photo. 1 Select a photo that you want , then press Print to browse the frames. Tip: You can add fun...
Basics
Page 25
...repeat steps 6 through 8. This does not affect how the photo prints, only how you see your photo with the decoration applied. 9 If you want to rotate the decoration. 8 Press OK. Your photo is rotated on PictureMate's photo viewer screen. Otherwise press OK. 10 Press OK to print... your photos. You see it smaller. ● Press l, r, u, or d to move the decoration to a different part of your photo. (For best results, avoid placing decorations ...
...repeat steps 6 through 8. This does not affect how the photo prints, only how you see your photo with the decoration applied. 9 If you want to rotate the decoration. 8 Press OK. Your photo is rotated on PictureMate's photo viewer screen. Otherwise press OK. 10 Press OK to print... your photos. You see it smaller. ● Press l, r, u, or d to move the decoration to a different part of your photo. (For best results, avoid placing decorations ...
Basics
Page 26
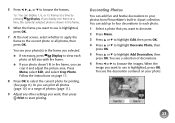
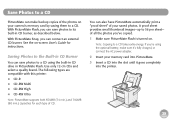
... PictureMate Flash, you 're using the built-in CD drive in PictureMate Flash. Saving Photos to the Built-in CD burner, as described below. Save Photos to a CD PictureMate can make sure it's fully charged, or connect the AC power adapter. 2 Insert your memory card into PictureMate. 3 Insert a CD into the slot until it goes completely into the printer...
... PictureMate Flash, you 're using the built-in CD drive in PictureMate Flash. Saving Photos to the Built-in CD burner, as described below. Save Photos to a CD PictureMate can make sure it's fully charged, or connect the AC power adapter. 2 Insert your memory card into PictureMate. 3 Insert a CD into the slot until it goes completely into the printer...
Basics
Page 27
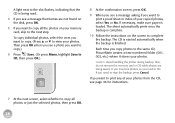
... copy. (Press u or d to complete the backup. If necessary, make sure paper is finished. Caution: Avoid handling the printer during backup. If you want to print any of your copied photos, select Yes or No. The sheet automatically prints once the backup is complete. 10 Follow the instructions on the screen... the backup is loaded. If you need to the same CD, PictureMate creates a new numbered folder (001, 002, etc.) where it stores your photos. A light next to the slot flashes, indicating that the CD is being saved, or you may lose photos on your card or CD. Then press OK when you see...
... copy. (Press u or d to complete the backup. If necessary, make sure paper is finished. Caution: Avoid handling the printer during backup. If you want to print any of your copied photos, select Yes or No. The sheet automatically prints once the backup is complete. 10 Follow the instructions on the screen... the backup is loaded. If you need to the same CD, PictureMate creates a new numbered folder (001, 002, etc.) where it stores your photos. A light next to the slot flashes, indicating that the CD is being saved, or you may lose photos on your card or CD. Then press OK when you see...
Basics
Page 28
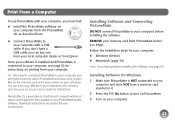
...good idea to your computer, you can buy one from your local computer dealer or from the PictureMate CD as described here. ● Connect PictureMate to your PictureMate printer software. See your on-screen User's Guide for instructions on your computer. 27 Follow the ... first: ● Install the PictureMate software on your computer. REMOVE your memory card from PictureMate before installing the software. Periodically, it were a drive on your computer from Epson. Tip: Once you've connected PictureMate to check Epson's support website at epson.com/support for your computer: ...
...good idea to your computer, you can buy one from your local computer dealer or from the PictureMate CD as described here. ● Connect PictureMate to your PictureMate printer software. See your on-screen User's Guide for instructions on your computer. 27 Follow the ... first: ● Install the PictureMate software on your computer. REMOVE your memory card from PictureMate before installing the software. Periodically, it were a drive on your computer from Epson. Tip: Once you've connected PictureMate to check Epson's support website at epson.com/support for your computer: ...

