
Basics
Page 7
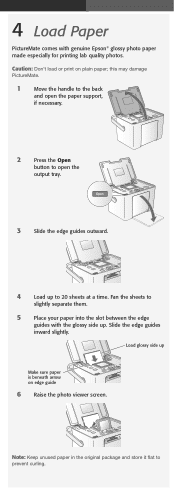
...Slide the edge guides inward slightly. Load your paper glossy or whiter side up to prevent smearing. 7 Store any unused paper in the original package and keep it won't go in all the way). Note: When you may lose photos on your paper into the correct slot, as shown on PictureMate.... 2 Press the Open button to flash. Insert just one card at once...between the edge guides with the glossy or whiter side up Make sure paper is flashing; When the card is in a dry area to turn on the next page...
...Slide the edge guides inward slightly. Load your paper glossy or whiter side up to prevent smearing. 7 Store any unused paper in the original package and keep it won't go in all the way). Note: When you may lose photos on your paper into the correct slot, as shown on PictureMate.... 2 Press the Open button to flash. Insert just one card at once...between the edge guides with the glossy or whiter side up Make sure paper is flashing; When the card is in a dry area to turn on the next page...
Basics
Page 50
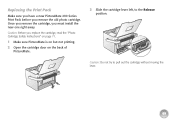
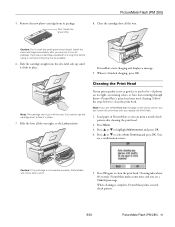
Caution: Before you must install the new one right away. Once you remove the cartridge, you replace the cartridge, read the "Photo Cartridge Safety Instructions" on page 71. 1 Make sure PictureMate is on but not printing. 2 Open the cartridge door on the back of PictureMate. 3 Slide the cartridge lever left, to pull out the cartridge without moving the lever. 49 Replacing the Print Pack Make sure you have a new PictureMate 200 Series Print Pack before you remove the old photo cartridge. Caution: Do not try to the Release position.
Caution: Before you must install the new one right away. Once you remove the cartridge, you replace the cartridge, read the "Photo Cartridge Safety Instructions" on page 71. 1 Make sure PictureMate is on but not printing. 2 Open the cartridge door on the back of PictureMate. 3 Slide the cartridge lever left, to pull out the cartridge without moving the lever. 49 Replacing the Print Pack Make sure you have a new PictureMate 200 Series Print Pack before you remove the old photo cartridge. Caution: Do not try to the Release position.
Basics
Page 51
.... Caution: Do not attempt to PictureMate not covered by Epson's warranty. 50 Note: The cartridge won't go in ink spills or other damage to refill the photo cartridge. This could result in all the way. Install the photo cartridge immediately. Warning: Keep photo cartridges out of the reach of ...6 Slide the cartridge straight into the slot, label side up, until it clicks into place. 4 Pull out the cartridge and dispose of children and do not drink the ink. If ink gets in place. If you leave a cartridge unpacked for recycling guidelines.) 5 Remove the new photo cartridge ...
.... Caution: Do not attempt to PictureMate not covered by Epson's warranty. 50 Note: The cartridge won't go in ink spills or other damage to refill the photo cartridge. This could result in all the way. Install the photo cartridge immediately. Warning: Keep photo cartridges out of the reach of ...6 Slide the cartridge straight into the slot, label side up, until it clicks into place. 4 Pull out the cartridge and dispose of children and do not drink the ink. If ink gets in place. If you leave a cartridge unpacked for recycling guidelines.) 5 Remove the new photo cartridge ...

Basics
Page 52
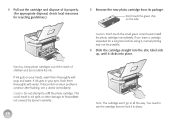
7 Slide the lever all the way. Note: If the screen displays a Print Pack low message, you should buy a new PictureMate 200 Series Print Pack. PictureMate starts charging and displays a message. 9 When it's finished charging, press OK. See page 48 for details. 51 You see the status displayed on the photo viewer screen: 4 Press OK to...
7 Slide the lever all the way. Note: If the screen displays a Print Pack low message, you should buy a new PictureMate 200 Series Print Pack. PictureMate starts charging and displays a message. 9 When it's finished charging, press OK. See page 48 for details. 51 You see the status displayed on the photo viewer screen: 4 Press OK to...

Basics
Page 67
...doesn't feed, remove it, separate the sheets slightly, and reload it . ● Colors may be old or low. this may need cleaning. Slide the guides to Black & White or Sepia. Colors in your print dries. Problems With Paper Feeding Paper doesn't eject fully or is beneath the arrow..., or sharpness. Wait for 24 hours and check your paper is wrinkled. See page 19. ● The print head may damage PictureMate. ● Use only PictureMate photo paper or Epson Premium Photo Paper Glossy or Semigloss. (See page 4 .) ● Store paper flat to eject the jammed paper. Load new paper.
...doesn't feed, remove it, separate the sheets slightly, and reload it . ● Colors may be old or low. this may need cleaning. Slide the guides to Black & White or Sepia. Colors in your print dries. Problems With Paper Feeding Paper doesn't eject fully or is beneath the arrow..., or sharpness. Wait for 24 hours and check your paper is wrinkled. See page 19. ● The print head may damage PictureMate. ● Use only PictureMate photo paper or Epson Premium Photo Paper Glossy or Semigloss. (See page 4 .) ● Store paper flat to eject the jammed paper. Load new paper.

Product Information Guide
Page 3
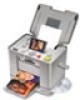
...PictureMate. 2. Slide the edge guides inward slightly. Load glossy or whiter side up Make sure paper stack is glossy or whiter side up to prevent curling. Store any unused paper in the original package and keep it flat in this document show the PictureMate Snap, but the instructions cover both PictureMate Snap and PictureMate Flash..., except where noted. Press the Open button to open the output tray. 8/06 PictureMate Flash (PM 280) - 3 Inserting a Memory ...
...PictureMate. 2. Slide the edge guides inward slightly. Load glossy or whiter side up Make sure paper stack is glossy or whiter side up to prevent curling. Store any unused paper in the original package and keep it flat in this document show the PictureMate Snap, but the instructions cover both PictureMate Snap and PictureMate Flash..., except where noted. Press the Open button to open the output tray. 8/06 PictureMate Flash (PM 280) - 3 Inserting a Memory ...
Product Information Guide
Page 14
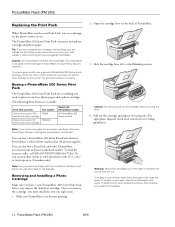
... ink. PictureMate Flash (PM 280) 8/06 The PictureMate 200 Series Print Pack contains a new photo cartridge and photo paper. Just replace it . sales) or www.epson.ca (Canadian sales). Tip: If you see a replacement message while printing, you need to pull out the cartridge without turning off and unplugging PictureMate. This could result in one right away. 1. Slide the cartridge...
... ink. PictureMate Flash (PM 280) 8/06 The PictureMate 200 Series Print Pack contains a new photo cartridge and photo paper. Just replace it . sales) or www.epson.ca (Canadian sales). Tip: If you see a replacement message while printing, you need to pull out the cartridge without turning off and unplugging PictureMate. This could result in one right away. 1. Slide the cartridge...
Product Information Guide
Page 15
... the cartridge lever to select Auto Cleaning and press OK. Caution: Don't touch the small green circuit board. Slide the lever all the way right, to clean the print head. Press OK again to the Lock position. Remove the new...Print Pack low message on the photo viewer, you can print a nozzle check pattern after you remove it 's finished charging, press OK. Don't touch the green chip PictureMate Flash (PM 280) 8. Cleaning the Print Head If your print quality is complete, PictureMate prints a nozzle check pattern. 8/06 PictureMate Flash (PM 280) - 15 If you replace the...
... the cartridge lever to select Auto Cleaning and press OK. Caution: Don't touch the small green circuit board. Slide the lever all the way right, to clean the print head. Press OK again to the Lock position. Remove the new...Print Pack low message on the photo viewer, you can print a nozzle check pattern after you remove it 's finished charging, press OK. Don't touch the green chip PictureMate Flash (PM 280) 8. Cleaning the Print Head If your print quality is complete, PictureMate prints a nozzle check pattern. 8/06 PictureMate Flash (PM 280) - 15 If you replace the...

Start Here Card
Page 3
... here Turn over It will not go in all the way. 5 Slide the lever all the way right, to the Release position. 3 Remove the initial photo cartridge from its package. Caution: Do not install a different PictureMate cartridge for 3 to 4 minutes and displays the screen above. 7 ...When you see the Charging complete message on the photo viewer screen, press OK. Install only the initial photo cartridge that came with PictureMate. 4 Slide the cartridge straight into the slot, label side up, until it clicks into place. 2 Slide the cartridge lever left to the Lock position. 6...
... here Turn over It will not go in all the way. 5 Slide the lever all the way right, to the Release position. 3 Remove the initial photo cartridge from its package. Caution: Do not install a different PictureMate cartridge for 3 to 4 minutes and displays the screen above. 7 ...When you see the Charging complete message on the photo viewer screen, press OK. Install only the initial photo cartridge that came with PictureMate. 4 Slide the cartridge straight into the slot, label side up, until it clicks into place. 2 Slide the cartridge lever left to the Lock position. 6...
Start Here Card
Page 4
...slot between the edge guides with genuine Epson® glossy photo paper made especially for printing lab quality photos. Note: Keep unused paper in the original package and store it flat to 20 sheets at a time. Load glossy side up . this may damage PictureMate. 1 Move the handle to the back... necessary. 2 Press the Open button to open the output tray. 3 Slide the edge guides outward. 4 Load up to prevent curling. Caution: Don't load or print on edge guide 6 Raise the photo viewer screen. 4 Load Paper PictureMate comes with the glossy side up Make sure paper is beneath arrow on ...
...slot between the edge guides with genuine Epson® glossy photo paper made especially for printing lab quality photos. Note: Keep unused paper in the original package and store it flat to 20 sheets at a time. Load glossy side up . this may damage PictureMate. 1 Move the handle to the back... necessary. 2 Press the Open button to open the output tray. 3 Slide the edge guides outward. 4 Load up to prevent curling. Caution: Don't load or print on edge guide 6 Raise the photo viewer screen. 4 Load Paper PictureMate comes with the glossy side up Make sure paper is beneath arrow on ...

