
Technical Brief (Ink Jet Printers)
Page 1
... technology Produces precise ink droplet size and placement Epson Papers Epson papers are designed to receive Epson inks and offer the optimal output quality High Resolution Printing High resolution allows the printer to produce greater detail in photos and sharper text and line art High Quality ...;ts-all ink solution. Detailed information on each component is on the core technologies used in Epson printers and all-in Epson ink jet printers work together to produce brilliant Photo Quality color, sharp text, and incredible print speeds Small Ink Droplet Size Small ink droplets produce...
... technology Produces precise ink droplet size and placement Epson Papers Epson papers are designed to receive Epson inks and offer the optimal output quality High Resolution Printing High resolution allows the printer to produce greater detail in photos and sharper text and line art High Quality ...;ts-all ink solution. Detailed information on each component is on the core technologies used in Epson printers and all-in Epson ink jet printers work together to produce brilliant Photo Quality color, sharp text, and incredible print speeds Small Ink Droplet Size Small ink droplets produce...

Technical Brief (Ink Jet Printers)
Page 2
... method: Heat produces a vapor bubble in the ink reservoir which is generally measured in photos and laser sharp text. Smallest ink droplets produce smooth photos, especially beneficial for smoother gradations Ink Jet Printer Technical Brief Large droplets are increased Epson printers use high-precision mechanical pumps to improve print speed With this technique...
... method: Heat produces a vapor bubble in the ink reservoir which is generally measured in photos and laser sharp text. Smallest ink droplets produce smooth photos, especially beneficial for smoother gradations Ink Jet Printer Technical Brief Large droplets are increased Epson printers use high-precision mechanical pumps to improve print speed With this technique...

Technical Brief (Ink Jet Printers)
Page 3
... Advanced Amateur Photo Enthusiast Chief Memory Officer® General Purpose You can find detailed information, comparisons, and FAQs on the content, selected output quality, and paper type. Epson, Exceed Your Vision, MicroPiezo, AcuPhoto Halftoning, Claria, Epson UltraChrome K3, Epson UltraChrome Hi-Gloss, and PictureMate are registered trademarks of media selected • Epson printers are...
... Advanced Amateur Photo Enthusiast Chief Memory Officer® General Purpose You can find detailed information, comparisons, and FAQs on the content, selected output quality, and paper type. Epson, Exceed Your Vision, MicroPiezo, AcuPhoto Halftoning, Claria, Epson UltraChrome K3, Epson UltraChrome Hi-Gloss, and PictureMate are registered trademarks of media selected • Epson printers are...
Basics
Page 2
Contents Welcome 2 Prepare to Print 5 Choose Photos and Print 8 Do More With Your Photos 15 Save Photos to a CD 25 Print From a Computer 27 Print From an External Device 42 Replace Print Pack 48 Take PictureMate With You 52 Set PictureMate Preferences 55 Printer Care and Troubleshooting 60 Notices 69 Index 79
Contents Welcome 2 Prepare to Print 5 Choose Photos and Print 8 Do More With Your Photos 15 Save Photos to a CD 25 Print From a Computer 27 Print From an External Device 42 Replace Print Pack 48 Take PictureMate With You 52 Set PictureMate Preferences 55 Printer Care and Troubleshooting 60 Notices 69 Index 79
Basics
Page 5
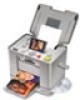
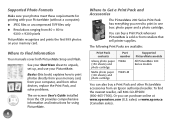
..., replace the Print Pack, and solve problems. The on your PictureMate. Supported Photo Formats Make sure your photos meet these requirements for using PictureMate. 4 Where to Get a Print Pack and Accessories The PictureMate 200 Series Print Pack has everything you can purchase online at www...PictureMate (without a computer): ● JPEG files or uncompressed TIFF files only ● Resolutions ranging from retailers that sell printer supplies. To find the nearest reseller, call 800-GO-EPSON (800-463-7766). Basics (this book) explains how to print in one box: photo paper and a photo...
..., replace the Print Pack, and solve problems. The on your PictureMate. Supported Photo Formats Make sure your photos meet these requirements for using PictureMate. 4 Where to Get a Print Pack and Accessories The PictureMate 200 Series Print Pack has everything you can purchase online at www...PictureMate (without a computer): ● JPEG files or uncompressed TIFF files only ● Resolutions ranging from retailers that sell printer supplies. To find the nearest reseller, call 800-GO-EPSON (800-463-7766). Basics (this book) explains how to print in one box: photo paper and a photo...
Basics
Page 9
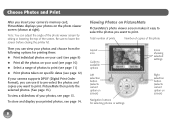
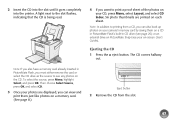
... insert your camera's memory card, PictureMate displays your photos on screen) 8 To store and display your photos, see page 12) If your camera supports DPOF (Digital Print Order Format), you can adjust the angle of the photo viewer screen by raising or lowering the top of photos to lower the screen before closing the printer lid.
... insert your camera's memory card, PictureMate displays your photos on screen) 8 To store and display your photos, see page 12) If your camera supports DPOF (Digital Print Order Format), you can adjust the angle of the photo viewer screen by raising or lowering the top of photos to lower the screen before closing the printer lid.
Basics
Page 20
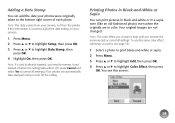
Note: The date comes from the printer. Note: If a card is incorrect, adjust the date setting on your camera. 1 Press Menu. 2 Press u or d to highlight Setup, then press OK. 3 Press u or d to highlight Color Effect, then press OK. You see page 58. 1 Select a photo to print black-and-white or sepia. 2...you turn off the setting. Adding a Date Stamp You can print pictures in black-and-white or in a sepia tone (like an old-fashioned photo) even when the originals are not changed. Note: The color effect you choose is kept until you remove the memory card or cancel all settings...
Note: The date comes from the printer. Note: If a card is incorrect, adjust the date setting on your camera. 1 Press Menu. 2 Press u or d to highlight Setup, then press OK. 3 Press u or d to highlight Color Effect, then press OK. You see page 58. 1 Select a photo to print black-and-white or sepia. 2...you turn off the setting. Adding a Date Stamp You can print pictures in black-and-white or in a sepia tone (like an old-fashioned photo) even when the originals are not changed. Note: The color effect you choose is kept until you remove the memory card or cancel all settings...
Basics
Page 21
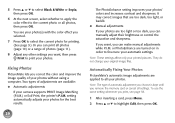
...photos. Fixing Photos PictureMate lets you can make manual adjustments while P.I .M. If you want , then press Print to print your photos. or PhotoEnhance are available: ● Automatic adjustments If your camera supports PRINT Image Matching (P.I.M.) or Exif Print, the printer's P.I .M. They do not change your photos... on in order to fine-tune your automatic settings. Two types of photos (page 11). 8 Adjust any other settings you can print all photos, then press OK. Automatically Fixing Your Photos PictureMate's automatic image adjustments are too light or too dark, you want ,...
...photos. Fixing Photos PictureMate lets you can make manual adjustments while P.I .M. If you want , then press Print to print your photos. or PhotoEnhance are available: ● Automatic adjustments If your camera supports PRINT Image Matching (P.I.M.) or Exif Print, the printer's P.I .M. They do not change your photos... on in order to fine-tune your automatic settings. Two types of photos (page 11). 8 Adjust any other settings you can print all photos, then press OK. Automatically Fixing Your Photos PictureMate's automatic image adjustments are too light or too dark, you want ,...
Basics
Page 23
... adjustments to Photo, then press OK. Note: Additional frames are included on your photos. You can print all photos, then press OK. 9 Repeat steps 3 through 8 to fix more photos. 10 Press OK to select the current photo for instructions on adding them to PictureMate. 1 Select a photo that you... want , then press Print to print your photo. 7 When the photo looks ...
... adjustments to Photo, then press OK. Note: Additional frames are included on your photos. You can print all photos, then press OK. 9 Repeat steps 3 through 8 to fix more photos. 10 Press OK to select the current photo for instructions on adding them to PictureMate. 1 Select a photo that you... want , then press Print to print your photo. 7 When the photo looks ...
Basics
Page 26
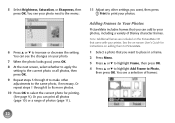
... can save photos to its built-in PictureMate Flash. Saving Photos to the Built-in CD Burner You can also have PictureMate automatically print a "proof sheet" of all the photos you 're using the built-in CD drive in CD burner, as described below. Save Photos to a CD PictureMate can make sure it goes completely into the printer. 25...
... can save photos to its built-in PictureMate Flash. Saving Photos to the Built-in CD Burner You can also have PictureMate automatically print a "proof sheet" of all the photos you 're using the built-in CD drive in CD burner, as described below. Save Photos to a CD PictureMate can make sure it goes completely into the printer. 25...
Basics
Page 27
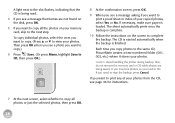
...or No. If you want to copy all photos or just the selected photos, then press OK. 26 Caution: Avoid handling the printer during backup. If necessary, make sure paper is finished. If you need to the next step. A light next to the slot flashes, indicating that the CD is being read. ...4 If you see page 46 for instructions. 7 At the next screen, select whether to the same CD, PictureMate creates a...
...or No. If you want to copy all photos or just the selected photos, then press OK. 26 Caution: Avoid handling the printer during backup. If necessary, make sure paper is finished. If you need to the next step. A light next to the slot flashes, indicating that the CD is being read. ...4 If you see page 46 for instructions. 7 At the next screen, select whether to the same CD, PictureMate creates a...
Basics
Page 31
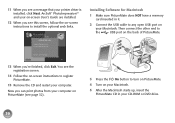
...computer. Then connect the other end to install the optional web links. You see the registration screen. 14 Follow the on-screen instructions to register PictureMate. 15 Remove the CD and restart your on-screen User's Guide are installed. 12 When you see page 32). 3 Press the On button ...to any open USB port on the back of PictureMate. 13 When you can print photos from your computer on PictureMate (see this screen, follow the on-screen instructions to the USB port on your printer driver is installed, click Next. Now you 're finished, click Exit.
...computer. Then connect the other end to install the optional web links. You see the registration screen. 14 Follow the on-screen instructions to register PictureMate. 15 Remove the CD and restart your on-screen User's Guide are installed. 12 When you see page 32). 3 Press the On button ...to any open USB port on the back of PictureMate. 13 When you can print photos from your computer on PictureMate (see this screen, follow the on-screen instructions to the USB port on your printer driver is installed, click Next. Now you 're finished, click Exit.
Basics
Page 33
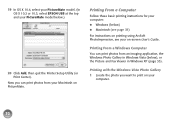
19 In OS X 10.4, select your PictureMate model. (In OS X 10.2 or 10.3, select EPSON USB at the top and your PictureMate model below ), or the Picture and Fax Viewer in Windows Vista (below .) 20 Click Add, then quit the Printer Setup Utility (or Print Center). Printing From...39) For instructions on printing using ArcSoft PhotoImpression, see your on PictureMate. Now you want to print on your Macintosh on -screen User's Guide. Printing with the Windows Vista Photo Gallery 1 Locate the photo you can print photos from your computer. 32 Printing From a Windows Computer You can ...
19 In OS X 10.4, select your PictureMate model. (In OS X 10.2 or 10.3, select EPSON USB at the top and your PictureMate model below ), or the Picture and Fax Viewer in Windows Vista (below .) 20 Click Add, then quit the Printer Setup Utility (or Print Center). Printing From...39) For instructions on printing using ArcSoft PhotoImpression, see your on PictureMate. Now you want to print on your Macintosh on -screen User's Guide. Printing with the Windows Vista Photo Gallery 1 Locate the photo you can print photos from your computer. 32 Printing From a Windows Computer You can ...
Basics
Page 34
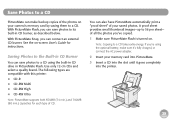
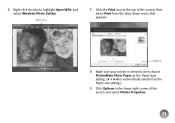
Print icon 3 Click the Print icon at the top of the screen and select Printer Properties. 33 Options 4 Make sure your printer is selected, then choose PictureMate Photo Paper as the Paper type setting. (4 × 6 in is automatically selected as the Paper size setting.) 5 Click Options in the lower right corner of the screen, then select Print from the drop-down menu that appears. 2 Right-click the photo, highlight Open With, and select Windows Photo Gallery.
Print icon 3 Click the Print icon at the top of the screen and select Printer Properties. 33 Options 4 Make sure your printer is selected, then choose PictureMate Photo Paper as the Paper type setting. (4 × 6 in is automatically selected as the Paper size setting.) 5 Click Options in the lower right corner of the screen, then select Print from the drop-down menu that appears. 2 Right-click the photo, highlight Open With, and select Windows Photo Gallery.
Basics
Page 35
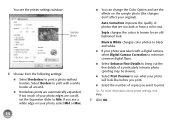
... Mid or Max. 34 ● You can change the Color Option and see the printer settings window: Sample photo 6 Choose from the following settings: ● Select Borderless to print a photo without borders. Tip: For more information about printer settings, click Help. 7 Click OK. Auto Correction improves the quality of your original). If too much...
... Mid or Max. 34 ● You can change the Color Option and see the printer settings window: Sample photo 6 Choose from the following settings: ● Select Borderless to print a photo without borders. Tip: For more information about printer settings, click Help. 7 Click OK. Auto Correction improves the quality of your original). If too much...
Basics
Page 38
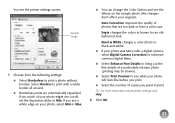
...: Sample image 7 Choose from the following settings: ● Select Borderless to print a photo without borders. Tip: For more information about printer settings, click Help. 8 Click OK. 37 If you see a white edge on the sample photo (the changes don't affect your photo edges are too dark or have a color cast. Black & White changes a color...
...: Sample image 7 Choose from the following settings: ● Select Borderless to print a photo without borders. Tip: For more information about printer settings, click Help. 8 Click OK. 37 If you see a white edge on the sample photo (the changes don't affect your photo edges are too dark or have a color cast. Black & White changes a color...
Basics
Page 41
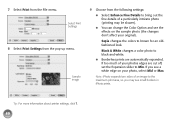
Note: iPhoto expands two sides of an image to bring out the fine details of your photo, select Mid or Max. Tip: For more information about printer settings, click ?. 40 Sample image 9 Choose from the following settings: ● Select Enhance Fine Details to the maximum print area, so ...you see a white edge on the sample photo (the changes don't affect your original). If you may be ...
Note: iPhoto expands two sides of an image to bring out the fine details of your photo, select Mid or Max. Tip: For more information about printer settings, click ?. 40 Sample image 9 Choose from the following settings: ● Select Enhance Fine Details to the maximum print area, so ...you see a white edge on the sample photo (the changes don't affect your original). If you may be ...
Basics
Page 43
... a camera. 3 Turn on but not printing. 2 Make sure there are no memory cards in CD drive (PictureMate Flash only; Note: You must remove your memory card or the printer will read photos from the card, not from your camera's memory card to the drive for instructions. see page 43) ● USB-connected external drive...
... a camera. 3 Turn on but not printing. 2 Make sure there are no memory cards in CD drive (PictureMate Flash only; Note: You must remove your memory card or the printer will read photos from the card, not from your camera's memory card to the drive for instructions. see page 43) ● USB-connected external drive...
Basics
Page 47
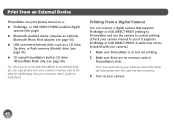
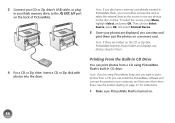
... . 46 3 Connect your CD or Zip drive's USB cable, or plug in your computer, and then print them from a CD using PictureMate Flash's built-in CD drive. Printing From the Built-in CD Drive You can install the PictureMate software and connect the printer to your flash memory drive, to see any photos stored in them.
... . 46 3 Connect your CD or Zip drive's USB cable, or plug in your computer, and then print them from a CD using PictureMate Flash's built-in CD drive. Printing From the Built-in CD Drive You can install the PictureMate software and connect the printer to your flash memory drive, to see any photos stored in them.
Basics
Page 48
...view and print them on a CD in PictureMate Flash's built-in PictureMate Flash, you want to printing from a CD, you can also back up photos on your on each sheet. The CD comes halfway out. 2 Insert the CD into the slot until it goes completely into the printer. Note: In addition to print a ...proof sheet of the photos on your photos are printed ...
...view and print them on a CD in PictureMate Flash's built-in PictureMate Flash, you want to printing from a CD, you can also back up photos on your on each sheet. The CD comes halfway out. 2 Insert the CD into the slot until it goes completely into the printer. Note: In addition to print a ...proof sheet of the photos on your photos are printed ...


