Camera Basics
Page 3
Contents Introduction 5 About the Software 6 Optional Accessories 7 Finding More Information 8 Getting Started 9 Unpacking Your Camera 9 Installing the Battery 10 Turning Your Camera On and Off 11 Setting the Language, Date, and Time 11 Using Memory Cards 12 Installing the Software 14 Taking and Viewing Photos 17 Taking Photos in Automatic Mode 18 Taking Photos in Manual Mode 19 Camera Settings 21 Continuous Shooting 23 Recording Videos 24 Taking Photos With Fun Frames 25 Playing Back Photos and Videos 27 3
Contents Introduction 5 About the Software 6 Optional Accessories 7 Finding More Information 8 Getting Started 9 Unpacking Your Camera 9 Installing the Battery 10 Turning Your Camera On and Off 11 Setting the Language, Date, and Time 11 Using Memory Cards 12 Installing the Software 14 Taking and Viewing Photos 17 Taking Photos in Automatic Mode 18 Taking Photos in Manual Mode 19 Camera Settings 21 Continuous Shooting 23 Recording Videos 24 Taking Photos With Fun Frames 25 Playing Back Photos and Videos 27 3

Camera Basics
Page 6
...'t need to install the USB driver.) ◗ Apple® QuickTime™ program for playing videos on your camera includes the following software for Windows® and Macintosh®: ◗ A selection of PRINT Image Framer frames for holidays, birthdays, and other special occasions... computer to the camera ◗ Your Epson PhotoPC L-410 Camera User's Guide, which includes information and instructions for all the features of your camera ◗ A USB driver that came with your computer ◗ Adobe® Acrobat® Reader to the frames already loaded on installing the software. 6
...'t need to install the USB driver.) ◗ Apple® QuickTime™ program for playing videos on your camera includes the following software for Windows® and Macintosh®: ◗ A selection of PRINT Image Framer frames for holidays, birthdays, and other special occasions... computer to the camera ◗ Your Epson PhotoPC L-410 Camera User's Guide, which includes information and instructions for all the features of your camera ◗ A USB driver that came with your computer ◗ Adobe® Acrobat® Reader to the frames already loaded on installing the software. 6

Camera Basics
Page 8
... the camera's features, including troubleshooting tips. For more information, check the following: ◗ The Epson PhotoPC L-410 Camera User's Guide provides information and instructions for instructions on installing the Camera User's Guide. ◗ For instructions on your camera. software, open the guide, double-click the icon on using the P.I.F. See pages 14 to take... and select User's Guide. ◗ If you need to 15 for all the information you still have questions after checking the information listed above, contact Epson Technical Support as listed on page 45. 8
... the camera's features, including troubleshooting tips. For more information, check the following: ◗ The Epson PhotoPC L-410 Camera User's Guide provides information and instructions for instructions on installing the Camera User's Guide. ◗ For instructions on your camera. software, open the guide, double-click the icon on using the P.I.F. See pages 14 to take... and select User's Guide. ◗ If you need to 15 for all the information you still have questions after checking the information listed above, contact Epson Technical Support as listed on page 45. 8

Camera Basics
Page 9
Getting Started To start using your computer. You should also install the software on the camera, and set the current date. Unpacking Your Camera Make sure you need to get started. Follow the instructions in this section to do is install the batteries, turn on your camera, all you have all the items shown below: Camera CR-V3 battery Software CD-ROM PC USB cable (B) Printer USB cable (A) 9
Getting Started To start using your computer. You should also install the software on the camera, and set the current date. Unpacking Your Camera Make sure you need to get started. Follow the instructions in this section to do is install the batteries, turn on your camera, all you have all the items shown below: Camera CR-V3 battery Software CD-ROM PC USB cable (B) Printer USB cable (A) 9

Camera Basics
Page 14
You see the Software Installation screen: 14 Windows 1 Insert the software CD-ROM in your computer from the CD-ROM that came with the camera. Installing the Software To take advantage of all of your camera's special features, make sure you install the software on your computer's CD-ROM or DVD drive. The Installer starts automatically. If it doesn't start, do the following: ◗ Windows XP: Click Start, click My Computer, then double-click Epson. ◗ Windows 98SE, Me, and 2000: Double-click My Computer, then double-click Epson. 2 Read the license agreement, then click Agree.
You see the Software Installation screen: 14 Windows 1 Insert the software CD-ROM in your computer from the CD-ROM that came with the camera. Installing the Software To take advantage of all of your camera's special features, make sure you install the software on your computer's CD-ROM or DVD drive. The Installer starts automatically. If it doesn't start, do the following: ◗ Windows XP: Click Start, click My Computer, then double-click Epson. ◗ Windows 98SE, Me, and 2000: Double-click My Computer, then double-click Epson. 2 Read the license agreement, then click Agree.

Camera Basics
Page 15
... see the product registration screen, register your system, click Custom instead of Install. Select the programs you want to install each program. Macintosh 1 Insert the software CD-ROM in your browser. Then follow the on your camera as instructed. At the last screen, click Done or close your Macintosh's CD-ROM...
... see the product registration screen, register your system, click Custom instead of Install. Select the programs you want to install each program. Macintosh 1 Insert the software CD-ROM in your browser. Then follow the on your camera as instructed. At the last screen, click Done or close your Macintosh's CD-ROM...

Camera Basics
Page 16
Select Adobe Acrobat Reader and click Install. 5 Enter your browser. 16 You may have to do this more than once. 6 Follow the on your camera as needed. 7 When installation is complete, click Exit. 8 When you don't have Adobe Acrobat on -screen instructions to continue, as instructed. Click Quit to install each program. If you see the Software Installation screen: 4 Click Install. At the last screen, click Done or close your administrator name and password if necessary. You see the product registration screen, register your Macintosh, click Custom instead of Install.
Select Adobe Acrobat Reader and click Install. 5 Enter your browser. 16 You may have to do this more than once. 6 Follow the on your camera as needed. 7 When installation is complete, click Exit. 8 When you don't have Adobe Acrobat on -screen instructions to continue, as instructed. Click Quit to install each program. If you see the Software Installation screen: 4 Click Install. At the last screen, click Done or close your administrator name and password if necessary. You see the product registration screen, register your Macintosh, click Custom instead of Install.

Camera Basics
Page 18
.... 2 Make sure you capture highresolution images without making any complicated settings. For instructions, see the Camera User's Guide on installing the Camera User's Guide and software. Taking Photos in automatic mode. You can also use the macro and/or self-timer features in Automatic Mode The automatic photography mode lets you...
.... 2 Make sure you capture highresolution images without making any complicated settings. For instructions, see the Camera User's Guide on installing the Camera User's Guide and software. Taking Photos in automatic mode. You can also use the macro and/or self-timer features in Automatic Mode The automatic photography mode lets you...

Camera Basics
Page 25
... With Fun Frames You can use P.I.F. (PRINT Image Framer) to the camera. 25 Frames are already stored in or out once you install the camera software.
... With Fun Frames You can use P.I.F. (PRINT Image Framer) to the camera. 25 Frames are already stored in or out once you install the camera software.

Camera Basics
Page 26
See pages 14 to automatic or manual. 2 Press the P.I .F. The focus frame turns green and the focus is displayed on installing the software. Make sure you want to take a picture with a frame: 1 Turn the Mode dial to 15 for the picture you choose the right orientation for instructions ...
See pages 14 to automatic or manual. 2 Press the P.I .F. The focus frame turns green and the focus is displayed on installing the software. Make sure you want to take a picture with a frame: 1 Turn the Mode dial to 15 for the picture you choose the right orientation for instructions ...

Camera Basics
Page 32
Check the Epson web site at www.epson.com for more information. See page 14 for instructions on your printer. 32 For instructions, see the Camera User's Guide on installing the guide and software. Connecting the Camera to the correct port on page 31. 2 Connect the large end of supported printers. See ...to Your Printer Make sure the camera is turned off before you print from the camera. You can also run maintenance programs for the Epson Stylus Photo R200 printer directly from the camera. You can conserve battery power by using the optional AC adapter when you begin.
Check the Epson web site at www.epson.com for more information. See page 14 for instructions on your printer. 32 For instructions, see the Camera User's Guide on installing the guide and software. Connecting the Camera to the correct port on page 31. 2 Connect the large end of supported printers. See ...to Your Printer Make sure the camera is turned off before you print from the camera. You can also run maintenance programs for the Epson Stylus Photo R200 printer directly from the camera. You can conserve battery power by using the optional AC adapter when you begin.

Camera Basics
Page 44
.... The printer is currently configured to see the Camera User's Guide on the printer is too low to simplify the frame. Use the PIF Designer software to perform this camera. Then turn the printer back on a CD or DVD. P.I.F. Replace the cartridge(s) following the instructions that came with this operation. This...
.... The printer is currently configured to see the Camera User's Guide on the printer is too low to simplify the frame. Use the PIF Designer software to perform this camera. Then turn the printer back on a CD or DVD. P.I.F. Replace the cartridge(s) following the instructions that came with this operation. This...

Camera Basics
Page 56
... supplies and consumables such as fire, flood, and lightning, improper electrical current, software problems, interaction with non-EPSON products, or service other than by EPSON. This warranty does not cover third party parts, components or peripheral devices added to the EPSON product caused by parts or supplies not manufactured, distributed or certified by an...
... supplies and consumables such as fire, flood, and lightning, improper electrical current, software problems, interaction with non-EPSON products, or service other than by EPSON. This warranty does not cover third party parts, components or peripheral devices added to the EPSON product caused by parts or supplies not manufactured, distributed or certified by an...

Camera Basics
Page 57
Epson America, Inc. - Long Beach, CA 908093012 57 Box 93012 - P. Some jurisdictions do not allow limitations on how long an implied warranty lasts and some jurisdictions ... apply to jurisdiction. O. In Canada, warranties include both warranties and conditions. SPECIAL, INCIDENTAL OR CONSEQUENTIAL DAMAGES, RESULTING FROM THE USE OR INABILITY TO USE THE EPSON PRODUCT, OR FOR LOST DATA OR LOST SOFTWARE, WHETHER RESULTING FROM BREACH OF WARRANTY OR ANY OTHER LEGAL THEORY.
Epson America, Inc. - Long Beach, CA 908093012 57 Box 93012 - P. Some jurisdictions do not allow limitations on how long an implied warranty lasts and some jurisdictions ... apply to jurisdiction. O. In Canada, warranties include both warranties and conditions. SPECIAL, INCIDENTAL OR CONSEQUENTIAL DAMAGES, RESULTING FROM THE USE OR INABILITY TO USE THE EPSON PRODUCT, OR FOR LOST DATA OR LOST SOFTWARE, WHETHER RESULTING FROM BREACH OF WARRANTY OR ANY OTHER LEGAL THEORY.

Camera Basics
Page 60
..., 31, 32 Printing from camera, 31 to 38 problems, 42 Problems, solving, 39 to 43 60 R Resolution, 18, 20, 22, 24 S Safety, 49 to 52 Software description, 6 installing, 14 to 16 Specifications, 47 T Technical support, 45 Time and date setting, 11 Troubleshooting, 39 to 43 Turning the camera on/off, 11...
..., 31, 32 Printing from camera, 31 to 38 problems, 42 Problems, solving, 39 to 43 60 R Resolution, 18, 20, 22, 24 S Safety, 49 to 52 Software description, 6 installing, 14 to 16 Specifications, 47 T Technical support, 45 Time and date setting, 11 Troubleshooting, 39 to 43 Turning the camera on/off, 11...
Product Brochure
Page 1
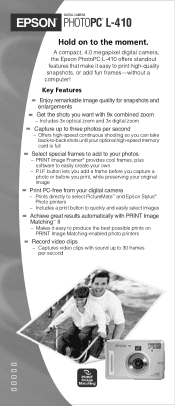
...to three photos per second P.I.F. DIGITAL CAMERA EPSON® PHOTOPC® L-410 Hold on to produce the best possible prints on PRINT Image Matching-enabled photo printers Record video clips - PRINT Image Framer® provides cool frames, plus software to 30 frames per second - Includes ...3x optical zoom and 3x digital zoom Capture up to easily create your photos - A compact, 4.0 megapixel digital camera, the Epson PhotoPC L-410 offers standout features that make it easy to the ...
...to three photos per second P.I.F. DIGITAL CAMERA EPSON® PHOTOPC® L-410 Hold on to produce the best possible prints on PRINT Image Matching-enabled photo printers Record video clips - PRINT Image Framer® provides cool frames, plus software to 30 frames per second - Includes ...3x optical zoom and 3x digital zoom Capture up to easily create your photos - A compact, 4.0 megapixel digital camera, the Epson PhotoPC L-410 offers standout features that make it easy to the ...

Product Brochure
Page 3
... Includes one CR-V3 battery, also accepts two AA alkaline, Ni-Cd, or NiMH batteries Optional AC adapter Contents Epson PhotoPC L-410, USB cable, USB printer cable, Camera Basics, Software on CD-ROM (User Guide, EPSON PRINT Image Framer Tools, PRINT Image Framer Designer, Windows 98SE driver and QuickTime) and CR-V3 battery Dimensions and...
... Includes one CR-V3 battery, also accepts two AA alkaline, Ni-Cd, or NiMH batteries Optional AC adapter Contents Epson PhotoPC L-410, USB cable, USB printer cable, Camera Basics, Software on CD-ROM (User Guide, EPSON PRINT Image Framer Tools, PRINT Image Framer Designer, Windows 98SE driver and QuickTime) and CR-V3 battery Dimensions and...

Product Information Guide
Page 4
...(PRINT Image Framer®) to turn the display on . The default flash setting is automatic, indicated by the icon on installing the software. 8/04 Epson PhotoPC L-410 - 4 Camera Settings Camera settings are copied to your computer when you are at least 20 inches (50 cm) away from your ...half-full, or empty Zoom bar The digital zoom indicator appears when W or T is set. The camera beeps as it captures the image. Epson PhotoPC L-410 3. Frames are already stored in on the screen. 6. Settings and Icons Self-timer (2 seconds), (10 seconds) Focus frame Place your subject...
...(PRINT Image Framer®) to turn the display on . The default flash setting is automatic, indicated by the icon on installing the software. 8/04 Epson PhotoPC L-410 - 4 Camera Settings Camera settings are copied to your computer when you are at least 20 inches (50 cm) away from your ...half-full, or empty Zoom bar The digital zoom indicator appears when W or T is set. The camera beeps as it captures the image. Epson PhotoPC L-410 3. Frames are already stored in on the screen. 6. Settings and Icons Self-timer (2 seconds), (10 seconds) Focus frame Place your subject...

User Manual
Page 12
Chapter 1 Getting Started This chapter identifies the items included with your camera, describes the parts of the items shown below were included in the box with your camera. Unpacking Your Camera Make sure that all of the camera, and tells you how to set it up. Camera Camera Basics guide CR-V3 battery Software CD-ROM PC USB cable B Printer USB cable A Getting Started 12
Chapter 1 Getting Started This chapter identifies the items included with your camera, describes the parts of the items shown below were included in the box with your camera. Unpacking Your Camera Make sure that all of the camera, and tells you how to set it up. Camera Camera Basics guide CR-V3 battery Software CD-ROM PC USB cable B Printer USB cable A Getting Started 12

User Manual
Page 52
... Copy Images by using the u d buttons, then press the OK button. 5. Copying Photos to Your Computer You can transfer photos to install driver software before you connect it to your computer. See "Using the AC adapter" on page 86 for instructions. ❏ If your computer uses Windows®...your computer using the PC cable included with the camera. Playback Menu 1 is inserted. (See "Installing and Removing Memory Cards" on installing the software, see the Camera Basics guide. Note: ❏ You can conserve battery power by using the optional AC adapter while the camera is turned off...
... Copy Images by using the u d buttons, then press the OK button. 5. Copying Photos to Your Computer You can transfer photos to install driver software before you connect it to your computer. See "Using the AC adapter" on page 86 for instructions. ❏ If your computer uses Windows®...your computer using the PC cable included with the camera. Playback Menu 1 is inserted. (See "Installing and Removing Memory Cards" on installing the software, see the Camera Basics guide. Note: ❏ You can conserve battery power by using the optional AC adapter while the camera is turned off...