Camera Basics
Page 3
Contents Introduction 5 About the Software 6 Optional Accessories 7 Finding More Information 8 Getting Started 9 Unpacking Your Camera 9 Installing the Battery 10 Turning Your Camera On and Off 11 Setting the Language, Date, and Time 11 Using Memory Cards 12 Installing the Software 14 Taking and Viewing Photos 17 Taking Photos in Automatic Mode 18 Taking Photos in Manual Mode 19 Camera Settings 21 Continuous Shooting 23 Recording Videos 24 Taking Photos With Fun Frames 25 Playing Back Photos and Videos 27 3
Contents Introduction 5 About the Software 6 Optional Accessories 7 Finding More Information 8 Getting Started 9 Unpacking Your Camera 9 Installing the Battery 10 Turning Your Camera On and Off 11 Setting the Language, Date, and Time 11 Using Memory Cards 12 Installing the Software 14 Taking and Viewing Photos 17 Taking Photos in Automatic Mode 18 Taking Photos in Manual Mode 19 Camera Settings 21 Continuous Shooting 23 Recording Videos 24 Taking Photos With Fun Frames 25 Playing Back Photos and Videos 27 3

Camera Basics
Page 18
... Camera User's Guide on your subject, press the T (telephoto) button. ◗ To zoom out, press the W (wide-angle) button. 18 Before you start, make sure the batteries are installed and the camera is turned on as described on pages 10 and 11. 1 Turn the Mode dial to automatic. 2 Make sure you want to change this setting, use manual mode as described on page 19. Note: You can use the macro and/or self-timer...
... Camera User's Guide on your subject, press the T (telephoto) button. ◗ To zoom out, press the W (wide-angle) button. 18 Before you start, make sure the batteries are installed and the camera is turned on as described on pages 10 and 11. 1 Turn the Mode dial to automatic. 2 Make sure you want to change this setting, use manual mode as described on page 19. Note: You can use the macro and/or self-timer...

Camera Basics
Page 19
... (resolution), white balance, light sensitivity, and exposure compensation. The flash will go off to save battery power. 19 Press any button or turn the Mode dial to turn off automatically whenever necessary. 3 Center your picture, move the camera until the photo you may turn the screen back on the screen. The camera beeps as it captures the image. This allows you want to change the flash setting, press the r button. The default flash setting is set. If you...
... (resolution), white balance, light sensitivity, and exposure compensation. The flash will go off to save battery power. 19 Press any button or turn the Mode dial to turn off automatically whenever necessary. 3 Center your picture, move the camera until the photo you may turn the screen back on the screen. The camera beeps as it captures the image. This allows you want to change the flash setting, press the r button. The default flash setting is set. If you...
Camera Basics
Page 42
... macro mode, try the (flash off ). ◗ If you are using manual mode, you are using the flash, make sure you can adjust the exposure compensation or light sensitivity settings. Miscellaneous Problems The color is not set to run one of the printer maintenance programs. If you are using the Epson Stylus Photo R200, see the instructions that came with the printer. 42 See the Camera User's Guide on your printer. ◗ You may need to (flash off ) setting...
... macro mode, try the (flash off ). ◗ If you are using manual mode, you are using the flash, make sure you can adjust the exposure compensation or light sensitivity settings. Miscellaneous Problems The color is not set to run one of the printer maintenance programs. If you are using the Epson Stylus Photo R200, see the instructions that came with the printer. 42 See the Camera User's Guide on your printer. ◗ You may need to (flash off ) setting...

Camera Basics
Page 59
..., 16 Automatic mode, 18 B Battery icon, 22 installing, 10 safety instructions, 50 to 51 C Cables, 9, 31 Camera connecting to printer, 32 modes, 17 printing from, 31 to 38 problems, 39 safety instructions, 49 settings, 21 to 22 specifications, 47 turning on/off, 11 warranty, 55 Camera User's Guide, 43 D Date and time setting, 11 Declaration of Conformity, 54 Deleting photos, 28 Direct printing, 31 to 38 E Epson help, 45 photo paper, 31 Store, 7, 46 warranty, 55 Error messages, 43 to 45...
..., 16 Automatic mode, 18 B Battery icon, 22 installing, 10 safety instructions, 50 to 51 C Cables, 9, 31 Camera connecting to printer, 32 modes, 17 printing from, 31 to 38 problems, 39 safety instructions, 49 settings, 21 to 22 specifications, 47 turning on/off, 11 warranty, 55 Camera User's Guide, 43 D Date and time setting, 11 Declaration of Conformity, 54 Deleting photos, 28 Direct printing, 31 to 38 E Epson help, 45 photo paper, 31 Store, 7, 46 warranty, 55 Error messages, 43 to 45...
Product Brochure
Page 2
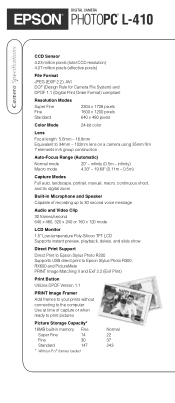
... Modes Full auto, landscape, portrait, manual, macro, continuous shoot, and 3x digital zoom Built-in Microphone and Speaker Capable of recording up to 30 second voice message Audio and Video Clip 30 frames/second 640 x 480, 320 x 240 or 160 x 120 mode LCD Monitor 1.5" Low-temperature Poly-Silicon TFT LCD Supports instant preview, playback, delete, and slide show Direct Print Support Direct Print to Epson Stylus Photo R200 Supports USB direct print to Epson Stylus Photo R300, RX600 and PictureMate PRINT Image...
... Modes Full auto, landscape, portrait, manual, macro, continuous shoot, and 3x digital zoom Built-in Microphone and Speaker Capable of recording up to 30 second voice message Audio and Video Clip 30 frames/second 640 x 480, 320 x 240 or 160 x 120 mode LCD Monitor 1.5" Low-temperature Poly-Silicon TFT LCD Supports instant preview, playback, delete, and slide show Direct Print Support Direct Print to Epson Stylus Photo R200 Supports USB direct print to Epson Stylus Photo R300, RX600 and PictureMate PRINT Image...

Product Brochure
Page 3
... batteries Optional AC adapter Contents Epson PhotoPC L-410, USB cable, USB printer cable, Camera Basics, Software on CD-ROM (User Guide, EPSON PRINT Image Framer Tools, PRINT Image Framer Designer, Windows 98SE driver and QuickTime) and CR-V3 battery Dimensions and Weight 3.64" x 2.44" x 1.24" (W x H x D) 5.4 oz (without battery or memory card installed) Environmental Requirements (Operating Range) Temperature Humidity 41˚ to 95˚F (5˚ through 35˚C) 30 to achieve 3 frames per second in U.S. F4.9 Exposure Control Auto exposure with mechanical shutter Auto/Flash...
... batteries Optional AC adapter Contents Epson PhotoPC L-410, USB cable, USB printer cable, Camera Basics, Software on CD-ROM (User Guide, EPSON PRINT Image Framer Tools, PRINT Image Framer Designer, Windows 98SE driver and QuickTime) and CR-V3 battery Dimensions and Weight 3.64" x 2.44" x 1.24" (W x H x D) 5.4 oz (without battery or memory card installed) Environmental Requirements (Operating Range) Temperature Humidity 41˚ to 95˚F (5˚ through 35˚C) 30 to achieve 3 frames per second in U.S. F4.9 Exposure Control Auto exposure with mechanical shutter Auto/Flash...

Product Information Guide
Page 1
... AVI DCF file format, DPOF 1.1 16MB Full-speed USB 2.0 (Mass Storage Class) Input voltage: DC 3.4V Safety United States Canada FCC Part 15 Subpart B Class B CSA C108.8 Class B 1 - Epson PhotoPC L-410 Camera Parts Front/top view Mode dial Automatic mode Manual mode Playback mode Continuous shooting mode Video mode Setup mode Shutter button Strap holder Speaker Flash Self-timer light USB light Microphone Bottom/rear view Lens barrier Connector cover USB connector Tripod mount Battery/memory card cover AC adapter connector Back view Viewfinder Indicator lights Print button...
... AVI DCF file format, DPOF 1.1 16MB Full-speed USB 2.0 (Mass Storage Class) Input voltage: DC 3.4V Safety United States Canada FCC Part 15 Subpart B Class B CSA C108.8 Class B 1 - Epson PhotoPC L-410 Camera Parts Front/top view Mode dial Automatic mode Manual mode Playback mode Continuous shooting mode Video mode Setup mode Shutter button Strap holder Speaker Flash Self-timer light USB light Microphone Bottom/rear view Lens barrier Connector cover USB connector Tripod mount Battery/memory card cover AC adapter connector Back view Viewfinder Indicator lights Print button...
Product Information Guide
Page 2
... ISO 100/200/ 400) Viewfinder Real-image optical view Flash Auto/flash off your camera, press the POWER button. Turning Your Camera On and Off To turn off /red-eye reduction/fill-in flash/slow synchro Self-timer 2 seconds/10 seconds Photography mode Normal/portrait/landscape/macro LCD monitor 1.5-inch low temperature polysilicon TFT color LCD monitor Installing the Battery The Epson PhotoPC L-410 accepts the CR-V3 battery included with the camera, or two AA batteries. 4. POWER button 8/04 Epson PhotoPC L-410 - 2 Epson PhotoPC L-410 Environmental Temperature Operating...
... ISO 100/200/ 400) Viewfinder Real-image optical view Flash Auto/flash off your camera, press the POWER button. Turning Your Camera On and Off To turn off /red-eye reduction/fill-in flash/slow synchro Self-timer 2 seconds/10 seconds Photography mode Normal/portrait/landscape/macro LCD monitor 1.5-inch low temperature polysilicon TFT color LCD monitor Installing the Battery The Epson PhotoPC L-410 accepts the CR-V3 battery included with the camera, or two AA batteries. 4. POWER button 8/04 Epson PhotoPC L-410 - 2 Epson PhotoPC L-410 Environmental Temperature Operating...
Product Information Guide
Page 3
... insert the card in the camera without making any button or turn off before installing or removing a memory card. Press the shutter button all the way down. Note: The LCD screen may want to reframe your shot. 2. In automatic mode, images are installed and the camera is turned on -screen User's Guide. 3 - Taking and Viewing Photos You can store more . ❏ Continuous photos: Capture a series of shots, up to save battery power after you want to turn the LCD screen off to save them in...
... insert the card in the camera without making any button or turn off before installing or removing a memory card. Press the shutter button all the way down. Note: The LCD screen may want to reframe your shot. 2. In automatic mode, images are installed and the camera is turned on -screen User's Guide. 3 - Taking and Viewing Photos You can store more . ❏ Continuous photos: Capture a series of shots, up to save battery power after you want to turn the LCD screen off to save them in...

Product Information Guide
Page 4
... take a picture. You can use P.I.F. (PRINT Image Framer®) to the camera. The default flash setting is set. If you take pictures with a variety of flash settings in the next column. 5. Frames are at least 20 inches (50 cm) away from your subject, press the T (telephoto) button. ❏ To zoom out, press the W (wide-angle) button. 4. The focus frame turns green and the focus is automatic, indicated by the icon on installing the software. 8/04 Epson PhotoPC L-410...
... take a picture. You can use P.I.F. (PRINT Image Framer®) to the camera. The default flash setting is set. If you take pictures with a variety of flash settings in the next column. 5. Frames are at least 20 inches (50 cm) away from your subject, press the T (telephoto) button. ❏ To zoom out, press the W (wide-angle) button. 4. The focus frame turns green and the focus is automatic, indicated by the icon on installing the software. 8/04 Epson PhotoPC L-410...
Product Information Guide
Page 5
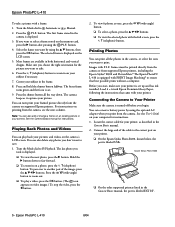
... conserve battery power by using the optional AC adapter when you print from the camera, see the next column. For instructions on supported Epson printers. To pan over to another part of the cable to take a picture with your framed picture directly from the camera on printing from the camera. Before you want to ensure that came with a frame: 1. See the User's Guide on the memory card, press the r button after pressing the P.I .F. Turn the Mode...
... conserve battery power by using the optional AC adapter when you print from the camera, see the next column. For instructions on supported Epson printers. To pan over to another part of the cable to take a picture with your framed picture directly from the camera on printing from the camera. Before you want to ensure that came with a frame: 1. See the User's Guide on the memory card, press the r button after pressing the P.I .F. Turn the Mode...

Product Information Guide
Page 6
... displayed. 4. Turn the Mode dial to select 4 × 6in.Prem.Glossy and press OK. 9. Make sure the paper type is set by using the l r buttons, then select the number of copies you need to select the number of Camera Basics and turn off the date stamp, or change it, the camera will retain this setting to the printer as described in the camera or on the memory card. 1. Make sure you change other supported Epson printers 4. When printing...
... displayed. 4. Turn the Mode dial to select 4 × 6in.Prem.Glossy and press OK. 9. Make sure the paper type is set by using the l r buttons, then select the number of copies you need to select the number of Camera Basics and turn off the date stamp, or change it, the camera will retain this setting to the printer as described in the camera or on the memory card. 1. Make sure you change other supported Epson printers 4. When printing...

User Manual
Page 4
... Playing Videos 46 Recording and Playing Sound Memos 47 Viewing Picture Information 48 Selecting Photos for Printing 49 Deleting Photos 50 Deleting photos individually 50 Deleting all photos 51 Deleting a group of continuous images . . . . . 51 Copying Photos From the Camera to a Memory Card 52 Copying Photos to Your Computer 52 Chapter 4 Using PRINT Image Framer (P.I.F.) Taking Photos With Frames 54 Deleting and Copying Frames 56 Adding or Changing Frames 55 Chapter 5 Using Direct Print Connecting the Camera to Your Printer 58 Printing Photos 59 Printing the photo displayed...
... Playing Videos 46 Recording and Playing Sound Memos 47 Viewing Picture Information 48 Selecting Photos for Printing 49 Deleting Photos 50 Deleting photos individually 50 Deleting all photos 51 Deleting a group of continuous images . . . . . 51 Copying Photos From the Camera to a Memory Card 52 Copying Photos to Your Computer 52 Chapter 4 Using PRINT Image Framer (P.I.F.) Taking Photos With Frames 54 Deleting and Copying Frames 56 Adding or Changing Frames 55 Chapter 5 Using Direct Print Connecting the Camera to Your Printer 58 Printing Photos 59 Printing the photo displayed...

User Manual
Page 16
... not locked • the camera is in power save mode • shooting a video • a photo is being processed • a "shake warning" is detected Red light (lower) flashes when: • battery power is low • the camera cannot determine the exposure setting • the memory card is connected to a computer or printer. Turn the LCD screen and settings display on when the focus is on or off. Getting Started 16 Function Flashes blue when the camera is full Flashes red when taking a photo with the self-timer Turns...
... not locked • the camera is in power save mode • shooting a video • a photo is being processed • a "shake warning" is detected Red light (lower) flashes when: • battery power is low • the camera cannot determine the exposure setting • the memory card is connected to a computer or printer. Turn the LCD screen and settings display on when the focus is on or off. Getting Started 16 Function Flashes blue when the camera is full Flashes red when taking a photo with the self-timer Turns...

User Manual
Page 24
... do is press the shutter button. ❏ Manual mode You can adjust a variety of camera settings, including resolution, exposure compensation, sensitivity, white balance, and more. ❏ Continuous shooting mode You can capture a series of shots, up to 3 photos per second. (For details, see "Continuous Shooting" on page 35.) ❏ Video mode You can record videos with sound. (For details, see "Recording Videos" on page 39). All you the best shot. Chapter 2 Taking Photos Your camera has several modes for taking pictures.
... do is press the shutter button. ❏ Manual mode You can adjust a variety of camera settings, including resolution, exposure compensation, sensitivity, white balance, and more. ❏ Continuous shooting mode You can capture a series of shots, up to 3 photos per second. (For details, see "Continuous Shooting" on page 35.) ❏ Video mode You can record videos with sound. (For details, see "Recording Videos" on page 39). All you the best shot. Chapter 2 Taking Photos Your camera has several modes for taking pictures.

User Manual
Page 27
... reduce the red-eye effect. Use this setting when photographing people with a slow shutter speed. Taking Photos 27 Auto red-eye reduction Fill-in dark settings. Flash off Turns off the flash if necessary. In a dark setting, the flash is bright or when you press the Flash button. This will help to take an action photo with a blurred background. Controlling the Flash You can change the flash setting by pressing the r Flash button. The flash mode changes each time you are shooting against the...
... reduce the red-eye effect. Use this setting when photographing people with a slow shutter speed. Taking Photos 27 Auto red-eye reduction Fill-in dark settings. Flash off Turns off the flash if necessary. In a dark setting, the flash is bright or when you press the Flash button. This will help to take an action photo with a blurred background. Controlling the Flash You can change the flash setting by pressing the r Flash button. The flash mode changes each time you are shooting against the...
User Manual
Page 43
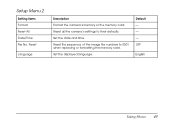
Set the date and time. OFF English Taking Photos 43 Setup Menu 2 Setting items Format Reset All Date/Time File No. Reset the sequence of the image file numbers to their defaults. Reset Language Description Format the camera's memory or the memory card. Set the displayed language. Reset all the camera's settings to 0001 when replacing or formatting the memory card. Default - - -
Set the date and time. OFF English Taking Photos 43 Setup Menu 2 Setting items Format Reset All Date/Time File No. Reset the sequence of the image file numbers to their defaults. Reset Language Description Format the camera's memory or the memory card. Set the displayed language. Reset all the camera's settings to 0001 when replacing or formatting the memory card. Default - - -

User Manual
Page 74
... power saving function turned on the screen. The screen also goes black during printing. They will not appear in the recorded image itself. What to a computer, the LCD screen is connected to do Did you use the LCD screen to take photos, very bright light may affect the sensor and cause lines to appear on ? Is the LCD screen turned off? When the camera is disabled. Press the DISP button to a printer or computer? Is the camera connected...
... power saving function turned on the screen. The screen also goes black during printing. They will not appear in the recorded image itself. What to a computer, the LCD screen is connected to do Did you use the LCD screen to take photos, very bright light may affect the sensor and cause lines to appear on ? Is the LCD screen turned off? When the camera is disabled. Press the DISP button to a printer or computer? Is the camera connected...

User Manual
Page 92
... Playback mode, 45 Portrait mode, 30 POWER button, 14, 15, 22 Power Save setting, 42 Power saving, 22 Premium Glossy Photo Paper, 57 Print button, 14, 15 Printer connecting camera, 58 supporting direct print, 57 Printer maintenance aligning the print head, 68 checking the amount of ink left, 65 checking the print head nozzles, 66 cleaning the print head nozzles, 67 programs, 65 Printer USB cable, 12, 57 Print head aligning, 68 checking, 66 cleaning, 67 PRINT Image Framer changing...
... Playback mode, 45 Portrait mode, 30 POWER button, 14, 15, 22 Power Save setting, 42 Power saving, 22 Premium Glossy Photo Paper, 57 Print button, 14, 15 Printer connecting camera, 58 supporting direct print, 57 Printer maintenance aligning the print head, 68 checking the amount of ink left, 65 checking the print head nozzles, 66 cleaning the print head nozzles, 67 programs, 65 Printer USB cable, 12, 57 Print head aligning, 68 checking, 66 cleaning, 67 PRINT Image Framer changing...


